
Loading...
Loading...
Loading...
Loading...
Loading...
Loading...
Loading...
Loading...
Loading...
Loading...
Loading...
Loading...
Loading...
Loading...
Loading...
Loading...
Loading...
Loading...
Loading...
Loading...
Loading...
Loading...
Loading...
Loading...
Loading...
Loading...
Loading...
Loading...
Loading...
Loading...
Loading...
Loading...
The following is a typical average timeline for First Class and Standard mailers sent through Poplar; this is an important factor to consider when calculating the launch date of your campaign:
Poplar is optimized for speed, so mailers are sent to production almost immediately and begin printing within 24 hours. Depending on the postage used, in-home time can be as little as 3-7 days. Mailers sent in the early-to-late afternoon may not enter production until the following day.
Poplar has built in features to make data privacy compliance easy for our clients. Poplar is set up to process both right to delete and right to access request types. This is separate from an opt out which is handled more as a default audience.
Data Subject Request API
In Platform CSV Upload
Formatting the CSV should be a single type of request per submission and use the standard audience fields. I.e. email, address_1, address_2, city, state, postal_code.
If you work across SLM, Poplar opt outs will apply to all of your client data across our business lines.
Data deletions submitted should generally occur within 24 hours.
Please submit all types of PII that you have when submitting opt outs or running a data deletion we do not have any type of global user profiles so if you submit an email it will only run a deletion on any records containing that email (we don’t automatically associate an email with addresses on an order for example)
We have 2 endpoints, an that will add submissions directly to a global opt out list for your account as well as a that can process the right to delete and right to access requests programmatically.
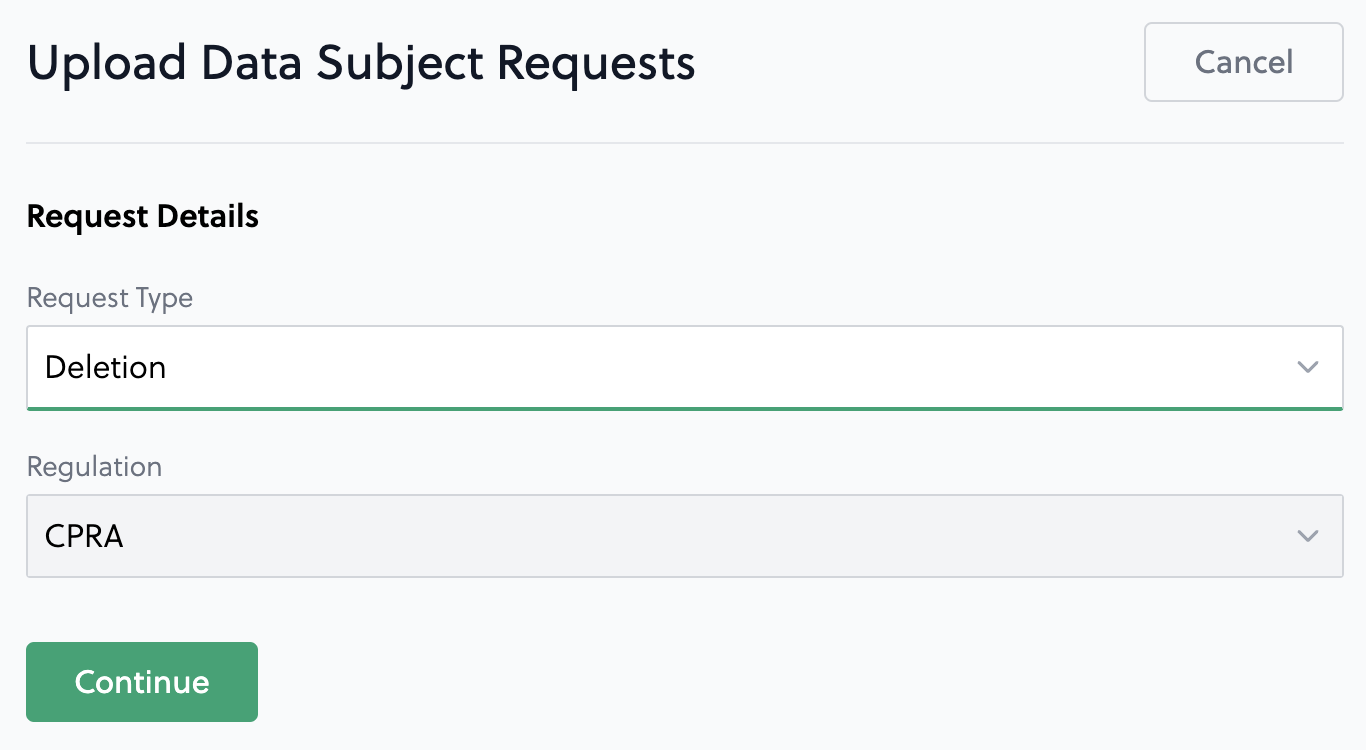
You can upload a CSV of deletion or access requests as well as review historical requests directly from the UI:
Data deletions and opt outs only apply to an individual client's data, if you found this article as a consumer wishing to opt out of mailings please contact the Brand directly via their website. To opt out of Share Local Media Shared Envelopes you can go to
During the account onboarding process, credit card details are requested to keep on file. If your account is being funded via invoice prepayment, this step may be skipped. Visa, MasterCard, American Express, and Discover are all accepted.
A credit card is the primary means of payment for Poplar, but please reach out to your account manager if you plan to mail large volumes consistently and wish to prepay via ACH, wire, or check.
On the billing page, you can top up your credit balance. As you mail, we will deduct it from this credit balance. We will email a notification if your balance drops to $20 and again a $0. If your balance is insufficient when generating a mailing, it will be paused. You have up to 30 days to top up your account and manually mail the piece.
If your balance is insufficient when creating a One Time Send with an uploaded list, you will be prompted to pay for the cost of the send via your card on file. If you have enabled invoicing, we will not be able to charge the card automatically, and you will need to add the credits manually if there is not enough credit balance.
When Auto Recharge is enabled, the card on file will automatically be charged an amount of your choosing when the account balance drops below the set balance threshold.
Changes to the balance threshold and recharge amount will affect the next time a mailing is triggered or once the account balance exceeds the threshold amount. If you need to refill your account balance immediately, you may do so manually by clicking Add Credit via Card.
If you have opted into Invoicing, we will never charge your credit card on file. To add credits, you can request an invoice and pay via wire/ACH. Alternatively, you can add credits manually via card on the billing page. For invoice clients, there is no way to utilize the auto-refill feature.
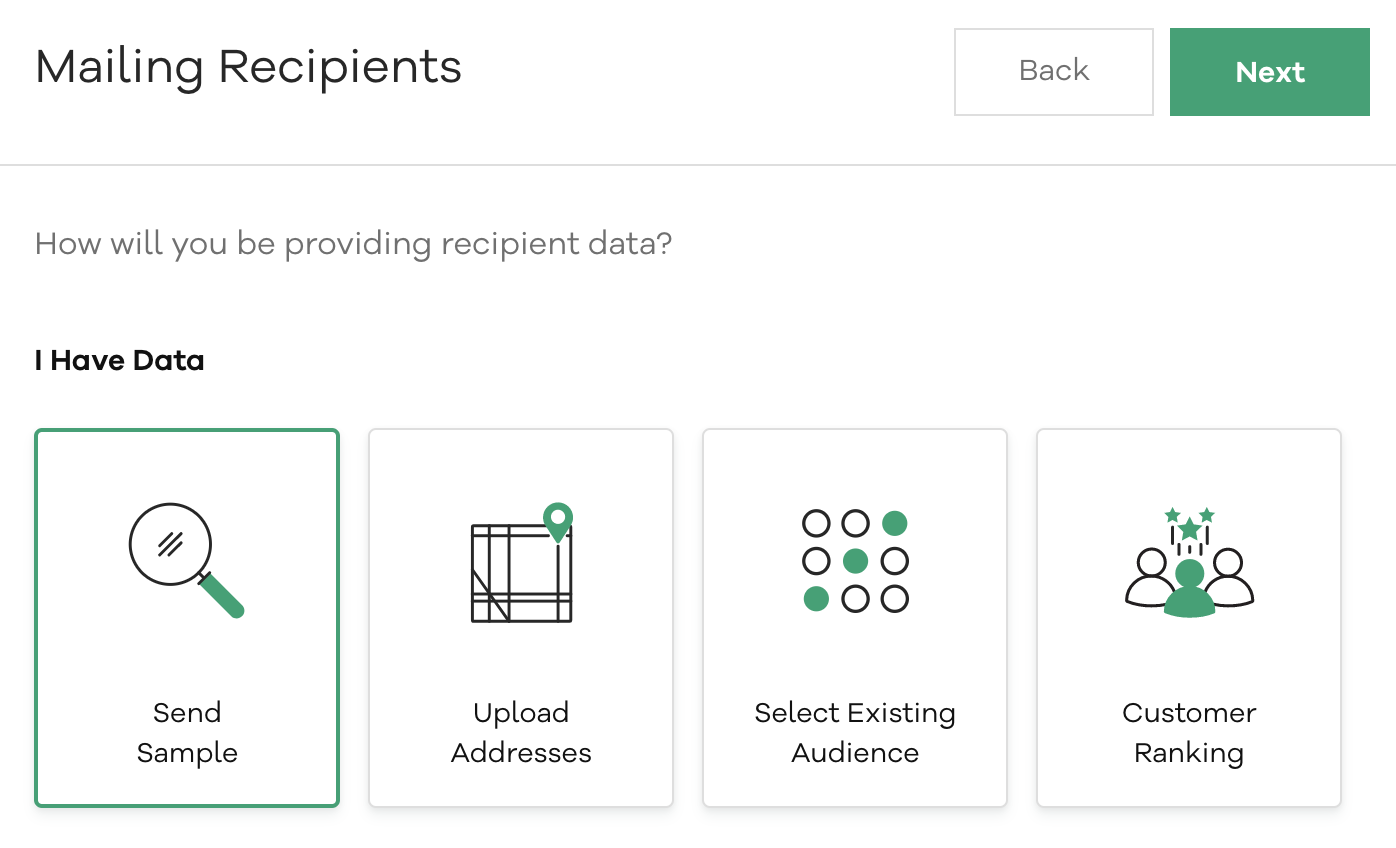
Quickly and easily send yourself samples of your creative before launching.
To send to multiple addresses and test merge tag data, follow the steps below:
You'll be prompted to map your file columns to the required data for mailing, as well as any custom merge tags (if applicable). If any required data columns are missing, you will not be allowed to proceed to the next step. If any of the values in your data column are empty or improperly formatted, you'll see a warning but will be allowed to move forward.
The tab under Billing shows a price-per-piece breakdown of every format and shipping option Poplar offers, including the additional rate for Address Enrichment and Lookalike Prospecting. Poplar has no minimums. If you are using appends, the data fee and printing/mailing cost are calculated separately.
In this article you'll find pointers and recommendations for content placement, export instructions, and general design best practices. Feel free to download our Creative Best Practices deck below as well for easy sharing with your creative design team:
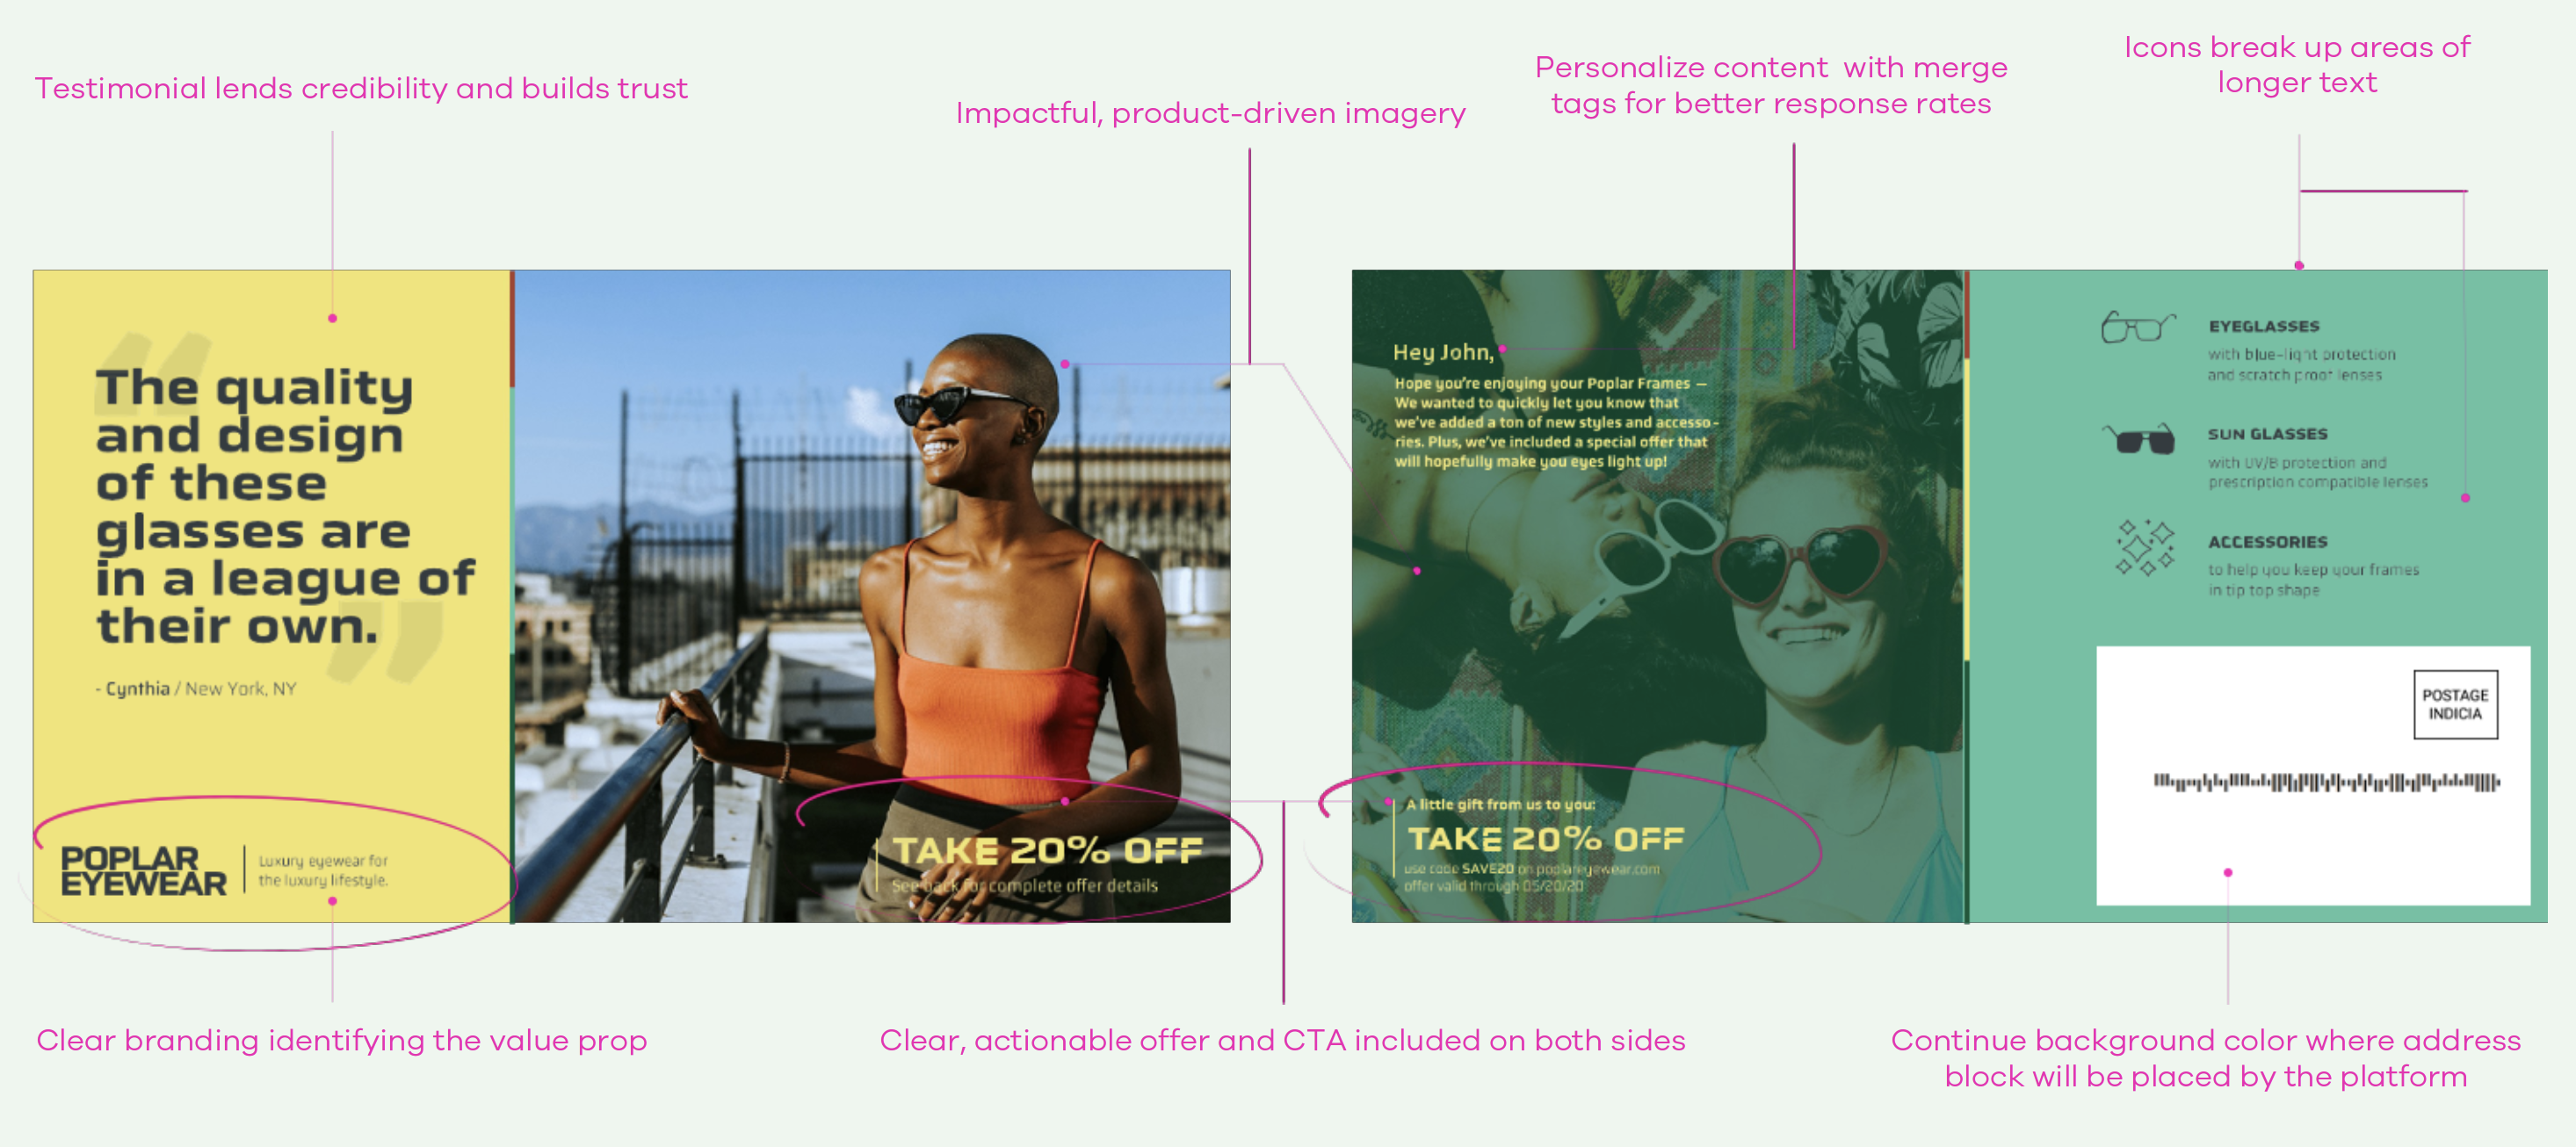
Keep it simple with the 1-2-3
GRAB ATTENTION. (keep text/copy to a minimum - think less is more)
Communicate the value prop - customers won't pass up a good offer. (think free shipping or 20% off)
Have an identifiable ➡ call to action.
We recommend including the call to action/promo code on the front and back, so it's visible no matter which side is facing up.
Track front end results by adding a different promo code for each test cell on the mail plan. (A/B creative designs)
Consider placing the offer on a bolder/more eye-catching background color or possibly an offer strip to grab the recipients' attention. Get them excited about the offer and give them a clear next action.
Make use of ALL real estate, we recommend using full panel images, collages, etc. to create an eye catching and engaging creative design. 👀
Ensure the creative aligns with the targeting (e.g. unisex targeting vs. child-focused, etc.).
Use contrasting colors and larger font sizes - at least 12pt is recommended.
Utilize icons ✅ where possible to help quickly identify key differentiators/features and break up any text-heavy areas.
When possible, feature customer testimonials to further reinforce the value prop. Social Proof is huge. 🙌
Reminder: Sometimes, less is more. Utilize the entire design, but do not overcrowd.
Postcards are always printed at larger dimensions, then trimmed down to final size to ensure no gaps or unprinted areas appear on the final product.
We always recommend designing edge-to-edge without white borders or crop marks to avoid the risk of them appearing on the final product after cut.
A safe zone is also specified to prevent any text or important copy from running too close to the edge of the mail piece.
Mail pieces should always be designed at, and contain, high-resolution images at 300ppi/dpi for best possible print quality.
Final Upload Dimensions
Trim
Safe Zone
4.25" x 6.25" or 1275 x 1875px
4" x 6"
3.75" x 5.75"
6.25" x 9.25" or 1875 x 2775px
6" x 9"
5.75" x 8.75"
6.25" x 11.25" or 1875 x 3375px
6" x 11"
5.75" x 10.75"
The white address block and subsequent text is applied automatically by the platform during upload.
PDF creatives should always be exported to be PDF/X-4 compliant. This is the most digital-print friendly format which ensures all transparencies have been flattened, color profiles are correct, fonts are fully embedded, and file size is under 5MB.
Make sure to uncheck all marks before exporting. Do not upload creative with any printer, trim or registration marks.
Only check the bleeds box if you did not account for the necessary dimensions in the earlier steps. See above for total dimension values for the creative formats.
If you're interested in receiving a physical sample of your creative before launch, you can do so via the One Time Send option from within your campaign:
During the creative upload process, you'll see the option to view and download a PDF preview of what your file will look like after cut, with the auto-applied address block.
Always download and review your creative preview to make sure all images and text are rendering in high resolution, with no typos or missing elements.
For new Poplar users who wish to make use of dynamic creative but need help with initial HTML/CSS, Poplar offers free translation services for your first campaign. The files will be coded as templates for easy updates (swapping out images, text, etc.) and provided with instructions for making such updates for future campaigns.
This free service is a one-time offer, and can take 3 business days to complete, so please account for this in your campaign timing.
The following materials are required for HTML creative translations:
A completed static version of your creative design.
The original packaged InDesign or Illustrator files (image assets and fonts included).
Clearly marked indicators and instructions for which elements you would like to be dynamic.
Translation services for future campaigns are only provided ad-hoc pending team availability and may involve additional cost.
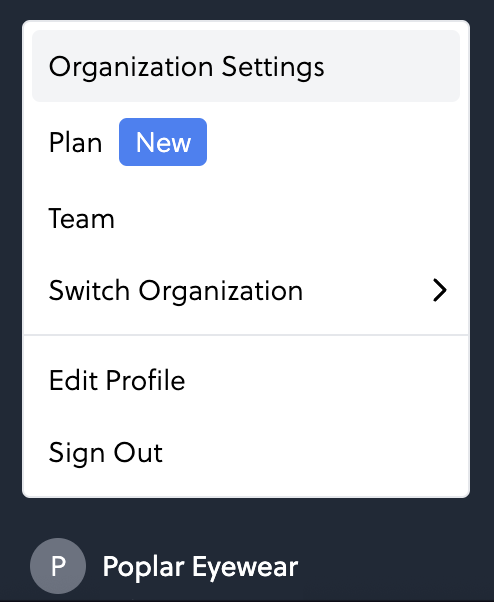
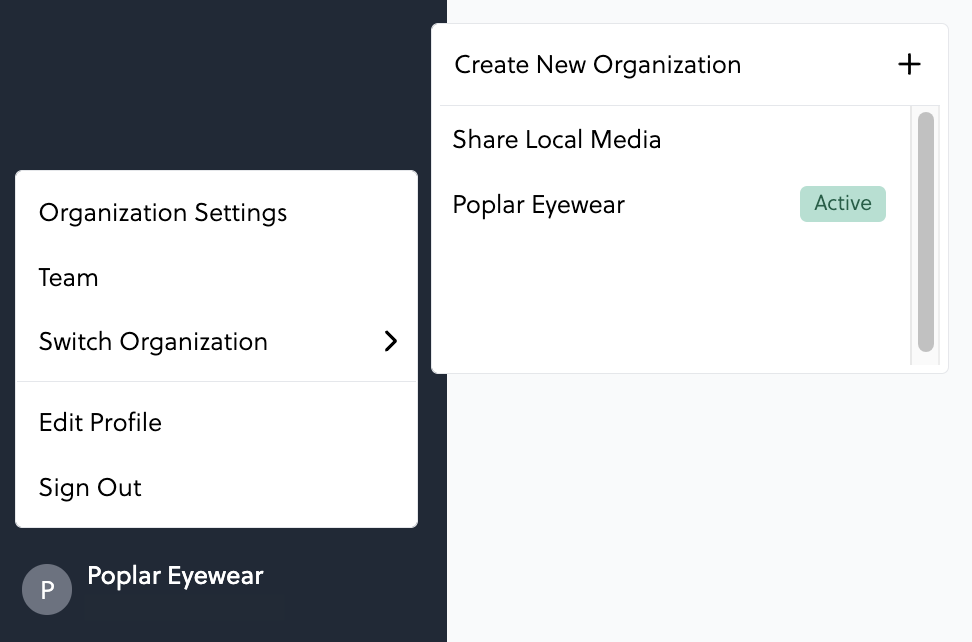
To access your Organization Settings, Plan, Team, Privacy Requests, Organizations (if your email is tied to more than one), and to edit your Profile click the icon with your name in the bottom left:
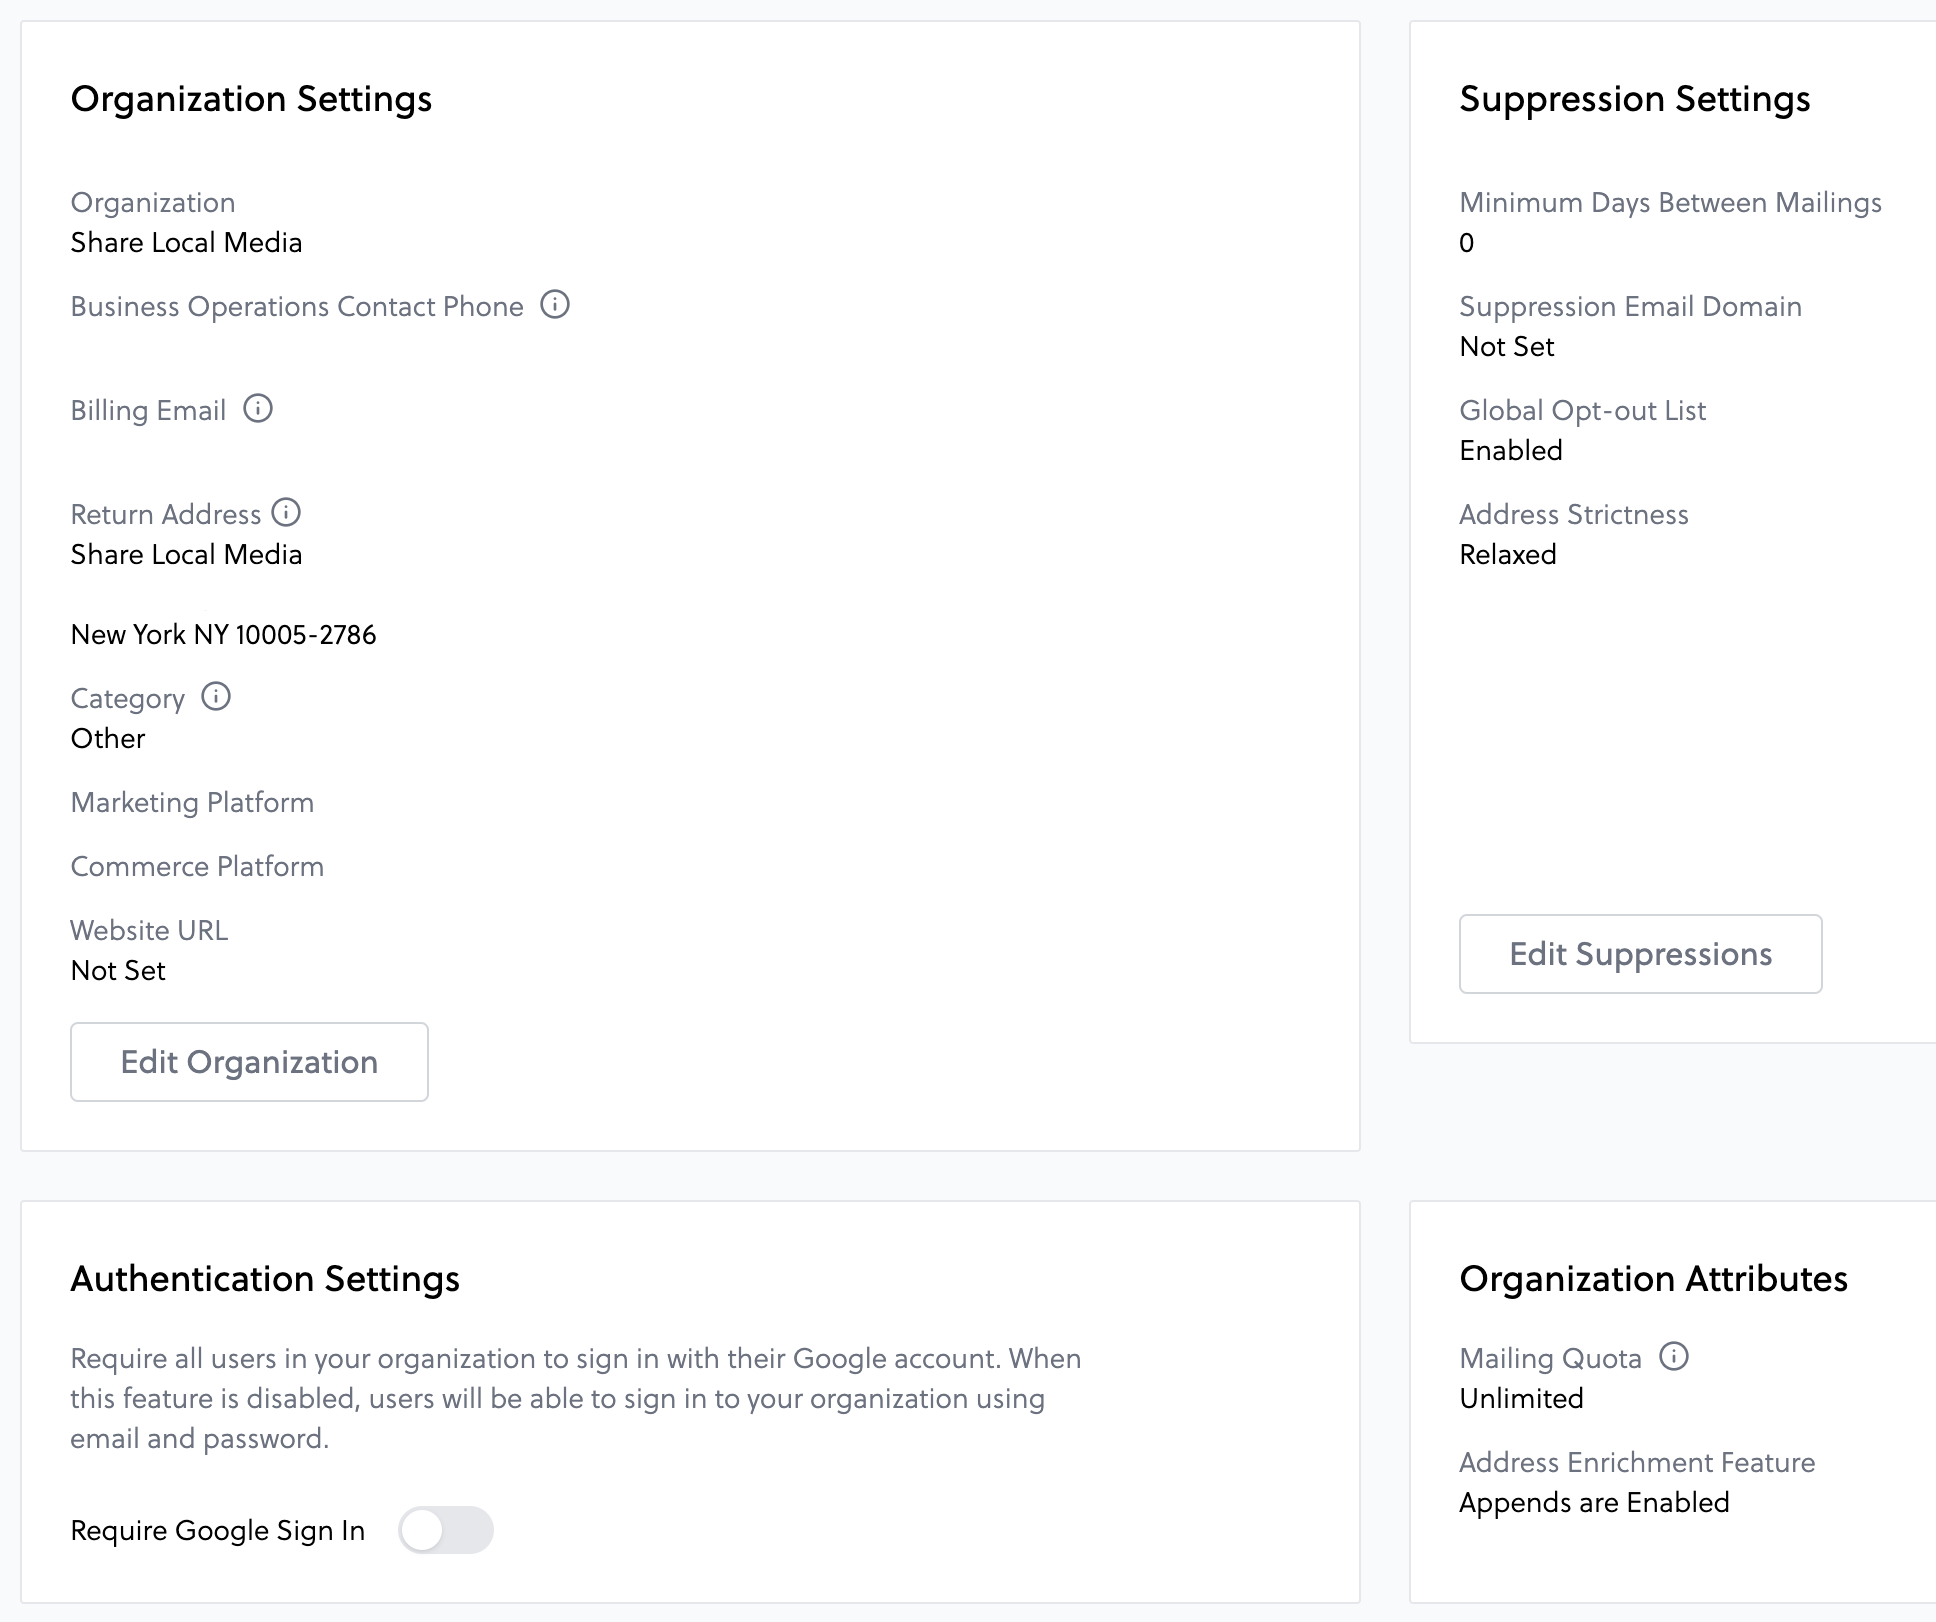
From Organization Settings you're able to access and edit your Organization details, Suppression Settings, Authentication Settings, and Organization Attributes:
The delay acts as a frequency cap with which you can suppress multiple mailings to the same address within a given timeframe.
When mailing multiple samples to the same address, we recommend setting Minimum Days Between Mailings to 0 to avoid unwanted suppressions. Once you've received your samples, approved the mailings, and are ready to go live, we recommend changing this setting to any number of your preference that's larger than 0.
This list includes households who are not interested in receiving promotional mailings. Only adjust this setting to off if using the platform in a non-promotional nature.
You can suppress mailings to individuals within your own organization by specifying an email domain. Please note that this will only apply if you use the address enrichment feature or supply a customer's email address when triggering your mailings.
These settings control the address validation rules when Organization Default selects strictness on a campaign level. Varying rules are applied when uploading address data and when sending mailings to gauge the highest possible deliverability.
You can view and adjust your personal information and email notification settings from the profile tab. Your User Profile stores the full name and email address attached to your account. It can be updated as needed.
For your Security, Poplar uses two-factor authentication. We highly recommend enabling this feature as an additional layer of protection for your account.
The Communication Settings control email notification preferences for product updates, reports & data exports, etc., and product analysis.
Here you can view and manage your team members for your organization. To add a new user, click Add Team Member and enter their email. When a new team member is added, they'll receive an email invitation to log into the platform. Invite emails expire in 2 weeks. If a user has not accepted their invite, you can re-trigger the invite by clicking on the resend icon 🔁 .
In compliance with CPRA, a CSV record can be uploaded to this page for Access or Deletion:
If you're an agency managing more than one client or have multiple product lines you'd like to create separate organizations for, Poplar supports multiple Organizations under a single login so you can easily navigate between accounts.
Billing and reporting operate independently for each account, and accounts are only visible to users who belong to them. For example, if you're managing multiple client accounts and invite a client to have access to their account, they will not be able to see the list of other organizations associated with your user/email.
Include a promo code specifically for the mail URL for more accurate tracking. Want to make each promo-code unique for each customer? Check out our feature.
Dynamic HTML template files must be used for creative designs that plan to utilize merge tags for personalization (first name greeting, changing images, etc.). Poplar offers several HTML/CSS creative templates based on use case, and our article " " covers how to implement your own text and images.
Strict
Only allows addresses deemed "in-service" by the USPS.
Normal
Checks the existence of an address and verifies that the street and unit information is correct.
Relaxed
Will mail regardless of address validity. This setting is only recommended when mailing to commercial addresses.


Poplar offers five mail formats: Bi-folds, Tri-folds, three different sized Postcards, and Letters available in Black & White or Color. For your campaign to be considered Active and available for mailing or running tests, you must first upload creative.
The .zip files below contain InDesign, Illustrator, HTML, PDF, and PNG/JPG templates. The templates are pre-formatted to include 0.125in bleed (except on letters) on all four sides along with trim, safe zone, and address block indicators. Our address block is applied to the creative after uploading so please remove the placeholder beforehand.
Static template files should be used for creative designs that do not utilize personalization or variable content:
Adobe InDesign
Adobe Illustrator
PDF/X-4
PDF/X1-a
PNG/JPG
For specific details on exporting, color profiles and general best practices, please visit the Static Creatives page before uploading to the platform:
Dynamic HTML template files must be used for creative designs that do plan to utilize personalization or variable content such as first name, rolling expiration date, unique promo code, etc. If no one on your team has sufficient knowledge of HTML or CSS, reach out to support@heypoplar.com for assistance.
For specific details on fonts, merge tags and general best practices, please visit the Dynamic Creatives page before uploading to the platform:
Postcards are always printed at larger dimensions, then trimmed down to final size to ensure no gaps or unprinted areas appear on the final product. Before uploading to the platform, your files must include a 0.125" bleed on all four sides.
A safe zone is also specified to prevent any text or important copy from running too close to the edge of the mail piece. Mail pieces should always be designed at and contain high-resolution images at 300ppi/dpi for best possible print quality.
Example If you're designing a 4" x 6" postcard, add an extra 0.125" to all four sides to bring the total file dimensions to 4.25" x 6.25". The safe zone should be inset from the 4"x 6" trim by 0.125" on all four sides so all text, logos, terms & conditions, etc. should appear within 3.75" x 5.75".
Total Dimensions
Trim
Safe Zone
4.25" x 6.25" or 1275 x 1875px
4" x 6"
3.75" x 5.75"
6.25" x 9.25" or 1875 x 2775px
6" x 9"
5.75" x 8.75"
6.25" x 11.25" or 1875 x 3375px
6" x 11"
5.75" x 10.75"
The highlighted orange address area picture above is applied automatically by our print rendering system. For best results, provide creative with background or design that runs fully behind this block.
Make sure to never place critical text in this area, as the address block will be layered on top prior to printing the piece. The printed color of the address block is white/paper color with text and postage indicia rendered in black.
Postcard Size
Address Block Dimensions
4" x 6"
2.375" x 3.275"
6" x 9"
2.375" x 4"
6" x 11"
2.375" x 4"
Our address block is auto-applied, please delete the placeholder before upload and DO NOT include a white block in your back artwork. We take care of that for you.
Bi-folds & Tri-folds are always printed at larger dimensions, then trimmed down to final size to ensure no gaps or unprinted areas appear on the final product.
A safe zone is also specified to prevent any text or important copy from running too close to the edge of the mail piece. Mail pieces should always be designed at and contain high-resolution images at 300 PPI/DPI for best possible print quality.
What holds them together? The vast majority of Bi-fold and Tri-folds will be folded and held together with a tabbed clasp by default. However, when mailing high volume batches adhesive may be used to optimize production time.
The white address block and recipient address is auto-applied by the platform upon upload. For best results, provide creative with background or design that runs fully behind this block.
Bi-folds are available in 2 different formats, Shortfold (folds left to right) and Longfold (folds top to bottom), each panel on both formats are the same size - just folded in a different direction. Both templates are pre-formatted to include a 0.125" at each edge, so the final dimensions after trim are as follows:
Panel
Size
Address Block
Outside/Inside Panel Front
8.5" x 5.5" or 1725 by 5175px
N/A
Outside/Inside Panel Back
8.5" x 5.5" or 1725 by 5175px
3.95" x 2.37"
Panel
Size
Outside/Inside Panel Front
8.5" x 5.5" or 3375 by 2625px
Outside/Inside Panel Back
8.5" x 5.5" or 3375 by 2625px
Tri-folds are also printed at larger dimensions with a slightly smaller bleed than bi-folds, so be sure to consider the safe zone when placing important text. The inside panel ends up being slightly smaller than the outside panel for easy folding. Both templates are pre-formatted to include a 0.25" total bleed, so the final dimensions after trim are as follows:
Panel
Size
Address Block
Interior/Exterior Outside Panel
5.5" x 8.5"
N/A
Interior/Exterior Inside Panel
5.375" x 8.5"
N/A
Interior/Exterior Mailing Panel
5.5" x 8.5"
3.75" x 2.15"
Total
16.625" x 8.75"
Be aware that folds are not always exact when considering panel design.
Our letter format is an excellent option if you'd like to target recipients with a longer or move private message. They're also preferable when mailing to commercial addresses, as other formats could be subject to a lower delivery rate if the commercial address is not accepting promotional mail.
Windowed envelope with the address info printed on the first page of the letter insert page. Includes the following options:
8.5" x 11" letter page inserts. (First page includes area for return and recipient address)
Color or B&W
Single or Double-sided
Additional pages (charged per page)
Letters are printed on standard 8.5" x 11" paper and inserted to a double windowed envelope with address info printed on the first page. Additional formatting options include single or double-sided print, additional pages, and B&W or Color:
Letters do not contain a bleed area since designs are printed straight onto the paper without being trimmed down. Because of this, we do not recommend using a heavily saturated edge-to-edge background color since there will be a slight white border where the printer ink detects the end of the page.
The letter base rate includes the first side of the first page, regardless of if you select single or double sided the additional page cost is per printed side. i.e. if you submit a 2 page PDF as a double-sided creative it would be the base rate + the cost of 1 additional page.
A white address block with return address is auto-applied in the top left during upload, it is the only part of the letter that's visible through the envelope windows and cannot be customized.
A bar code will also be auto-applied along the 0.25" safe zone line at the bottom of each page. It is important to keep this in mind when positioning footer text, terms & conditions, or other important promotional information:
One unique feature of the Poplar platform is the capability to print dynamic mailers. You can personalize your postcards or letters just like you can in an email with any information you have on your customers like first name, past products purchased, and unique promo codes. This personalization allows you to create designs that are statistically more likely to get the recipient’s attention since they’re tailored to each individual.
Poplar offers a variety of flexible and creative ways to customize mailers based on different types of collected audience data.
Translating a static PDF design may sound intimidating, especially if you have little to no prior coding knowledge. Fortunately the process is usually as simple as:
Pulling certain aspects of your static design together
Re-saving them as one element
Embedding the URL within an .html file.
There are a few key tools and elements to have in place before you begin:
Your original InDesign or Illustrator files
All image assets and fonts
Since Poplar is converting an HTML file to PDF, the capabilities and best practices differ slightly from a web page which uses a multitude of behind-the-scenes tools and software to render in a browser.
A browser can be used to preview your code design, but keep in mind certain elements, such as merge tags, may appear differently in the browser than they do when converted to PDF in the platform - this is why viewing the PDF proof generated by the platform is the best, most accurate way to check your work.
Default Merge Tags (Recipient)
Poplar will automatically populate default merge tags based on recipient data received via CSV upload or trigger integration. In your HTML creative, default merge tags are always preceded by recipient. to access the core recipient data in your mail file or API request.
The platform will NOT prompt you to set default values for recipient. merge tags. This means that in the event of a blank value or mismatched data, your creative will print with a blank.
Missing first name data will populate as Current Resident and will appear on your creative as such - if you are using the {{recipient.first_name}} merge tag, make sure first name is provided for every recipient.
See the Custom Merge Tag section for details on how to use first name with a default value...
If you've created a Promotion and uploaded a list of unique codes, use a {{promotion.promo-code}} merge tag to pull in each code. Upon uploading creative, the platform will detect promotion. and prompt you to select your Promotion from a dropdown.
Location based merge tags populate with data pulled from Saved Locations within your Poplar account. They are considered default merge tags, meaning the platform will NOT prompt you to set a default value to appear in the event of missing data. Location based merge tags provide a flexible and easy way to customize creative based on Geolocation settings.
Poplar populates custom merge tag data by pulling from any additional column headers in your CSV Mail File, or any values present in the merge_tags object of your triggered API request. When HTML creative files are uploaded, the platform will scan for any custom merge tags present in your design and prompt you to set a default value. The default value will populate the custom merge tag in the event of a blank field or mismatched data in your CSV mail file or API request.
Uploading and storing files under Audiences will strip all custom merge tag values and extra column headers. To preserve custom merge tags for a One Time Send, drag & drop your CSV file directly into the platform during the launch process.
When adding custom merge tags to you HTML, make sure they are always preceded by custom. This is how the platform differentiates between default and custom merge tags. The following are common examples of custom merge tags:
If you don't have first name data for every recipient, you can create an additional custom merge tag named anything BUT first_name (ie. first-name or firstname). The platform will prompt you to set a default value (ie. "there" or "friend") to appear in the event of missing data.
Poplar also has the ability to render QR codes by using a Liquid tag to pass promotional data into the QR code configuration. The Liquid tag will return an image URL which can be used either as the src attribute of an <img> element or as the url for a background image.
The length of your URL affects the density of the QR code, therefore we recommend generating/using a shortened version of your URL to avoid scanning issues when printed.
Promotional data (codes, urls, etc.) must be created externally, as Poplar does not have the capability to generate or track promotional data.
Background Image Example
Image Source Example
When setting up your QR code, the following parameters can be used in the configuration:
If the parameters are used as a merge tag, they do not currently have validation. For the color and bg, you will need to add the hex code without the # e.g., FF0000, not #FF0000.
If the text field is empty, there will be no error.
Basic Example
Promotion Example
You can also reference promotion codes you imported into the Poplar platform.
Custom Merge Tag Example
Custom URL/string Example
The QR code image returned is an SVG so that can be displayed at any size.
Objects Add high-level variability to dynamic data in your creative. All default and custom merge tags used in creative are classified as objects.
Filters Allow you to reformat and set consistent formatting ( ie uppercase, lowercase, or proper-case)
There's no limit on the number of ways you can get creative with Liquid Templates; below are some sample use cases and code snippets to get you started. We highly recommend testing all your Liquid templates thoroughly in order to ensure they are error free!
Rolling Expiration Date
Add an expiration date to your creative that will always show 90 days from the time of print. The Liquid filter below creates a Unix timestamp, adds the number of seconds in 90 days and then reformats the date.
Character Casing
If your audience data contains some values that appear in all caps, lowercase, or a mix of both, Liquid can be used to ensure they appear consistently formatted in your creative design. Below is an example for how to make sure all first_name data appears in proper case, with the first letter uppercase and the rest lowercase.
Variable Discount
Offer a variable discount based on a customer’s purchase history, average order value, lifetime value, etc. The Liquid tag below will use a custom merge tag to display a different message based on the purchase_history value listed in your audience data.
Terms & Conditions
Dynamically alter legal text based on the recipient's city or state .
Behavior Dependent Images
Show a different product image based on characteristics related to the recipient’s most frequently purchased item. Below we have a custom merge tag called item-color, and the image shown in the creative features items of a similar color to those most frequently purchased.
Reach out to support@heypoplar.com for more use cases or assistance...
After setting up your campaign, it's time to upload your creative files. These are essential for activating your campaign and testing integrations.
Types of Creatives
Static: PDF, PNG/JPEG (Not suitable for merge tag personalization)
Dynamic: HTML/CSS (Required for 1:1 personalization)
Before Uploading, Ensure:
Files have a distinct Front and Back. The back gets an auto-applied address block.
Designs are full coverage without white edges, crop marks, or address placeholders.
Incorporate a 0.125in bleed on all sides. This means dimensions should be 4.25 x 6.25, 6.25 x 9.25, or 6.25 x 11.25 for postcards.
Use high-quality images at 300 DPI/PPI and ensure static creatives are in PDF/X-4 format.
For more detailed guidelines and export instructions, check our Static and Dynamic creative guides. If you're not familiar with HTML/CSS but wish to use dynamic merge tags, Poplar provides complimentary translation services to convert static designs to dynamic HTML. Learn more and submit your request here:
Start by clicking into your campaign and navigating to the Creative tab, then click New Creative in the top right to begin:
First, you'll see the option to select the creative format that aligns with your design files. Then you'll be prompted to give your creative a unique name:
Bi-fold and Tri-fold formats are currently in private beta, please reach out to support@heypoplar.com for more info.
Next you'll select postage speed and paper type. USPS Standard shipping typically reaches homes within 7-15 business days (Monday-Friday), where USPS First Class can start to hit homes between 5-7 business days from launch - see a breakdown of our production and in-home timelines here. These estimates are subject to change considering federal holiday closures and on USPS back-log during major holidays. Our 4 x 6 and 6 x 9 postcard formats have first class shipping baked into the base price, but as you switch between formats and shipping speeds you'll notice the price per-piece calculate in the top right.
Poplar offers two paper stock options: premium coated and uncoated:
Premium Uncoated currently only supports static PDF/x1a creative designs and is not available for HTML creatives using dynamic merge tags - reach out to support@heypoplar.com for more info.
If you selected one of our postcard formats, you'll be prompted to drag & drop your front and back files into the platform for upload. The address block will be auto-applied to the back, so make sure the uploaded files are in the correct order. If you selected a letter, bi-fold or tri-fold format you'll be prompted to upload a single file - if your letter has multiple pages or is double sided, make sure all pages/sides are within a single PDF or HTML file. Other key items to consider during upload:
Supported file formats: PDF, PNG, JPG, HTML
Maximum file size: 5MB
Front and Back files do not need to be the same format - if only one side of your postcard uses dynamic merge tags, the other side may be uploaded as a static PDF/X-1a file.
Liquid logic can be used to set a fallback value for first name default merge tags, if you don't have first name data for every recipient on your list. If a fallback isn't set, "Current" (as in "Current Resident") will end up populating the merge tag. Promotions merge tags don't need a fallback because mailers will automatically stop sending once the list of codes runs out.
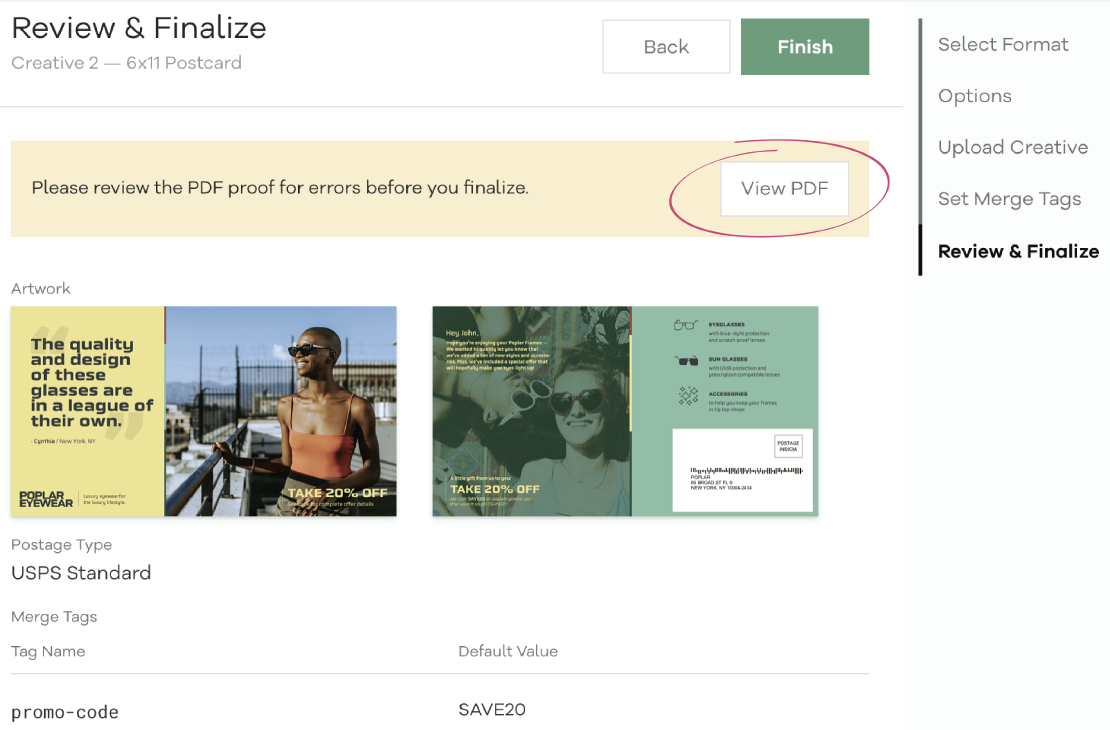
The final step in the upload process is reviewing the PDF proof of the final product after trim, with the address block and default merge tag data applied. ALWAYS closely review your proof by downloading it and opening the file outside of the browser, here are a few key things to look for:
Spelling errors, typos, blurry images or text, missing promo codes or QR codes
Make sure the address block is on the correct side and not covering any important text or images
Double check expiration dates are at least 30 days from the launch date
No text is being cut off or running too close to the edge
Creatives may take a number of minutes to render, but if end up stuck on this step and unable to finalize please reach out to support@heypoplar.com for assistance.
Click into your creative to see an overview of the Creative Details and to access functions such as Edit Creative, Set as Default, Deactivate Creative, download Uploaded Artwork files and Proofs. Towards the bottom of the page you'll see a list of all merge tags present in the creative, any promotions the creative is connected to, and Data Guides for CSV and API templates.
This allows you to edit the Creative Name and Shipping speed ONLY. Any other updates such as paper type, size, or file edits will require uploading new creative and deactivating the old one.
If you're running a triggered campaign and want to fire one specific creative, you may do this by setting it as the default. When a default is set, you do not need to include creative_id in your webhook trigger - if creative_id is set in your webhook it will override the default setting. If you're looking to A/B test multiple creatives, make sure a default is not set and the platform will automatically randomize between all active creatives under the campaign.
Deactivating a creative renders it inactive for mailing. This means if you have any active webhook triggers pointing to an inactive creative_id, mailings will stop firing.
Creatives must have unique names so if you plan to upload new creative with the same name, make sure to rename the creative before deactivating.
This article dives deep on the 3 categories of merge tags used within our Poplar platform. If you want to learn how to add merge tags to your creative please check out .
Poplar’s HTML template files ()
A text editor such as or
A tool to preview your design as you code such as a browser window or
Personalizations can be broken down into four merge tag categories: Default, Promotion, Location-based, and Custom - all of which can be dynamically optimized by the use of Shopify’s language.
There must be at least one (1) saved location under the geo-locations tab & the saved locations suppression must be toggled on under the campaign Suppressions tab before you upload an HTML creative including {{location.merge_tag}}. Click to learn more.
The platform does not track QR code scans as part of attribution reporting. This is because scans can typically be tracked in the program used to generate your unique QR code URLs, such as
Poplar accepts the use of Shopify's language in HTML creatives. Liquid is an open-source templating language that lets you add nifty logic to dynamic data to make it even more flexible by using:
Tags Let you add conditional logic (using ) to your messages. The most basic form is an if...else statement.
If your dynamic HTML creative contains any , you'll be prompted to set a default value as a fallback in the event of blank data. These fallbacks are for custom merge tags only. If your creative contains default merge tags (such as first name) or a promotion merge tag this step will be skipped - this is not an indication the merge tags are missing from the creative. You have the option to opt out of setting a default value if a fallback isn't applicable, but we definitely recommend setting one whenever possible.
Column Header or Key
Merge Tag
full_name
{{recipient. full_name}}
first_name
{{recipient. first_name}}
last_name
{{recipient. last_name}}
address_1
{{recipient. address_1}}
address_2
{{recipient. address_2}}
city
{{recipient. city}}
state
{{recipient. state}}
postal_code
{{recipient. postal_code}}
{{recipient. email}}
identifier
{{recipient. identifier}}
Saved Location Field
Merge Tag
Location Name
{{location. name}}
Address 1
{{location. address_1}}
Address 2
{{location. address_2}}
City
{{location. city}}
State
{{location. state}} or {{location.state_name}}
Postal Code
{{location. postal_code}}
Merge field 1
{{location. merge_field_1}}
Merge field 2
{{location. merge_field_2}}
Merge field 3
{{location. merge_field_3}}
Column Header or Webhook Field
Merge Tag
image-url
{{custom. image-url}}
last-purchase
{{custom. last-purchase}}
loyalty-level
{{custom. loyalty-level}}
first-name
{{custom. first-name}}
color
optional
The foreground color for the QR code
bg
optional
The background color for the QR code


Dynamic creatives (designs featuring variable or personalized data) using Merge Tags or Liquid Template logic, must be uploaded in HTML file format.
Inches and Pixels are the only recommended units of measurement - relative lengths such as em, rem, vw, etc. may not render properly upon upload.
A file path describes the location of a file. There are two types of file paths: Absolute and Relative.
A relative path file points to a local file relative to the current page, an absolute file path uses a URL to an internet or Bucket file.
The platform is only able to render files with an absolute path and will NOT render files sourced relatively.
Path Type
Example
Absolute
<img src="https://www.app.heypoplar.com/logo.png"> Correct
Relative
<img src="/images/logo.png"> Incorrect
When uploading HTML creatives, it's essential to ensure that all URLs within the creative are functional and visible to the public.
The best way to test the functionality of your src URL is to copy and paste it in your browser. If it's functional it will appear and if not, you may receive an HTTP Error Code.
Supported Content Types
File Type
Accepted Format
font
.otf, .ttf, .woff, .woff2
image
.bmp, .gif, .jpg, .jpeg, .png, .svg, .tiff, vnd.microsoft.icon, .webp, .xml
text
CSS
Linking Fonts
The simplest option is to link your asset in the <head> of the HTML document rather than in the in the CSS. Using this method, the platform is able to accept a maximum of 2 different font weights.
This rule allows custom fonts to be loaded to the creative. Once added to the CSS in the rule instructs the printer to download the font from the URL where it is hosted. The @font-face rule should be added to the top of the CSS before any other styles.
A/B Tests can be set up and run between any number of creatives within a campaign. Based on your goals, you can choose to optimize on overall conversion, CAC, or ROAS. Common test variables include:
Size or Format: 4 x 6 vs. 6 x 9 Postcard
Promotional Offer: "Free Shipping" vs "$10 OFF" vs "20% OFF"
Call to Action: Website URL vs. QR Code
... and so much more!
To reach statistical significance truly get a "good read" between multiple creative designs we recommend upwards of ~10k per design to see an effectively measurable difference between the creatives.
To setup your A/B test, you'll first want to upload all your creatives to the same campaign - the platform will automatically randomize between all active creatives as they move to production. If you upload 2 creatives to test, each creative will have a 50% chance in the rotation and if you upload 3 creatives, each one will will have a 33.33% chance, and so on.
If you are launching via One Time Send, you'll want to initiate a new send and select the creatives you would like to use for the A/B test:
Continue through the flow and you'll see confirmation of the A/B test using multiple creatives on the last step before launch. If one of your creatives is set as the Default, that tag will be ignored when selecting the Multiple Creatives option via One Time Send.
When you process a One Time Send that uses the Multiple Creatives A/B testing feature, you are billed according to your highest-priced, mailable creative.
This will first draw from your credit balance
If your credit balance is insufficient, an additional charge will be made to the card on file to make up the difference
At the time you process the mailing, we don't yet know the final distribution of addresses, because the system must first append or cleanse addresses and check your suppression settings before resulting in the final set of mailable addresses and randomizing creative assignment.
Once the creative assignment has finished, and final A/B testing ratios are confirmed, if the actual cost was lower than what was billed, the difference will return to your account's credit balance.
When setting up a Poplar Mail trigger via platform integration, you have the option to specify a creative_id along with campaign_id in the webhook payload. If creative_id is NOT specified in your webhook trigger, the platform will automatically randomize all active creatives under the campaign - this is how to A/B test when activating your trigger.
If creative_id isn't specified and one of your creatives is set as the Default, then only the default creative will trigger.
If you've shared Transactional Data with Poplar for in-platform reporting, you'll see the A/B test results broken down by creative at the bottom on the campaign's Overview page:
Additionally, if you download the raw match data there will be a creative_id column that specifies which creative was matched or attributed.
Poplar offers a number of configurable suppression controls to check against before a mailing moves to print. Suppression lists can be uploaded to the Audiences page or set under Geolocations, then selected from a campaign's Suppressions tab. Additionally, account-wide suppressions (such as Minimum Days Between Mailings) can be controlled from your Account Settings.
In the example above, if you're sharing transactional data with Poplar via integration, your customer list can be selected for suppression if you don't want to mail to customer who've already converted.
Maintain your Do Not Mail list by manually uploading a CSV list or integrating with our Do Not Mail API. Members of this list are automatically suppressed across all campaigns.
If you're sharing transactional data with Poplar, a list of all your customers will automatically populate this audience which can be optionally selected if you'd like to suppress customers who've already purchased.
Poplar offers a number of options for suppressing mailers based on recipient address. State and Zip Code Whitelists, Saved Location Options, and Geofence Suppressions from the Geolocation page. These settings can be Enabled or left disabled on a campaign-level.
Enabling state or zip code whitelist suppressions will suppress any mailings to addresses that fall outside of the states or zip codes saved under the Geolocation page.
Whitelists can be only be enabled or disabled on a campaign-level, they cannot be differentiated on a campaign basis.
Example
If you're running a year-round triggered campaign promoting flip-flops and only have warmer states selected in your whitelist and enabled for suppression, you wouldn't be able to simultaneously run a campaign for winter coats and enable a whitelist for colder states without disrupting the flip-flop suppressions.
When enabled, any addresses that fall outside a custom radius of a saved location will be suppressed from mailing. Saved locations can also be used to customize dynamic creatives by pulling merge field data into the design via Location Based Merge Tags.
Only Mail in Range
Enabled
Blocks any recipient address from being mailed outside the range of a saved location
Disabled
Does not block address destinations
Populate Merge Tags
When in Range
If the recipient falls within the locations range, it will populate the merge tag with the location specific data. Outside of the range it will leave any location merge tags blank.
Nearest Location
Populate location merge tags based on the nearest location to the recipient regardless of the location's range
Unlike other location based suppressions which can only be enabled or disabled, Geofences can be established to be inclusive or exclusive, then selected for suppression or dynamic creative personalization.
The delay acts as a frequency cap with which you can suppress multiple mailings to the same address within a given timeframe. The platform automatically sets the minimum days between mailings to 7 unless otherwise changed.
When mailing multiple samples to the same address, we recommend setting Minimum Days Between Mailings to 0 to avoid unwanted suppressions. Once you've received your samples, approved the mailings, and are ready to go live, we recommend changing this setting to any number of your preference that's larger than 0.
This list includes households who are not interested in receiving promotional mailings. Only adjust this setting to off if using the platform in a non-promotional nature.
You can suppress mailings to individuals within your own organization by specifying an email domain. Please note that this will only apply if you use the address enrichment feature or supply a customer's email address when triggering your mailings.
Most of your work will be done from the Campaigns page. Once you begin creating and launching campaigns, they'll appear listed on this page in alphabetical order. Active, Paused, or Archived status (archived campaigns are moved to the bottom of the list) are also shown, along with the date Last Mailed.
At the top you'll see the Total Spend, Total Mailed, CPA, ROAS, and Total Revenue across all campaigns. The Reporting Window for these metrics can be adjusted using the calendar tool in the top right. The Columns tool allows you to select which reporting metrics you'd like to view across all campaigns.
Click the New Campaign button in the top right to create a new campaign, or click into an existing campaign to see the Overview, Creative, One Time Sends, Suppressions, and History tabs.
For existing campaigns, the campaign settings can be accessed by clicking into the campaign and selecting Edit Campaign on the far right. If your Poplar account is brand new, the only thing you'll see on the Campaign's page is the option to Create New Campaign:
The campaign name should be unique and reflect your use case - adding the date of creation is recommended, if you plan on having multiple campaigns of the same nature.
The description should contain any key information such as trigger filters, notes on audience suppression, or anything relevant worth communicating to team members.
Setting a campaign purpose helps communicate even more context across team members. It also gives the Poplar team insight into campaign goals and use cases so we can better assist with strategy and results analysis.
Poplar's Address Enrichment feature matches email addresses to physical addresses. If you plan on passing only email addresses via trigger or when uploading a CSV list to be matched, Enable Address Enrichment when your campaign is created, or click Edit Campaign in an existing campaign to adjust the setting. If you already have full address data for your target audience, leave this setting Disabled.
Typically, Poplar's address enrichment process sees a 60-80%+ match rate. In our internal tests we have generally found that older demographics tend to yield a higher match rate than younger ones. Thanks to the strict accuracy filters we've put in place, there should be a high yield of accurately matched addresses.
Running the match process costs an extra $0.07 per piece. You will only be charged if an append is successful, and will not be charged if a match can't be found. Under the campaign's History tab, the system will return append failed if it is unable to identify an address to match. If it's successful it'll change the status to mailing_queued.
Rules and Limitations
Emails submitted must be customer emails; you should NOT submit emails you have obtained in other ways.
The emails must belong to US residents only.
Recipient addresses for append will always be addressed to "Current Resident." Any personalization of the mail piece should not include any PII (personally identifiable information) for that specific customer.
Use of certain merge tags in creative design is restricted for recipient privacy purposes.
Matched address data is not available for download and will be redacted from CSV mailing records downloaded from the campaign's History tab. The email addresses that found a match will be visible for tracking and attribution reports.
Enable a specified holdout percentage to compare conversions between mailed and unmailed groups and easily analyze incremental lift. Given that mailings are triggered or launched individually and in real time, the holdout percentage is approximate. The holdout percentage you set is just the odds that any individual mailing will move to the holdout group.
We strongly recommend taking a holdout for campaigns sending at least ~5,000 pieces per month. If you're mailing at lower volumes, the holdout size is generally too small to get a high level of confidence in it, in which case this setting can be left Disabled.
We do not recommend manually taking a holdout from your audience segment, outside of the platform. It is best practice to set a holdout inside the platform to ensure the highest level of randomization, and allow for in-platform reporting of lift metrics.
Holdouts are taken after Address Enrichment so matched addresses can be checked against your opt out list. Any holdout requests are still charged for address enrichment, but the base print and mail fee is not charged when the mailing is in the holdout group.
For triggered campaigns, you have the option to specify a daily and/or weekly budget cap. Budget caps are approximate and your actual costs may end up lower or higher.
The reason for this is because you are only charged after specific events occur in the mailing stream. This means if more data appends succeed than expected, or if more mailing addresses you've provided fail to validate, you may see the actual costs come in above or below your budget.
Weekly Budget
Resets every Sunday at 12:00am UTC
Budget settings are ignored for One Time Sends. The cost of the send will be charged to your account credits, and the card on file if the balance exceeds your account credits.
Address Strictness can be set on a campaign-level, which will override the global strictness set under Account Settings. Varying rules are applied when uploading address data and when sending mailings to gauge the highest possible deliverability.
Organization Default
Uses the strictness specified under Account Settings
Strict
Only allows addresses deemed "in-service" by the USPS
Normal
Checks the existence of an address and verifies the street and unit information is correct
Relaxed
Will mail regardless of validity *This is only recommended when mailing to commercial addresses
You can set a custom attribution window when you create a new campaign. By default, Poplar uses a 90-day attribution window. This is the period of time for which you wish to credit a customer's transaction to the mailing. We recommend a minimum of 30 days to see the full scope of your results.
If you're sharing transactional data with Poplar, you may begin to see some results before your attribution window has fully passed. Since these number are considered incomplete, we suggest waiting until the attribution window has fully passed before evaluating the performance of your campaign.
How is NCOA accounted for when using Geolocations, Geofences, and Zip & State suppressions?
Our location and area-based checks are performed on the original address that you provide. These checks are run prior to NCOA, meaning if your recipient has moved, we do not account for the move in our checks.
However, if you are concerned about potentially mailing someone who has moved outside your delivery area(s), you can append the phrase " or Current Resident" to your recipient name field. This allows you to skip NCOA, meaning your mailer ultimately lands at the original address.
Example
USPS requires NCOA on this address will be forwarded
Bypasses NCOA won't be forwarded
Jane Doe 123 Main Street Brooklyn, NY 11221
Jane Doe or Current Resident 123 Main Street Brooklyn, NY 11221
Recommended when targeting commercial addresses, for higher possibility of successful delivery.
Some campaign use cases require or would benefit from the option to show a unique return address from the one listed for your Organization. Reach out to support@heypoplar.com to have this feature turned on for your account.
Click into a campaign to see its Overview tab. At the top you'll see the Mailed number which includes all requests that have or will likely move to production, total Spend which includes any requests that have or will incur a cost as it moves through the system (i.e. production and/or data appends) and, if you're sharing transactional data with the platform, CPO, ROAS and Revenue for the campaign's set Attribution Window.
Below, you'll see a data graph which is controlled by the adjustable calendar.
On the right hand side you'll see the campaign's status, and the option to Edit or Pause the campaign at the top, followed by the unique campaign_id and a summary of the campaign's settings. All settings can be updated at any point by editing the campaign. The option to archive a campaign will appear once a campaign is paused.
Campaign Active indicates a campaign is available for launch. A campaign will not start mailing unless it is hooked up to a live trigger or specifically launched via One Time Send.
If you're sharing transactional data with the platform, the bottom of the page will show a detailed attribution analysis divided by each creative mailed. If the campaign has been in-home for the 30-90 day attribution window, this section breaks down campaign's success and is especially useful if comparing against a holdout group or A/B testing different creatives.
Visible attribution metrics can be adjusted using the columns filter to the right. Descriptions of each metric appear when hovering your mouse over the information circle.
A record of raw matches can be downloaded can be downloaded on a campaign and account-wide level. When you download this record for a single campaign, the CSV file will contain all matches and attributions.
If you only need attributions, please ensure you filter out matches under the column match_type
A means that the order was attributed to that particular mailing.
M means that the order simply matched to that particular mailing, but was not attributed to that mailing. We follow a last-touch attribution model across campaigns, so it could be that the mail piece was not the last one that the specific customer received.
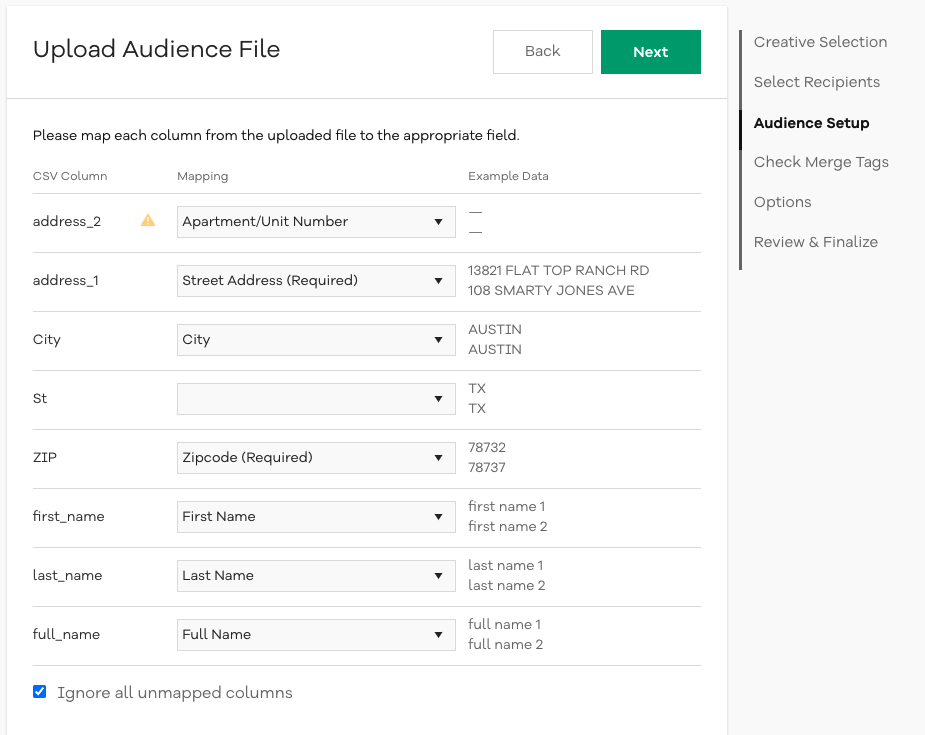
The Audiences page provides an easy way to store addresses for mailing and suppression. This is especially helpful if you want to suppress a list for an individual campaign, separate from the global Do Not Mail List. Upload a CSV file comprised of either mailing addresses, or email addresses if you opt to use the address enrichment feature.
Below is an example of the required and optional fields for full address data, and emails for address enrichment. The column headers don't need to match perfectly as you'll be prompted to map the required headers upon upload, and ignore any irrelevant columns that may be present in your file. Suppressions are matched against either address or email, so if you are running campaigns using address enrichment, email alone can be used for suppression.
full_name
required max character count: 40
company
optional
address_1
required
address_2
optional
city
required
state
required
postal_code
required
optional
identifier
optional
custom_merge_tag
optional
custom merge tag columns can be stored for creative, but we recommend uploading your CSV file directly to the One Time Send flow whenever possible
required
full_name
optional
identifier
optional
custom_merge_tag
optional
Audience Files are commonly used for suppression lists, campaigns using static creative or creatives using only default merge tags, and lists containing emails for Address Enrichment.
Extended processing times may indicate an error in formatting. Make sure Ignore this field is selected for any irrelevant columns.
Mail Files are the ideal choice for launching batched campaigns via One Time Send and are the only other option, aside from trigger setup, for supplying custom merge tag data.
If you notice duplicate addresses in the list, this is because both shipping and billing address are captured through Shopify.
If you're sharing transactional data from Shopify, you may notice some duplicate addresses. This is not an error as both billing and shipping addresses are being captured.
How to Use Poplar
Welcome to Poplar — your tech-enabled direct mail partner. We make it easy to launch personalized, data-driven campaigns that print, ship, and arrive in homes within days. Here's a quick walkthrough to get you up and running in just a few steps.
After completing Onboarding upon sign-up, you'll be brought to your Poplar Dashboard! If you've been invited to an existing Organization, you might see existing campaigns and data already populated. If you're working with a brand new account, you'll want to click into your account icon on the bottom left to access key account settings:
Here you'll be able to do the following:
Make sure your Organization address is set
Invite team members to your new account
Manage 2FA and Google Sign In
The Audiences page is where you'll store both your Mailing & Suppression lists. We also highly recommend installing the Poplar Shopify App to automatically share transactional with the platform, which will start populating under your Customers (Orders API) list as orders are made in real-time. This audience ingests both shipping and billing address to calculate Attribution, and it can be optionally selected for suppression in your Campaign's Suppression Settings.
Poplar supports five mail formats — including postcards, bi-folds, tri-folds, and letters in color or black & white.
To activate your campaign (for Samples or Integration tests), upload your creative files:
Front & Back PDF/x-4 files
Review the auto-generated PDF proof for accuracy
With your campaign created and creative uploaded, you're now ready to send yourself Samples - or even launch! Yes, it's that quick and easy.
Navigate to Campaigns > Creative > Click into the Creative your want to Sample
Enter your mailing address, phone number, and desired quantity - then hit Send!
Reach out to your Account Manager or support@heypoplar.com for integration assistance
Automate mail to send when customers take action — like abandoning a cart or making a purchase. Set this up by integrating Poplar’s Mailing API with your CRM/ESP or using a connector tool like Zapier.
After launching, you can navigate to the History tab in your campaign to track where your mailers are in the mail stream.
What you’ll find:
Mailing Status: Real-time updates based on USPS scan data (filter to see Delivered/Suppressed/Hold Out/Invalid Addresses)
Request Details (Triggered Integrations Only): See exactly what info was shared used to generate the address block and custom merge tags
📊 Want full attribution? Share your order data with us and we’ll generate Attribution Reports so you can see the impact.
A Hybrid Approach to Omni-channel Marketing - Email retargeting integrates digital touchpoints with physical outreach, optimizing the customer journey through a combination of online behaviors and offline engagements. Customer email data can be leveraged in a number of ways through online interactions; Poplar enables you to incorporate Direct Mail into your email marketing flows for enhanced and seamless targeted offline campaigns.
Abandoned Cart: Target customers earlier in the checkout process, where only email is collected before mailing address is entered.
Subscribers and Unsubscribers: Send a promotional mail piece to welcome new subscribers, or retain unsubscribers with a physical mail offer - chances are they're still interested in your product, just not interested in receiving emails.
Leads: Any instance where you're able to collect email leads (site views, sign-ups, etc.) Direct Mail can also be utilized to boost engagement.
Poplar's Address Enrichment feature is able to match emails to physical mailing address at a 50-80%+ success rate. Our internal tests have generally found that older demographics tend to yield a higher match rate than younger ones. Thanks to the strict accuracy filters we've put in place, there should be a high yield of accurately matched addresses. If applicable, Enable Address Enrichment when your campaign is created, or Edit an existing campaign to adjust the setting.
When making an API request or prepping an audience file, only the email field is required; Poplar will initiate an address search as described in the image below. You will only be charged if an append is successful and will not be charged if a match can't be found.
Holdout groups are included in the data charge since an email has to find a match in order to be eligible for the holdout group, but the cost of production will not be applied. The system will return append failed if it is unable to identify an address to match. If it's successful, it'll change the status to mailing_queued.
Your account will be charged the full amount (100% match rate) and will be automatically refunded the remainder after the email appends process is complete. The refund will be credited to your Poplar account (or the original payment method upon request).
Example
If you have $100 in your account and push through three $50 One Time Sends quickly, Poplar will think there is enough there is enough money for all three. By the time the first two are done processing, the third mailing will be suppressed due to lack of funds.
Emails submitted must be customer emails; you should NOT submit emails you have obtained in other ways.
Emails must belong to US residents only, Poplar does not ship outside the US.
Recipient addresses for append will always be addressed to "Current Resident." Any personalization of the mail piece should not include any PII (personally identifiable information) for that specific customer.
When downloading mailing history for Address Enrichment campaigns, address data will be redacted from the file.
The use of name merge tags is restricted for recipient privacy purposes.
Before launch, the platform will scan the validity of your address data (based on USPS flags) and return the number of mailable addresses, along with a CSV file listing all the invalid addresses. Common reasons an address may be labeled invalid include:
The address has been flagged as vacant or inactive by USPS
The address has an invalid primary number
The address has missing or invalid secondary information (ie: apt. or suite #)
The city/state/postal code combination is invalid
The address belongs to a commercial mail receiving agency
After uploading your Audience or Mail File, Poplar performs a set of validations to ensure complete and deliverable addresses. The platform will assess the Total Records which is the number of correctly formatting fields in the file, as well as the number of Mailable Records which is the quantity that can be mailed based on your address strictness.
Click Download File with Error Report for a record of which addresses are invalid, and the reason they were marked as such (for example: "missing secondary data" indicates address_2 APT/Suite number is required to complete delivery). You can decide whether to address the errors or skip those addresses and proceed with the send:
Address Strictness can be set on an account-wide level from your Account Settings and a campaign level when creating a new campaign. This setting controls the level of address validation required to mail. To assure the highest likelihood of deliverability to we recommend the Strict setting. When mailing to commercial addresses, you may want to try adjusting to Normal or Relaxed depending on the confidence in your data.
Strict
Only mails to addresses deemed "in-service" by USPS. New construction may remain "inactive" for a few months after being occupied.
Normal
Checks the existence of an address but ignore other data such as the USPS "in-service" flag.
Relaxed
Skips most address validation checks and should only be used for thoroughly vetted data or transactional mailings, where there is a high degree of confidence in the dataset.
Below you will find information on formatting requirements and export instructions for static creative designs.
When uploading creative, the platform will ask for two separate files: front and back. We always recommend designing edge-to-edge without white borders or crop marks, to avoid any risk of them appearing on the creative after cut. Before exporting, there are a few important factors to consider for an error-free upload process and high-resolution print:
Total dimensions equal exactly...
4.25" x 6.25"
6.25" x 9.25"
6.25" x 11.25"
Your file has been exported as Adobe Preset: [PDF/X-1a:2001] or [PDF/X-4:2008] or as a 300PPI High-Resolution image
File size should be under 5MB
Our address block is auto-applied, please DO NOT include a white block in your back artwork. We take care of that for you
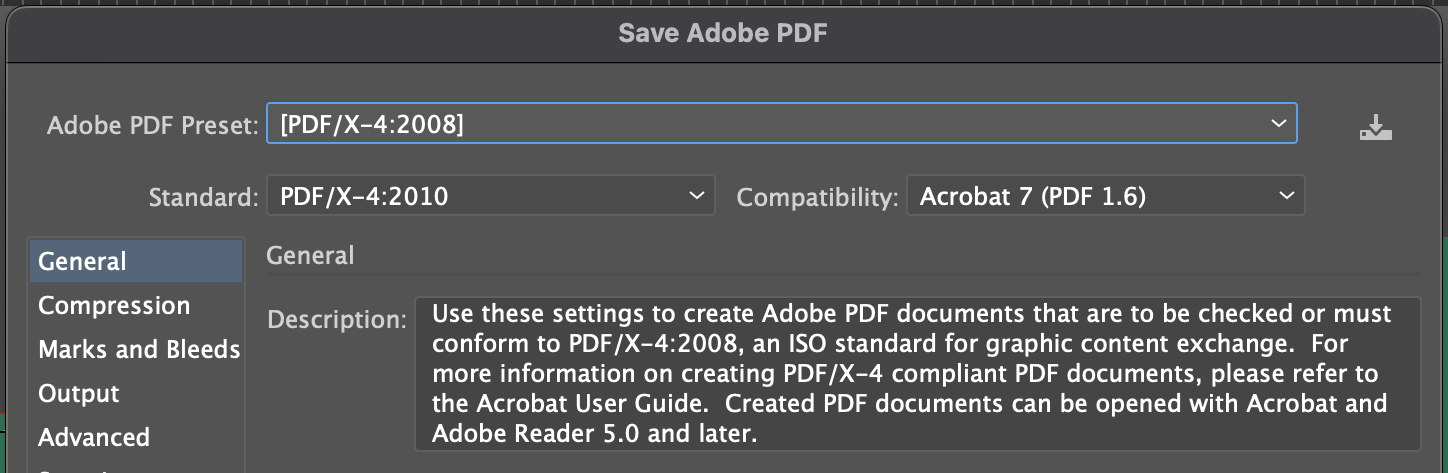
Poplar supports two different standards of the PDF/X family: Adobe PDF/X-1a and PDF/X-4. These are subsets of the PDF file format specifically designed for reliable prepress (printing) workflows. They ensure all transparencies have been flatted, color profiles are correct, and fonts are fully embedded in the PDF file; if you do not embed the font, text may shift and/or render differently from the preview on your computer. Make sure large image files are reduced as much as possible without compromising resolution (300PPI), as the platform will only accept files under 5MB.
While PDF/X-1a is accepted and prints beautifully, we recommend the more recent PDF/X-4 preset for any new creative uploads. Here are the key differences between the two:
Color Management
PDF/X-1a: All color data must be in the CMYK (Cyan, Magenta, Yellow, and Black) color space or grayscale. This ensures consistent and predictable color output in a printing environment.
PDF/X-4: Supports color management through the use of ICC profiles, allowing a wider range of color spaces, including RGB, CMYK, and Lab. This provides more flexibility for high-quality color reproduction in various printing conditions.
Transparency
PDF/X-1a: Does not support transparency, requiring all transparent elements to be flattened before the creation of the PDF/X-1a file. This ensures compatibility with older RIPs (Raster Image Processors) and printing equipment.
PDF/X-4: Supports native transparency in the PDF, meaning that transparent objects can be maintained within the file without flattening. This allows for better print quality and more sophisticated effects in the final printed product.
Font Embedding
PDF/X-1a: Requires that all fonts be embedded within the PDF file, ensuring that the exact fonts used in the document will be available during the printing process.
PDF/X-4: Also requires font embedding, similar to PDF/X-1a, to maintain consistency in the final printed output
Here is an example of the document setup for a 4 x 6 postcard that includes 0.125" bleed on all four sides:
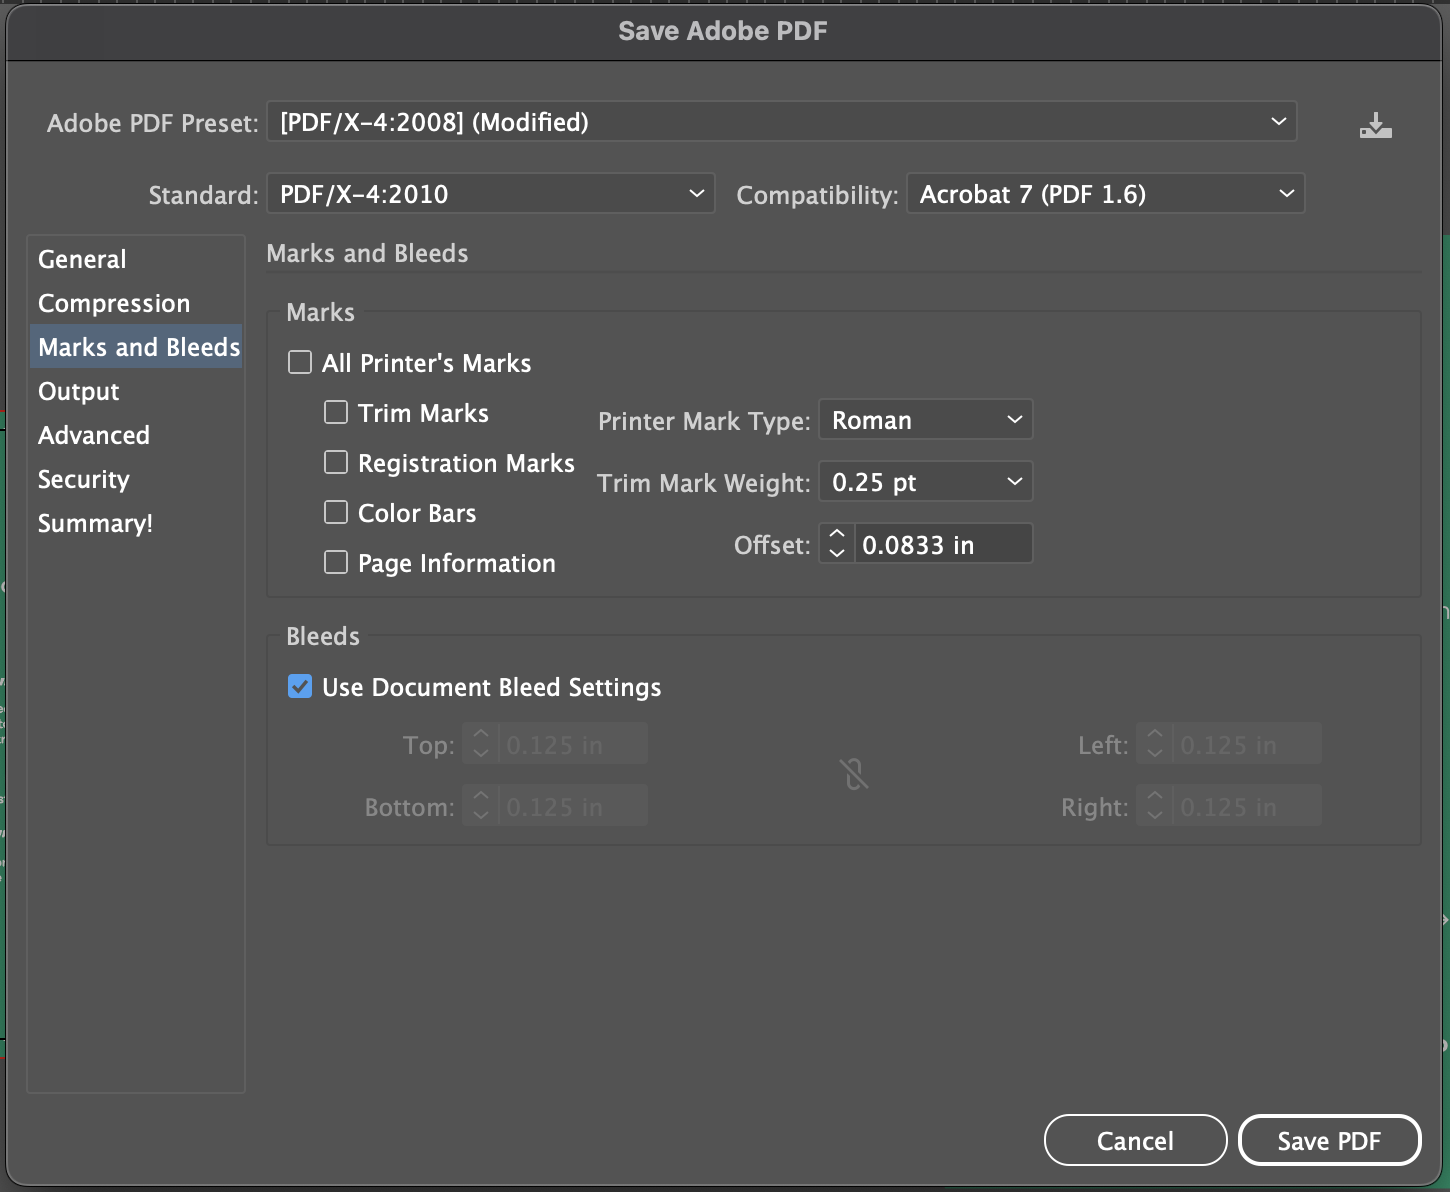
1File → Export... → Format: Adobe PDF (Print) → Save2Adobe PDF Preset: [PDF/X-4:2008]3Marks and Bleeds → Bleed and Slug → ✓ Use Document Bleed Settings → Export
Make sure "Use Document Bleed Settings" is always selected before exporting. If it is not selected, the bleed will not be included in the final dimensions, and your file will only measure out to 4" x 6" which will trigger an error message when uploading to the platform.
Here is an example of the document setup for a 4 x 6 postcard that includes 0.125" bleed on all four sides:
Adobe Illustrator does not provide inset margin dimensions in the document setup. We recommend creating your own or using the inset Safe Zone marker provided in the template.
1File → Save As... → Format: Adobe PDF (Print) → Save2Adobe PDF Preset: [PDF/X-4:2008]3Marks and Bleeds → Bleeds → ✓ Use Document Bleed Settings (Make sure NO printer marks are selected) → Save PDF
Double check total dimensions of the file, make sure trim and safe zone indicator layers are deleted and not hidden.
To export correctly for Canva, the creative dimensions must be defined as pixels (not inches).
Here is an example of the document setup for a 6 x 11 postcard that includes 0.125" bleed on all four sides:
Canva does not provide the ability to add a bleed or margin so the width and height must include the bleed. You can confirm the total creative dimensions below.
Share → Download
Select PNG (Confirm the pixel dimensions are correct)
Download FRONT and BACK creatives as separate PNGs.
QR codes are commonly used to link back to client sites and work great for front-end tracking of campaigns for clients that don't get enough conversions to run a match-back (b2b or real estate).
For static QR codes, InDesign has a built in QR code generator that will provide you a vector output that you can use in your creative. We recommend keeping QR codes a minimum of .75" in width, and testing the QR code with your phone in the PDF preview to make sure it works.
Craft compelling mailers easily with Poplar's Design Templates.
These drag-and-drop formats make it simple for your team to add the right copy and the right imagery, ensuring your value proposition shines. Designed to stand out in the mailbox, these templates effectively communicate your brand while grabbing attention.
Make direct mail easy and download today!
Lookalike models are special, custom prospecting lists created from traits and/or behaviors identified within your existing customers. These can encompass purchasing behavior, interests, affinities, and additional predictive traits you wouldn’t initially think of.
In Poplar, we've built a streamlined lookalike model development process that allows you to build a lookalike model within 2-3 business days.
On-demand models
Minimums start at just 5,000 circulation
No requirement to contribute to any data share
Complimentary 10% or 20% Holdout group (optional but highly recommended to calculate lift metrics)
By using this feature you accept the Poplar Terms of Use for Prospecting Data
Lookalike lists are built as part of a One Time Send launch flow. This means creative files must be uploaded to your campaign beforehand, so they can be selected during the first step in the flow. After submission, the list can take up to 3 business days to build, and the campaign will immediately move to production once audience sourcing is complete.
You need at least 1,000 customers to build a lookalike model. Your file should contain full name and address data only, emails are not accepted.
Do NOT cull the customer list on your end. Even if you have more than 1,000 customer records, you should upload the ENTIRE file for best results
Your uploaded customer list will double as a suppression list for the campaign, but any additional state, zip code, or Audience list suppressions should be set under the campaign's Suppressions tab.
Ensure you have enough funds in your credit balance for the mailing. Your estimated cost: quantity of mailings * ($0.07 + cost of your creative)
Although circulation starts at only 5,000 we recommend at least 10,000 prospects to get a better grasp on your target audience and analyze the results which would carry more statistical weight.
As mentioned above, Lookalike models are launched via the One Time Send flow so you'll want to click into you campaign, head to the One Time Send tab and click New One Time Send. You'll then be prompted to select which creative you'd like to use. If you're A/B testing creatives, select the Multiple Creatives option from the dropdown.
Under Send Type, select Build a Model and click Next:
Next you'll see the option to Add a New Audience or select and Existing Audience:
Enter your desired circulation (excluding holdout) and any required attributes for your model.
We highly suggest avoiding using the attributes unless they are absolutely key to your product or if your product doesn't serve a certain group. For example:
You sell only women's clothing
You're a real estate firm and you're mainly marketing to homeowners who want to sell
You're selling children's toys (and thus want to market only to households with children)
Why?
The lookalike model automatically reflects the demographic patterns discovered amongst your customers.
Letting the model run naturally will allow you to get the highest-ranking names from the largest universe of prospects.
To give a concrete example, let's say, Sally, David, Bob, Linda, and Annie were your top 5 prospects based on their purchasing behavior.
If you deselected "Male", we would remove David and Bob, who were actually ranked 2nd and 3rd in terms of likeliness to convert - and replace them with Amanda and Jane (ranked 6 and 7 in your list).
Though we recommend mailing as broadly as possible, you can specify if you want to reach specific zip codes or states. If you already set your campaign states and zips, you can just use those.
Because this is a prospecting product, your customer file will always be suppressed from results. If you already set audience suppressions under your Campaign settings, you can breeze through this step.
During the modeling process we collect some additional details, including a list of 5-10 competitors and your product category. We highly recommend sharing all these details as they help inform the model of the types of purchases it should give more weight.
If you have enabled holdouts in your campaign setting, you can take a holdout of 10% or 20% at no additional charge. For example, if you wish to mail 10,000 prospects and also use a holdout, we would provide 2,000 extra addresses for your holdout, at no additional charge. We highly recommend taking a holdout, because having incremental lift metrics will help you understand the true return on the campaign.
We recommend leaving NCOA turned ON, unless you have specific state or zip suppression set and don't want to risk mailers being forwarded outside those parameters.
Before submitting your order for a lookalike model, you'll be able to review all details and costs. If anything needs to be changed, be sure to go back into the workflow and make the updates.
Once you hit "Process Mailing", we begin our modeling process, which occurs in the span of 2-3 business days. The steps involved in sourcing an audience are:
Your customers (first-party data) are matched against a co-op database that contains your customers' purchasing behavior from parties other than yourself (third-party data).
The prospects in the database are then scored according to their similarity in purchasing behavior to your customers.
Next, all potential customers that don't comply with your overlays are removed, suppressions are removed, and the top viable prospects are finalized for mailing.
Once the top prospects are sourced, your mailing automatically goes into printing & production, without further action needed from you.
Production & mailing will occur, just like any other mailing in Poplar where you uploaded a CSV of addresses or emails. These steps follow the normal timelines of First Class or Standard postage depending on your selection.
Once your campaign has been created, creative files uploaded and a credit card is on file for your account, you can launch your mailing via One Time Send. Before initiating, make sure your campaign is Active - if your campaign is Paused you will not be able to launch.
Multiple One Time Sends can be launched under a single campaign, this is important to keep in mind so as not to overcrowd your account with duplicate or similar campaigns unnecessarily.
Click into the Campaign you'd like to launch, navigate to One Time Sends (tab at the top navigation) and click New One Time Send.
Name your One Time Send ( optional step). If you've already uploaded your audience file to the Audiences page, you'll see it available for selection if the list has finished processing. If the audience hasn't been uploaded yet, select Add a New Audience. Existing Audiences only store core mailing data and mapped merge tags, any additional/custom columns not mapped are removed upon upload.
If your creative has dynamic elements, be sure the column header matches 1:1 with the custom merge tag values before uploading.
The default delivery timing is set to ASAP which will go into production as soon as you hit approve. If scheduling a campaign to launch for a specific future date, select Schedule, then -> Choose the date for the mailers to begin production on.
When scheduling a future send, the date chosen is the date that the mailers will start printing and mailing out. Ensure to leave enough time for the postcards to arrive in-homes. If you have any questions regarding in-home dates or would like help scheduling a campaign, reach out to support@heypoplar.com.
We highly recommend enabling a holdout percentage. Having incremental lift metrics will help you understand the true return on the campaign. Our location and area-based checks are performed on the original address that you provide. These checks are run prior to NCOA, meaning if your recipient has moved, we do not account for the move in our checks.
Once your send has finished processing, head to the History tab in your campaign to see a record of each individual mailer. Click into one of the items to see a PDF preview with the individual address data and merge tags applied, along with the Request Details and Event Log. The Event Log tracks each mailer as it moves through the mail stream, based on scans updated by the USPS.
A typical mailing transitions through a number of states during its lifecycle. These states indicate where it is in the preparation, production and mailing process. You can see many of these states when viewing a campaign on the web or when querying the API, this value is presented in the state field.
In some instances a mailing will never receive a USPS scan event and will be remain in the In Production state. Generally this should be under 5% for any given campaign but the piece would be expected to still be delivered in this instance.
The campaign's History tab is going to be your greatest asset for tracking the status of individual mailers, testing integrations, and viewing incoming Request Details. Once a One Time Send has launched and processed or a trigger is set live and is sending requests, a list of individual mailers will start to appear.
If testing a trigger integration, the History tab is where you'll want to look to confirm the requests are successful, merge tags are populating correctly, and all the necessary mailing data is coming through as expected.
In the top right you'll see a tool for filtering by Mailing State and/or Environment, the option to Download a CSV record, and a calendar tool for filtering by date. In the top left you'll see a mailing count which reflects the filter settings.
Numbers and mailing status are most accurately reflected under the History tab. While the graphs shown on the overview page are a useful visual aid, always refer to the campaign History for the most detailed account.
Once a mailer is In Transit or Mailed, status updates are based on incoming scans from USPS. If you notice a slight lag in delivery updates, we recommend checking back in later or the following day in case USPS hasn't updated their data yet.
Below is a typical average timeline for First Class and Standard mailers sent through Poplar; this is an important factor to consider when calculating the launch date of your campaign:
Poplar is optimized for speed, so mailers are sent to production almost immediately and begin printing within 24 hours. Depending on the postage used, in-home time can be as little as 3-7 days. Mailers sent in the early-to-late afternoon may not enter production until the following day.
The Mailing State, Environment and Calendar filter setting will be applied when downloading a CSV record. Shortly after clicking Download CSV, you'll receive an email from no-reply@heypoplar.com with a download link - this email can take up to 15 minutes to arrive depending on the amount of data requested.
Your CSV record will contain the following data columns:
If you're looking to download a record of mailing history across all campaigns, this can be done from the Mailing Data tab under API:
Each individual mailer, along with a unique mailing ID will appear listed under the History tab. Click into a mailer to see a summary of the Mailing Details, Event Log, and Request Details. If the mailer is or was in print production, you'll see an image preview with address and merge tag (if applicable) data applied and the option to download a PDF proof:
Under the Mailing Details you see the Recipient Address, Campaign name, Creative name, Postage Type, Trigger Source (API Request or Manual Send), Creative Type, send_at trigger setting, Estimated Cost (price per piece), and a list of any custom merge tags used showing their name and value as populated based on mailing data.
The Event Log shows a Timestamped record of how long the mailer spent in each step of the mail cycle from Created to Delivered.
If the mailer was launched via trigger or integration with our Mailing API, the individual webhook data will be shown in the Request Details.
Measuring the impact of your direct mail campaigns can easily be done from inside the platform. We recommend waiting 30-90 days after your campaign's in-home date to see the full scope of success accurately reflected in the numbers.
The maximum file size is 20MB so if your uploading large amounts of order data, we recommend splitting the CSV and uploading separately.
Reports can take a few hours to generate or refresh upon upload. If you have new order data to submit, it is best to upload without deleting the existing data (unless the existing data is flawed).
To run attribution reports the platform requires (at minimum) order_id, order_date, shipping address OR billing address and order_amount to calculate revenue related metrics. For campaigns that mailed using emails for Address Enrichment, we accept email OR hashed_email to match against as well.
To generate attribution reports in Poplar, transactional (order) data must be shared with the platform by one of three ways:
Manual CSV Upload
Poplar's Shopify App
Orders API Integration
If you haven't shared transactional data using one of these methods, Poplar will not be able to calculate attribution metrics. If you did not set a Holdout group for your campaign upon mailing, the platform will not be able to calculate Lift metrics. Attribution reports are updated with a roughly 24 hour delay as data flows into our system. If you change your attribution window at any point after setting up your campaign, it will take time to refresh and reload your new attribution data.
Poplar measures customer response to mailings using the last-touch attribution model. This means that we attribute orders to the most recent mail piece (within the attribution window).
The attribution window is the length of time after customers have received your mailing for which you want orders to count towards your campaign. You can set a custom attribution window when you create a new campaign, and adjust the window by editing an existing campaign. This is the period of time for which you wish to credit a customer's transaction to the mailing. By default, Poplar uses the recommended 90-day attribution window with a minimum option of 30 days.
Before your attribution window has fully passed you may begin to see results populate, but because these are incomplete, we suggest waiting until the attribution window has fully passed before evaluating the performance of the mailings.
Typically 60-70% of conversions will occur in the first 30 days, 20-30% in the 30 days following that, and around 10% in the final 30 days. The 90-day window is a Direct Mail industry standard, and is the best option to see the full scope of the numbers.
Adjusting this setting after reports have been generated will result in a wait time for re-calculation. Your attribution reports are updated roughly on a 24 hour delay. If you change your attribution window at any point after your set up your campaign, it will take some time to refresh and reload your new metrics.
The attribution window begins when your mailings are in-home. To provide a direct comparison across postage types and holdouts, there is a slight nuance to this rule.
Let's say you sent two mailings on January 1:
Mailing A used Standard postage Mailing B used First Class postage
And let's say Mailing B was in-home on Jan 5 (e.g. Jan 5 was the Delivery Scan Date):
For all mail pieces from A and B, including any holdouts in A and B, we would consider January 5 as the in-home date. This allows you to directly compare the results from all mailings on January 1.
You may select a reporting window to filter and see only mailings that were sent in that time period. In Poplar, reporting window refers to the date a mailing was sent (created manually or triggered). Please keep in mind that this is different from the attribution window. To view reports by day instead of by week, simply adjust the Reporting Window to only show the past seven days:
We assume that all New Buyer data sent to our system is correct. Therefore, if Jane Doe made two orders and both orders were marked with the flag new_buyer: true your attribution reports would count Jane Doe as a new customer, twice.
Per campaign, the first matching order from each customer is considered unique and any subsequent orders from the same customer that are also attributed to the campaign are not considered unique.
A customer should only ever be reported as a New Buyer once, but per campaign you send out, each customer has a new opportunity to be considered unique. We determine whether or not a customer is unique (per campaign) based on a couple of data points and the likelihood the data point is available.
The data points we consider are customer_id and customer_email.
If neither customer_email or _id are provided, the platform will not be able to determine a customer's uniqueness. Address data cannot be used to determine customer uniqueness as a single address could map to multiple individuals.
The holdout metrics allow you to compare activity amongst the mailed group vs. customers who did not receive a mailer but converted anyway. If you opted for a holdout group when setting up or launching your campaign, the holdout group performance will appear right below the mailed group's metrics for easy comparison. If you did not enable a holdout for your campaign, the platform will not be able to calculate lift metrics.
This article mentions common and general merge tag use cases used within our Poplar platform. If you want to learn how to add merge tags to your creative please check out .
Below are a some HTML template files, designed by use case to get you started. If no one on your team has HTML design knowledge, but you want to utilize our or merge tag features, reach out to support@heypoplar.com to discuss your options with an account manager.
When formatting your HTML design, all CSS styling should appear within the <style> tag located inside the <head> tag. Additionally we recommend using positioning for all elements.
Dynamic content must use a or a font with a purchased license.
From the page, you can create new audiences for suppression and add members manually via CSV upload, or by using the . From the Suppressions tab within each campaign, you may choose to suppress individual audiences:
Account-wide suppression settings such as Minimum Days Between Mailings, SLM Global Opt-Out and Suppression Email Domain won't be visible from the campaign's suppressions tab but can be checked and adjusted from the page in your account.
You must agree to the Share Local Media . (screenshot below)
NCOA is a dataset of change-of-addresses filed by individuals and/or businesses with the USPS. The database is maintained by the USPS and we are required by the USPS run a check for every mail piece we send.
When passing audience members to Poplar via the , be sure to manually create an Audience within the platform first, so you can successfully add members.
Maintain your Do Not Mail list by manually uploading a CSV list or integrating with our . Members of this list are automatically suppressed across all campaigns.
If you're sharing transactional data with Poplar via or integration with our , a list of all your customers will automatically populate this audience which can be optionally selected if you'd like to suppress customers who've already purchased.
Head to your Campaigns page to create a new campaign. We won't dive into each of the settings here, but for more detailed information on campaign creation please visit .
Want to start testing before finalizing design? Use one of our as a placeholder. 🔗 Check out our and for inspiration and guidance.
If you're totally ready to launch, visit for step-by-step instructions on how to send to one of your Audiences. If you're looking to set up a programmatic Triggered campaign (Abandoned Cart Retargeting, Post-purchase, Retention, etc.) visit our page for instructions on how to integrate your CRM or ESP.
Send to a specific list by uploading a CSV file to your Audiences. This Audience will be available for selection during the flow.
You must agree to the Share Local Media and reach out via our chat portal to request access to the Address Enrichment feature (for new accounts only).
PDF/X-4 will automatically take care of flattening transparencies, opacities, and color overlays for highest quality print ()
If designing in Adobe Suite, We do not recommend using .png or .jpg files unless it's your only option. PDF & HTML are vector based formats that will generally print at greater than 300PPI; generating higher quality with very crisp text. The maximum file size for an image is 5MB. Review the PNG/JPG dimensions in the above section or confirm in our .
Fun Fact: QR codes that use capital letters are significantly smaller! See .
A CSV record of your order data can be uploaded to the page of your account. Records can be uploaded more than once, without having duplicates - the platform will ignore duplicates and update any changes to existing orders by order_id.
The allows you to specify whether transactions came from a new buyer (customer) or not. If you are using Poplar in any customer acquisition campaigns, or if you just want to filter your attribution reports by new customers, we recommend including this metadata through the Orders API.
Format
Pixels
4" x 6"
1275px by 1875px
6" x 9"
1875px by 2775px
6" x 11"
1875px by 3375px
Bifold Short-fold
1725px by 5175px
Bifold Long-fold
3375px by 2625px
Trifold
2625px by 4987px
8.5" x 11" Letter
612px by 792px
Processing
The mailing has been submitted to our API and is being validated. Here we may append an address, perform validation, and take holdouts.
In Production
The mailing has been sent to a print partner and is being produced. At this point a PDF and image of the final piece will be available for download.
Mailed
The mailing has been printed and handed off to the USPS.
Delivered
The mailing has been processed for delivery by the USPS. Typically it will arrive in the recipient's mailbox the same day or next day.
Suppressed
The mailing has been suppressed and will not be sent. Further detail is provided on the History page as to why the piece was suppressed.
Holdout
The mailing was part of a holdout group and will not be mailed.
Exception
An error was encountered during processing. This may be further broken down by:
append_failed
address_invalid
budget_exceeded
credit_balance_exceeded
printer_rejected
delivery_exception
failed
Status
Description
processing
Confirming all details of the mailing and production.
production
The mailer has passed data and suppression checks and is in print production.
holdout
Not mailed as part of the control group.
suppressed
The mailer recipient was found on your Do Not Mail list, or suppressed due to another setting such as regional, domain, or recently mailed.
delivered
Scanned and processed for delivery by USPS.
in_transit
The mailer has received one or more USPS mail scans and is on its way to the recipient. The Mailed state also falls under in-transit.
exception
An exception occurred while processing. This includes invalid addresses, unmatched emails for Address Enrichment, campaign budget exceeded, or insufficient account credit.
production_key
Successful trigger requests using your Production API Key.
test_key
Incoming trigger requests using your Test API Key.
campaign_id
The ID of the parent campaign.
campaign_name
The name of the parent campaign.
mailing_id
The ID of the individual mailing.
current_state
The current state of the mailing.
mailing_time
The timestamp when the mailing was created. This is in UTC.
scheduled_for
The scheduled mailing time (if set).
postage_type
The type of postage applied to the mailing (usually either first class or standard mail).
format
The format of the mailing (e.g. "6x9 postcard")
creative_id
The ID of the creative used for the mailing. If you are running an A/B test of multiple creative then this will be different per creative.
creative_name
The name of the creative used for the mailing.
The email address submitted with the mailing.
external_id
The external_id provided when creating the mailing.
name
The name printed on the mailing.
address_1
Address line 1 When using the address append functionality, as per our terms of use, this information is redacted and not provided for download.
address_2
Address line 2 When using the address append functionality, as per our terms of use, this information is redacted and not provided for download.
city
state
postal_code
5 Digit postal code
postal_code_ext
4 digit postal code extension
expected_delivery_date
The expected delivery date of the mailing. This is an estimate calculated based on submission time and historical mailing data.
actual_delivery_date
The date of the USPS delivery scan. Typically this occurs at the local post office, within 0-48 hours of the mailing arriving at the recipients mailbox.
estimated_cost
The estimated cost of the send based on the postage and format of the mailing.
send_type
The type of send. Valid values are API and MANUAL. This indicates if the mailing was triggered by our API or if it was created as a one-time send.
manual_send_id
This allows you to group mailings that are part of a one-time send.
merge_tags
The merge tags used for the mailing.
environment
This indicates if a test API key was used for the mailing. Valid values are test and production.
order_id
Required
A unique identifier for each order
order_date
Required
YYYY-MM-DD
Must be an ISO8601 formatted date representing the date and/or time of purchase
order_amount
Required/Optional
Required to calculate Revenue and related metrics (CPO, ROAS, etc.), must represent the total order value in decimal form
Optional for use cases that don't require revenue tracking (site sign-ups, app downloads, etc.)
customer_id
Optional
A unique identifier for the transacting customer in your e-commerce system
billing_name billing_address_1 billing_address_2 billing_city billing_state billing_postal_code
Required/Optional
Required if Shipping Address data is not provided
Optional to include with Shipping Address data
shipping_name shipping_address_1 shipping_address_2 shipping_city shipping_state shipping_postal_code
Required/Optional
Required if Billing Address data is not provided
Optional to include with Billing Address data
Optional
Can be used to match against campaigns that mailed using emails for Address Enrichment
This data is not stored by Poplar, it is used to compute a hash and then discarded
hashed_email
Optional
The SHA256 has of the customer's email address as a 64 character string
Please convert the value of the email address to lowercase prior to hashing
metadata
Optional
Additional order details such as items purchased or New Buyer tags
currency_code
Optional
Three character ISO country-code - if not provided will default to USD
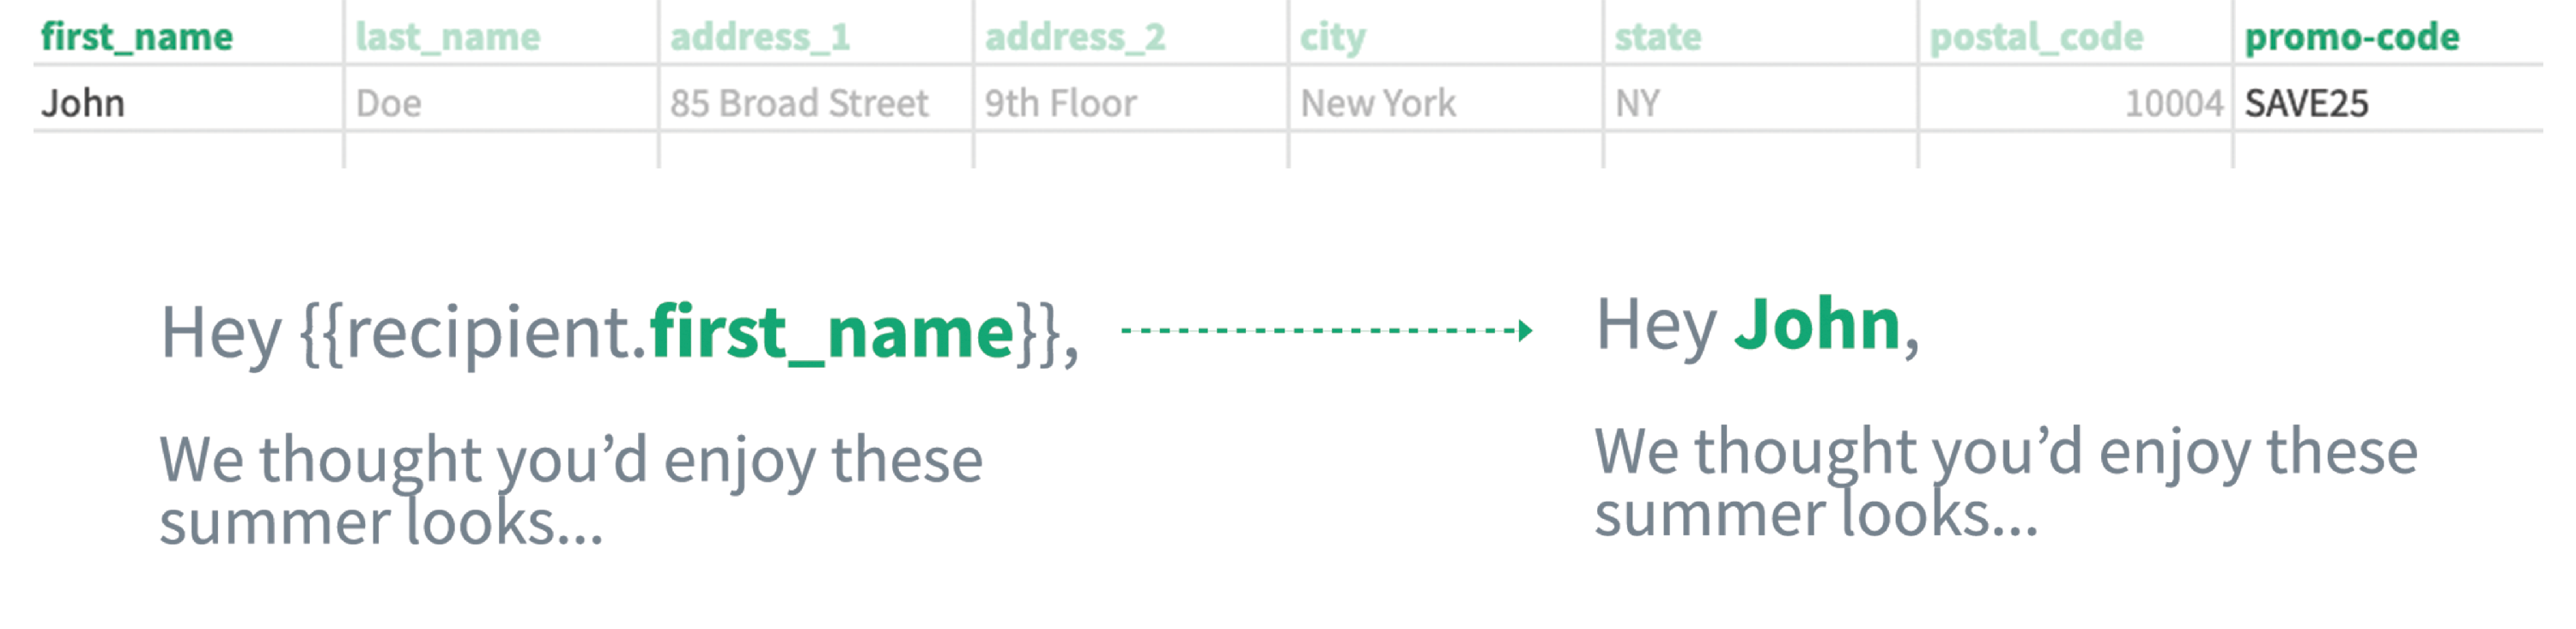
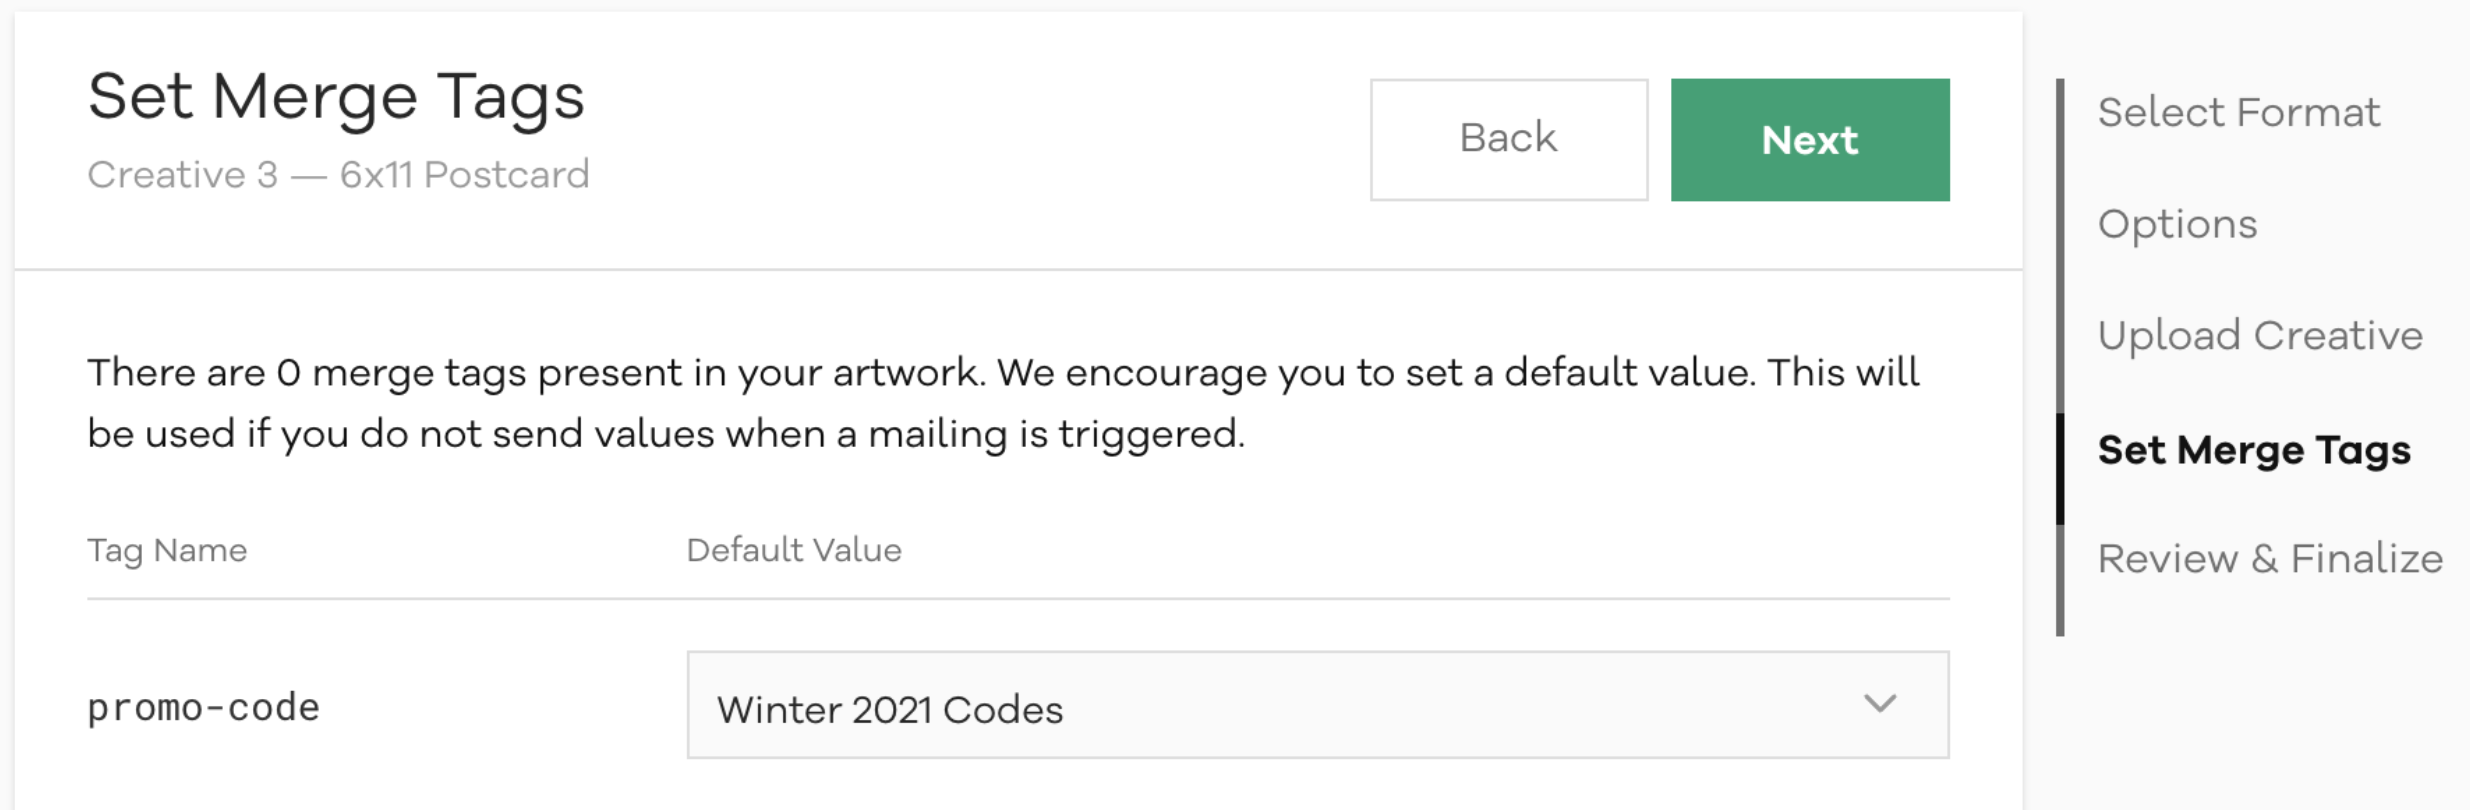


The average order value of all orders attributed to the campaign or mailing.
The total number of conversions or orders that were attributed to the campaign or mailing.
Total spend divided by number of conversions.
The number of mailings sent. This excludes suppressions, exceptions, and holdouts.
The number of orders attributed to these mailings that came from new buyers. In order to report New Buyers, you must specify whether each order is associated with a New Buyer or not, through the Metadata Object when using the Orders API.
Revenue from the attributed conversions divided by spend.
The percentage of mailings (in the selected reporting window) that converted within the attribution window. Please keep in mind that you might have set different attribution windows across various campaigns.
The total revenue from conversions (orders) attributed to the campaign or mailing.
The total billable for the mailings sent. This includes the costs for the postcards and any additional data. All spend is reported as part of the mailed group.
The number of unique customers (mailing recipients) with 1 or more orders.
The metrics below are only available if you enabled holdouts for the campaign.
The incremental cost per acquisition for the mailed group vs. the holdout group. It indicates the costs of the entire campaign spread over solely incremental orders (Orders Lift), or conversions beyond what was generated in absence of the campaign (holdout).
The incremental ROAS for the mailed group vs. the holdout group. It indicates the return that was generated from this campaign beyond what was generated in absence of the campaign (holdout).
The incremental lift (difference) in the number of conversions in the mailed group vs. holdout group.
The incremental lift (difference) in Response Rate in the mailed group vs. holdout group.
The difference in Revenue between the mailed vs. holdout group.
The Orders API endpoint may be used to report customer transactions as they happen. These are used within Poplar for attribution reporting and to enable existing customers to be easily suppressed within your campaigns.
You can monitor this integration from the Transactions page in your account. We provide basic diagnostic information and the ability to purge any transactional data stored within your account.
Two fields in the payload: order_date and order_id. This allows you flexibility and control over the amount and specificity of the data you choose to share with Poplar. Be sure to use your Production Access Token in the Authorization header.
To assure a high level of accuracy, we recommend including additional data beyond the required fields. Adding customer_email, shipping_address, or billing_address will help solidify the match quality of orders to mailings. customer_email is typically the most unique identifier whereas shipping_address or billing_address can map to multiple customers, unless you're assuming 1 Household = 1 Customer.
If none of these data points are passed to Poplar, your attribution reports will be incomplete.
order_id
String
A unique identifier for each order
order_date
String
YYYY-MM-DD
Must be an ISO8601 formatted date representing the date and/or time of purchase
total
Number
Required to calculate Revenue and related metrics (CPO, ROAS, etc.), must represent the total order value in decimal form
Optional for use cases that don't require revenue tracking (site sign-ups, app downloads, etc.)
customer_id
String
A unique identifier for the transacting customer in your e-commerce system
billing_name billing_addresss_1 billing_address_2 billing_city billing_state billing_postal_code
String
Required if Shipping Address data is not provided
Optional to include with Shipping Address data
shipping_name shipping_address_1 shipping_address_2 shipping_city shipping_state shipping_postal_code
String
Required if Billing Address data is not provided
Optional to include with Billing Address data
String
Can be used to match against campaigns that mailed using emails for Address Enrichment
This data is not stored by Poplar, it is used to compute a hash and then discarded
hashed_email
String
The SHA256 has of the customer's email address as a 64 character string
Please convert the value of the email address to lowercase prior to hashing
metadata
Object
Additional order details such as items purchased or New Buyer tags
currency_code
String
Three character ISO country-code - if not provided will default to USD
You're not required to define your campaign success in terms of orders or conversions. For example, if you are sending mailings to generate leads, rather than purchases, you could still pass successful leads through the Orders API and receive attribution reports.
This list is useful when you are mailing prospecting campaigns and want to suppress existing customers that have been submitted to the Orders API.
You're not required to define your campaign success in terms of orders or conversions. For example, if you are sending mailings to generate leads, rather than purchases, you could still pass successful leads through the Orders API and receive attribution reports.


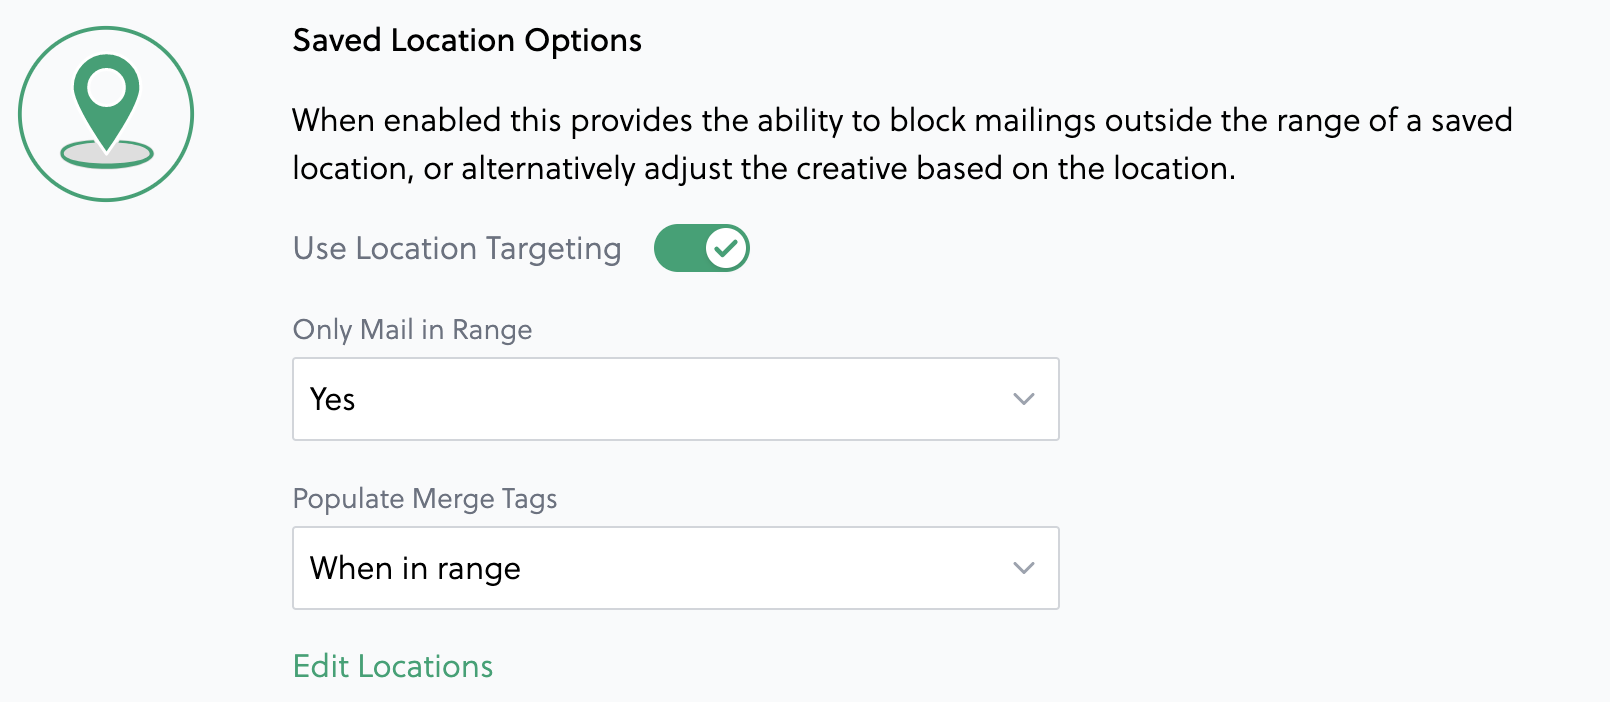
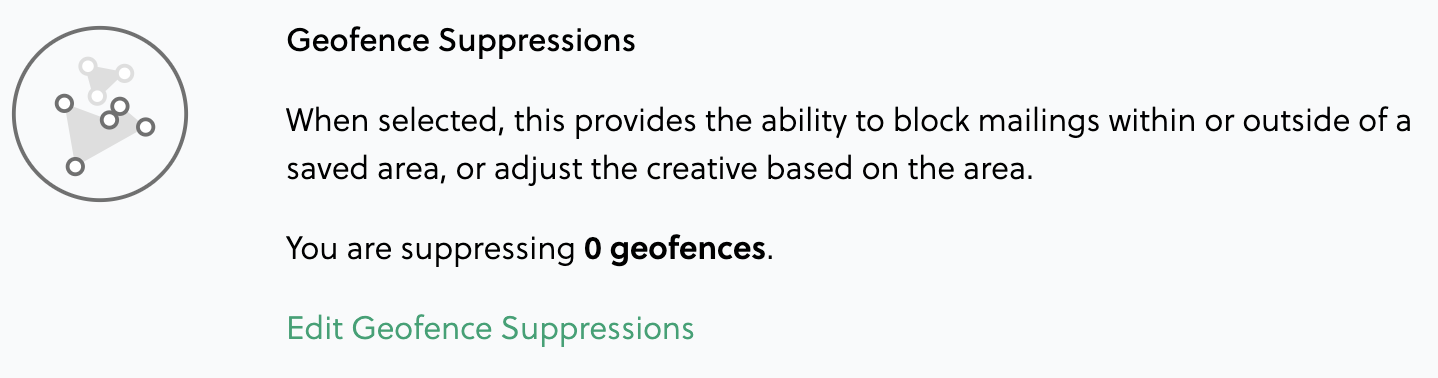
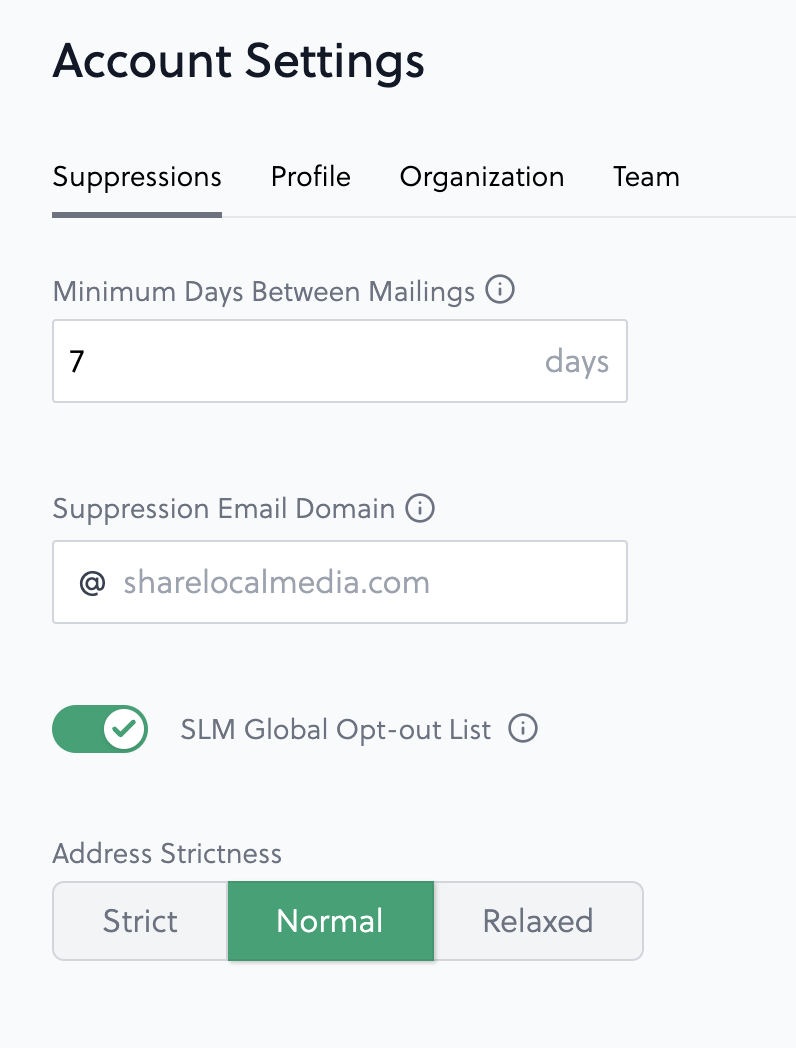
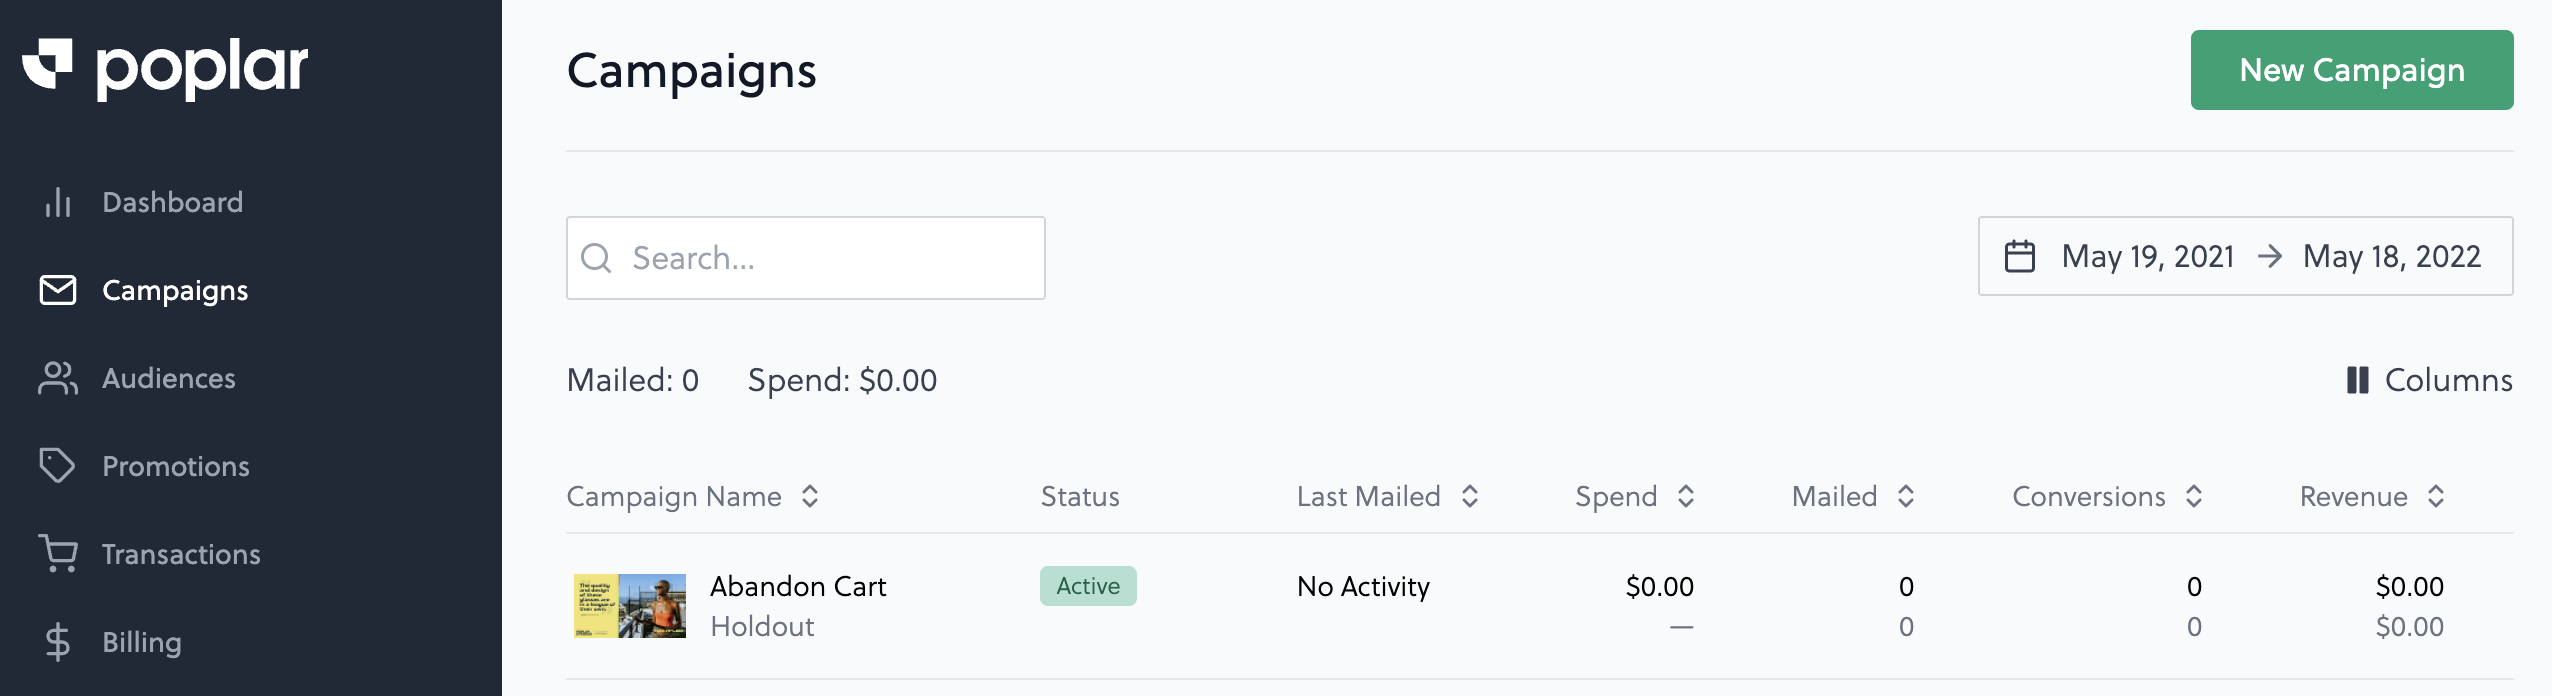

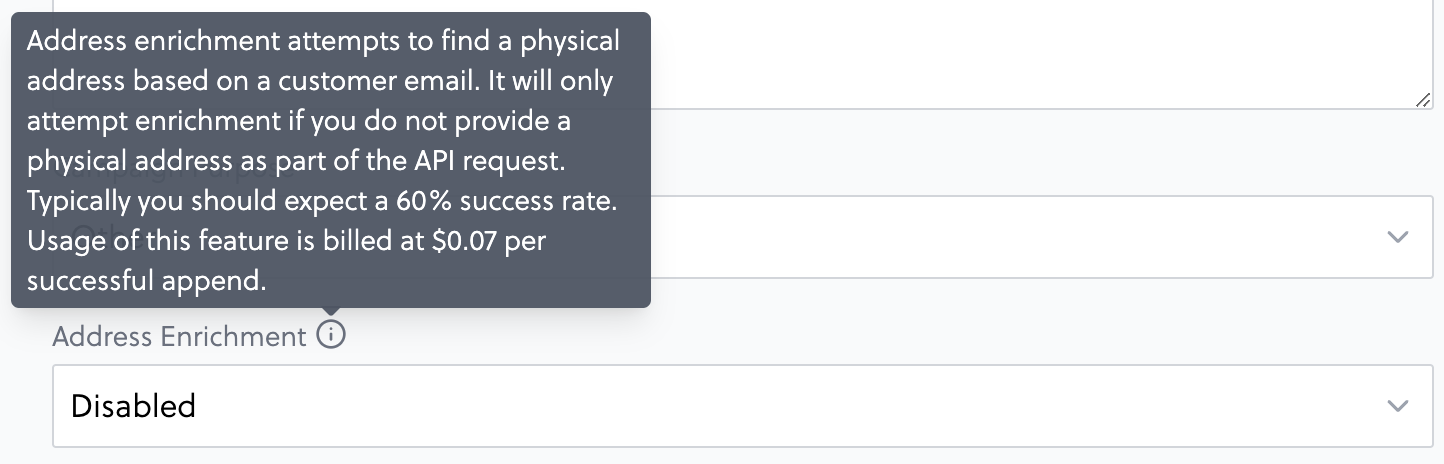
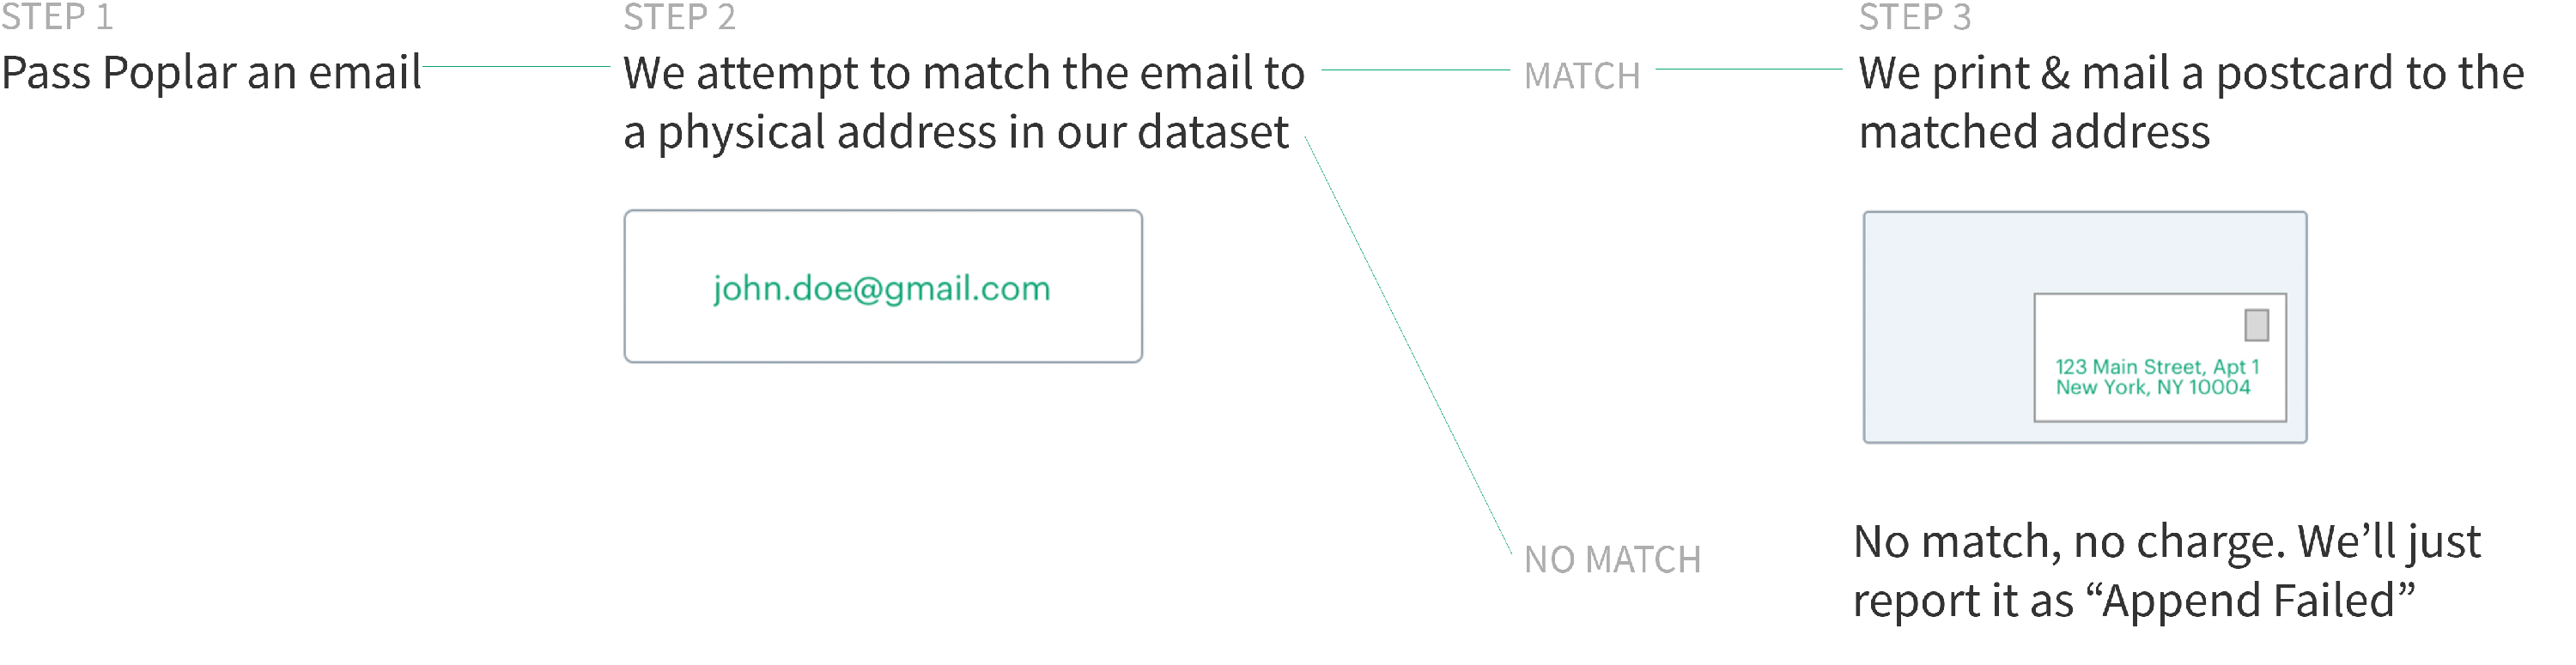
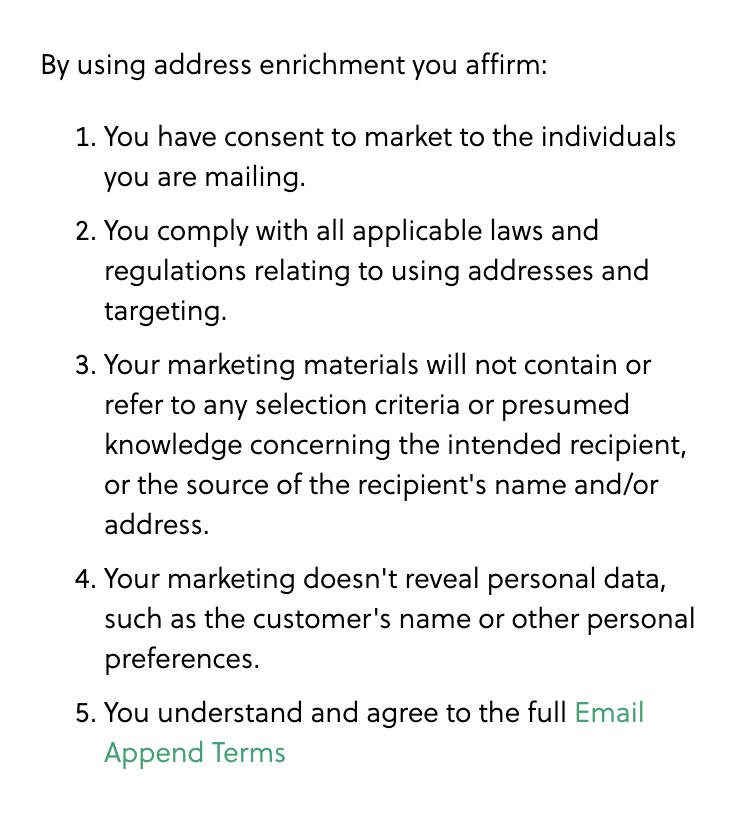
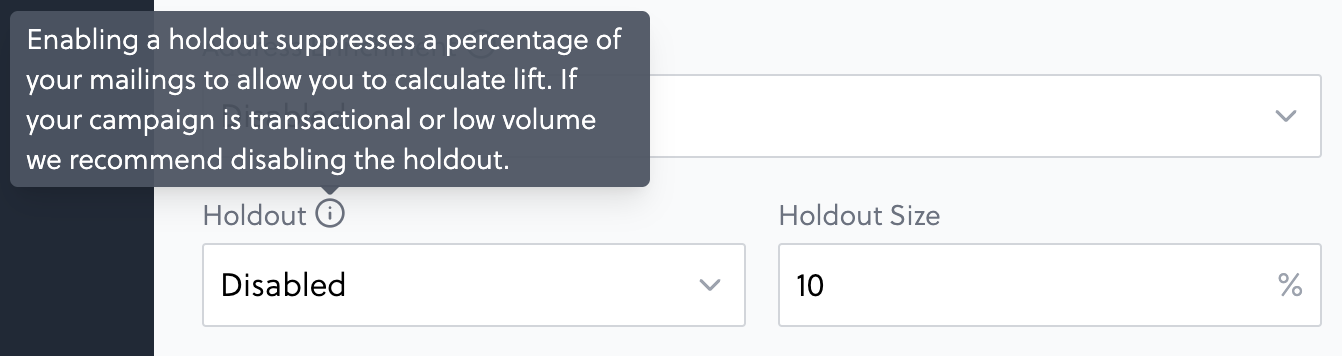
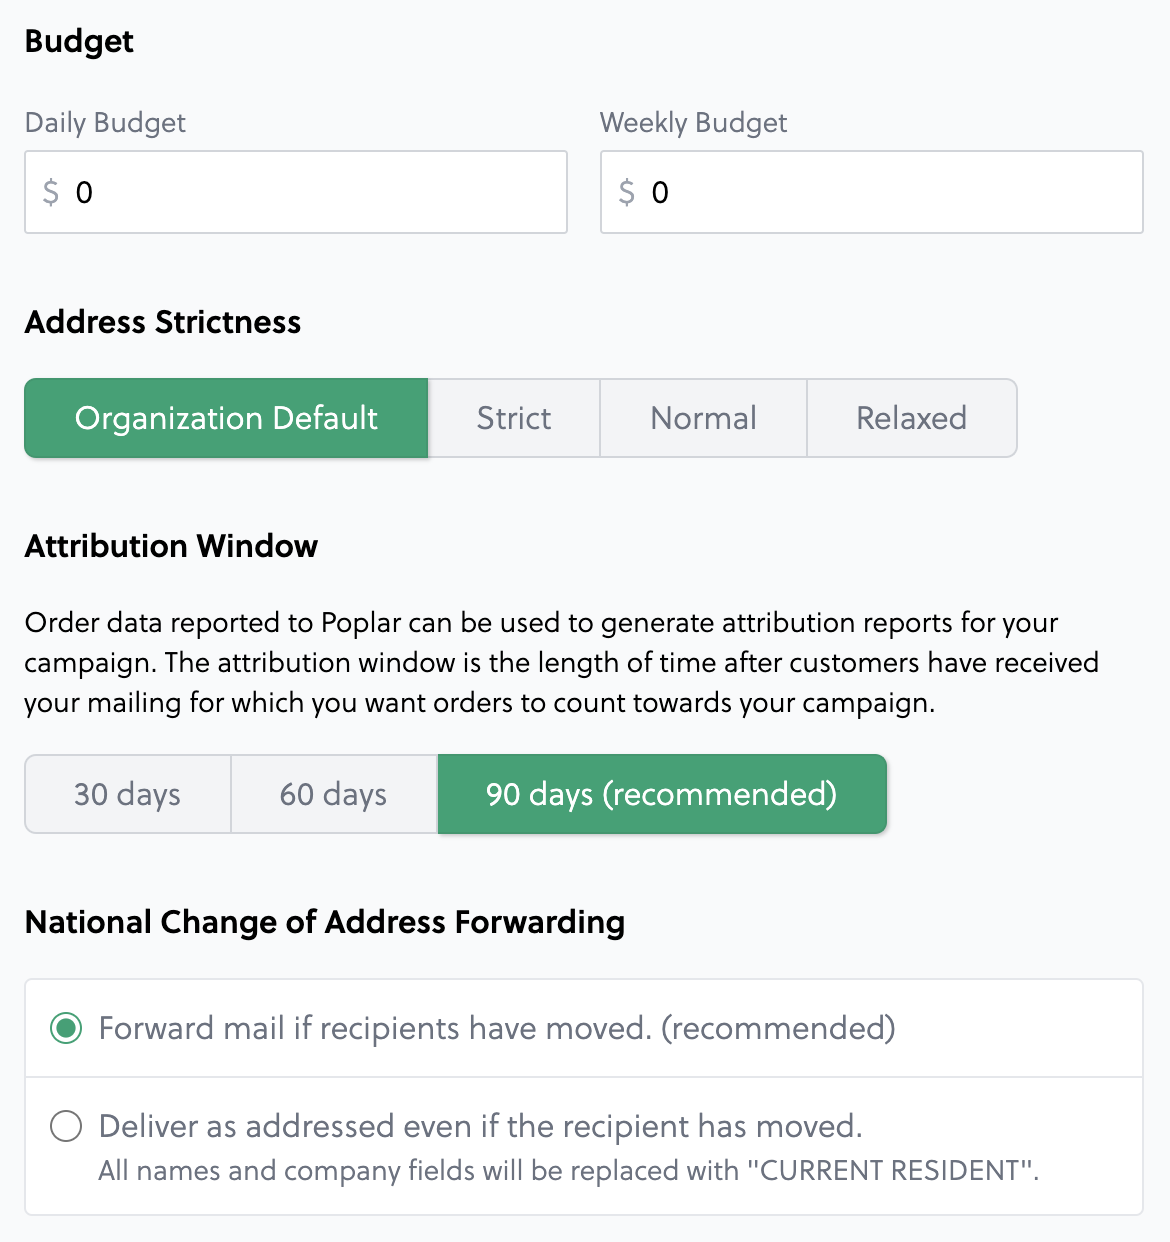
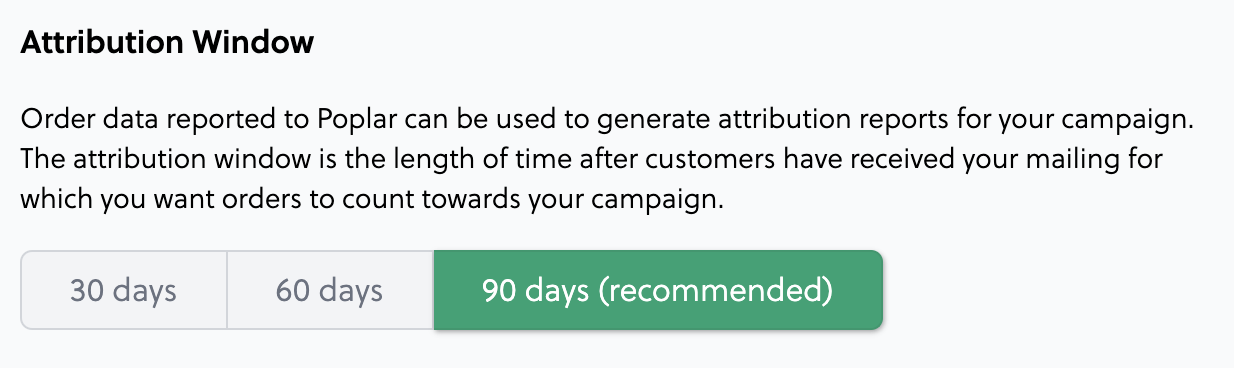
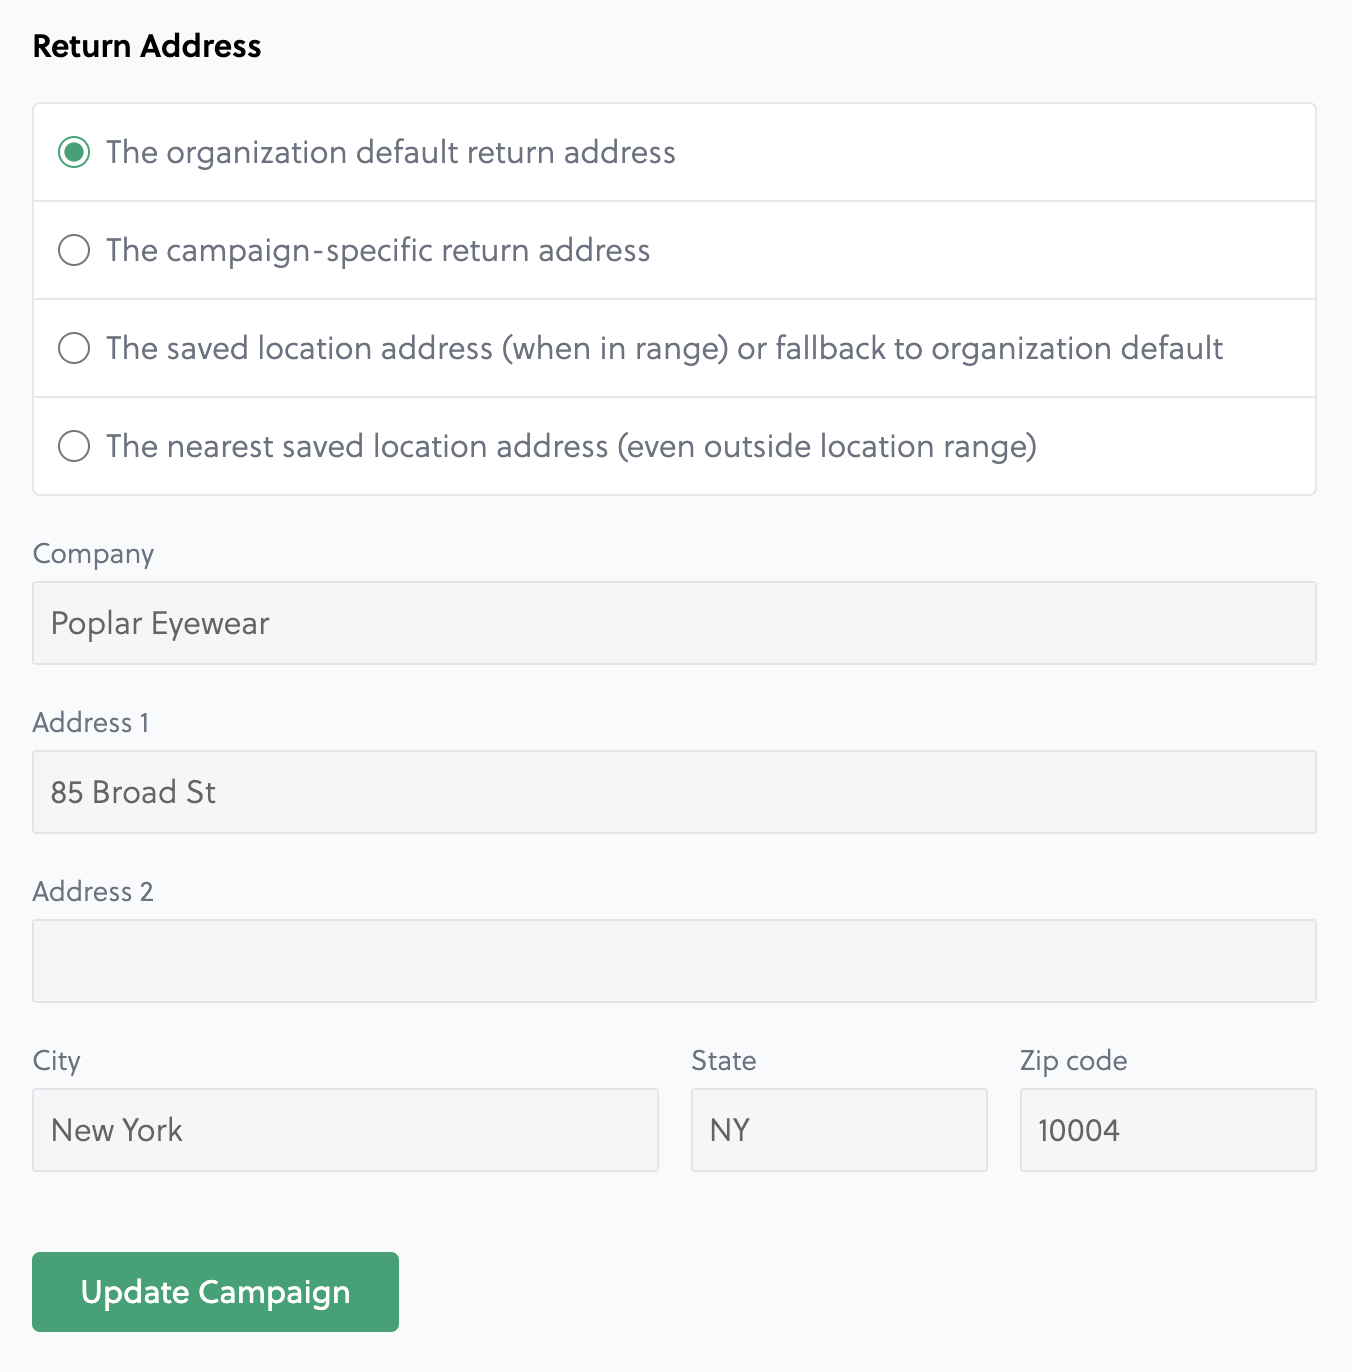
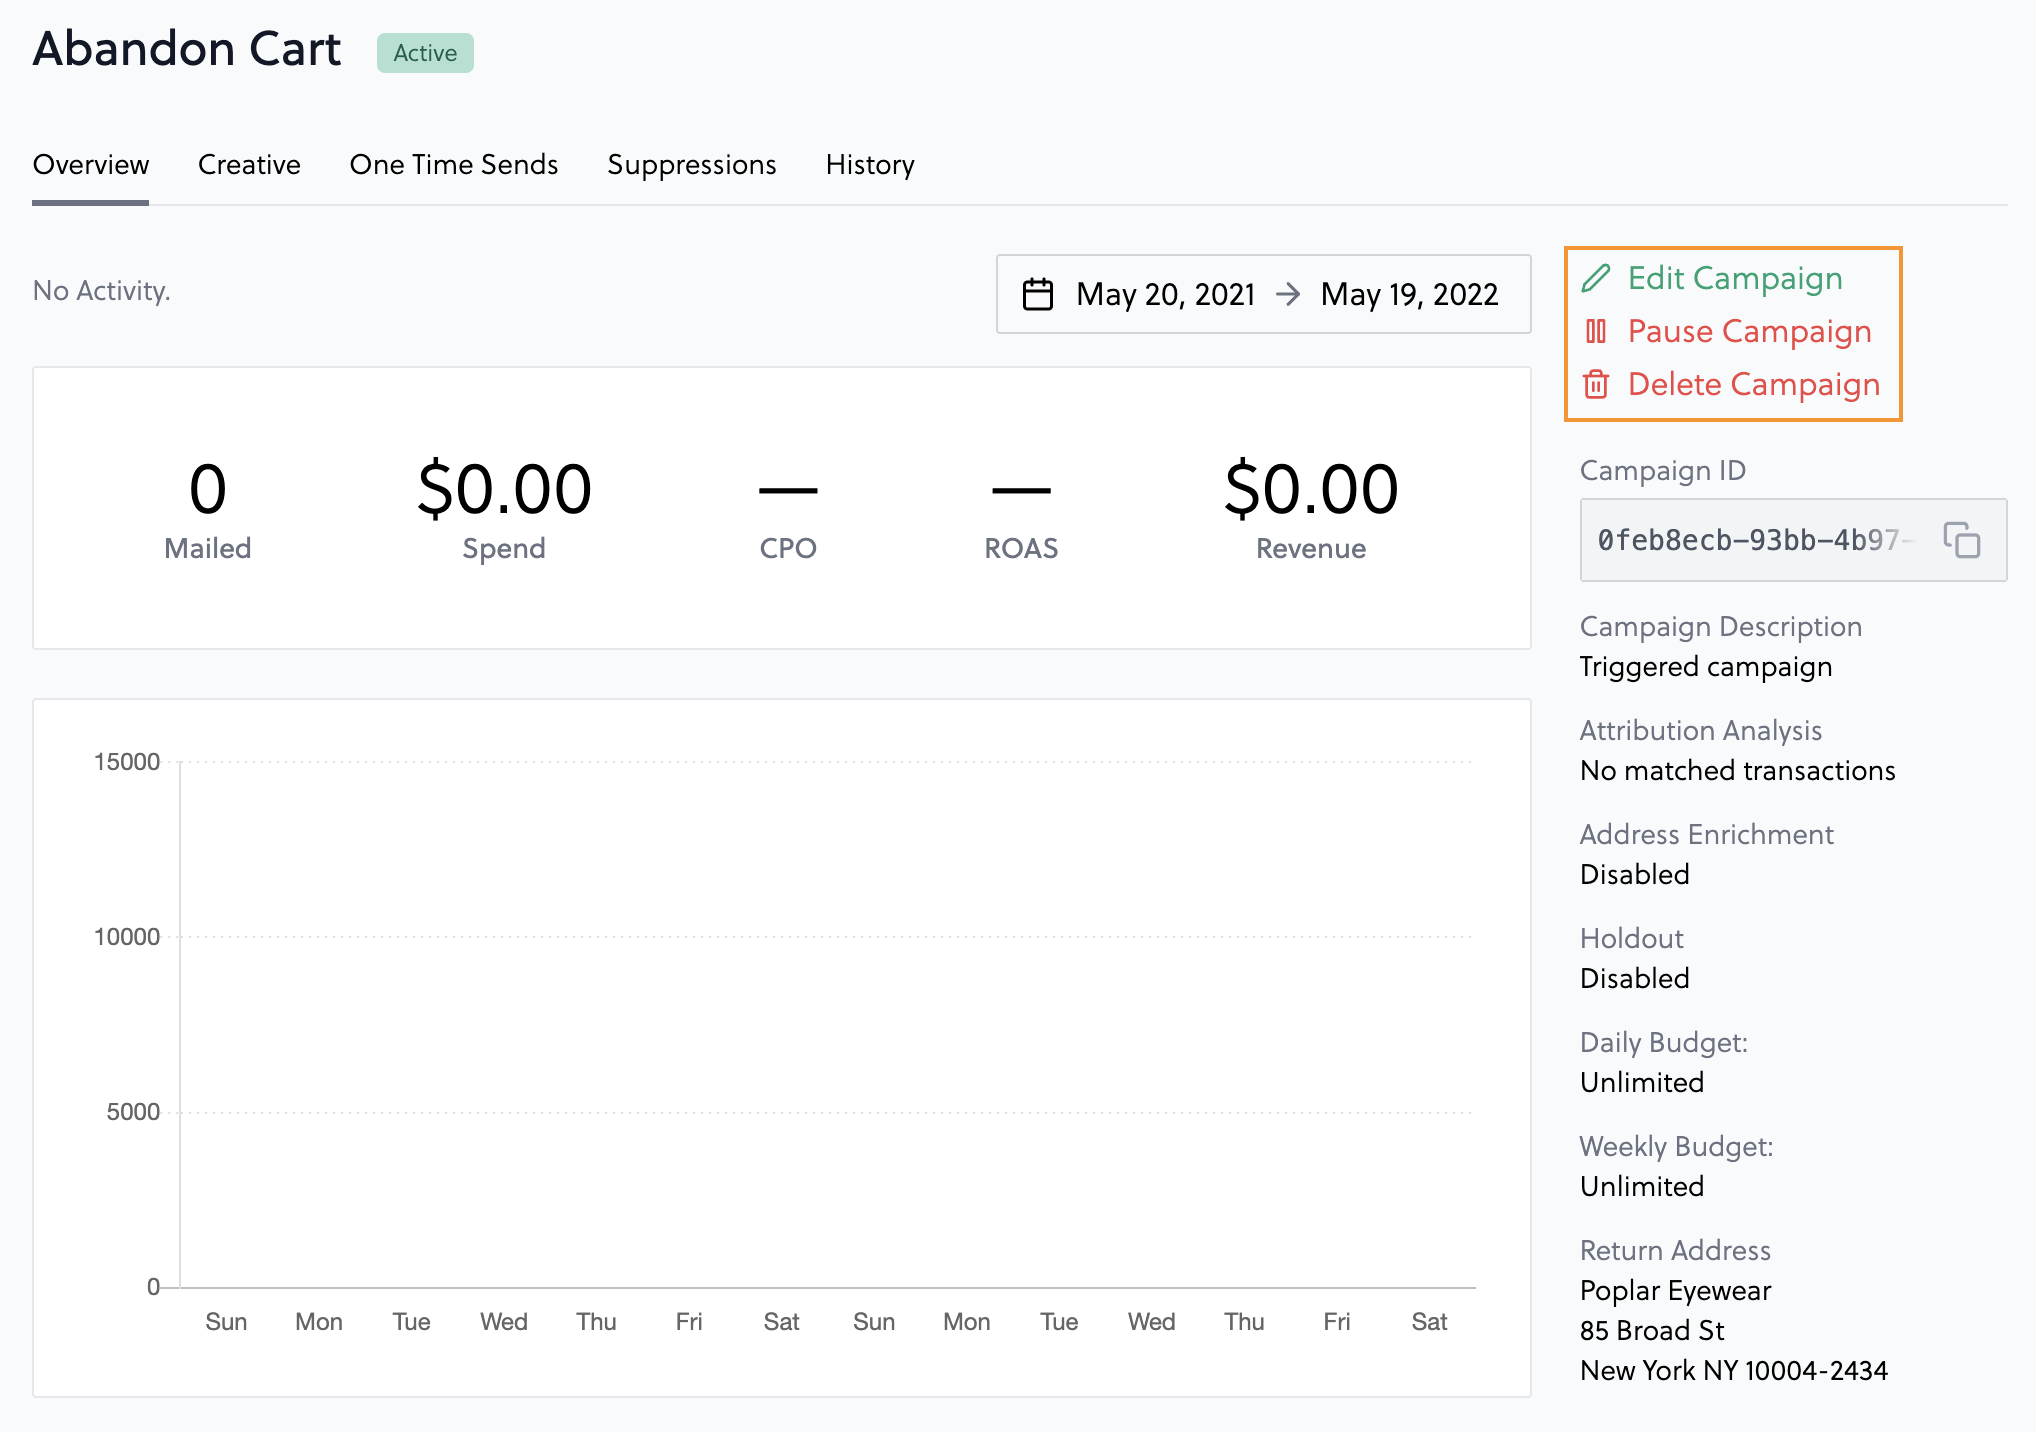

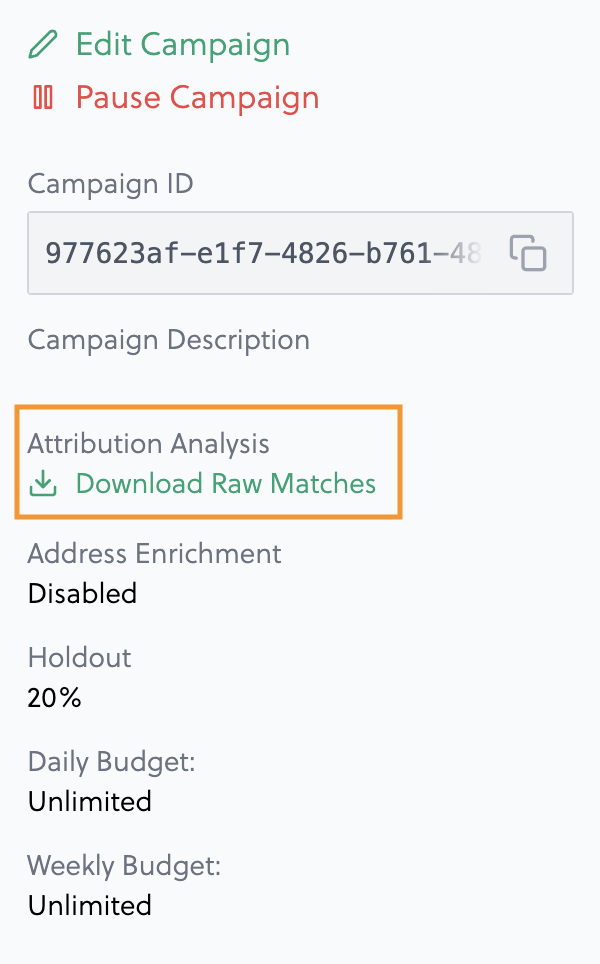


Direct Mail Abandon Cart retargeting campaigns are one of the highest ROI use-cases for DM. Cart abandoners have shown significant intent by going that deep into the funnel, and they may just need the push or reminder from a well-timed marketing message to get them over the line.
In a marketing environment that’s over-saturated with email, SMS, and push notifications, programmatic Direct Mail retargeting offers a unique and tangible edge in the arena. With Poplar, an abandon cart mail piece can reach homes in as little as 5-7 business days.
There are a number of different considerations that go into planning your abandon cart campaign. Depending on whether or not you’re already running an abandon cart flow, you’ll also want to consider at which point you’re collecting email or address data, when to trigger a mailer, and how to track their success:
Poplar’s 4 x 6 or 6 x 9 postcard sizes are most popular for this use case, as first-class shipping is included in the base price per piece, allowing you to get your mailer in-home as quickly as possible while still maintaining a low cost-per-piece.
Depending on the flow of your checkout system, abandonment may be triggered once email address is captured OR when full address details are captured.
We recommend delays of at least 12-24 hours post cart abandonment in order to give time for natural conversion to occur first.. With this delay, customers will still have a chance to convert via email first, and if they do, they’ll be removed from the direct mail campaign. Even though your email series may continue for longer, the incremental lift Direct Mail provides at this point is tangible.
Taking a holdout group allows for the platform to calculate lift metrics when sharing transactional data for in-platform reporting. Depending on the volume of abandon carts, we recommend taking at least a 10% holdout to measure the true success of the campaign against a control group. Holdouts can be set during campaign setup and adjusted in your campaign’s settings by clicking Edit Campaign.
Before setting up your Abandoned Cart Playbook, make sure your campaign has been created in Poplar and creative files have been uploaded. Do not pause your campaign after creating it, it needs to be Active for trigger selection. Your campaign will not start mailing until you've connected it to you playbook and turned it ON under the production environment.
When downloading the Poplar for Shopify App, you'll notice it comes with a template Abandoned Cart playbook:
To connect the playbook to your Poplar campaign, click Edit and select Advanced Settings. Here you will see the option to name your playbook, select the event trigger, campaign, desired filters, mailing delay, and whether you want to go live in a Test or Production environment. Only customer mailing address is captured, once it is entered and the checkout process is abandoned. Because of this, Address Enrichment does not need to be enabled for Shopify abandoned cart triggers, as no email data will come through the platform.
Select your Poplar campaign from the dropdown, and a preview of your creative will appear underneath. Under Final Touches, we recommend selecting the Test environment first so you can confirm the setup is successful without actually mailing or being charged.
The Abandoned Cart event trigger has an automatic 24hr delay that cannot be adjusted. This means if a customer converts within 24hrs of abandoning their cart, they will not receive a mailer. The Mailing Delay simply controls when the mailer will send. If your Mailing Delay is set to 3, and a customer abandons cart on Monday but converts on Wednesday, they will still receive a mailer which will move to production on Friday. Save your playbook and turn it on to let the test triggers roll in. Head to the History tab of your Poplar campaign to see each individual mailer and confirm the data is coming in successfully. Once confirmed, head back to Shopify and Edit your playbook to use the Production Environment, then turn the playbook ON to go live!
Before testing your Klaviyo webhook integration, make sure your campaign has been created in Poplar and creative files have been uploaded. Do not pause your campaign after creating it, it needs to be Active for trigger selection. Your campaign will not start mailing until you've connected it to you playbook and turned it ON under the production environment. If you're sending email data to the platform for address matching, make sure Address Enrichment is Enabled under your campaign settings - if it is not enabled, you will see a failed mailing status under your campaign History. Whether you have an existing abandoned cart flow or are creating one from scratch, you'll want to select the Webhook action and drag it into your flow when you want to trigger a mailer:
Follow the steps to set up the Klaviyo // Poplar mail trigger, first using your Test access token to confirm the connection is successful. When timing the trigger, it's important to consider time in transit, when a customer could potentially end up converting shortly before receiving the mailer.
Save your webhook configuration and turn it on to let the test triggers roll in. Head to the History tab of your Poplar campaign to see each individual mailer and confirm the data is coming in successfully. Once confirmed, head back to Klaviyo and Edit your Webhook to swap in your Production token where your Test one was, then switch your Webhook to Live!
You can restrict mailings to specific states or zip codes. For any lists that are submitted, the state and zip code whitelists will suppress any addresses that fall outside the set parameters.
Geolocation targeting or suppression are created on an account wide level. You can toggle suppressions on/off under the "Suppressions" tab in your campaign overview menu.
From the Geolocation page, navigate to the Zip Codes tab. Click "Add", then, type or paste zip codes in the space provided below. One per line, or separated using commas.
From the Geolocation page, navigate to the States tab. Select only the states you wish to mail.
Turn on your state/zip code whitelists for each campaign where they are applicable.
If you are using both state & zip whitelists at the same time, only the overlapping area will be mailed.
The same settings apply for all campaigns where you have turned the states/zips on.
Measuring the impact of your direct mail campaigns can easily be done from inside the platform. We recommend waiting 30-90 days after your campaign's in-home date to see the full scope of success accurately reflected in the numbers.
If you enable Transactional Reporting after your initial in-home date, you'll have to backfill the order data by exporting from Shopify and manually uploading a CSV to the Transactional Data tab in your Poplar account.
If you enable data sharing via Shopify after a campaign has reached homes, you'll need to back-fill the order data manually by exporting a CSV from Shopify and uploading it to Poplar to generate the correct metrics.
How to Export
When exporting order data, you'll want to follow the steps detailed in Shopify's documentation linked below:
It is important to filter your orders to include only the relevant data, otherwise you will likely run into issues when uploading your CSV to Poplar, or end up with incorrect metrics.
Delivery Method: ship to customer
Payment status: authorized, paid, partially paid
Date: first campaign launch - present/date when transactional data sharing was turned on
Next you'll want to click Export in the top right, specify the date range if necessary, select Plain CSV file then Export orders:
How to Upload
Minor formatting adjustments will need to be made to your CSV before it can be successfully uploaded to Poplar. We recommend making these updates in Excel (if you're proficient), or copy and pasting the required columns into Google Sheets to make adjustments.
Shopify Column
Poplar Required Field
Format
Name
order_id
Integer (Not scientific notation) 10004
Created at
order_date
ISO8601 Date YYYY-MM-DD
Total
total
Number 0.00
Billing Name Billing Address1 Billing Address2 Billing City Billing Province Billing Zip
billing_name billing_address_1 billing_address_2 billing_city billing_state billing_postal_code
Optional to include with Shipping Address data
Shipping Name Shipping Address1 Shipping Address2 Shipping City Shipping Province Shipping Zip
shipping_name shipping_address_1 shipping_address_2 shipping_city shipping_state shipping_postal_code
Optional to include with Billing Address data
Can be used to match against campaigns that mailed using emails for Address Enrichment This data is not stored by Poplar, it is used to compute a hash and then discarded
The platform will automatically dedupe records by Order ID. Shopify will export individual items in an order under the same Order ID, but the total for the order will only be present on one record, which is why you'll see a number of blank rows in the total column - this is expected and will not skew attribution results.
Invalid Records
If you experience a high number of invalid records after authorization, click Download File with Error Report for a CSV record of each row with an added column explaining why it was marked invalid. From there, you can make the necessary adjustments or reach out to support@heypoplar.com via our chat beacon for assistance.
A high-level preview of what you'll need to get started:
Export: Generate a list of single-use codes in your CMS and export to a CSV file.
Upload: Add the list of promotion codes to a Promotion you create into Poplar.
Send: Associate a promotion with an HTML creative you're using for your one-time send or triggered mailing. Poplar will dynamically insert one code per message wherever you insert the promotion tag.
When sending a single, shared code to many customers, you can:
display the code as part of your image
use a variable to show the same code to all recipients of a given campaign using merge tags
If the creative includes multiple promotions the generated codes must be uploaded to separate promotion lists with unique names.
In your commerce platform, create a set of unique, single-use discount codes for your promotion. You will need to export those codes to a file and then import them into Poplar. The import file must be a CSV with your codes under a header. We recommend "code".
To use promotion codes, you will need to create a promotion to hold codes that you create in your external commerce system. You'll then specify the promotion in your template for triggered sends or one-time send.
In the left-hand navigation, select Promotions.
Add a Promotion Name. You will use this name to reference the promotion in your templates.
Click Upload File and select your CSV file.
Map the column you wish to import. Click Continue.
Once the codes have been imported, Review & Confirm and click Finish Import.
When uploading an HTML creative, insert a merge tag. We recommend adding {{promotion.promo_code}} to your creative, which will populate a promo code.
Import your creative to your campaign as your normally would.
You can choose the promotion (or promotions) you would like to associate with the campaign during import.
If you've shared Transactional Data with Poplar, a record of raw matches will be available for download on both a campaign and an account-wide level. It may take up to 24 hours for order data to be processed into matches.
After clicking the link you'll receive an email with the record for download, depending on the amount of data you have stored the email could take up to 20 minutes to arrive. The CSV file will contain all matches and attributions. If you only need attributions, please ensure you filter out matches. Under the column match_type:
A
Indicates the order was attributed to that particular mailing
M
Indicates the order simply matched to that particular mailing, but was not attributed to that mailing
Poplar reporting follows a last-touch attribution model across campaigns, so it could be that the mail piece was not the last one that the specific customer received. Use the order_id column to trace an attribution back to a specific order.
match_id
ID unique to that match
campaign_id
Poplar campaign ID
campaign_name
name of campaign that matched
creative_id
unique ID for the creative that matched
mailing_id
unique ID for the mailer that matched
order_id
external order ID for the match (can be used to trace specific purchase)
customer_id
external customer ID
order_date
date the order was placed
order_total
total cost of the order (occasionally a 0 can appear, this is likely caused by a return or customer service comp)
order_currency
payment currency
mailing_cost
per piece cost of the single mailer
mailing_state
delivered or holdout
send_date
date the mailer was launched
in_home_date
date the mailer was delivered
match_type
A if the mailer was attributed to a conversion, M if the mailer simply matched an address in the mailed group
unique
True/False a customer (mailing recipient) has placed 1 or more orders
new_buyer
True/False if orders attributed to a mailer came from a new buyers - New Buyer flag is passed to the platform via Shopify App integration or in the metadata when sending to the Orders API
email_match
True/False if customer email matches an email provided with mailing data during launch
billing_address_match
True/False if customer's billing address matched the provided mailing address
shipping_address_match
True/False if customer's shipping address matched the provided mailing address
Select the or you wish to mail. Those left unselected will not be included in the mailing.
In the small number of instances there is a chance that the mail piece will be rerouted outside your regional selections.
Transactional data can be programmatically shared with Poplar via the app, by heading to the Order Data tab and clicking Enable:
This will supply a live feed of order data for in-platform reporting from the moment it is turned on. You can confirm the connection is successful if you head to your Poplar and click into Customers (Orders API), you should see a list of customer shipping and billing addresses start to populate as orders roll in. You can also confirm the connection by heading to the tab on the API page under Settings in your Poplar account.
Once you've double checked your column headers and formatting, head to the page in Poplar and click Upload Transactional Data to upload your CSV. Map the headers accordingly:
If you are using , your exported CSV file will already be in a valid format and can be directly uploaded.
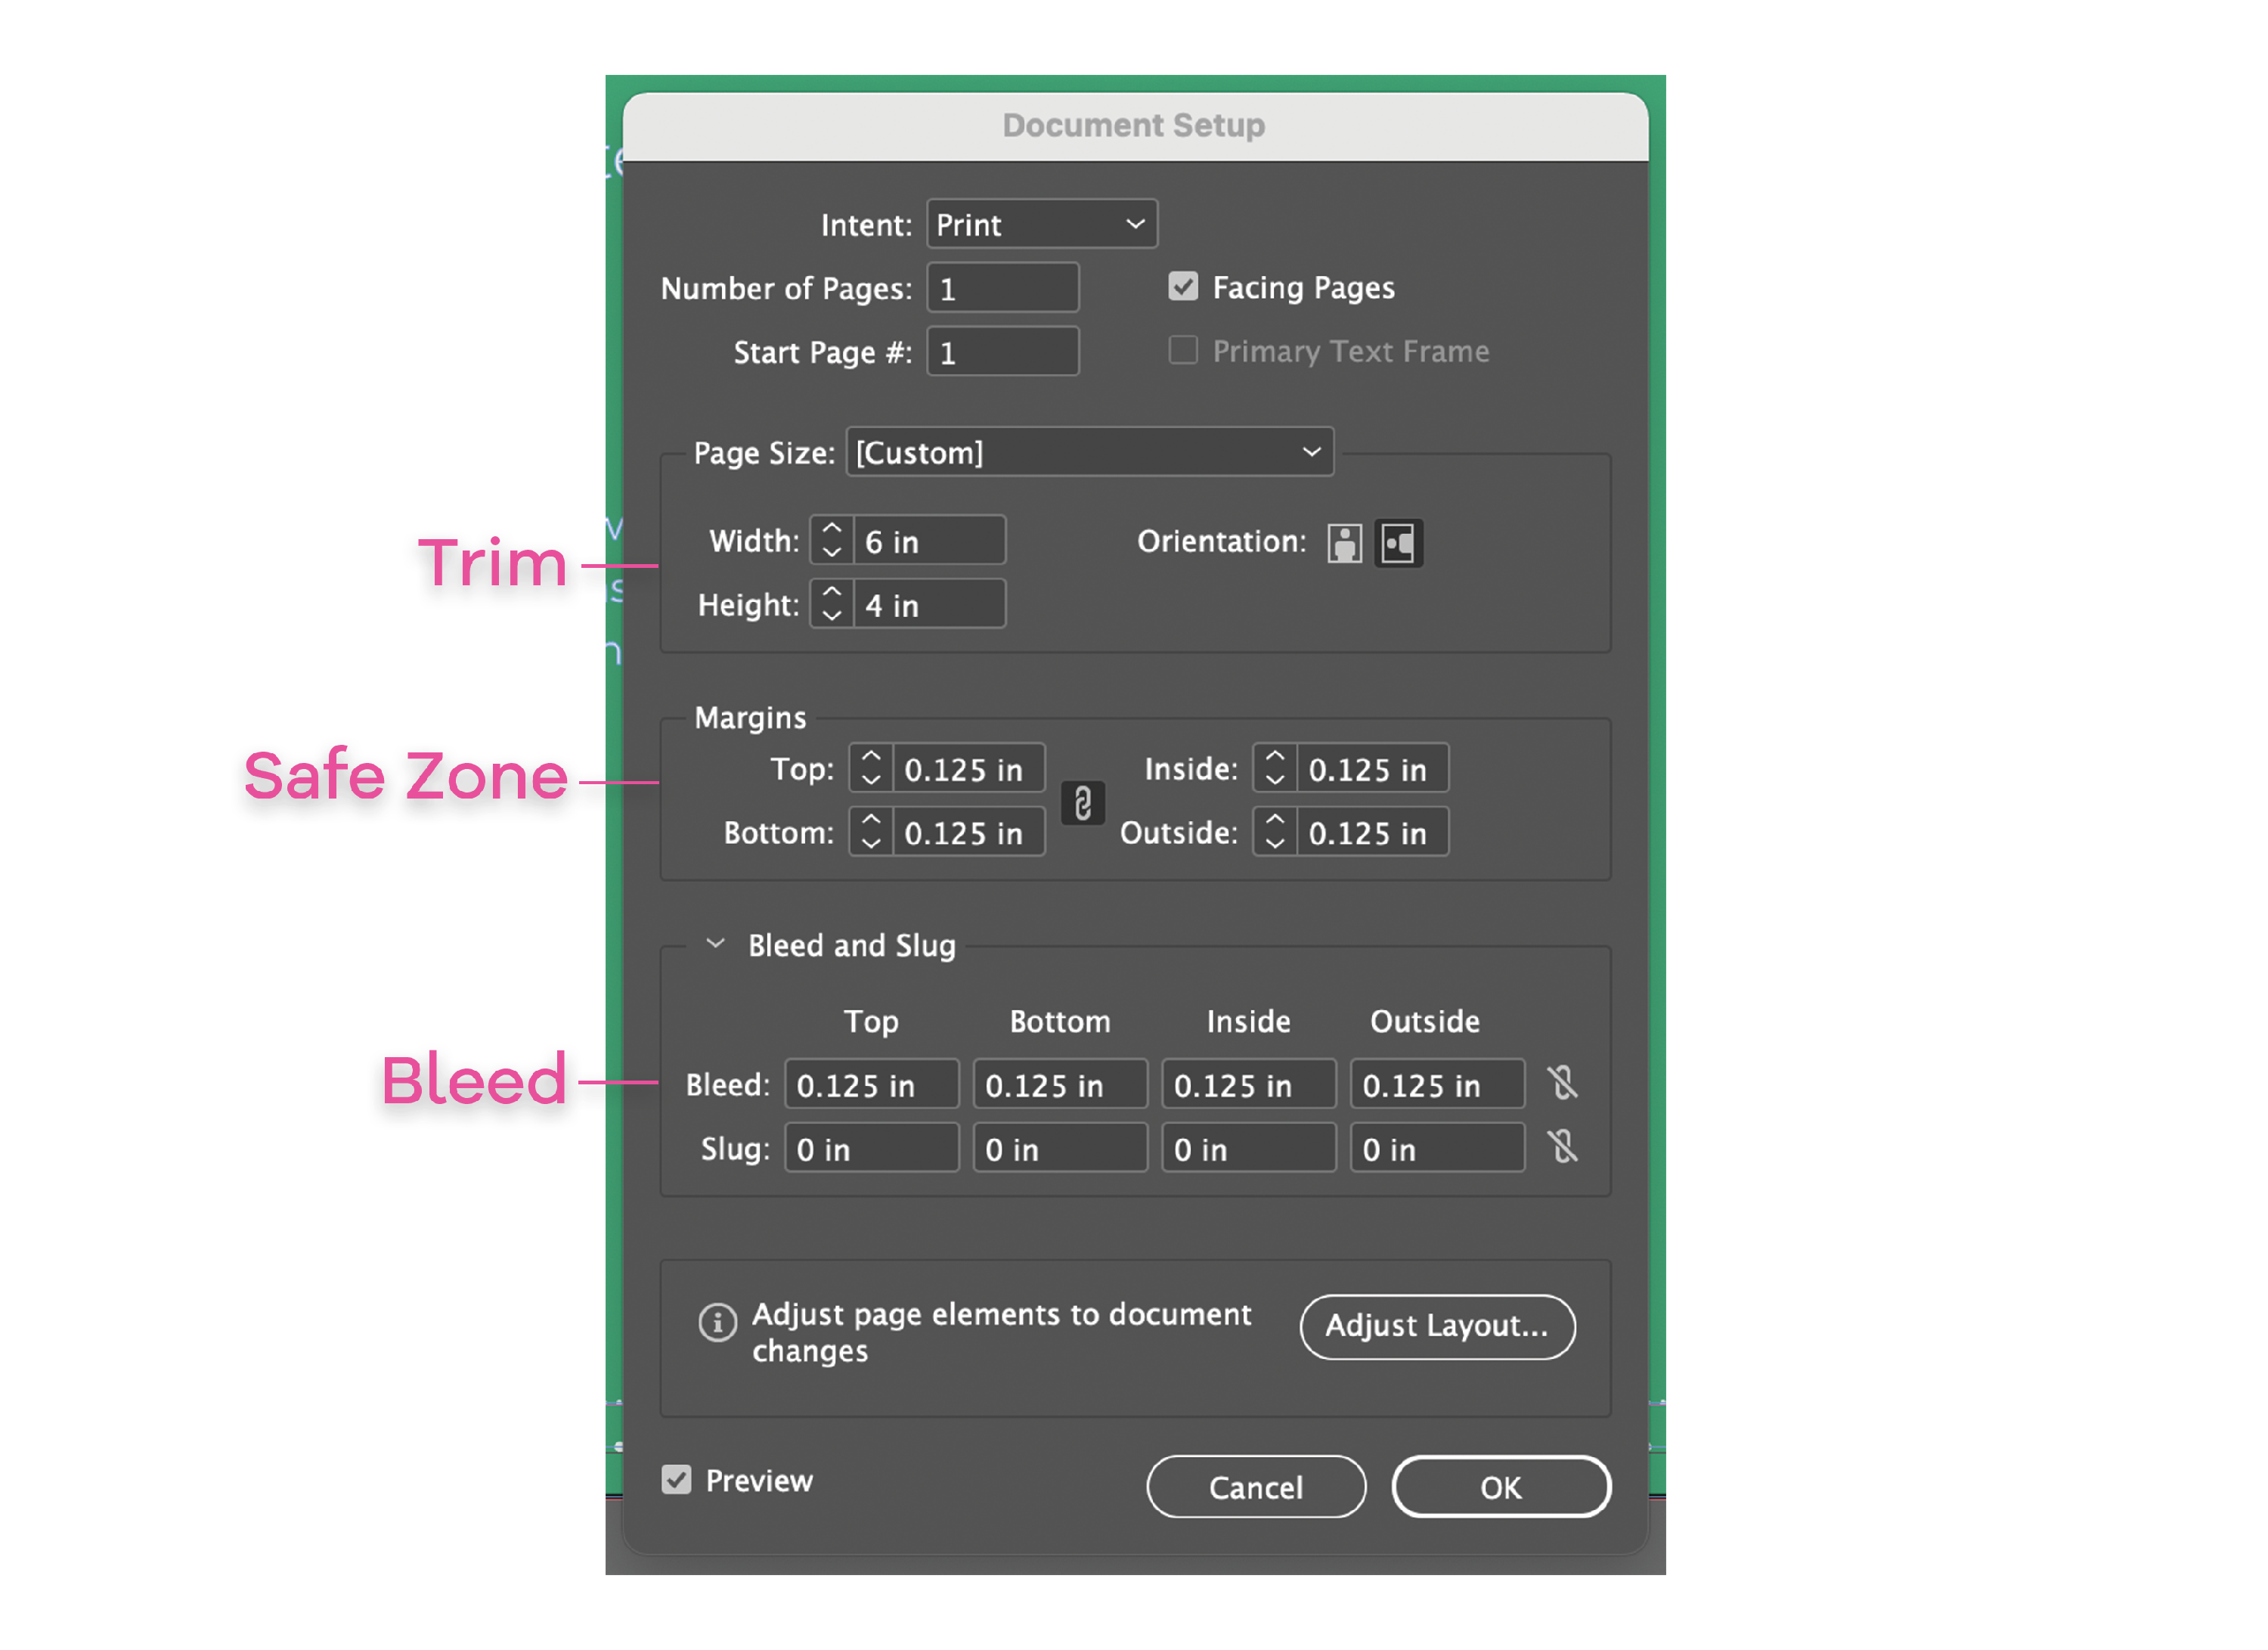
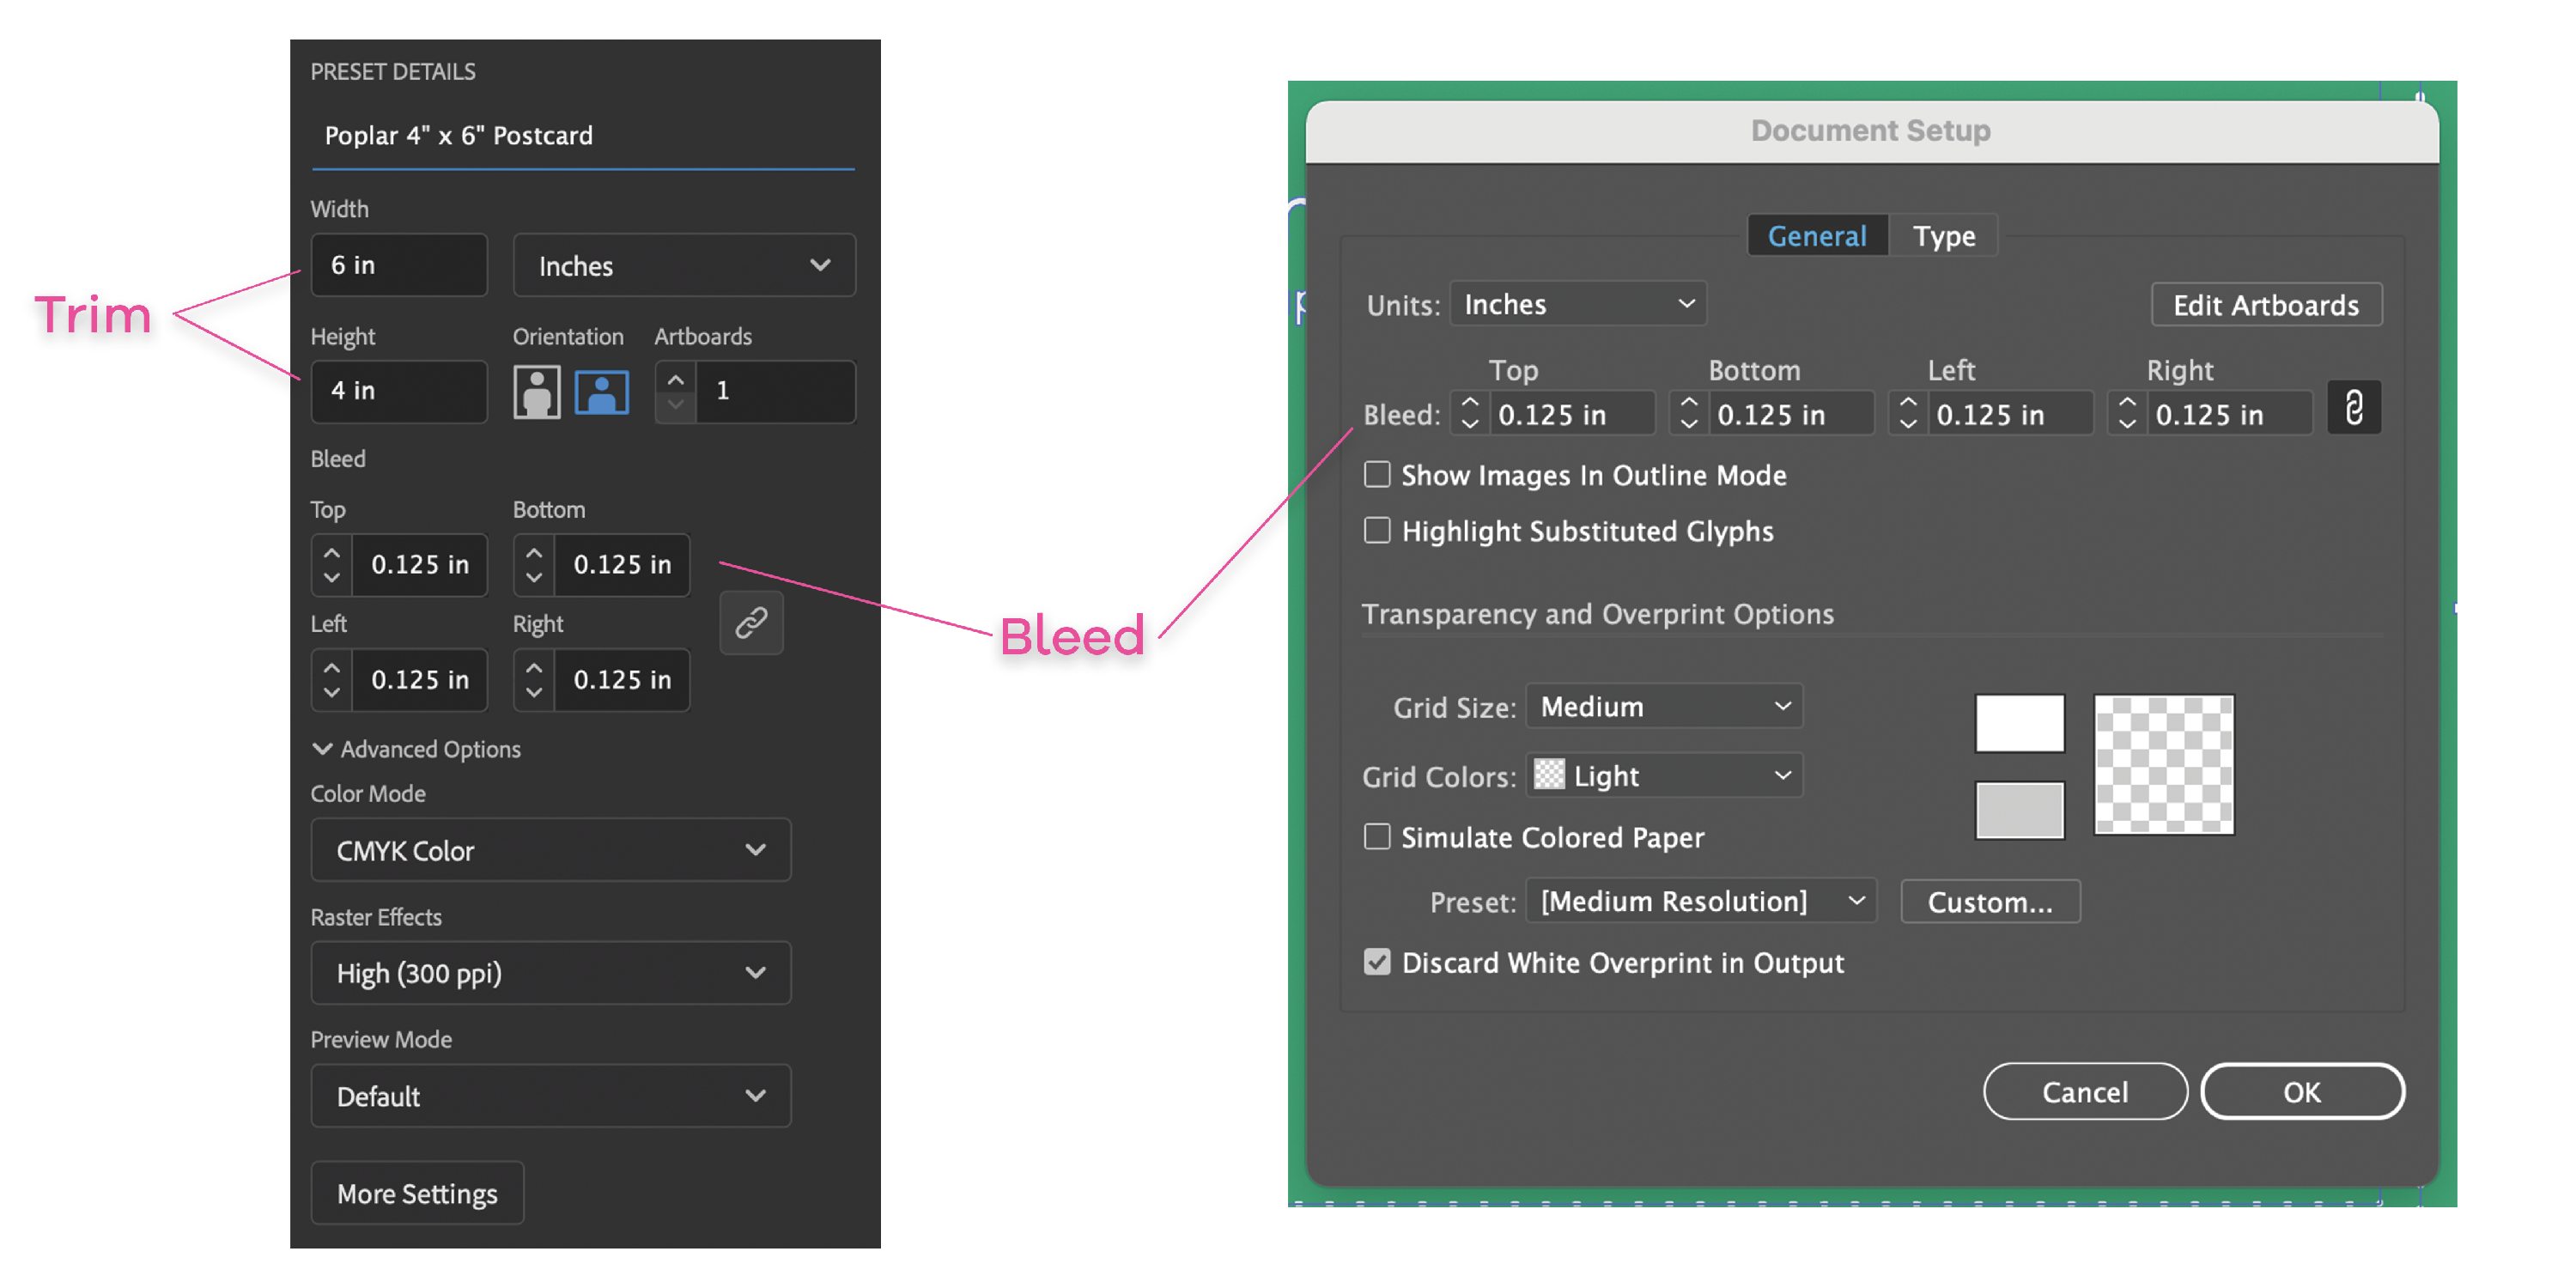
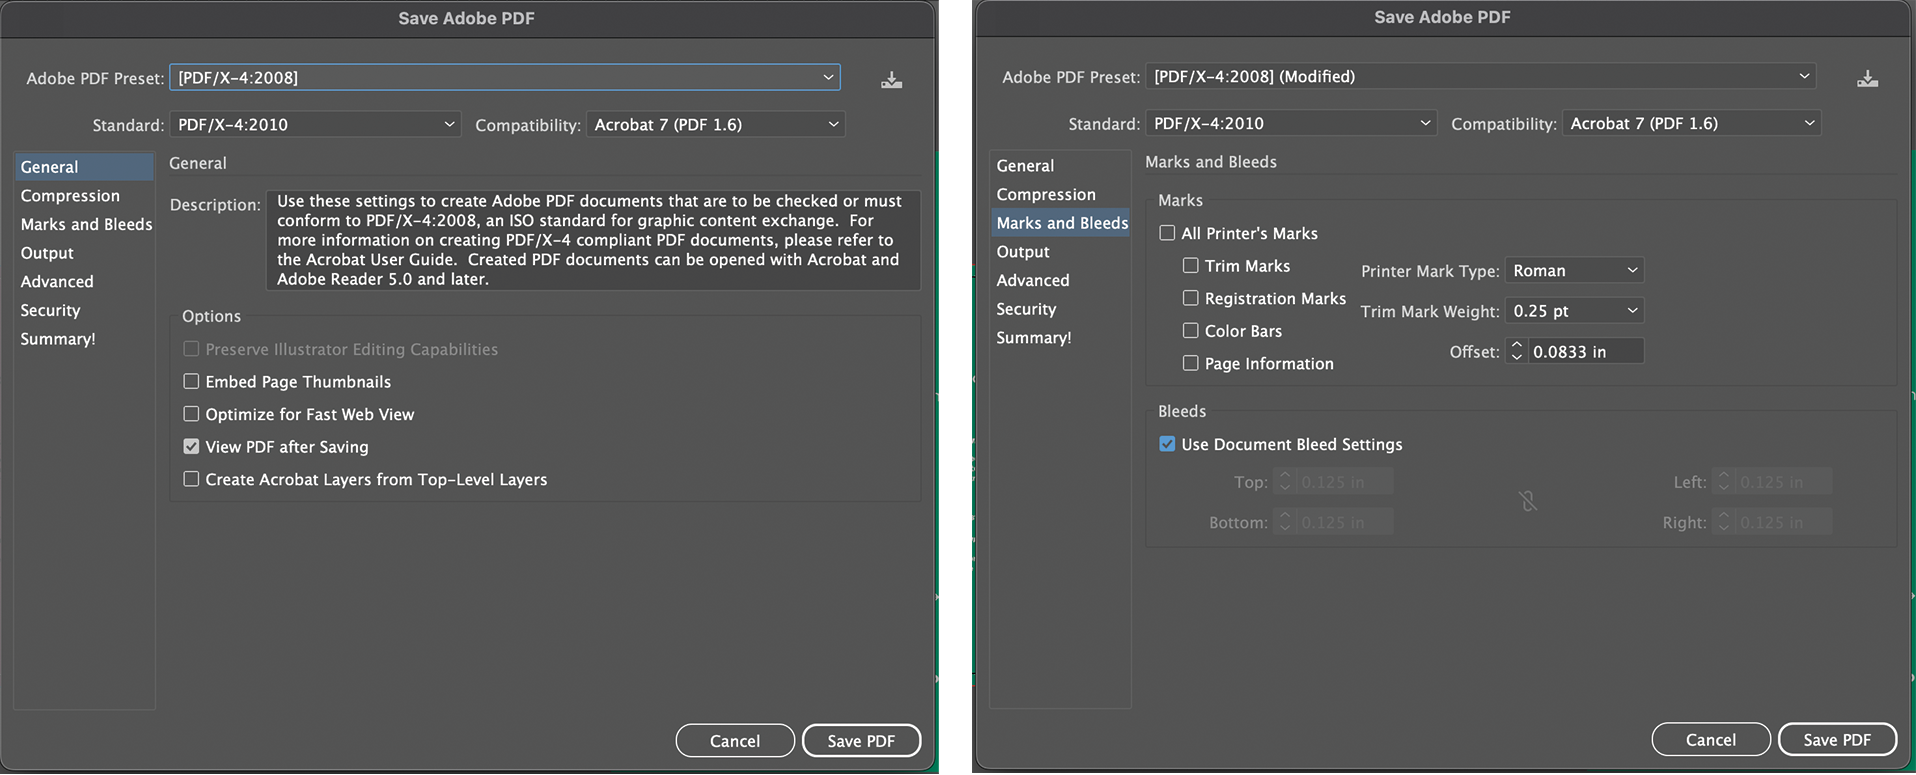
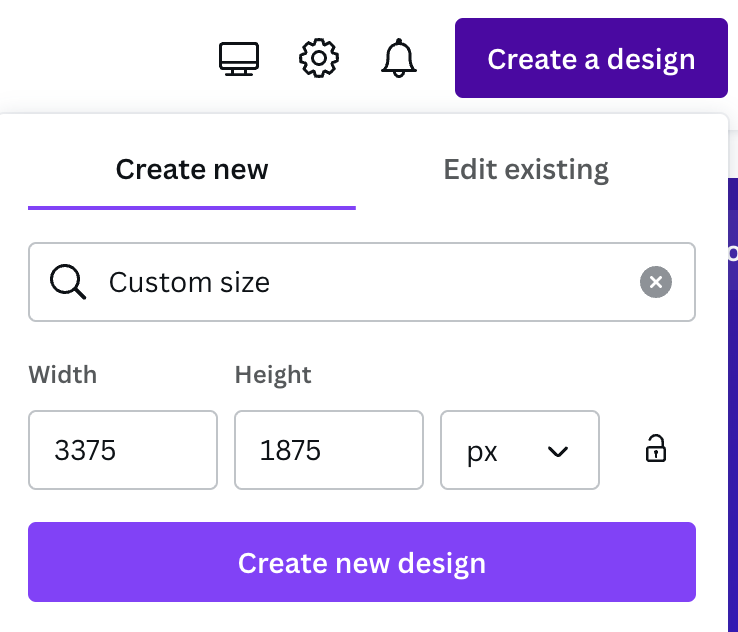
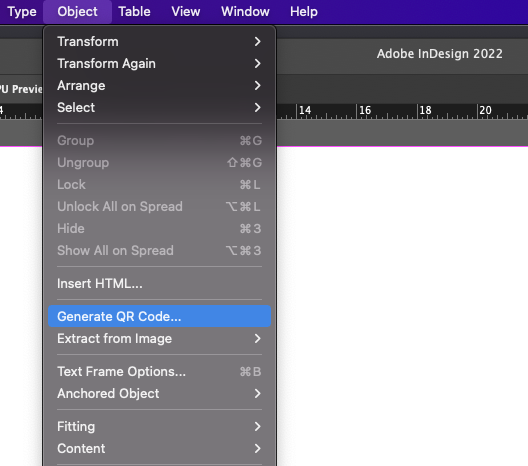


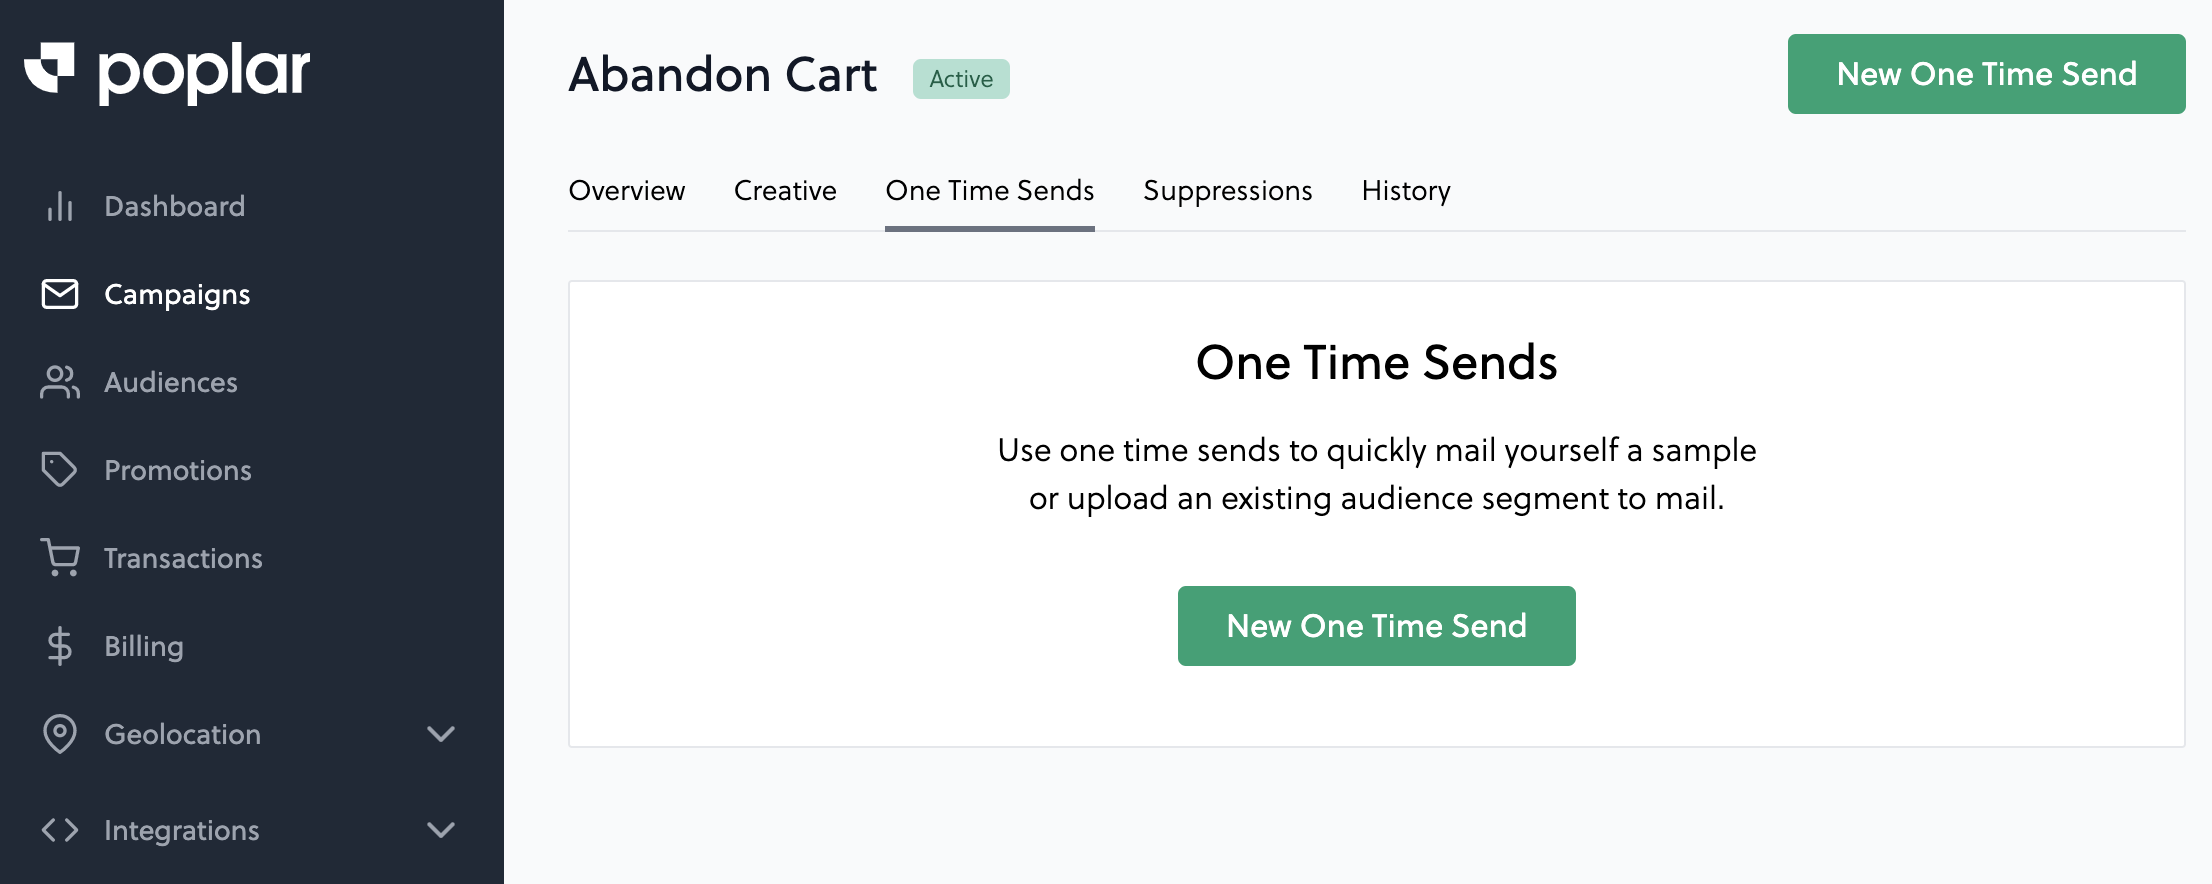


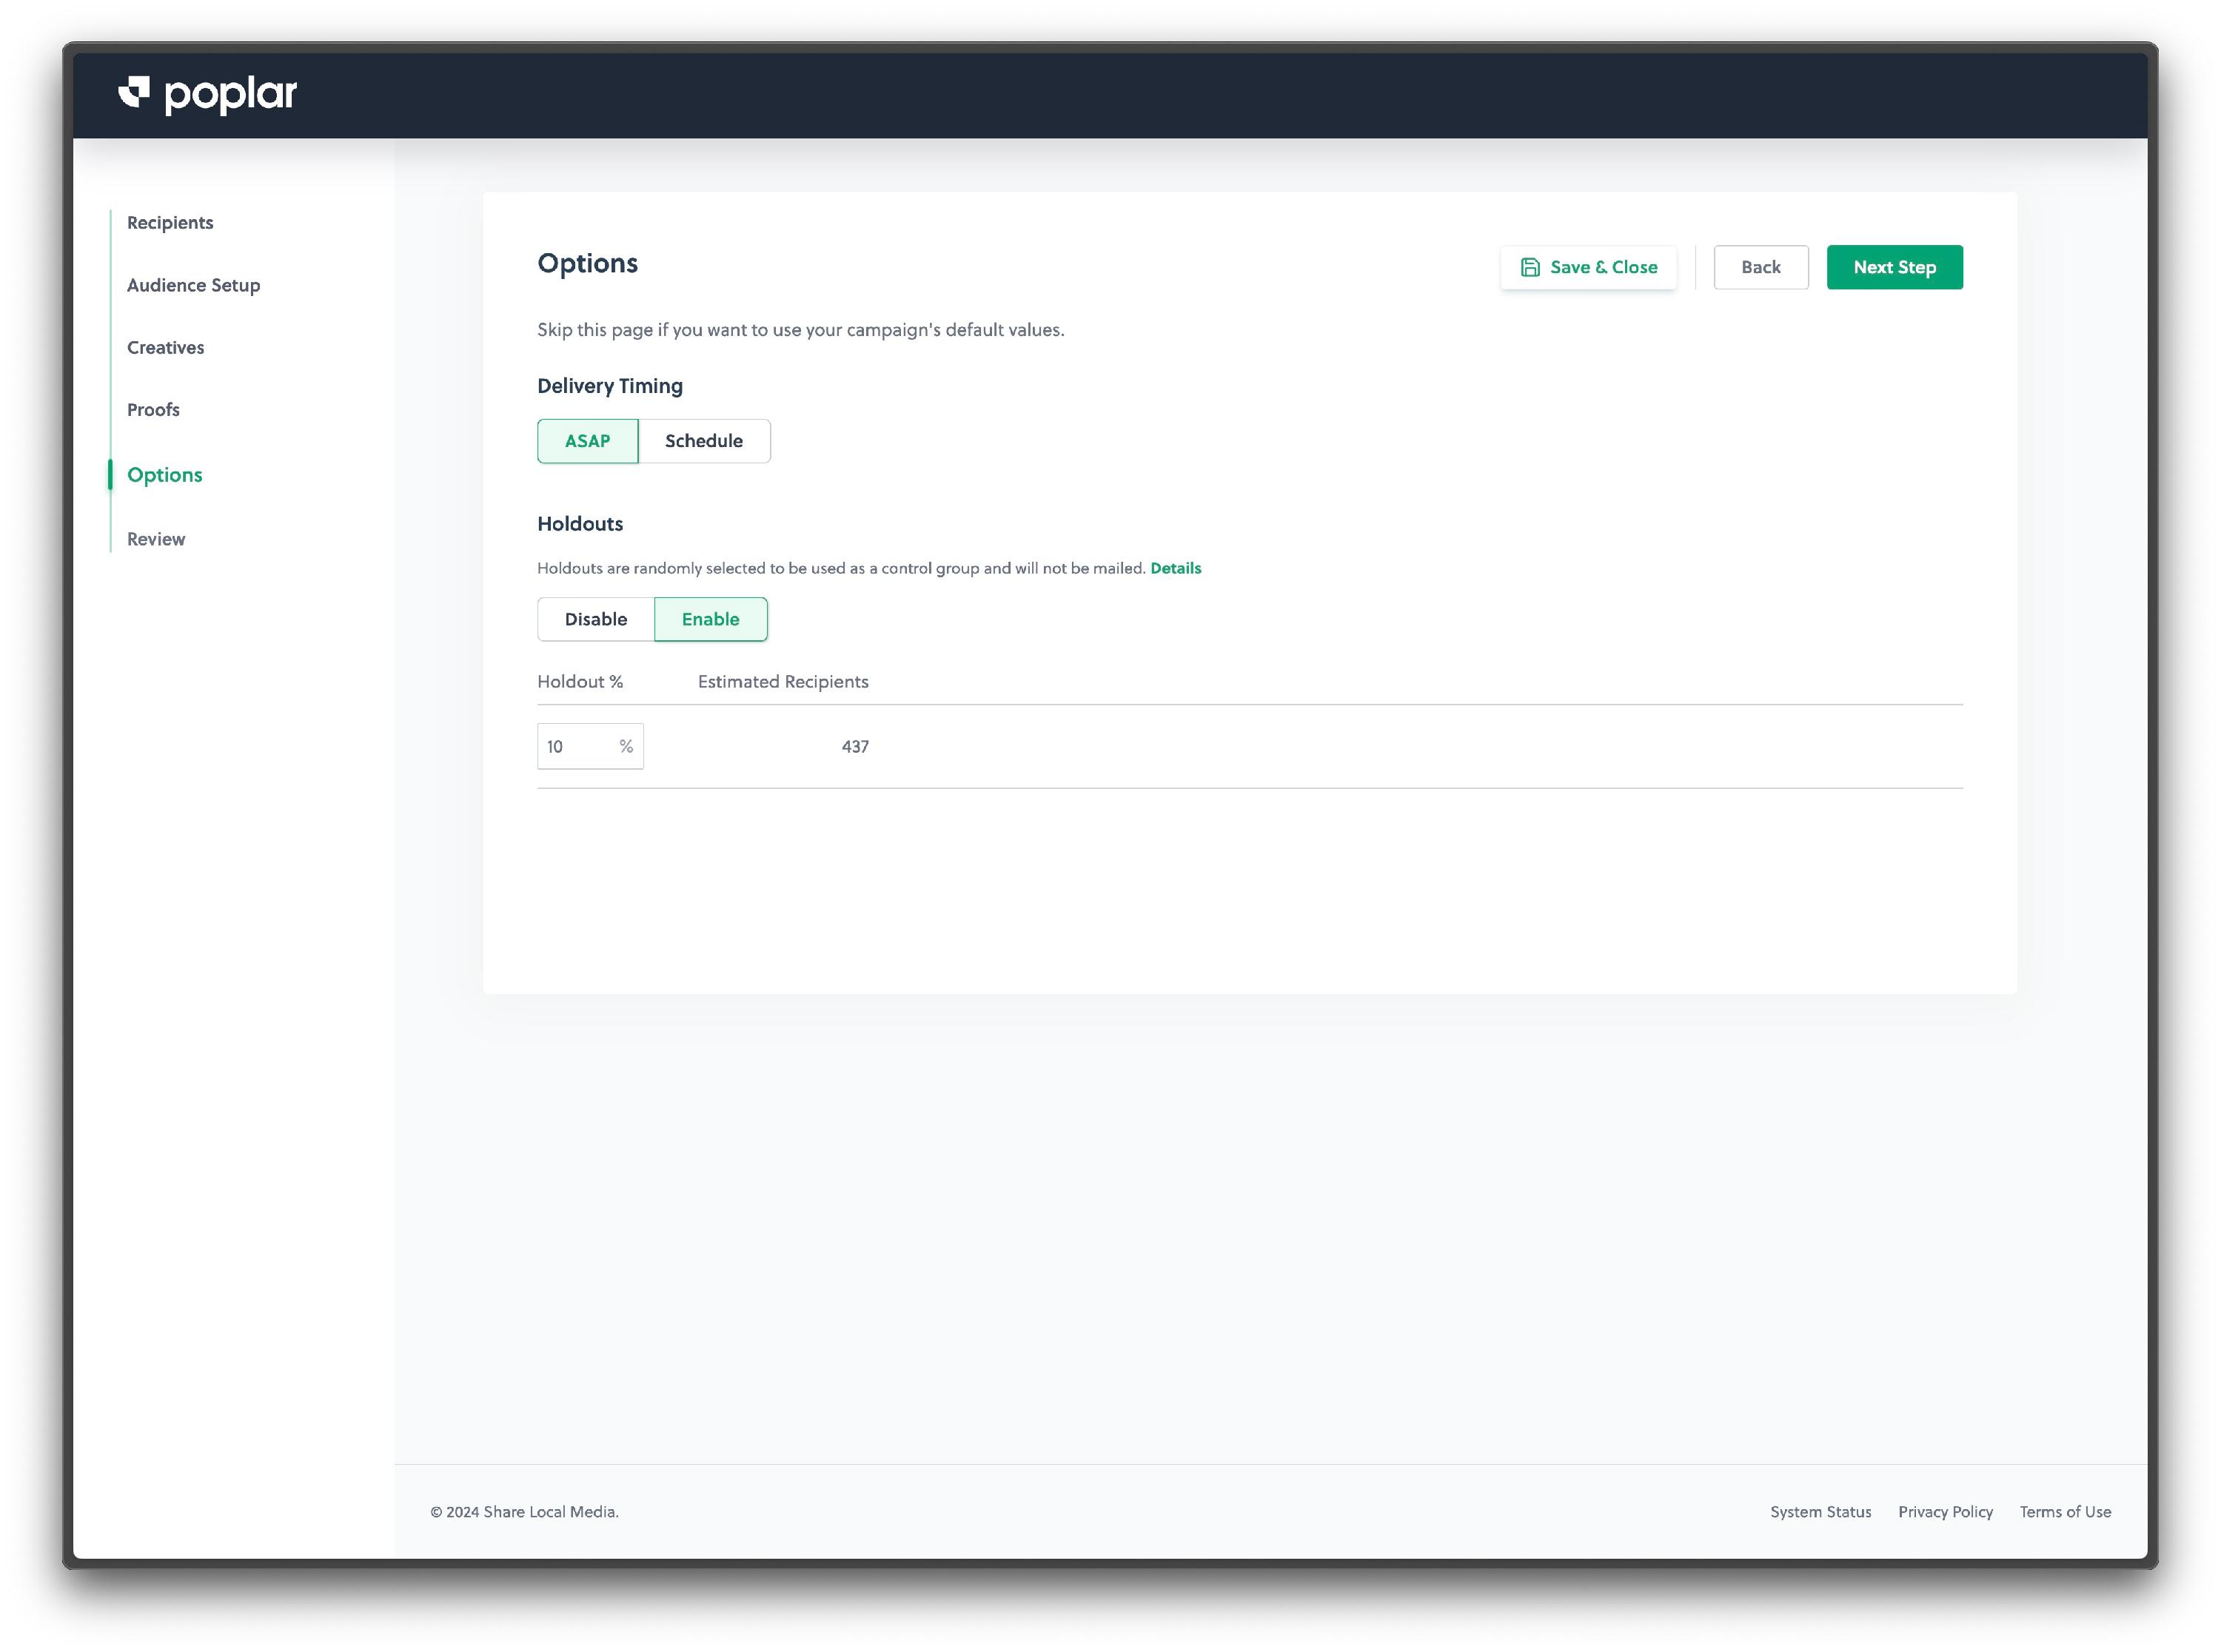


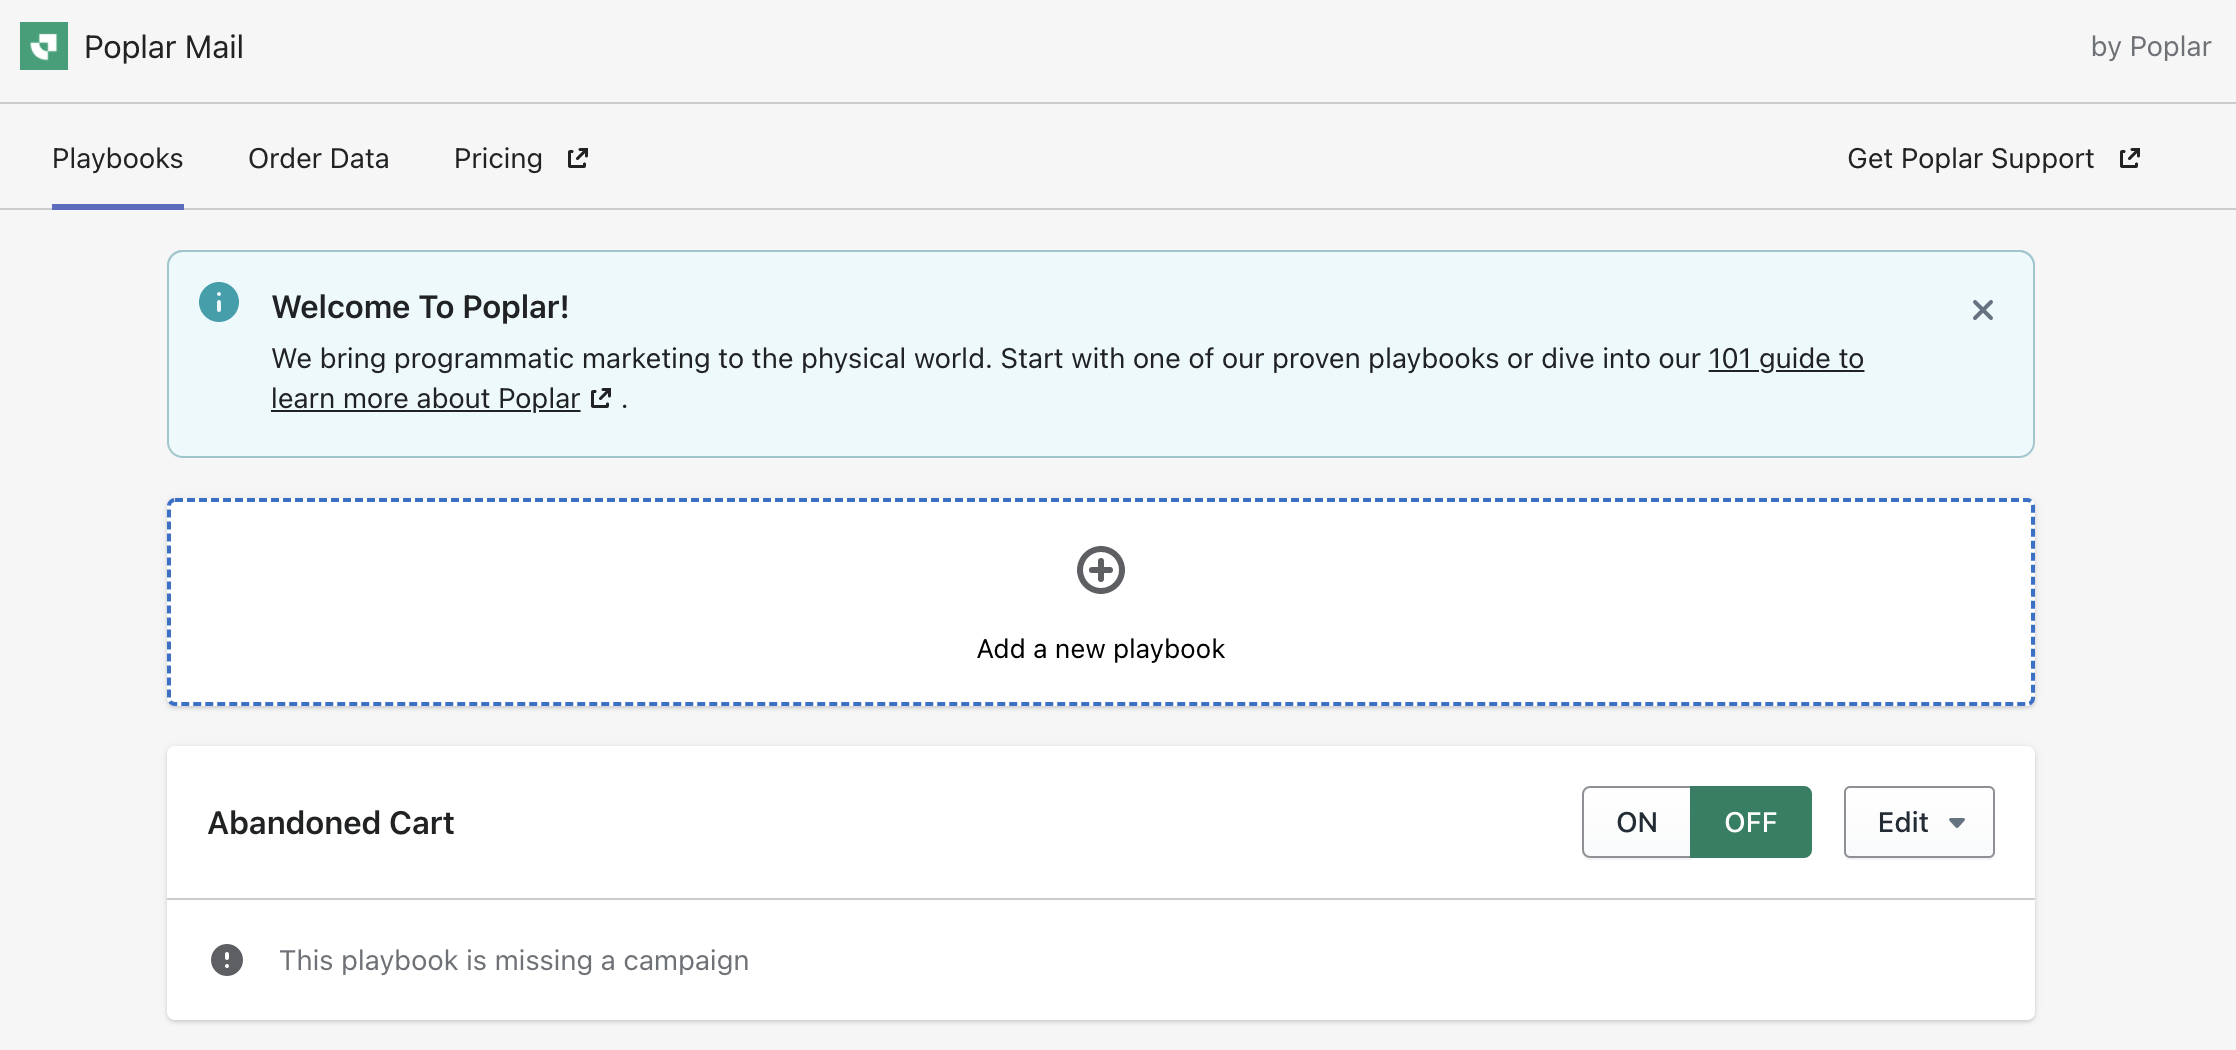

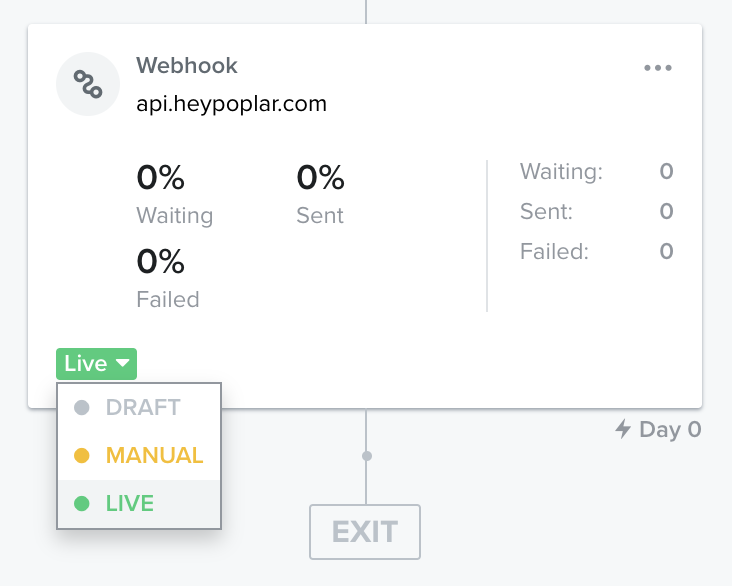


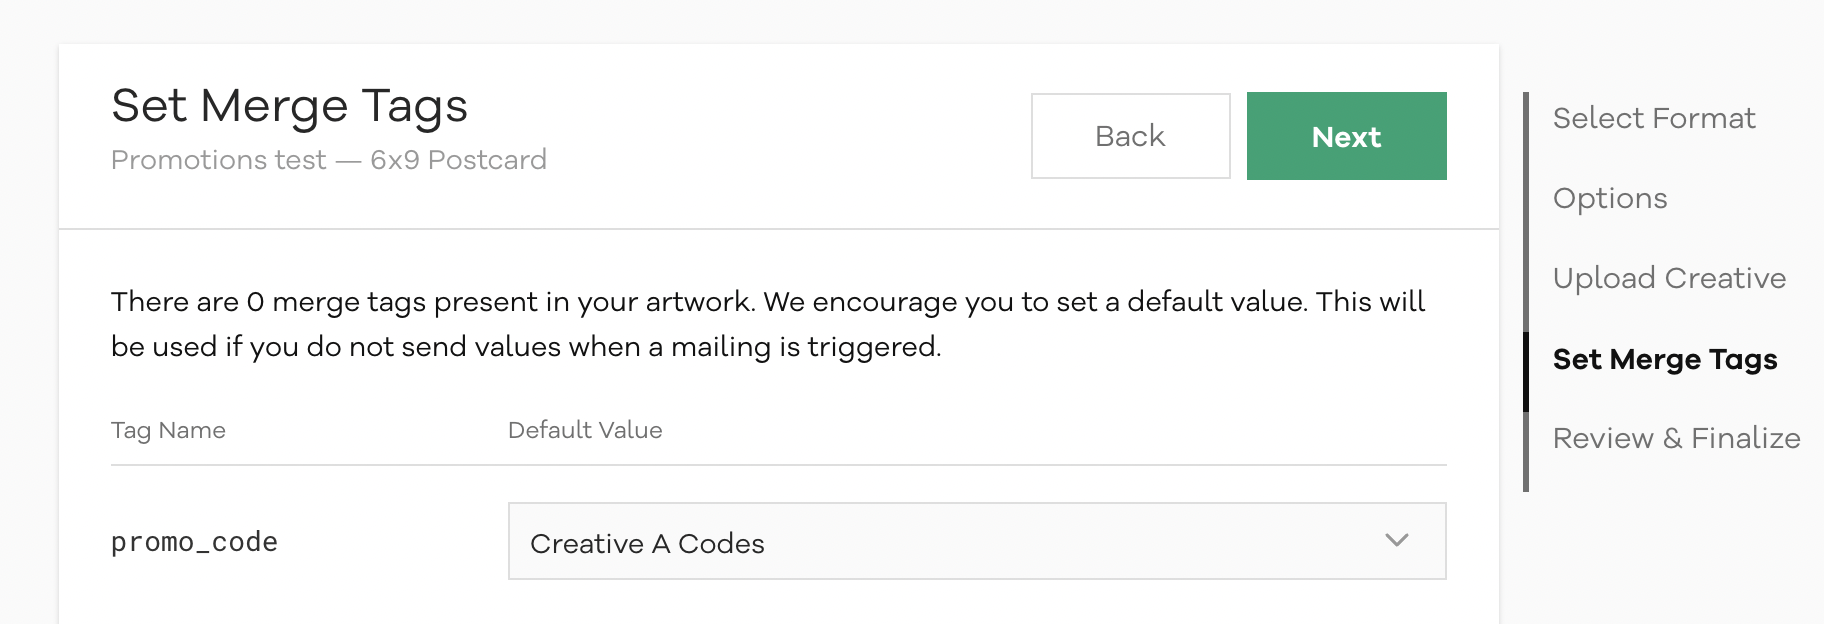


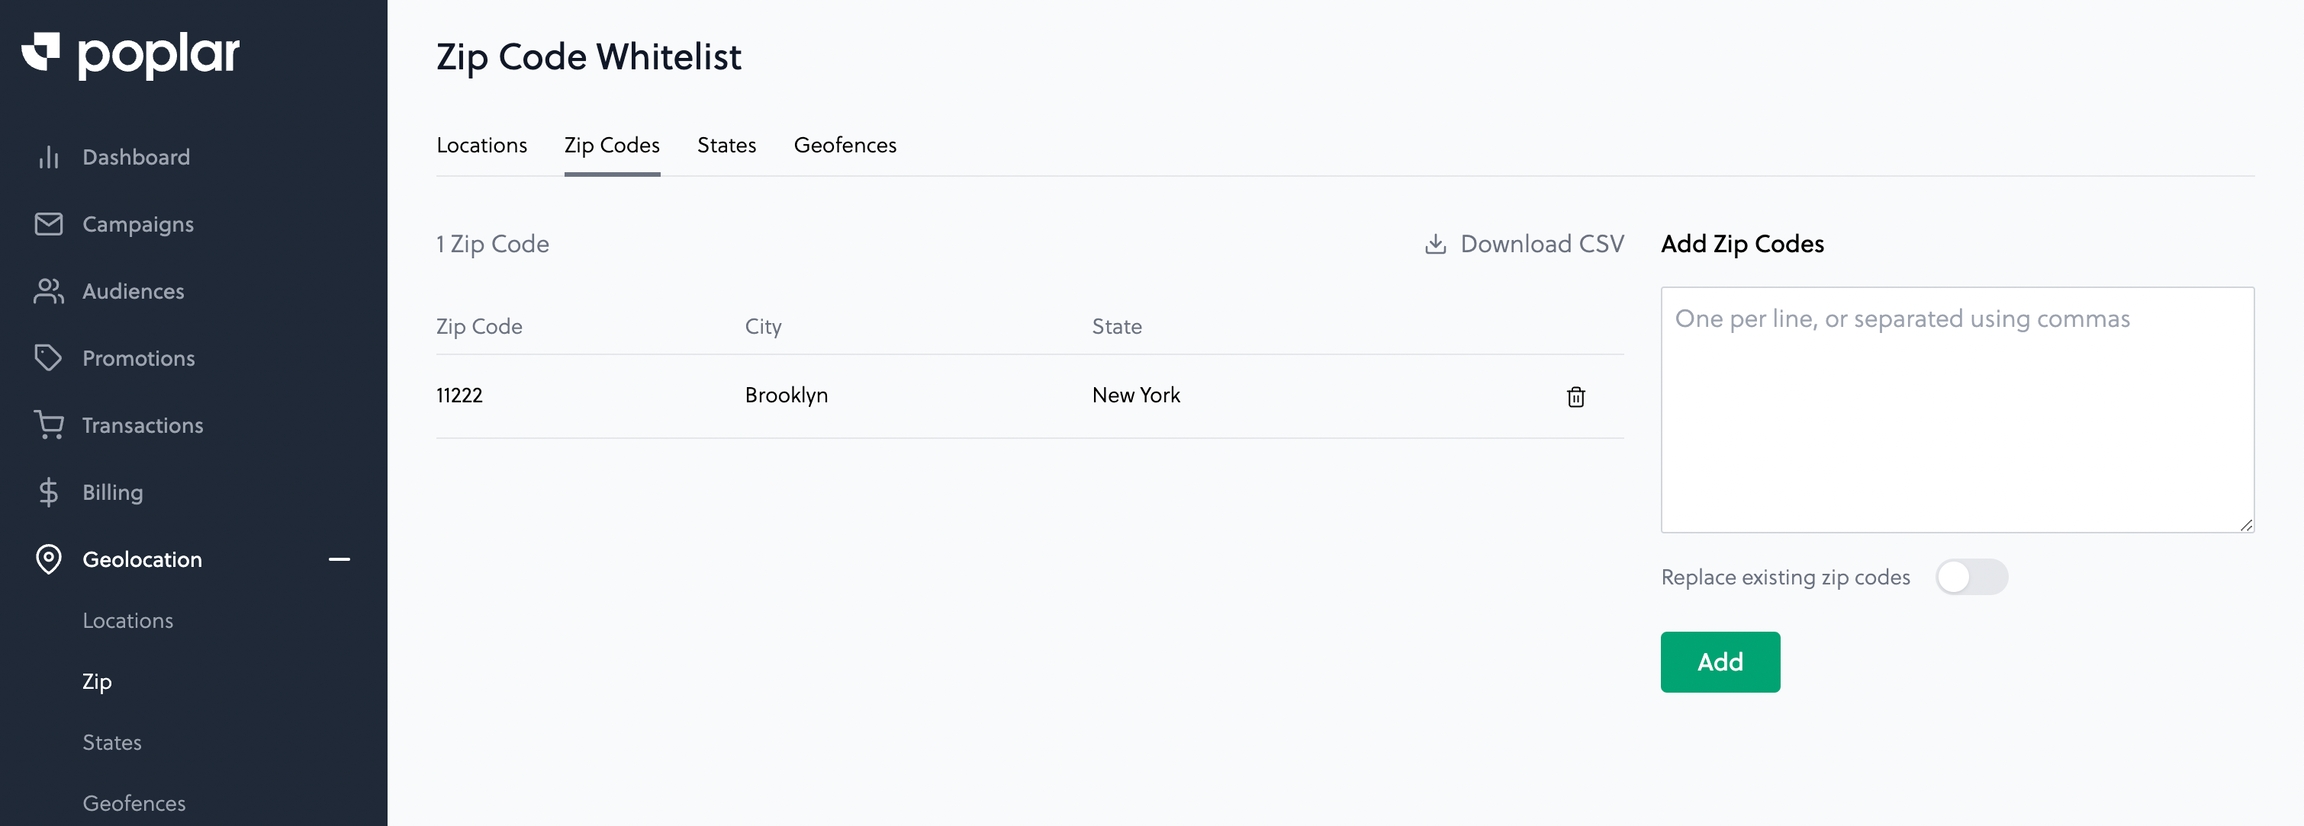
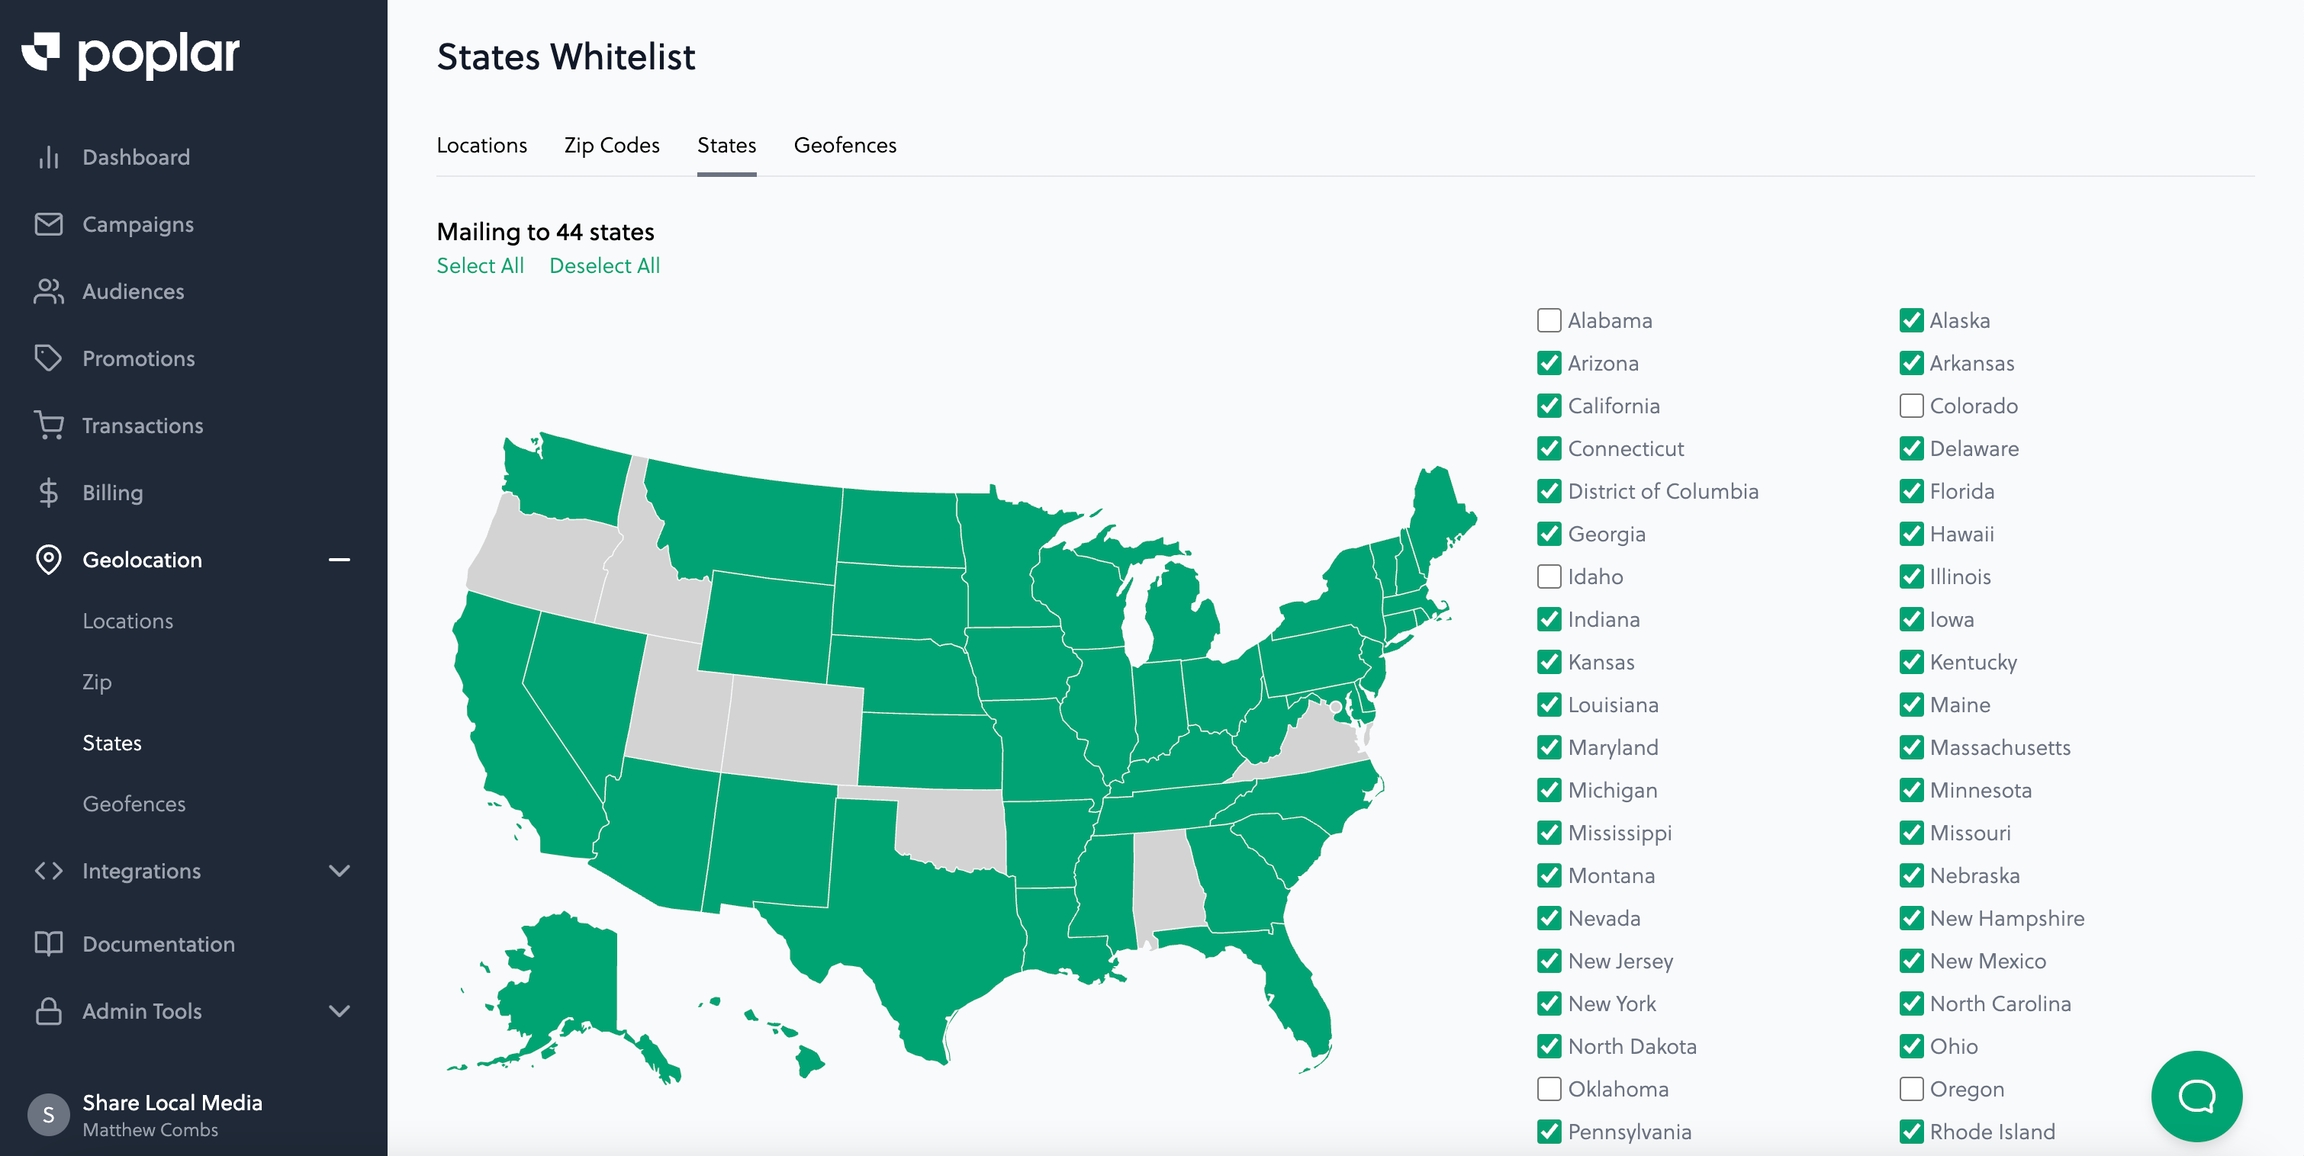
Locations may be stores, offices, or any placeholder address relevant to campaign targeting. For each location, you have the ability to include a custom mile radius and location-specific default merge tag values. When enabled this provides the ability to block mailings outside the range of a saved location, or alternatively adjust the creative based on the location.
Saved Locations are best suited for storing a brick & mortar address and encompassing a set mile radius around that location for targeting or creative personalization. Geofences are slightly more custom, use adjustable perimeters (read: not just radius circles), and are best suited for either targeting or suppressing certain areas and utilizing location-specific creative personalization.
Locations
Define a radius (aka circular area) around an address with the option to suppress mailings outside this radius.
Geofences
Define any custom area for mailing or suppression.
{{location.merge_field_1}}
{{location.merge_field_2}}
{{location.merge_field_3}}
Note: Saved Locations must be turned on under each campaign's Suppressions tab. They are not automatically applied across all campaigns.
Once you've saved your location, head to the Suppressions tab within your campaign to apply the location targeting as desired:
You have the option to suppress any mailer that fall outside the set radius, or mail outside the radius but only populate the merge fields when in rage.
Access the page from the Geolocation tab. Here, you can view current saved locations and view their status. Click the green Add Location button in the top right corner. Fill out the address form with the store or location you wish to target around.
Merge fields are any custom personalization you wish to add to your creative based on the saved location targeting. The value set for each merge field can be populated in a creative design by using the following :
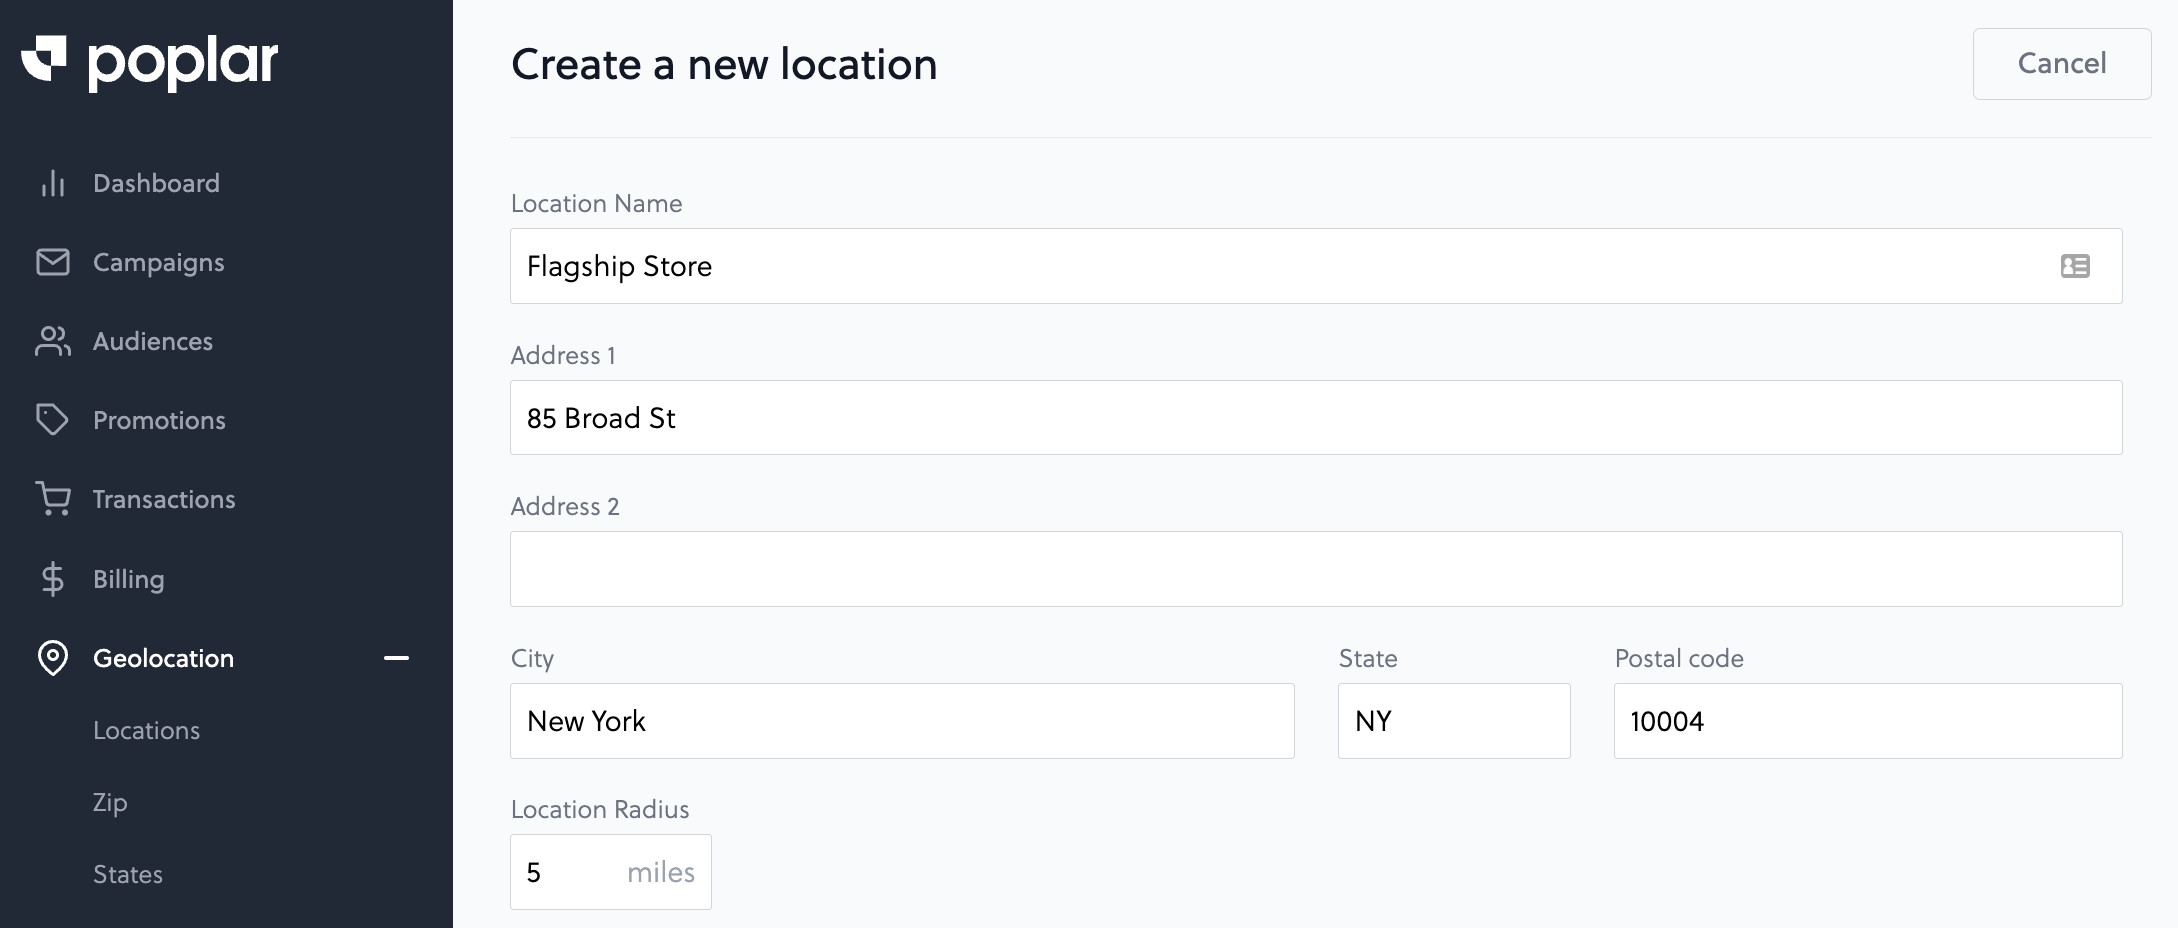
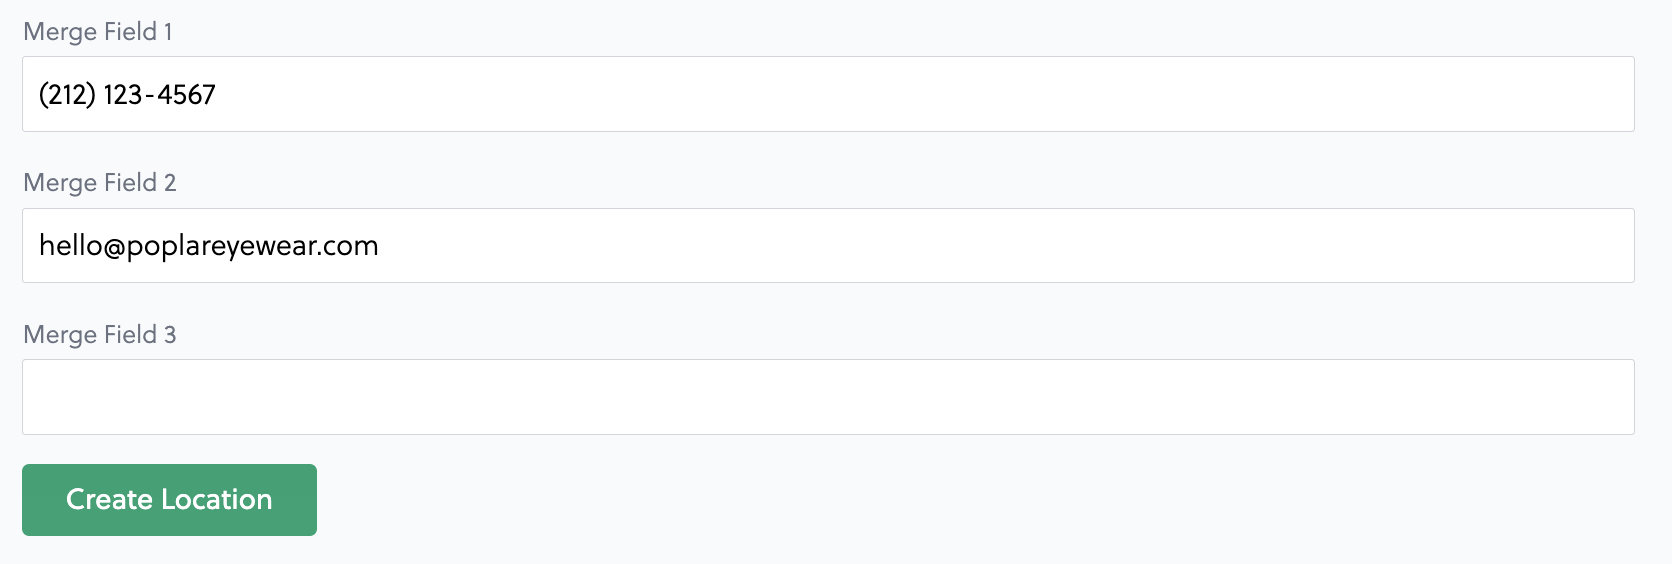
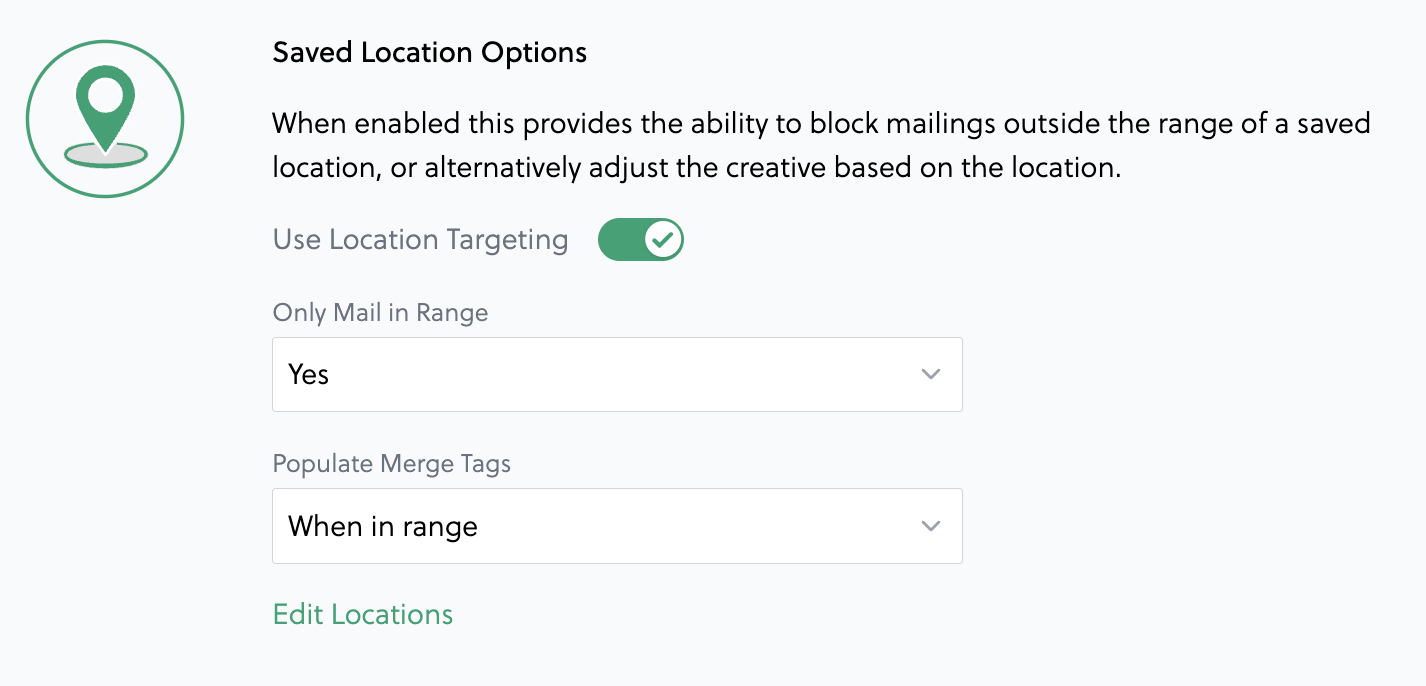
Geofence perimeters can be established by tracing an area on a map, or from uploading a KML file containing coordinates of a target area. You can choose between only mailing in or not mailing to the selected area. A physical address and custom fields can be added and dynamically referenced in creative artwork. Each individual fence can be selected for use on a campaign level from the campaign's Suppressions tab.
Saved Locations are best suited for storing a brick & mortar address and encompassing a set mile radius around that location for targeting or creative personalization. Geofences are slightly more custom, use adjustable perimeters, and are best suited for either targeting or suppressing certain areas and utilizing location-specific creative personalization.
Saved Locations
Define a radius (aka circular area) around an address with the option to suppress mailings outside this radius.
Geofences
Define any custom area for mailing or suppression.
Geofences must be turned on under the campaign's Suppressions tab. They are not automatically applied across all campaigns.
To draw your geofence, zoom in or expand the map to the area you need, and click Draw. Click a starting point on the map, then continue clicking multiple points to pin down the desired boundaries of your geofence.
You can adjust or clear the polygon at any point. Non-polygons, broken shapes, and lines won't be accepted. You'll know your geofence is valid and complete when the polygon turns green.
When uploading to Poplar, if your KML file contains multiple polygons, you'll see the option to flip through each one and specify the settings.
Give the area a descriptive name then choose if you want to suppress mailers inside OR outside this area:
Merge Fields are custom values you can add into creative artwork via merge tag. They're helpful if you need to list location-specific contact info or want to feature location-specific promotional offers.
{{geofence.merge_field_1}}
{{geofence.merge_field_2}}
{{geofence.merge_field_3}}
Once you hit Finish you'll return to the Geofences tab, where you'll see a list of your geofences. We show the Name, Status (Active or Inactive) and Type (Included or Excluded) in each geofence, along with a map.
Inclusive geofences are green and will only mail to addresses that fall within the area.
Exclusive geofences are grey and will not mail to addresses that fall within the area.
If an inclusive geofence overlaps with an exclusive geofence, the exclusive geofence will be honored.
When you click into an individual geofence, you can download a CSV of all the zip codes that fall into that geofence and the percentage of each zip code that does.You can also download a copy of the uploaded KML file, if you originally uploaded one.
You can also Edit, Deactivate, or Delete the Geofence under the Actions section on the right. If you click into Edit, you can also change a geofence from Inclusive to Exclusive or vice versa.
Finally, you'll want to enable your geofence from within your campaign's Suppressions tab. Click Edit Geofence Suppressions to select your inclusive or exclusive fences then hit Save Changes:
Our location and area-based checks are performed on the original address that you provide. These checks are run prior to NCOA, meaning if your recipient has moved, we do not account for the move in our suppression checks.
Using an application such as you can draw multiple geofences, export as a KML file, and upload directly to the platform. Layers can be exported together or individually by clicking the three dots to the right of the map's name and selecting Export to KML/KMZ:
Adding a physical address allows you to dynamically pull this information into creative artwork by using . This is a useful feature if you'd like to point customers to a nearby retailer, information center, or any other relevant destination.


