Loading...
Loading...
Loading...
Loading...
Loading...
Loading...
Loading...
Loading...
Loading...
Loading...
Loading...
Loading...
Loading...
Loading...
Loading...
Loading...
Loading...
Loading...
Loading...
Loading...
Loading...
Loading...
Loading...
Loading...
Loading...
Loading...
Loading...
Loading...
Loading...
Our brand-new Klaviyo app will provide direct access to your Lists & Segments, allowing you to execute One Time Sends with external audiences for the first time. One you've installed the app, you can create a One Time Send using the instructions below.
Existing Poplar account and Klaviyo account
On your Poplar account, create a Campaign or select the existing Campaign you'd like to use. Make sure you have a Creative uploaded before proceeding.
Click the One Time Sends tab, then click New One Time Send
Give your send a name, then select External Audience
Select the Integration you'd like to use, and then the Audience type. For Klaviyo, you can choose between Lists & Segments. Select your target audience, and then click Next Step.
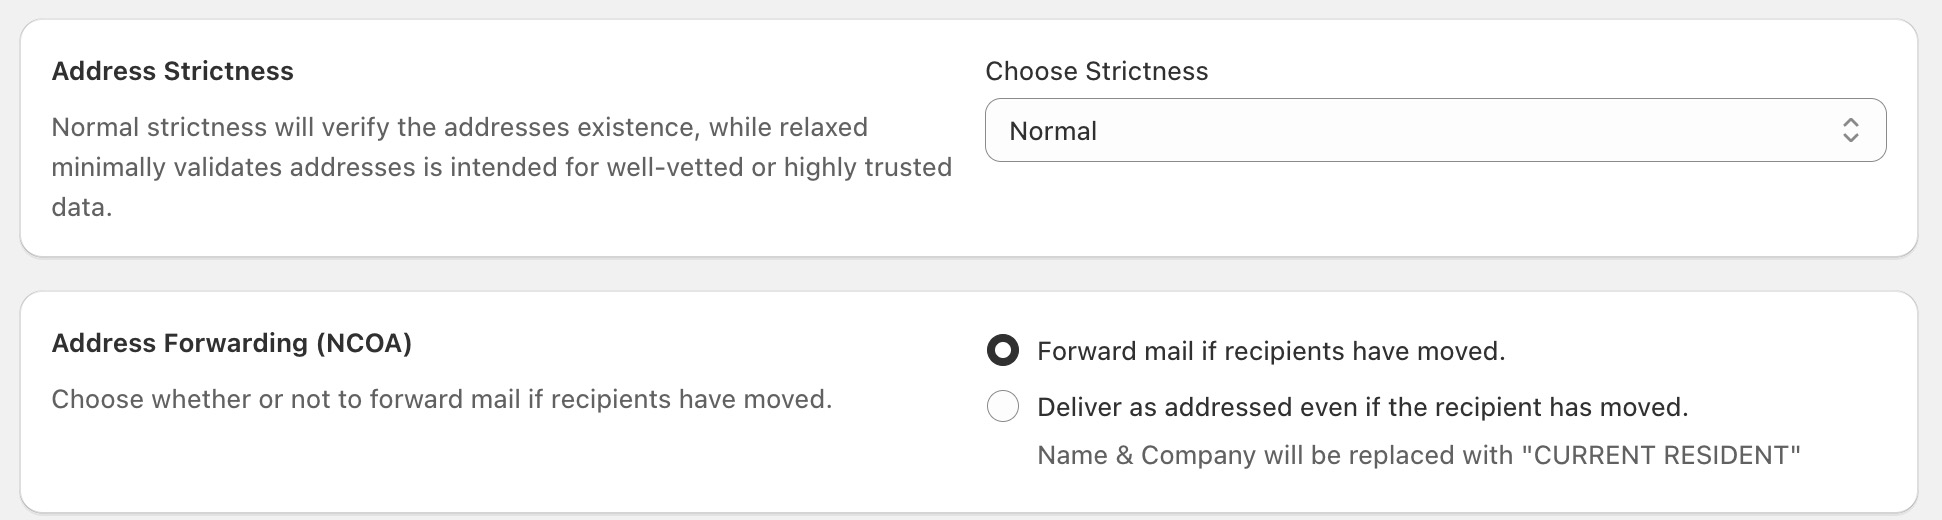
Select your preferences for Address Strictness and forwarding, then click Next Step.
Select the Creatives you'd like to use. If selecting multiple, we will split your mailings evenly across all selected creatives.
If you would like a Holdout for a control group that will not receive mailings, click Enable and enter a percentage. If not, leave disabled. Then click Next Step.
Doublecheck your artwork proofs. If there are any merge tags or dynamic elements to your creative, we will render a live preview for your approval. Once confirmed, check the box and click Next Step.
Confirm all of your send's options and selections, and then click Submit!
Note: You may see a note indicating that your list or segment's import is still in progress. If so, the page will refresh once complete. We will also send you an email notification letting you know that the send is ready.
Feeling stuck? Reach out to us for help at support@heypoplar.com!
Installed the Poplar app from the Integrations tab ()


After creating a data extension, you must remember to bind your data extension to the Salesforce Contact in order to be able to access the data extension data in your journey using the syntax {{Contact.Attribute.<Data-Extention-Name>.<attribute-name>}}.
Below is just one example of a successful setup for a Data Extension. If your setup looks different and you are encountering trouble passing through data, please reach out to support@heypoplar.com. You can also contact your Salesforce Account Executive for help on finding out how to reference your specific dataset in the journey.
If you already have a Data Extension set up, skip to Step 3.
From your dashboard, navigate to Audience Builder > Contact Builder > Data Extensions and click Create:
Give your data extension a unique and relevant name, then check Is Sendable? AND Is Testable? Leave Creation Method set to "Create from New" and External Key blank - Description is optional.
All Sendable data extensions map to a subscriber whereas non-sendable data extensions are meant for reference data(e.g. product tables) that does not map to a subscriber, but that you may want to pull into an email.
Next, you'd typically set your data retention policy - for a test you can just leave the default, and continue on.
Then create your fields. Make sure you include an identifier field and set it as the primary key (identifier can be any kind of customer ID, email, etc.). This is what you'll use to link the data extension to your Contact. Ensure you set the Send Relationship as "identifier relates to Subscriber Key" (see bottom left corner in image below).
It is best practice to make sure the Subscriber Key is stored as text.
Click Complete to finish setting up your data extension.
Click into your new Data Extension, and navigate to the Records tab.Bulk import by clicking Import or manually add 2-3 records for test purposes by clicking Add Record.
Once you've created your Data Extension, navigate back to Data Designer to create an Attribute Group and link them together.
Click Create Attribute Group. Give it a different name from your Data Extension and pick whichever icon you'd want to represent it with.
Select Link Data Extensions and map the Contact Key from the Salesforce Contact to the identifier in your Data Extension.
Hit Save, and you can now use this Data Extension in your journey!
To access the data extension data in your journey using the syntax: {{Contact.Attribute.<Data-Extention-Name>.<attribute-name>}}
Need help? Reach out at support@heypoplar.com for assistance.
Our brand-new Klaviyo app will provide direct access to your Lists & Segments, allowing you to execute One Time Sends with external audiences for the first time. Follow the instructions below to install the app today before it's publicly available!
Existing Poplar account and Klaviyo account
Manager, Admin, or Owner role on your Klaviyo
On your Poplar account, click Integrations. Then click on the Klaviyo sub-tab.
Click Install, then click Continue.
Note: You will see the below notice letting you know that the app is pre-release, but you can still continue.
Select the Klaviyo account you'd like to connect.
Confirm permissions and click Allow. We will only ask for permissions that are absolutely needed.
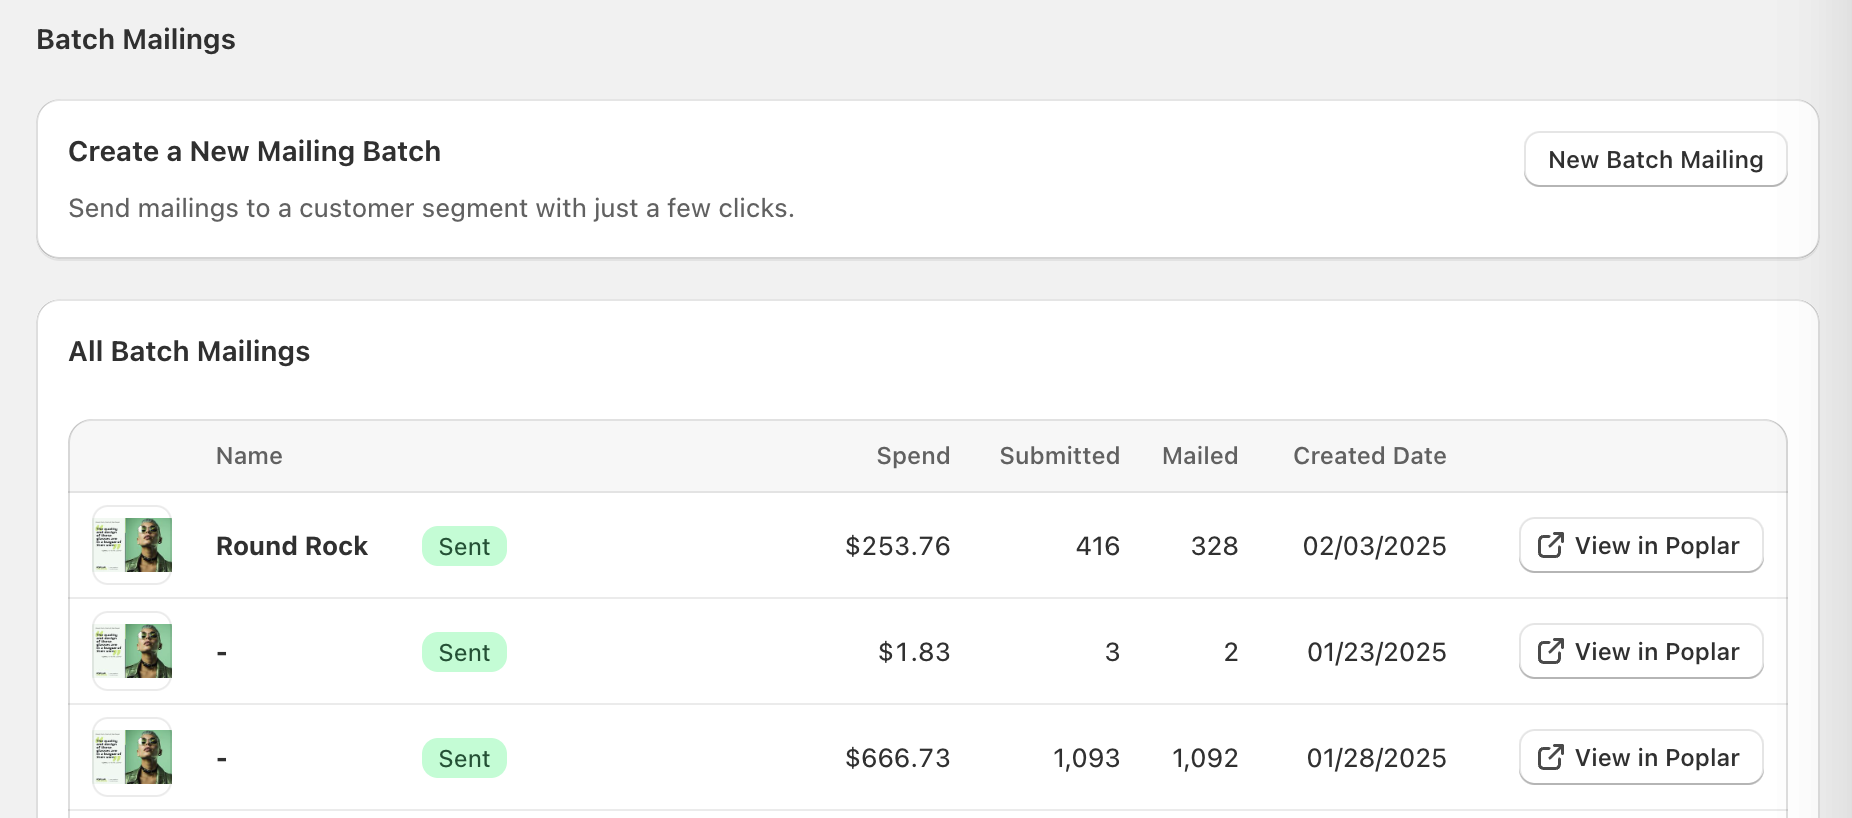
If you'd like to send mailings to a number of customers all at once, versus triggered with Playbooks, you can send a Batch Mailing. With the Poplar app on Shopify, you can target any of your existing segments without needing to upload a CSV into your Poplar account.
Existing Poplar account, connected to your Shopify Poplar app
Campaign created with a creative uploaded
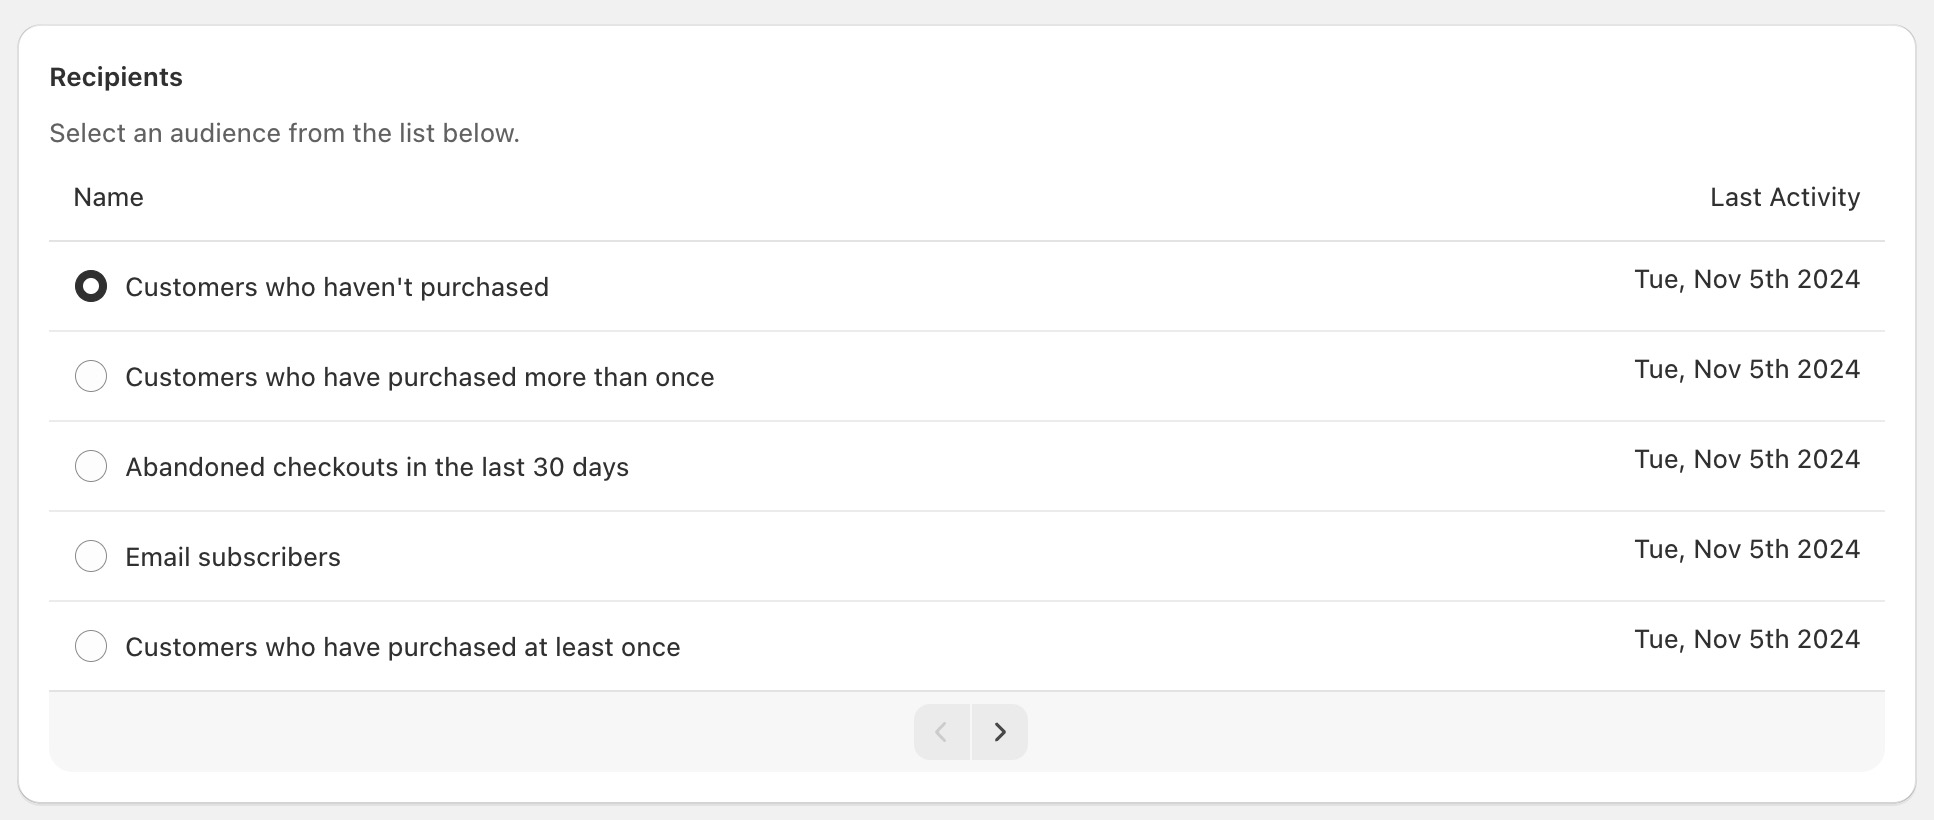
Segment of customers you'd like to mail
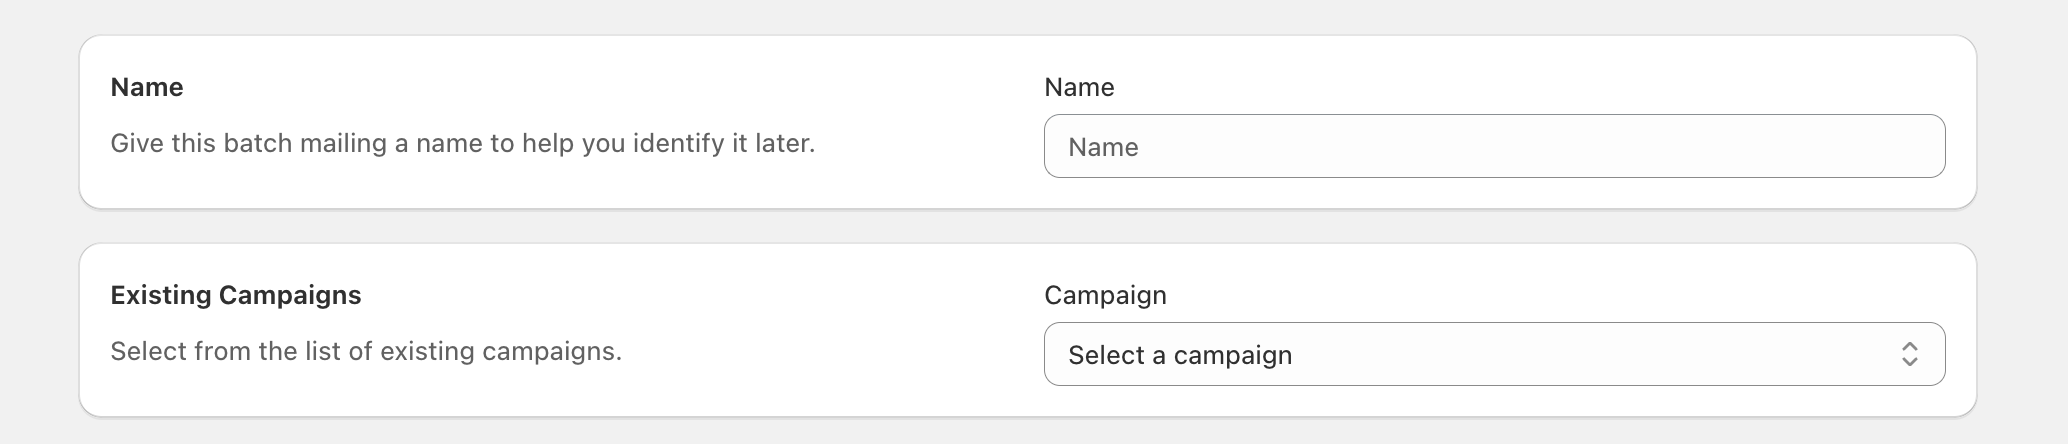
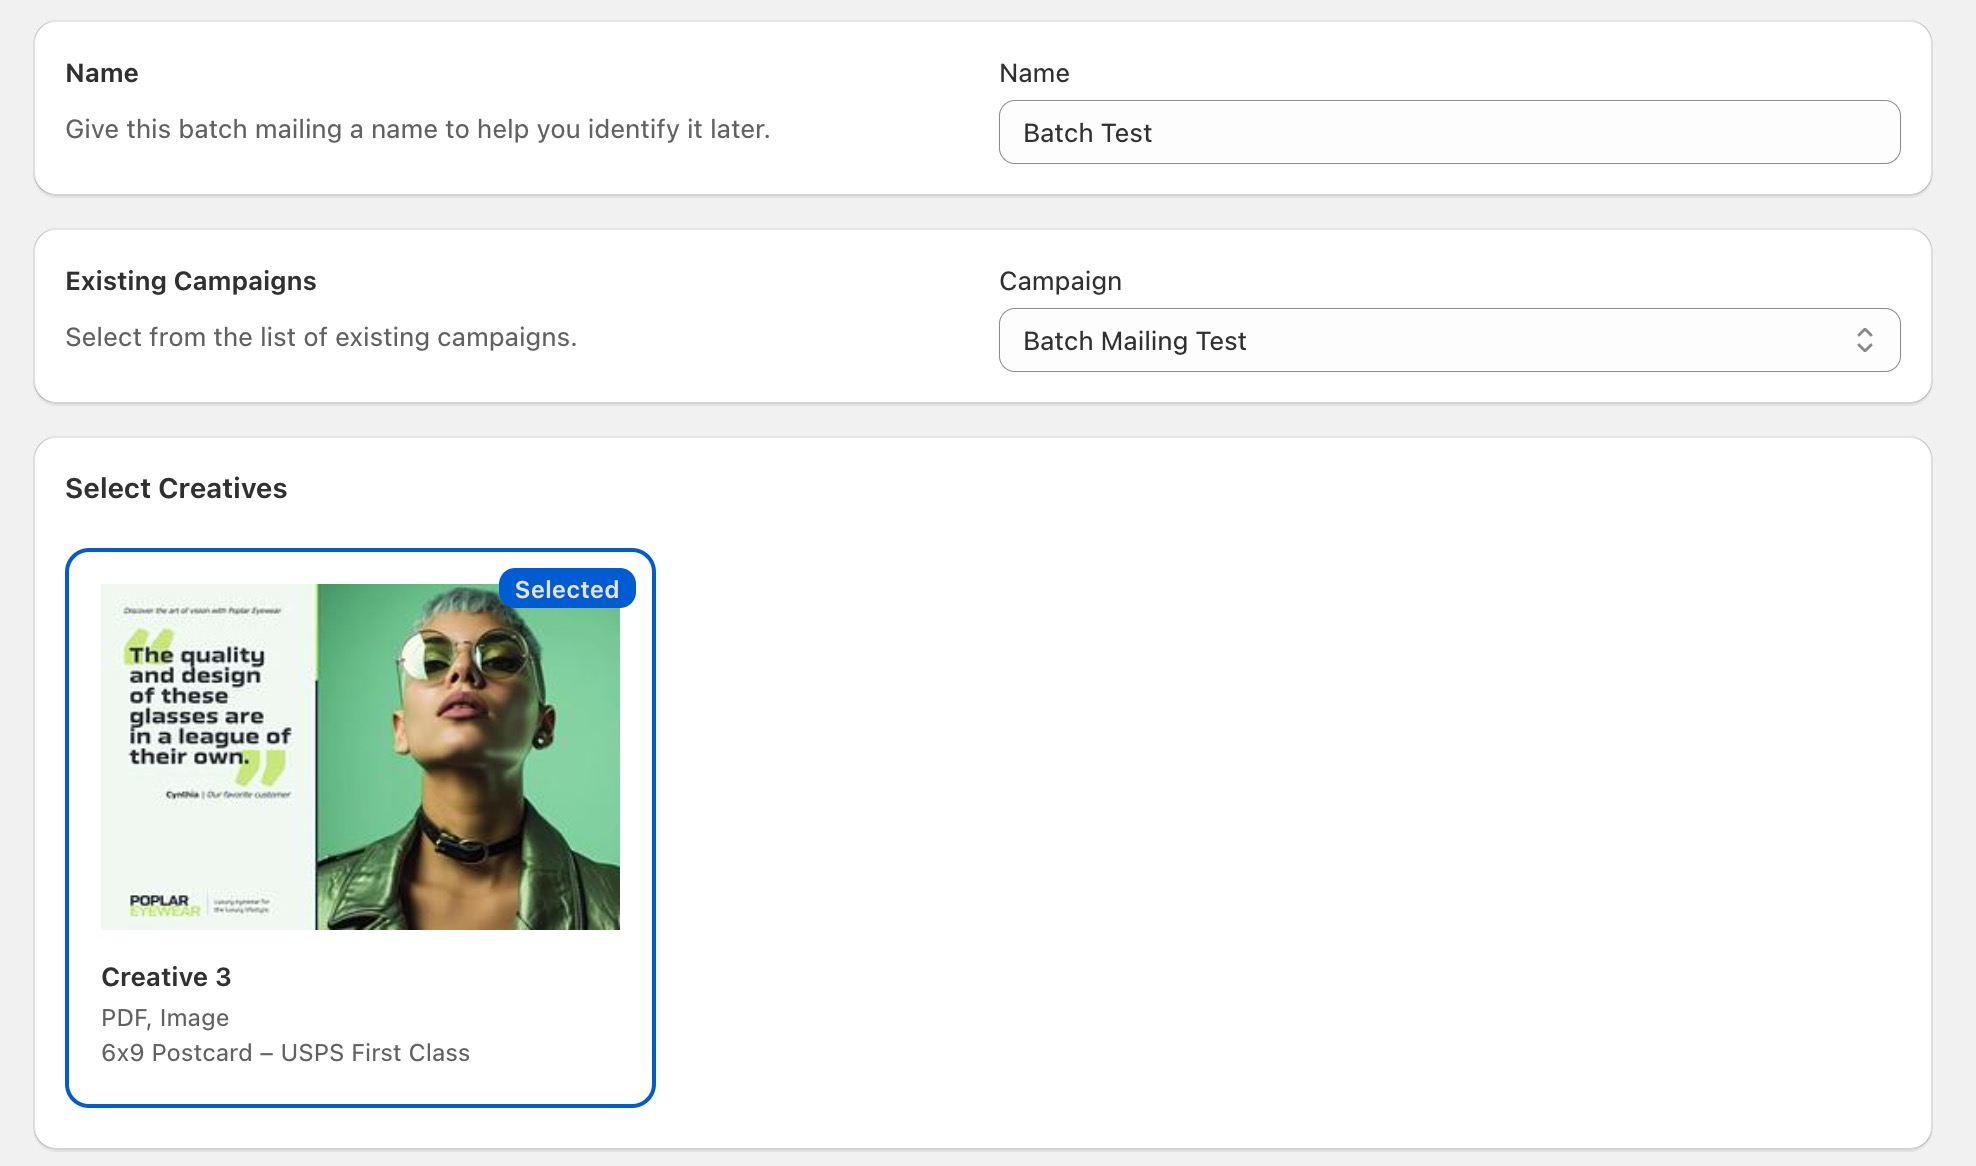
On the Campaigns tab, click New Batch Mailing
Select the Creative(s) you'd like to use for your mailing. If you select multiple creatives, we will apply an even A/B split across your selected artworks.
Select your settings for Address Strictness and Forwarding.
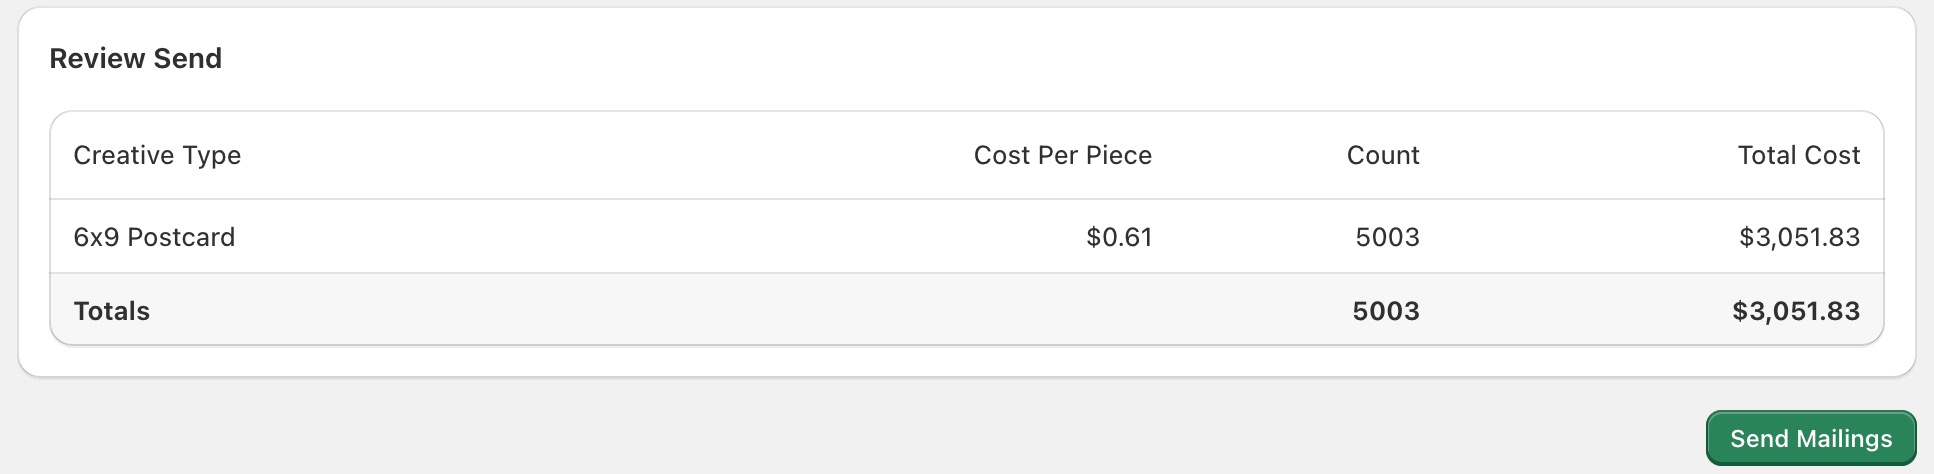
Review your estimated (maximum) cost and complete your send.
Note: These totals are based on the total number of segment members. After Poplar imports your segment, we will charge the credit card on file for the number of valid, mailable addresses.
Once processed, we will create mailings and send them off to our print partners. You can click the "View in Poplar" button on the campaigns page to view updates on delivery and attribution results.
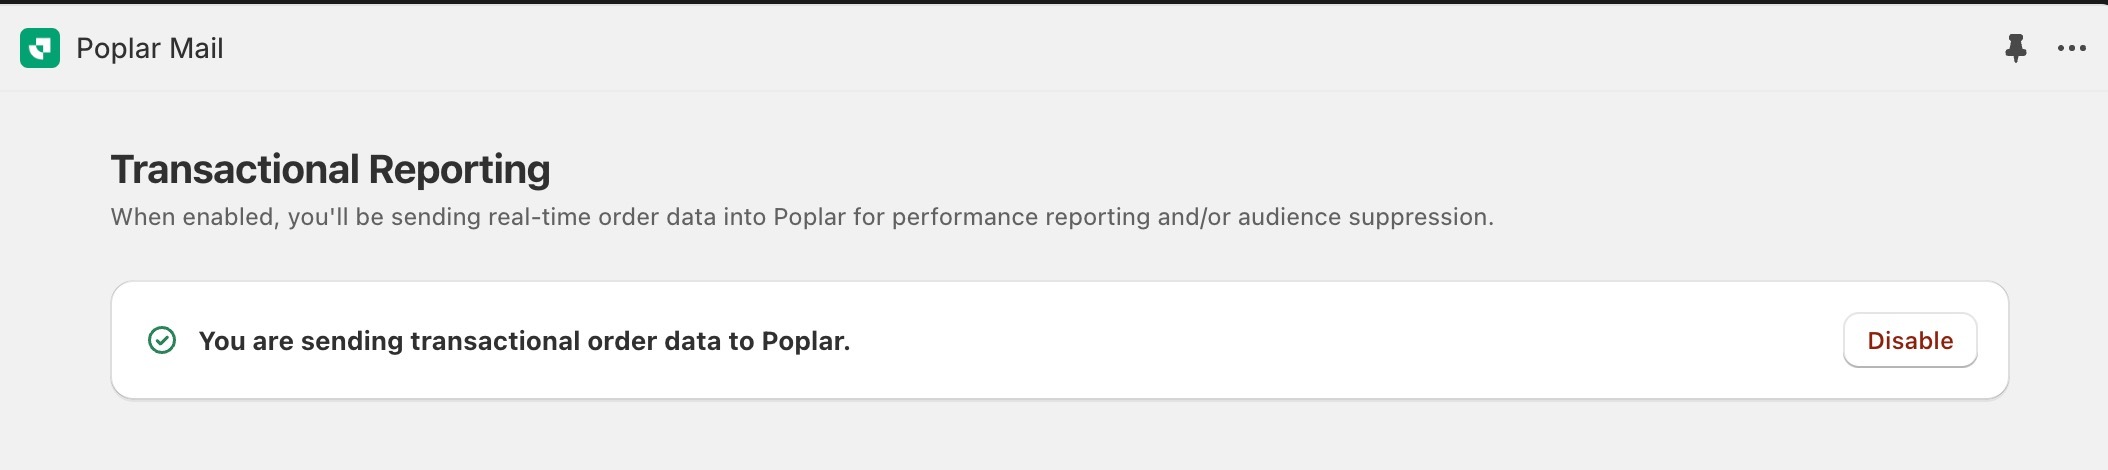
Pro tip: Make sure you've enabled Transactional Reporting in the Orders tab which will allow us to automatically calculate attribution metrics for your campaigns. Be sure to check in 30 days after your send to see results!Last updated on February 4, 2025
If you are new to using Data Extensions in Salesforce, be sure to reference the when you're getting started.
Make sure you don't modify data extensions that are being used in an active journey. Modifications to data extensions used in active journeys are ignored by those active journeys. about the steps you should take if you wish to modify your data extension.
You're done! You can now access Lists & Segments in One Time Sends. See article on to learn more.
Give your mailing a name and select the corresponding Poplar campaign. If you need to create a new one, .
Select the segment of customers you'd like to mail. If you need help creating a new segment, to learn more.


If you use Shopify, the easiest way to integrate with Poplar is with the Poplar Mail Shopify application.
Poplar for Shopify supports Abandoned Cart, New Order, New Customer, and Cancelled Order trigger events along with a number of highly specified filter options. If your use case requires another trigger event not listed, please check the Zapier section for an alternative approach.
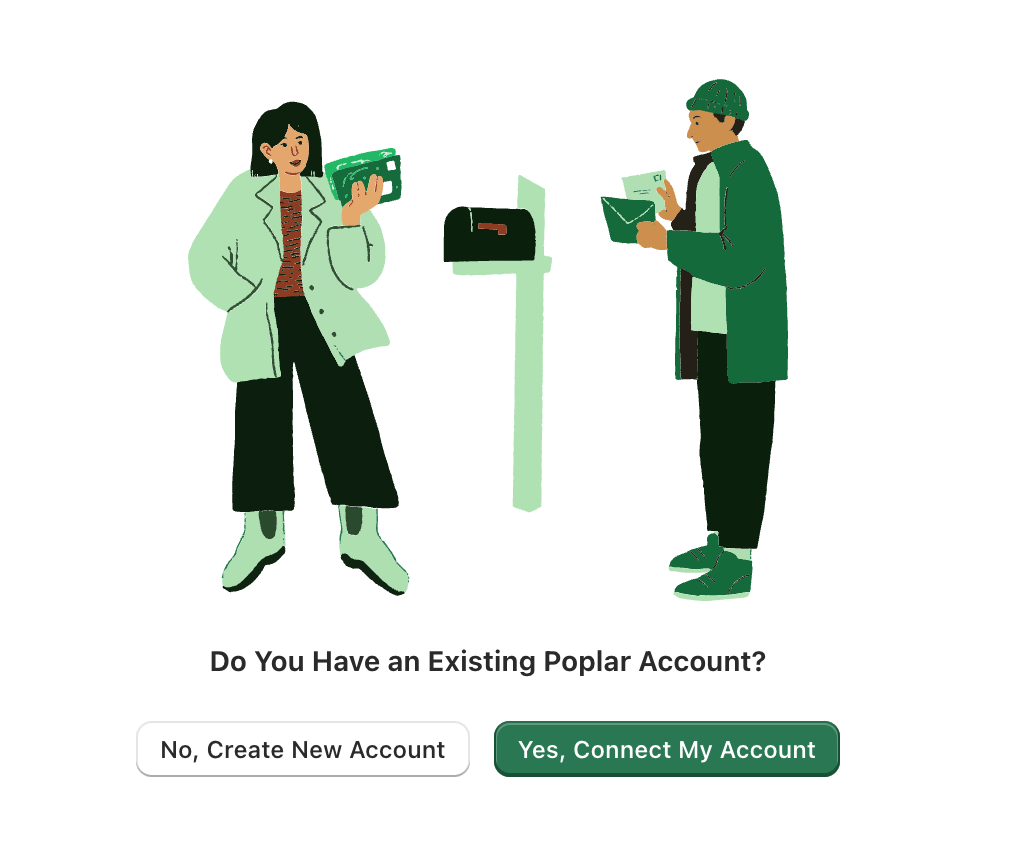
Sign in to your Poplar account and choose the organization you want to connect with. Your Shopify account and your Poplar account will be automatically linked.
If you do not already have an account with Poplar, select the Create Account button. Otherwise, click the green Connect My Account button.
The first time you open the Shopify app, you'll see two playbooks we've pre-built for you. Note: The playbooks have created corresponding campaigns in Poplar.
If this is your first time mailing with us, make sure the following tasks are completed in your Poplar account before continuing:
Creative artwork has been uploaded to the campaign in Poplar and is set to Active
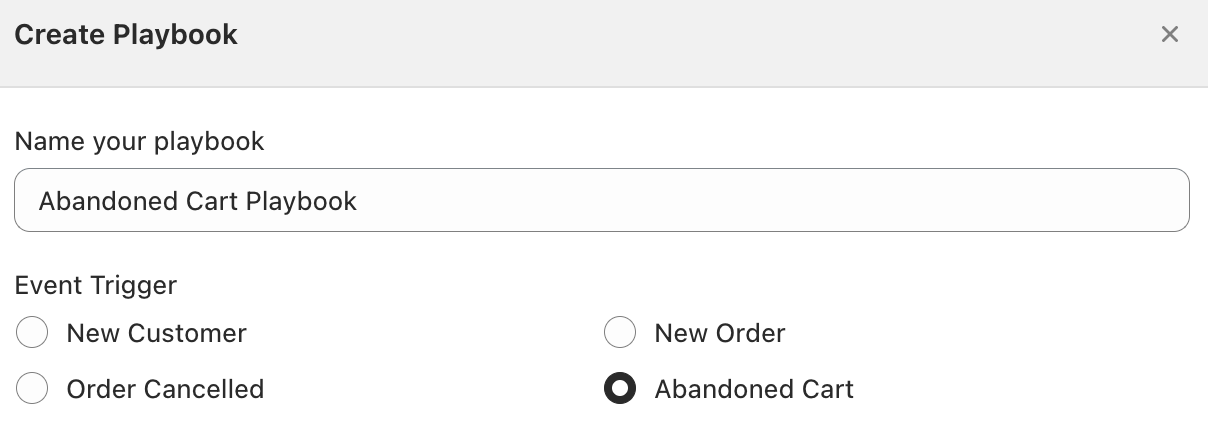
Under Campaigns click Create a Playbook
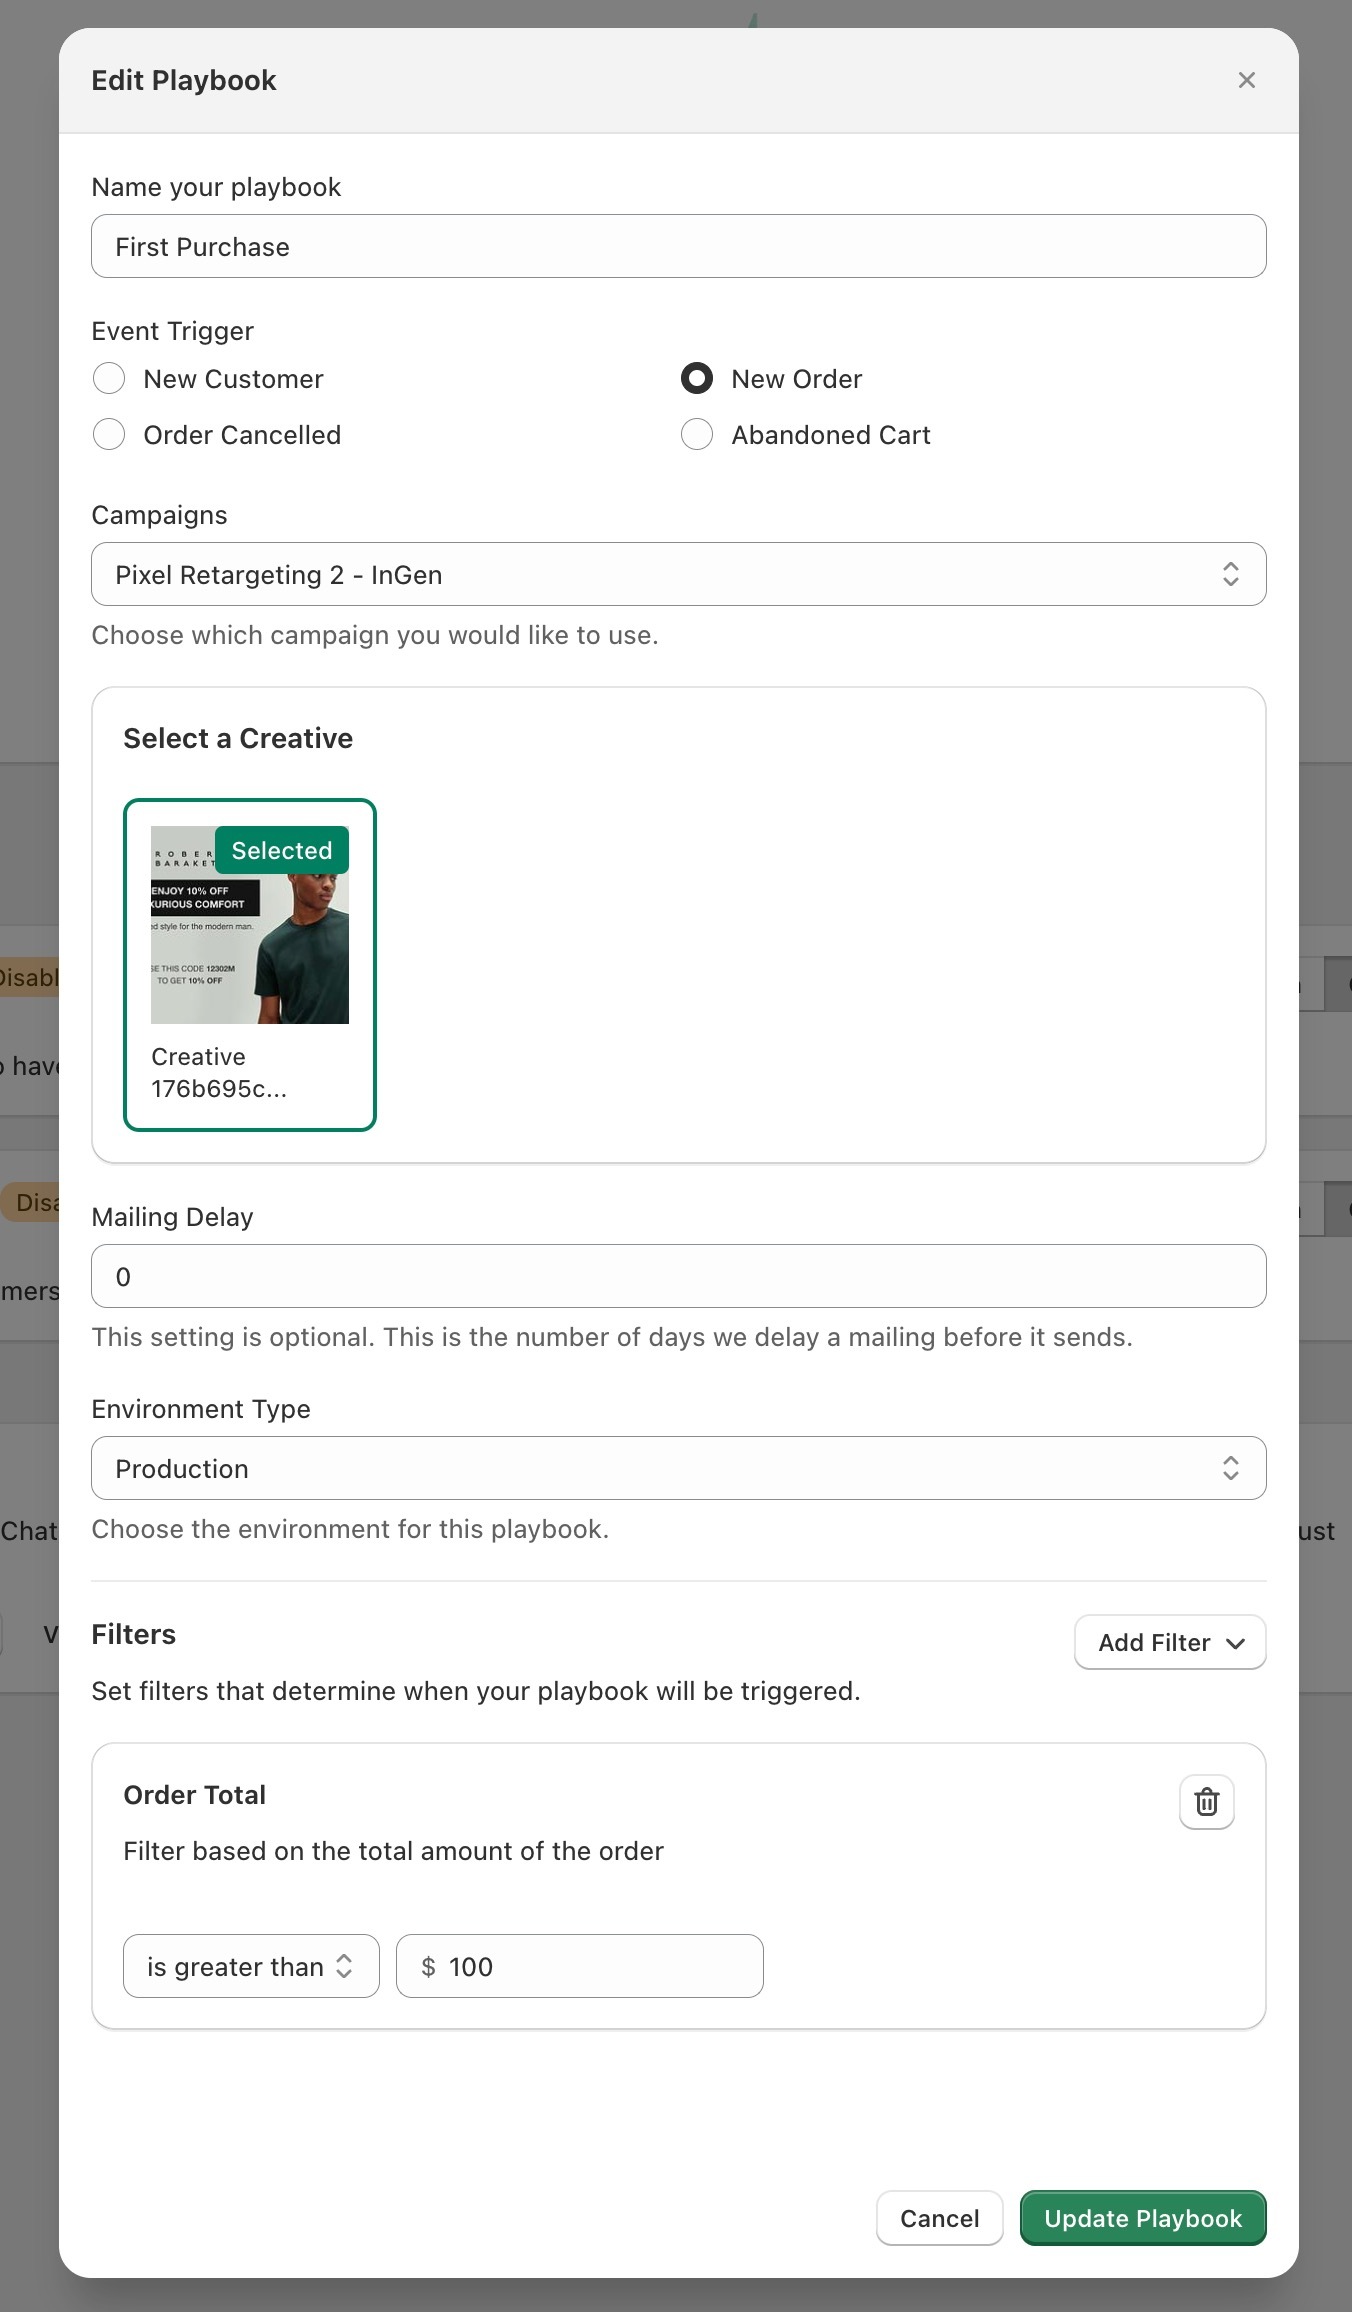
Name your playbook and select the type of event you would like to target. You can choose between 4 event triggers:
Abandoned Cart: Send mail to potential customers who abandon the checkout process in your Shopify store and get them back on track to convert.
New Order: Send mail to customers to request a review or cross-sell/up-sell complementary products after a purchase.
New Customer: Send postcards introducing your brand to a new customer after their first purchase.
Canceled Order: Bring customers who cancel an order back to your site with an offer code.
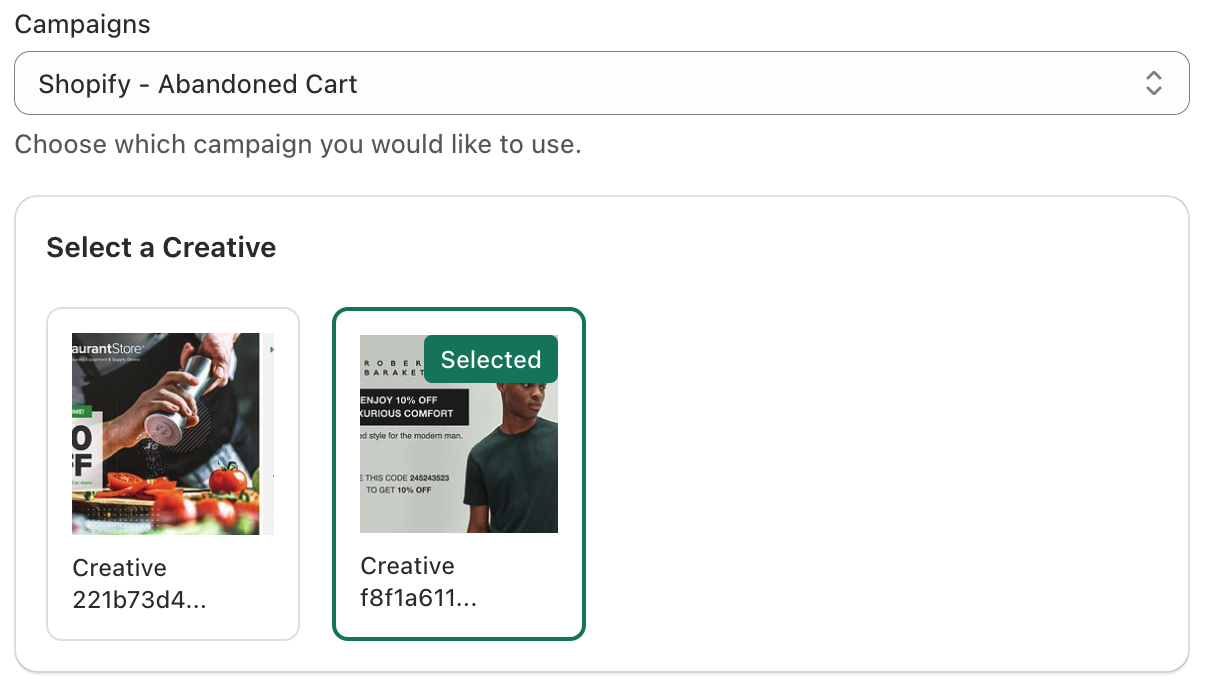
Once your Trigger is selected, choose a Campaign and Creative you’d like this segment to be mailed.
Only one creative can be selected per campaign. To target multiple creatives with the same use case or event trigger, create separate Poplar campaigns for each Playbook.
Optional: Set a Mailing Delay. This setting is defaulted to 0 which triggers the mailing to go into production immediately.
IMPORTANT: Select your Environment Type. Choosing Production will trigger the mailers and send them into the mail stream. Choosing Test will flag each triggered customer as “test”, and the mailings will not go out.
💡 Tip: The test environment allows you to gauge volume of a segment without having to use any allocated budget.
Once you choose your event trigger, you can optionally add filters to send to a more targeted audience. Choose Add Filter and select any filters you want to apply to the playbook trigger.
Each event trigger comes with its own set of filter options. See the Filter Engine section below for a guide to available filters and their functions.
When selecting filter rules, you have two main options: you can either allow the event to mail if all filters are true or allow the event to mail if any of the filters are true. If you choose not to configure any filters, every event will mail, provided there is enough customer information to do so.
In the Final Touches section, you'll see the option to choose a Test or Production environment. The Test environment will behave as if in production, so you can gauge volume and confirm filter success, only no mail will send and you won't be charged.
We recommend first enabling your playbook under the Test environment, to ensure the connection is successful and requests are coming through to your campaign's History tab in Poplar.
To go live and start mailing, change this setting to Production and click Save Playbook and switch the status to ON!
Playbooks that are toggled OFF do not send requests to Poplar regardless of the deployment environment.
Transactional reporting is enabled by default. Order data will be shared with your Poplar account and used to generate in-platform reporting metrics. It will also auto-populate the Customers (Orders API) audience with billing and shipping addresses which can then be selected for suppression from other campaigns. Please refer to the Orders API documentation for details on what information is being passed in the call.
Below is a brief description of each filter and applicable events.
Event
Key
New Order
NO
Cancelled Order
CO
Abandoned Cart
AC
New Customer
NC
Filter Name
Event Triggers
Description
Total Price
NO, CO, AC
The total price of the order
Accepts Marketing
NO, CO, AC, NC
Whether the customer agreed to receive marketing
Order Count
NO, CO, AC
How many orders the customer has placed in the past
Line Item SKUs
NO, CO, AC
Whether an order contains an item with the specified SKU ( case insensitive)
Product Title
NO, CO, AC
Whether an order contains an item with the specified product title ( case insensitive)
Variant Title
NO, CO, AC
Whether an order contains an item with the specified product title ( case insensitive)
Total Spend
NO, CO, AC, NC
The total amount spent by the customer
Verified Email
NO, CO AC, NC
Whether the customer has verified their email
Poplar Custom Activity for Journey Builder
Requirements:
You must have Salesforce Marketing Cloud (SFMC).
You must have organization access to Salesforce Journey Builder.
You must be a Salesforce administrator to be able to install the Custom Activity for your organization.
You will need a Custom Activity URL (obtained in Poplar) to perform the installation in Salesforce.
The Poplar Custom Activity was built with Data Extensions as the main intended entry source
Poplar’s Custom Activity lets you pass a contact from Salesforce Journey Builder to Poplar as part of your Salesforce Journey, and send that customer a postcard or letter.
This URL is unique to your Poplar organization and is essentially your "key". Do not share this URL with anyone outside the organization.
Log into Salesforce Marketing Cloud and hover over your profile icon to access Settings > Setup. Under the left-hand navigation, click into Platform > Apps > Installed Packages:
Click the New button in the top right corner and give the new package a recognizable name, then hit Save:
Next click Add Component and you'll want to select the Journey Builder Activity component type:
Set your Journey Builder Activity Properties with a recognizable name and Messages as the Category. Then head back to Poplar to copy your Activity URL and paste it into the Endpoint URL field:
Hit Save then copy your JWT Signing Secret (NOT the "Unique Key") and paste it into Poplar under Step 3 and hit Save:
Data Extensions hold your audience member attributes, which will be mapped to corresponding values in Poplar during the trigger request (i.e full name, address 1, address 2, city, etc.).
If you already have a Data Extension set up, skip to Part III. Otherwise follow the setup instructions linked below:
Now that you've installed the Poplar Custom Activity, it's time to use it in a journey! While building your Journey, you'll see the option to switch between Test and Production in Step 5 - we highly recommend starting in a Test environment so you can fire the trigger without actually sending any mailers.
From your SFMC dashboard, navigate to Journey Builder and click Create New Journey.
For this type of flow, select Multi-Step Journey.
For demonstration purposes, we'll be selecting the Poplar_DM extension from the Data Extension Setup tutorial.
Make sure your Data Extension contains record that can be used to test the integration connection.
Under Activities, select the Poplar Custom Activity from the Messages section and drag it into your Journey to reflect when you'd like to trigger a mailer.
As mentioned, we recommend selecting a Test environment so no real postcards are sent when testing the trigger. Once you've confirmed the connection is successful, you'll come back and switch to the Production environment to go live.
In each of the fields in the Poplar Custom Activity config, you need to reference the data columns from your selected Data Extension using the following syntax:
{{Contact.Attribute.<data-extension-name>.<SFMC-attribute-name>}}
Once you've mapped all the fields and selected your campaign, hit Done.
If your creative contains custom merge tags, you'll want to make sure that data is also stored in your Data Extension. Expanding on the example above, say the Data Extension also contains LTV and code attributes:
To map the SFMC code attribute data to the {{custom.promo-code}} merge tag in your Poplar creative, you'd want to set the Merge Tag Key to promo-code and the Merge Tag Value to {{Contact.Attribute.Poplar_DM.code}} as pictured below:
Before activating, you must set your Schedule settings. Click Schedule and select the Run Once option:
On the next screen, click Edit to select the Entry mode. For demonstration purposes, we'll be selecting On activation:
Click Done to close out the Schedule settings. Next, click Validate in the top right to Edit the Settings for your Entry Mode values:
The key here is to specify whether or not a contact can re-enter a Journey. When testing, we recommend selecting Re-entry anytime. Click Done to return to the Validation Results screen, the click Revalidate and Save.
If your Journey is in Test mode, you can safely activate without actually sending any mailers. After confirming the triggers are successfully coming through to your Poplar campaign's History tab, you can switch to Production mode and Activate your trigger to go live!
Hitting the Test button that brings you to the "Choose Contacts" page does not test the trigger connection, it only checks your data within SFMC.
Once you've completed your setup and returned to the Journey dashboard, you're ready to test the trigger connection by clicking Activate!
Head to Poplar, click into your campaign and head to the History tab to see the successful test triggers come through:
Click into one of the Test mailers and scroll down to the Request Details to make sure all your data is coming through and mapping correctly.
Once data is flowing through correctly and to your specifications, head back to the Journey, Pause it, and click the Poplar Custom Activity to switch to your Production environment (create a new Version of the Journey if necessary).
Finally, Activate your Journey again to go live in Production!
Other entry sources into journeys using the Poplar Custom Activity remain untested. If you are interested in leveraging other entry sources, let us know at support@heypoplar.com. You can also contact your Salesforce Account Executive for help on finding out how to reference your specific dataset in the journey.
What is the Salesforce JWT signing secret?
This is a secret generated by Salesforce pertaining to the Custom Activity that you've just installed. Salesforce sends over this secret every time it sends information to the Custom Activity, in our case, sending recipient information to trigger a mailing in Poplar.
Because you've shared the secret with Poplar, we can use that to check against what Salesforce sends us, in order to confirm that it's really Salesforce and not a bad actor attempting to overtake your Poplar account & funds.
Why don't my teammates have access to the Custom Activity?
You must " license" the Custom Activity to everyone in your org in order for them to be able to use it. You can do so underneath the settings for the Installed Package:
How do I specify which creative to use?
You don't need to specify a creative in your Salesforce config. Rather, you will manage all creative rules in Poplar. The Poplar Custom Activity will randomly use an active creative in your selected campaign according to the following rules:
If there is a default creative, we will use the default creative.
If you have NOT set a default creative for the campaign, we will randomize amongst all the active creatives in the campaign.
To set a creative as the default, click Set As Default when you click into the creative.
What is a Salesforce Data Extension?
A Salesforce Data Extension is a relational database table used to store additional Subscriber-related data in Salesforce. It contains custom columns defined by you or your organization. It can be used as the data entry source in an SFMC Journey Builder journey.
Why is there no data passing through to Poplar?
The way your Data Extension is set up may affect whether or not you can pass data through the journey using the syntax {{Contact.Attribute.<data-extension-name>.<attribute-name>}}.
You must bind your Data Extension to the Salesforce contact in order to be able to access the data extension's columns in your journey. Learn more about a successful Data Extension setup.
If your Data Extension name or attributes have any spaces, for example "My Data Extension" or "First Name", you need to wrap it in quotation marks:
{{Contact.Attribute."My Data Extension"."First Name"}}
Accessing Data Extensions from the Journey Event
If you don't have the ability to change the Data Extension setup, you can also try this alternative way of accessing the attributes that are passed from the Data Extension into a journey.
In each of the fields in the Poplar Custom Activity config, you can reference the columns (aka attributes) from your selected Data Extension using the following syntax:
{{Event.<insert event-id-here>.<my-data-extension-column-name>}}
Here's an example to illustrate. Say your Data Extension looked like the table below. You'd use {{Event.<insert-event-id-here>.promo-code}} to pass the promo code with a value of WELCOMEBACK20 for Jane Doe and WELCOMEBACK25 for James Bond to Poplar.
To grab the event-id , right click to inspect the page code after setting up your Data Extension in Journey Builder and search for "DEAudience". Copy and paste the id into your Poplar configuration entry field.
The code typically looks like this when you inspect it:
<li data-value="{{Event.DEAudience-ab1c2de3-456f-7ghi-8901-etc."Email"}} ...
DEAudience-ab1c2de3-456f-7ghi-8901-etc would be your event-id.
Note: If you change the Data Extension you are using for this journey, you need to inspect the code again and grab the new event-id related to the new Data Extension.
In short, no. The Poplar Custom Activity is currently provided free of any SaaS fee. You only pay the flat rate for each piece you mail.
Still need help? Contact support@heypoplar.com for assistance.
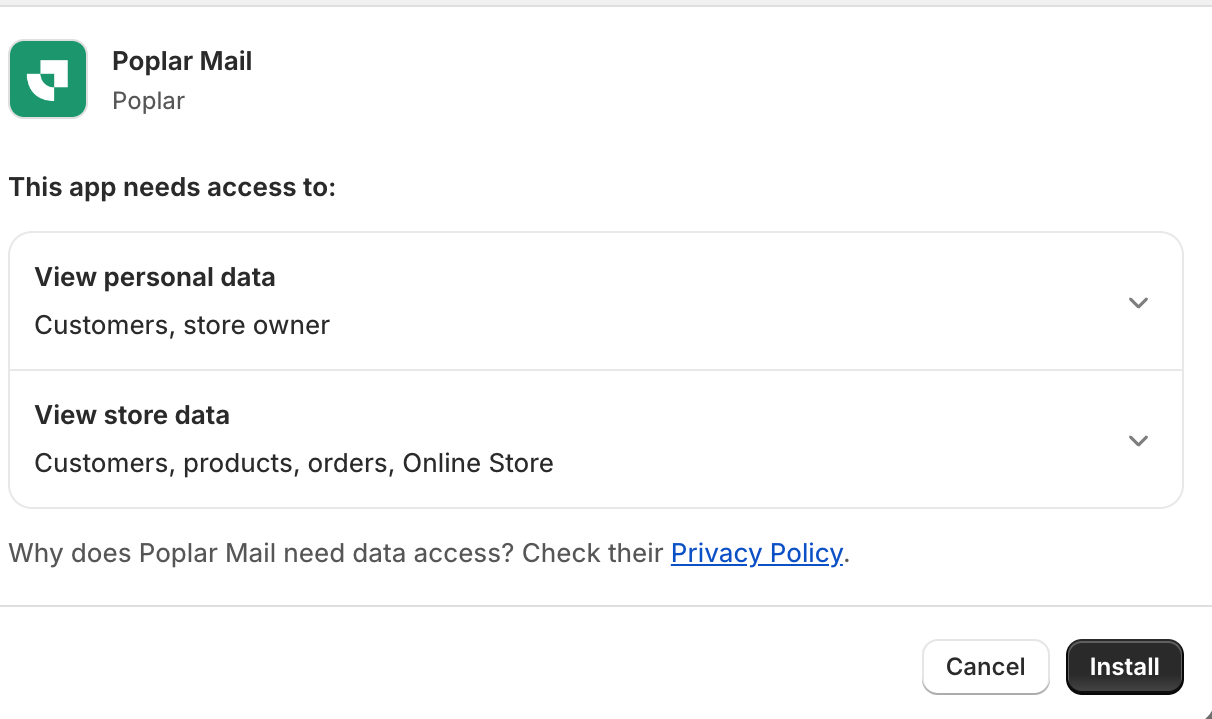
Head to the store page and click Add app to install.
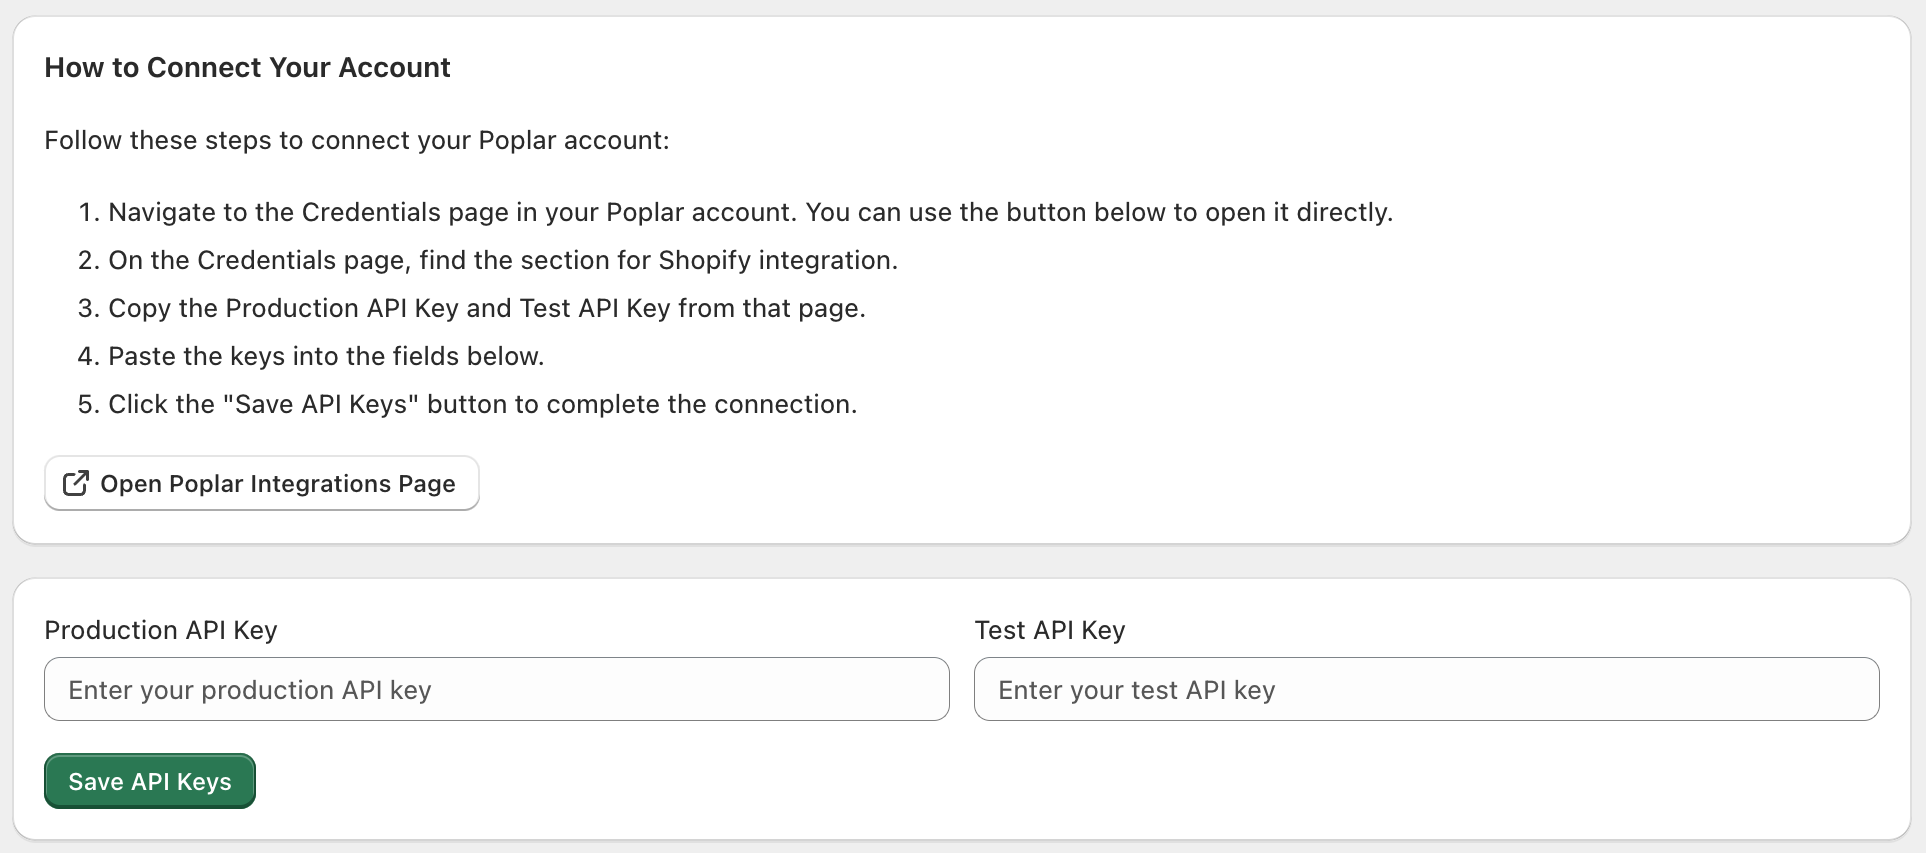
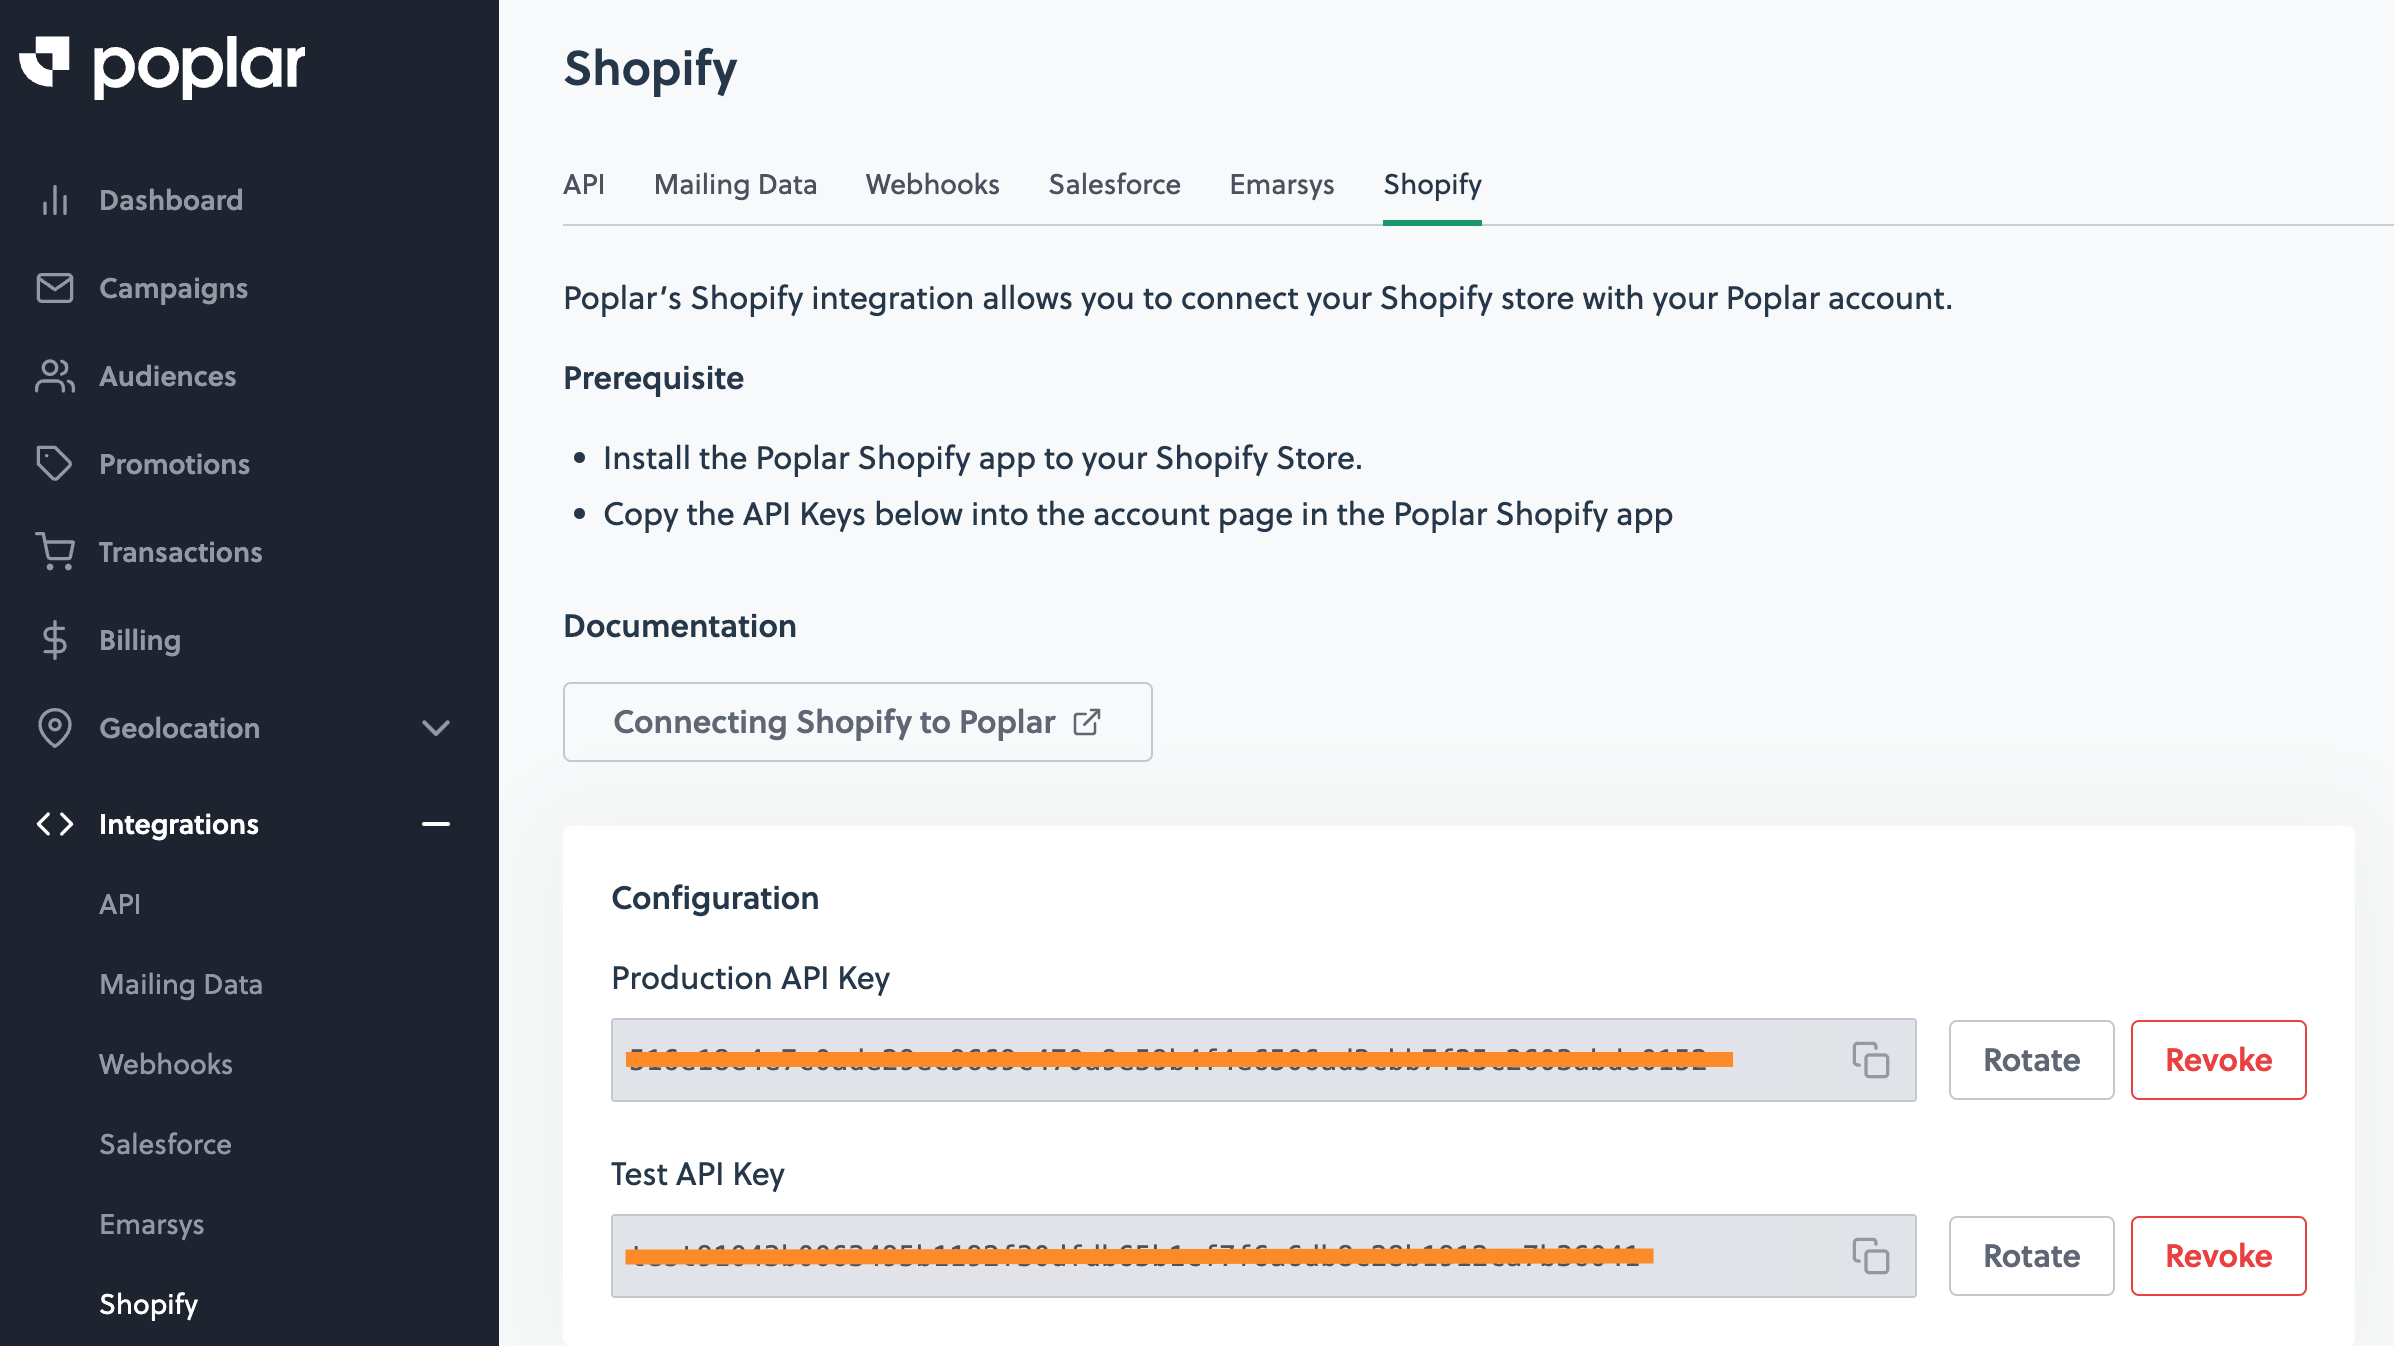
Once your Poplar account is made or you are signed in, navigate to the page in Poplar. Copy your Production and Test API tokens and past them into the "Connect your Poplar Account" page within the Shopify app.
Your account is properly funded under .
Navigate to the API page of your Poplar account and click Get Custom Activity URL under the tab:
If you are new to using Data Extensions in Salesforce, the can be used as an additional reference.
The Poplar Custom Activity was built with as the main intended entry source. Drag and drop Data Extension into the Entry Source step, then click on the grey icon to select your Data Extension.
Jane
Doe
123 Main Street
$200
WELCOMEBACK20
James
Bond
890 M16 Street
$250
WELCOMEBACK25
first_name
last_name
address
LTV
promo_code
Jane
Doe
123 Main Street
janedoe@mail.com
$200
WELCOMEBACK20
James
Bond
890 MI6 Street
bond@mail.com
$250
WELCOMEBACK25


Before integrating and sending tests with Klaviyo, make sure you've completed the following:
Create a campaign in Poplar
Upload creative (can be a placeholder creative for testing purposes)
For the webhook request to successfully hit the Mailing API endpoint, the campaign_id must be pointing to an Active campaign that has creative artwork uploaded - otherwise you will receive a 400 HTTP error.
From your Dashboard, navigate to your Flows page and use the Create Flow button, or select an existing one by clicking Edit Flow.
If you're creating a flow from scratch, select your Trigger event, set any necessary filters, and click Save, then Done to access the Actions step.
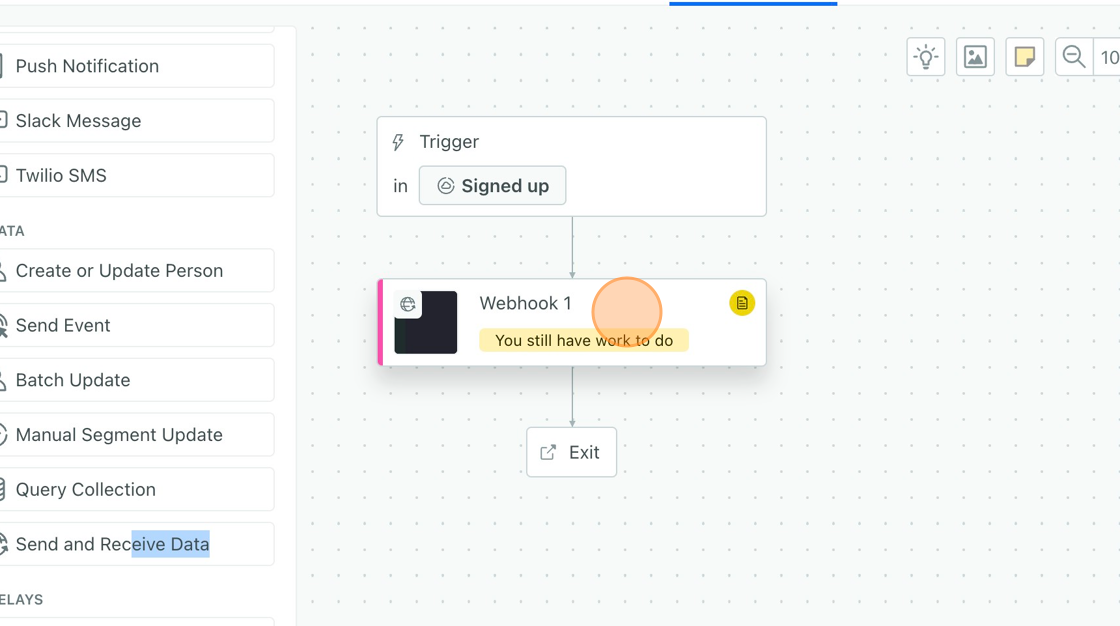
Drag and drop the Webhook action into your flow:
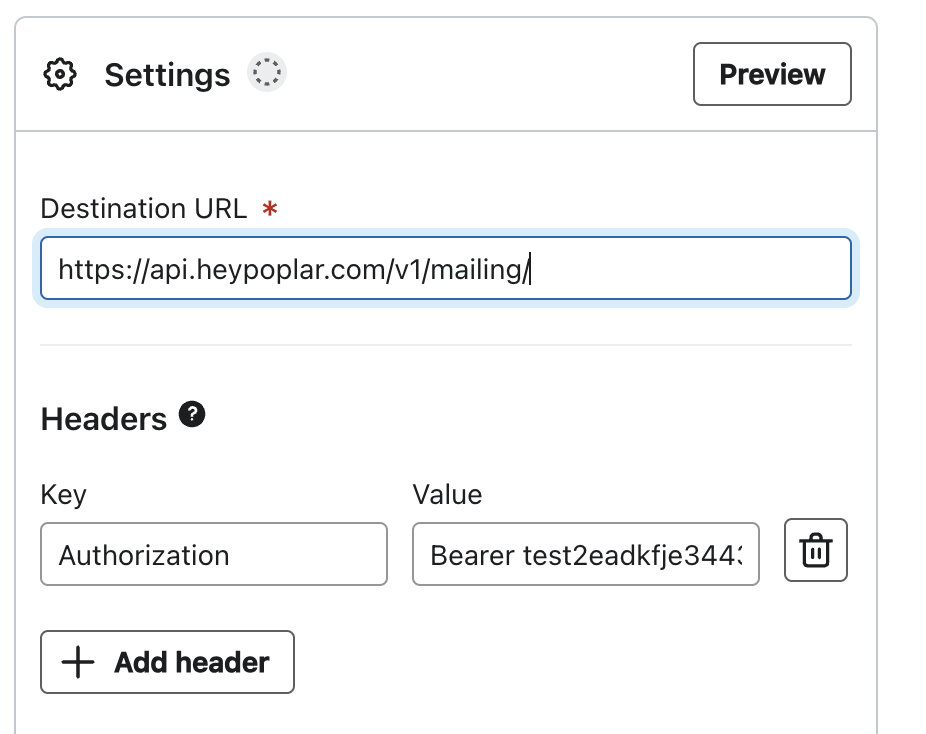
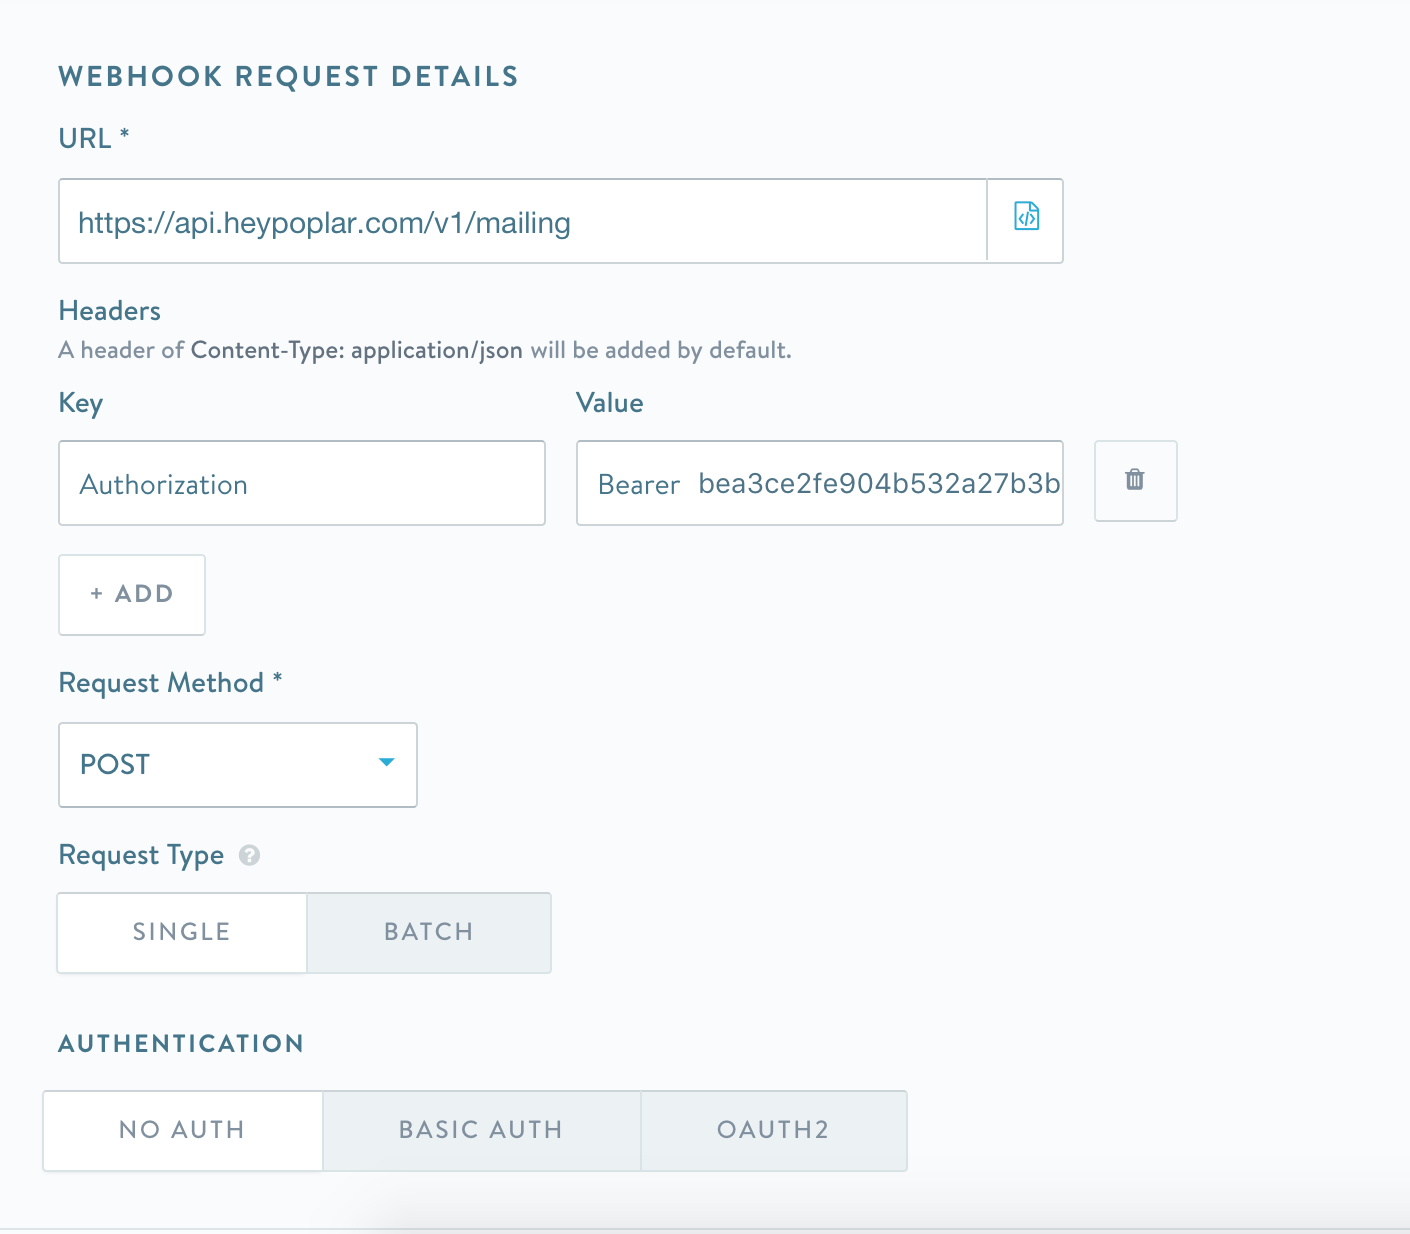
Under the configuration settings on the left, you'll want to enter the following values so that you can trigger a mailing by sending data to our Mailing API:
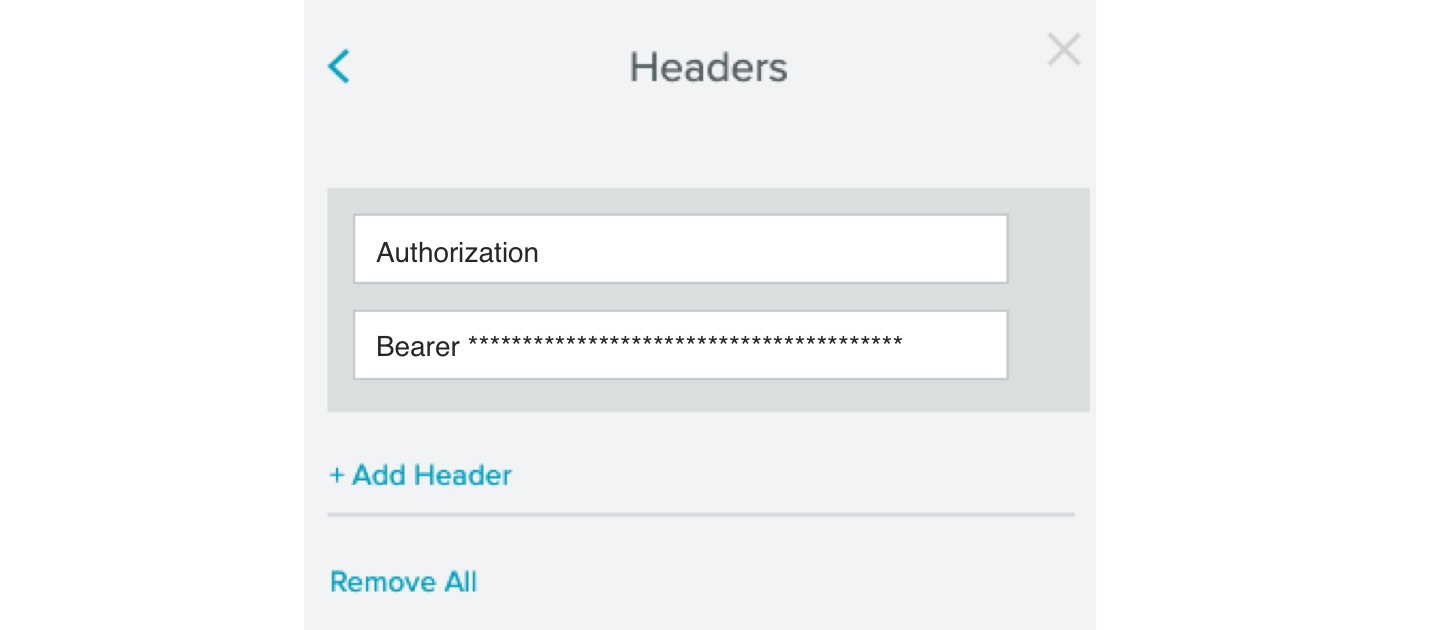
HEADERS
Text
Authorization
Bearer *Test or Production API Access Token*
Your JSON payload should contain all the data you'd like to share with the platform. This includes recipient info such as name, address, customer ID, and/or email, along with any custom merge tags that may be present if you're using dynamic creative.
campaign_id and optionally creative_id will also have to be included in the payload, to tell the trigger which Poplar campaign and (if multiple creatives in a campaign), a specific creative to point to. If creative_id is not specified, the platform will automatically randomize between all active creative under the campaign (ideal setup for A/B testing). If a creative is set to Default, the trigger will only fire the defaulted creative.
If you have customer Shipping or Billing addresses stored in Klaviyo and want to use them for mailing, use the code below as a template for your JSON Body:
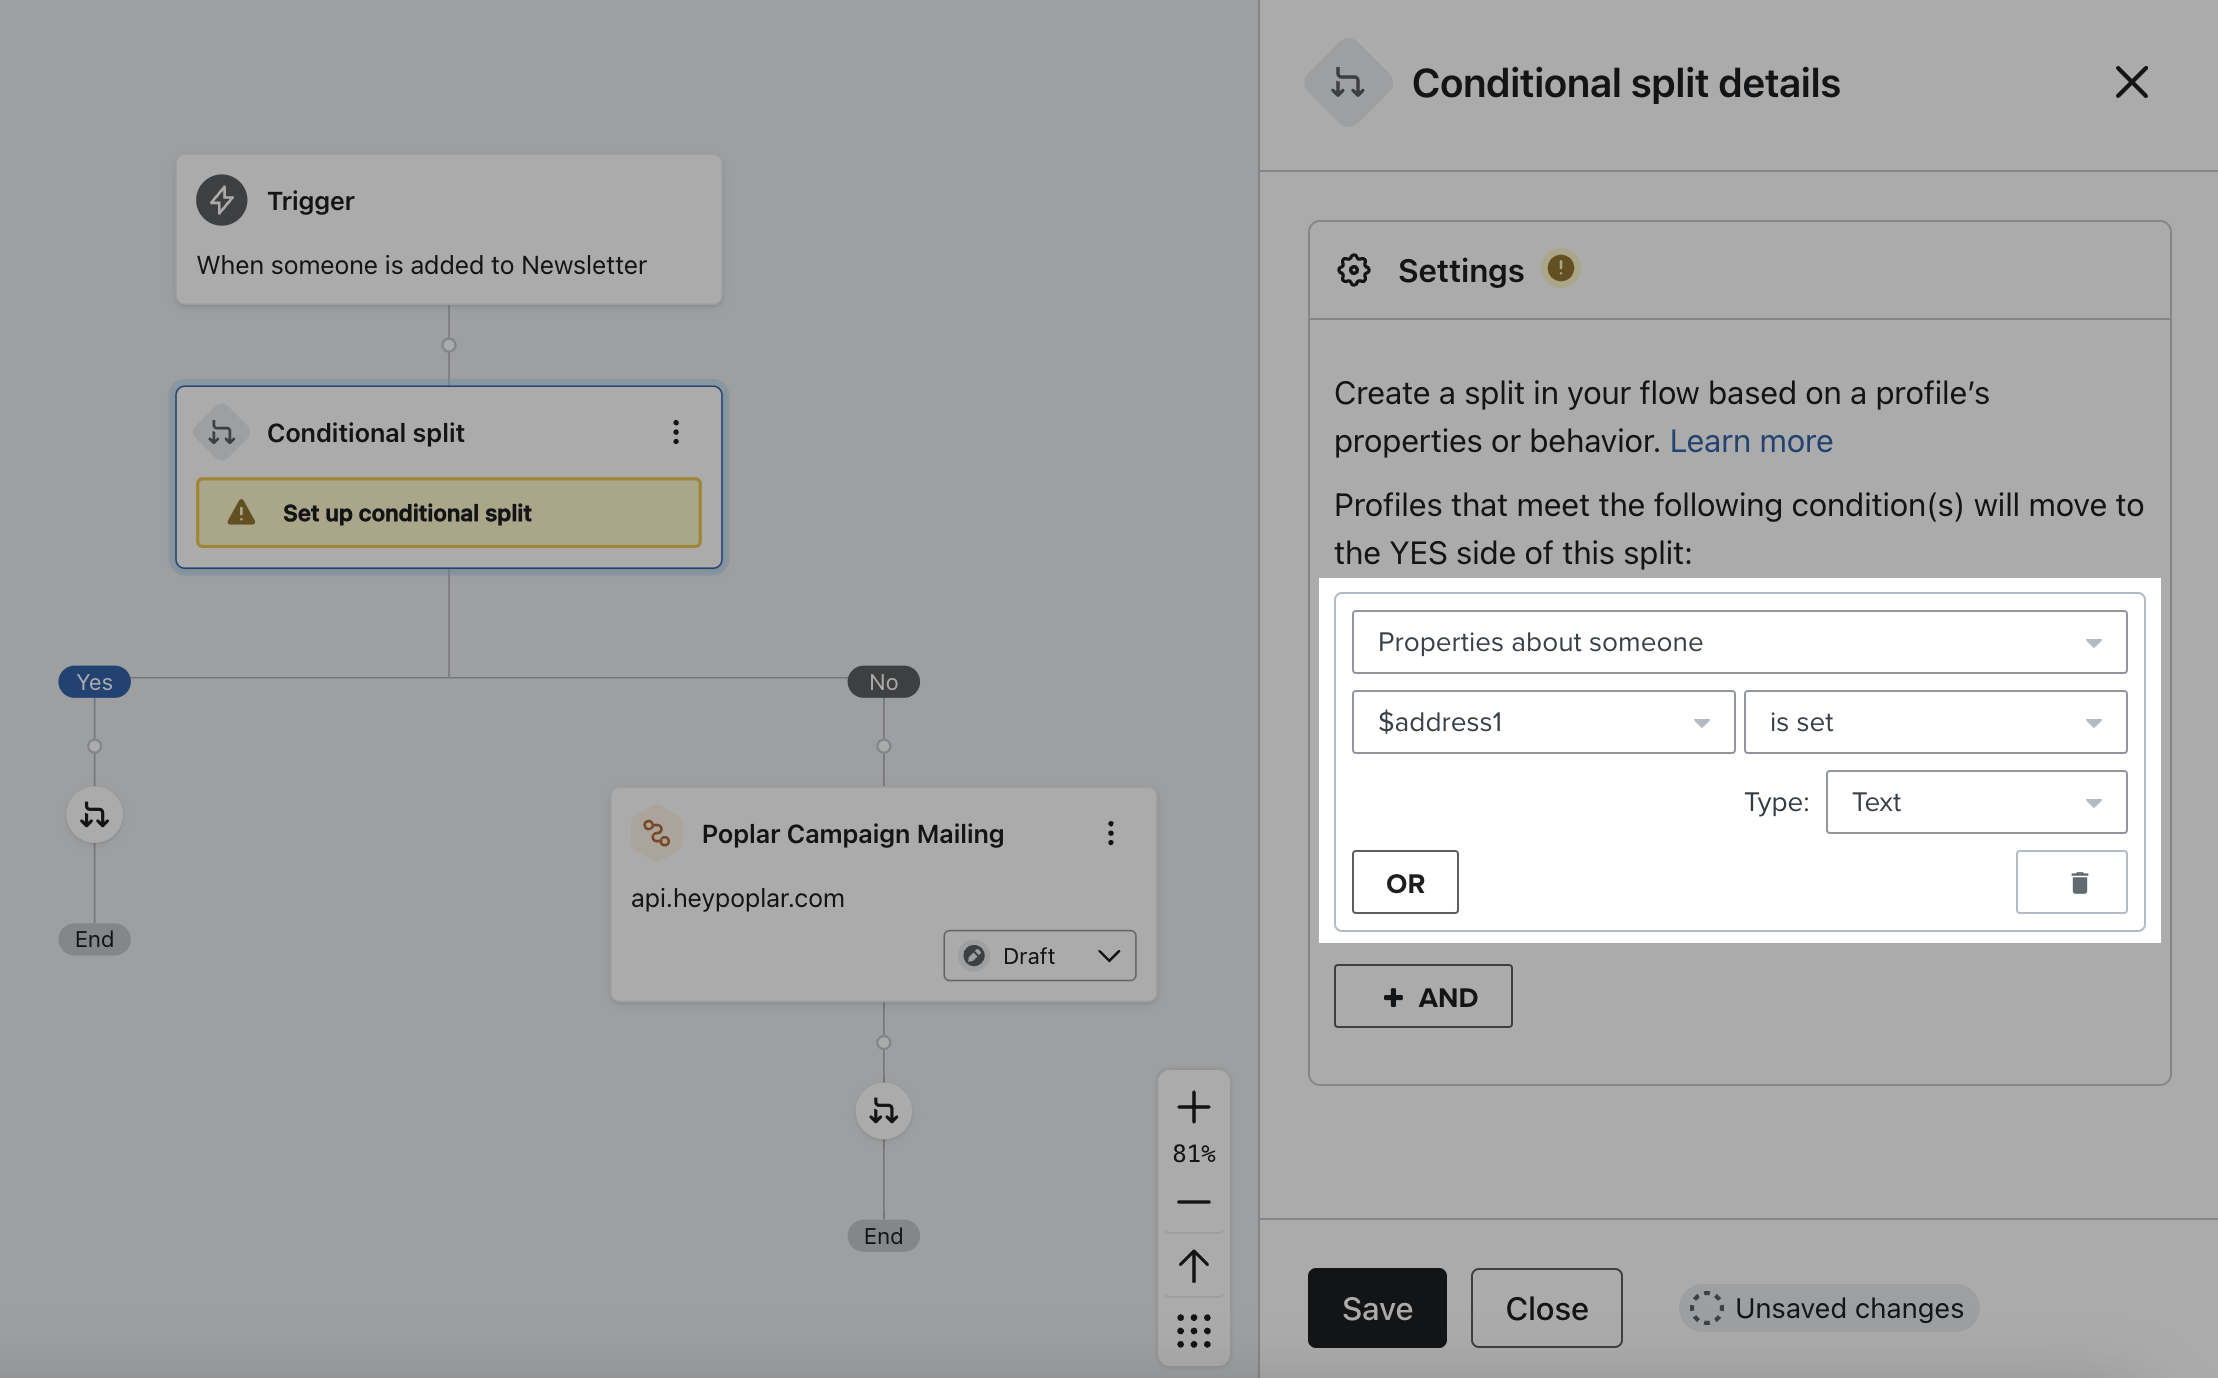
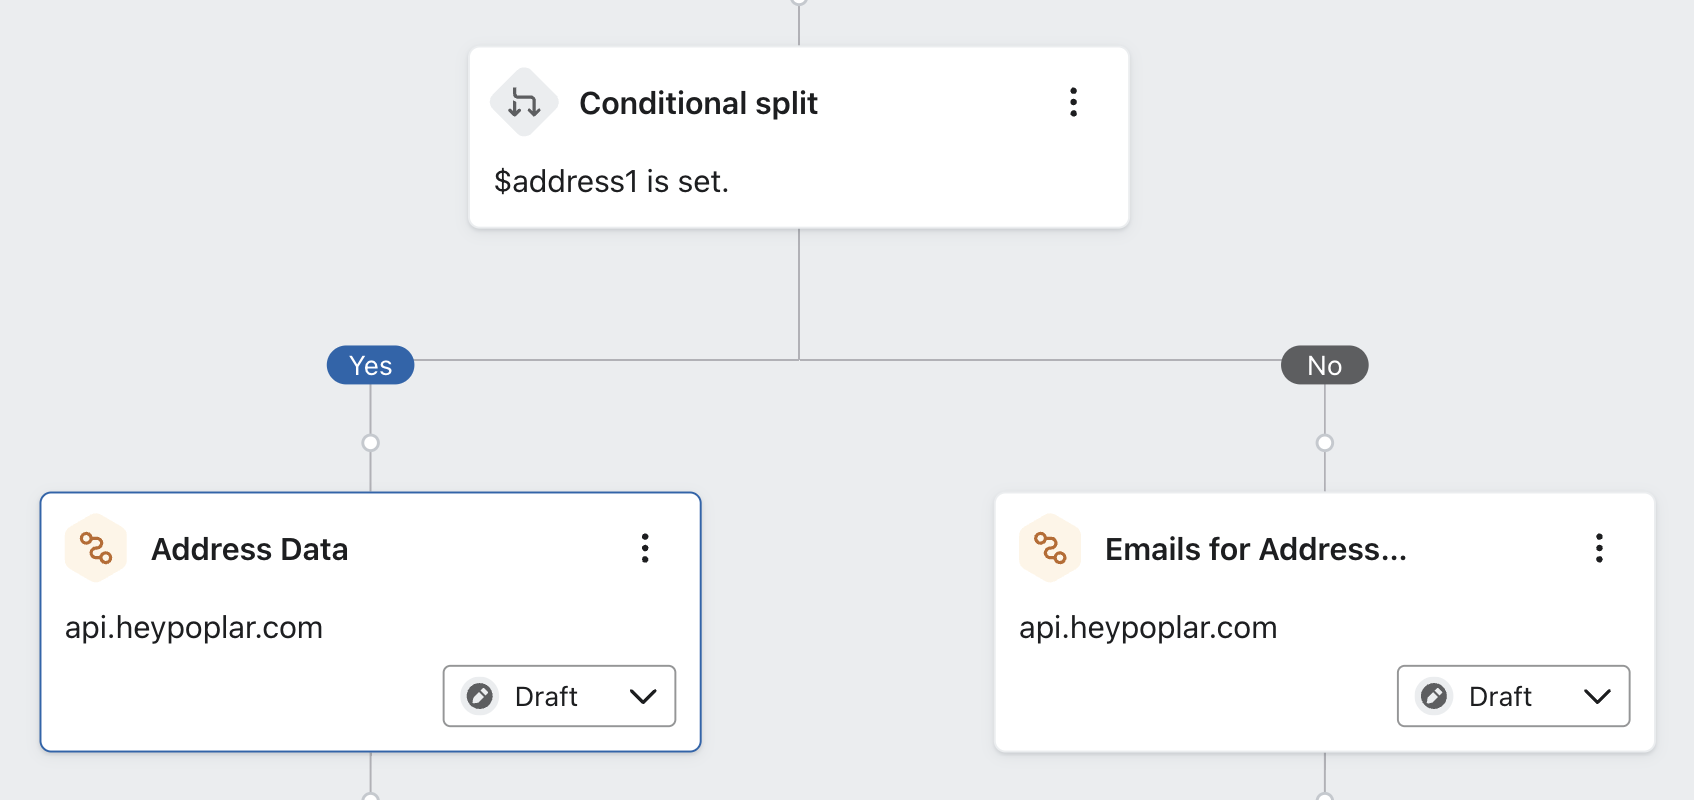
If some of your customers in the flow have properties filled out for only email or an email & address you'll want to use a conditional split block to filter on a customer address field. Then you can set up two webhooks one specific for email append and one with address fields.
Without the conditional split we'll respond with a 400 error on any customers triggered in the flow that have blank address data.
Setting up a conditional slit to handle both address records and email only records.
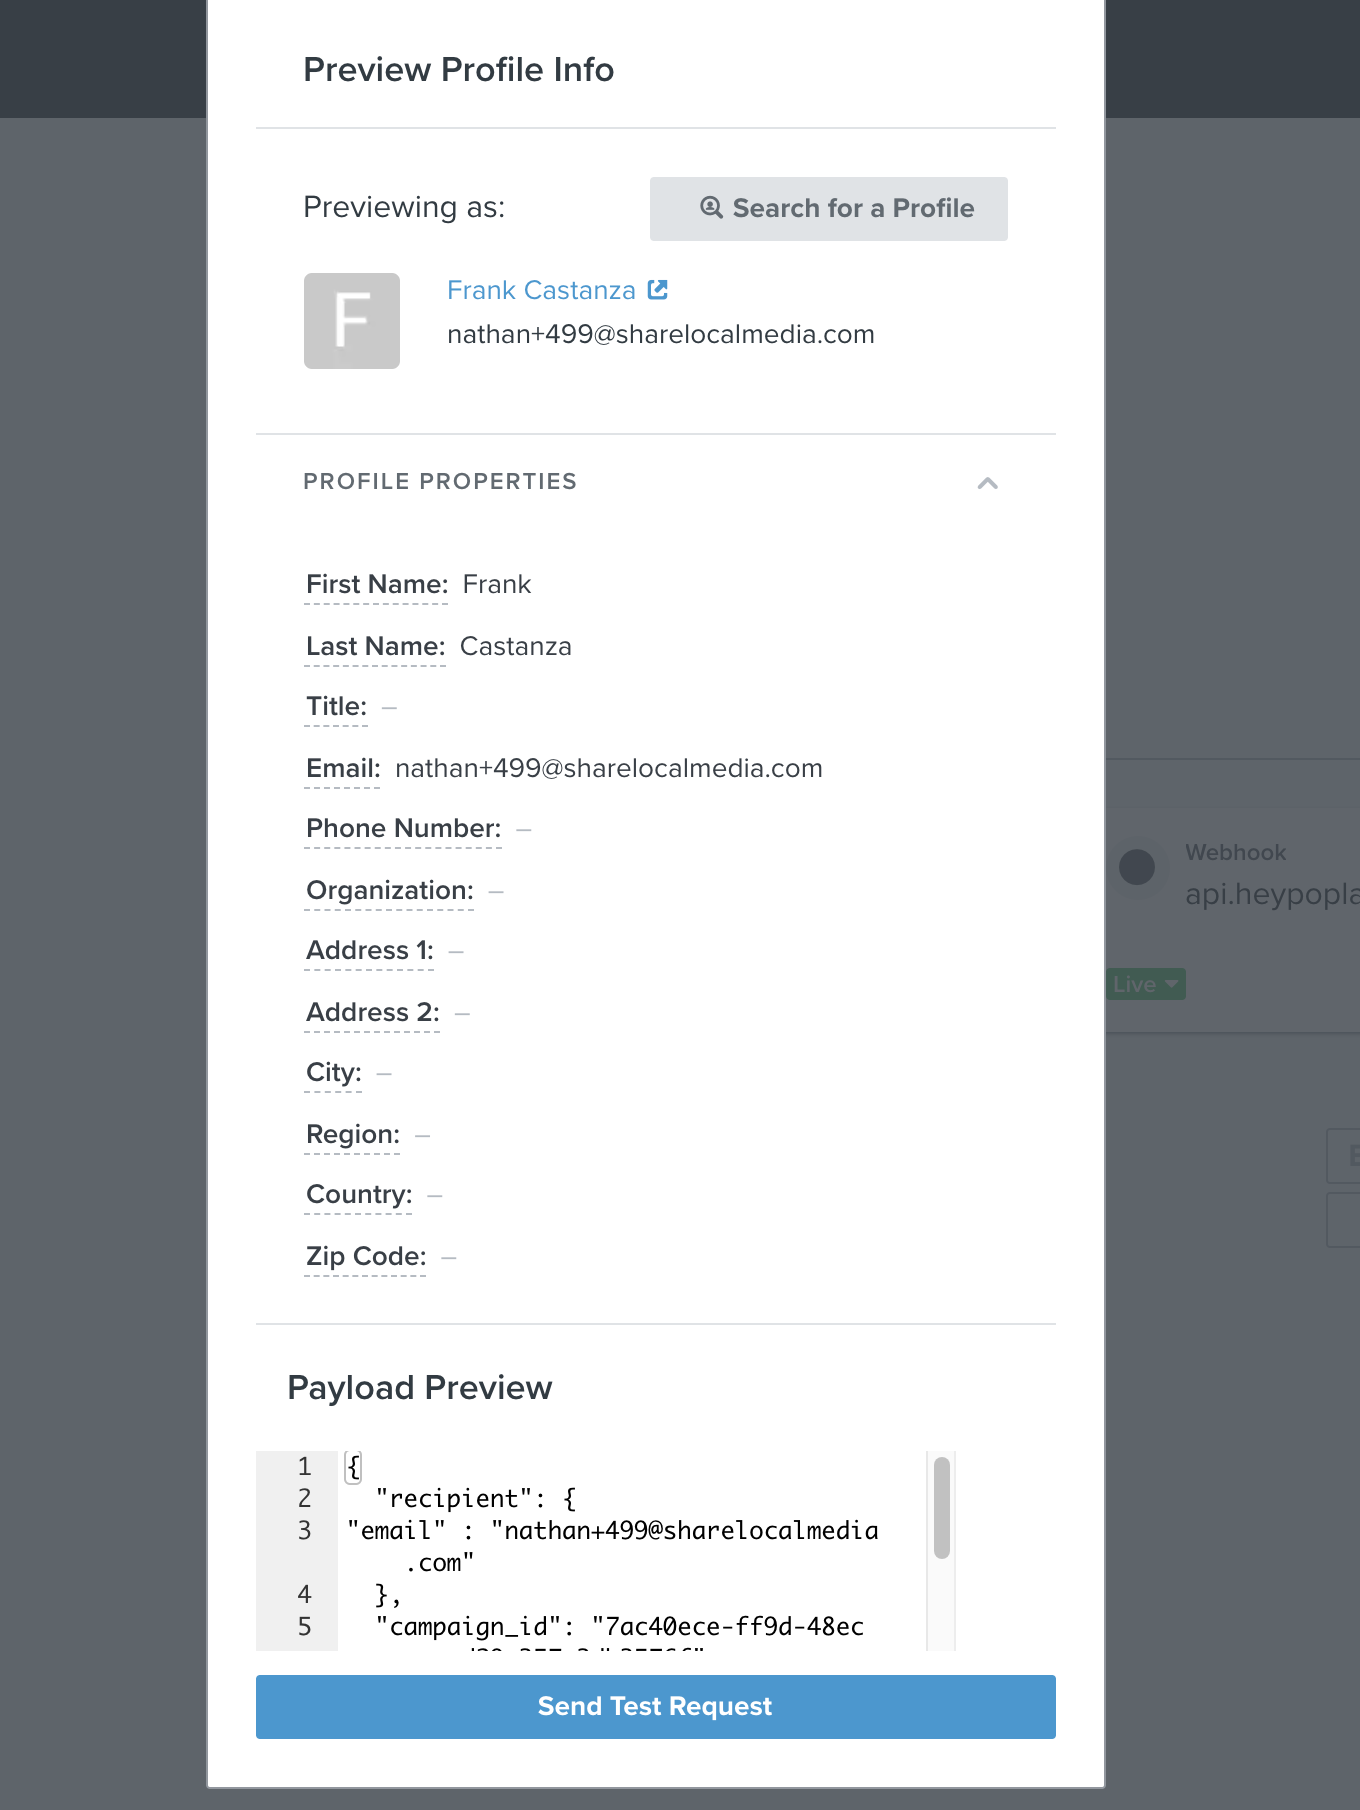
After entering your JSON Body code, click Preview Webhook to view a sample customer profile and ensure all the desired data is being pulled into each field.
The Profile Properties will show all the data for the sample customer, and the Payload Preview will show what data is being pulled into the webhook to be passed to the platform.
Data that appears under Profile Properties isn't guaranteed to be passed to the platform, always make sure the desired data is present in the Payload Preview as well.
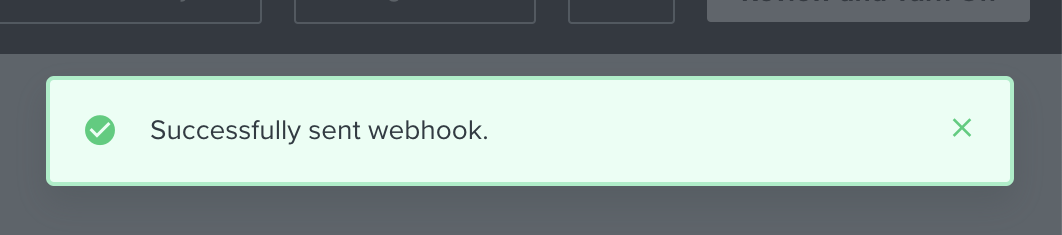
Send Test Request to push the webhook preview to Poplar to confirm the connection is successful. If the trigger goes through successfully, you'll see a green "Successfully sent webhook" in Klaviyo:
201 indicates a successful trigger
If you receive anything but a green success or if you receive a 400 error, consult our Common Questions section below or reach out to support@heypoplar.com for assistance.
Head to the History tab of your campaign within your Poplar account to see successful tests come through:
Click into one of the mailers to see a PDF proof with the user data applied. Scroll down to the Request Details to confirm the data coming through the platform matches your Klaviyo JSON payload.
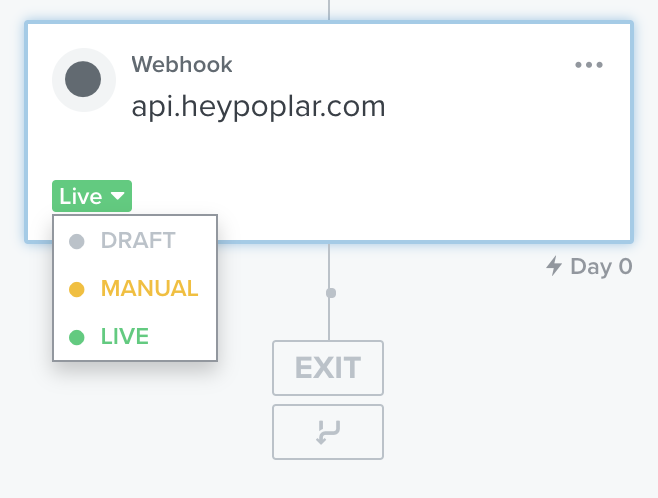
Once you've confirmed the connection is successful and customer data is coming through to Poplar as desired, swap your Production Access Token in place of your Test token under HEADERS. Make sure to Save your updates, the set your Webhook action to Live!
The manual setting will accumulate customers when they reach this step in the flow, and will only get passed onto Poplar if they are triggered manually.
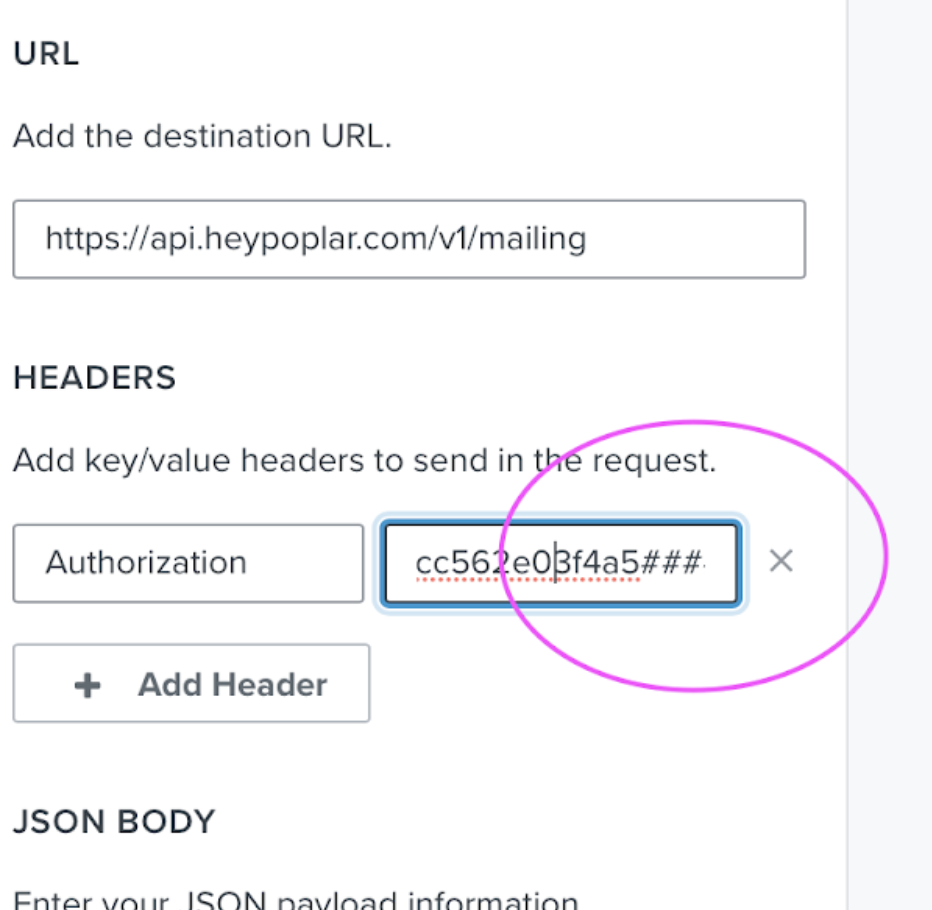
For security purposes, if you clone a webhook the access token entered under HEADERS will be hashed at the end:
We recommend copying and pasting your access token again, then re-trying the test to see if it is successful.
Need help? Reach out to support@heypoplar.com for assistance.
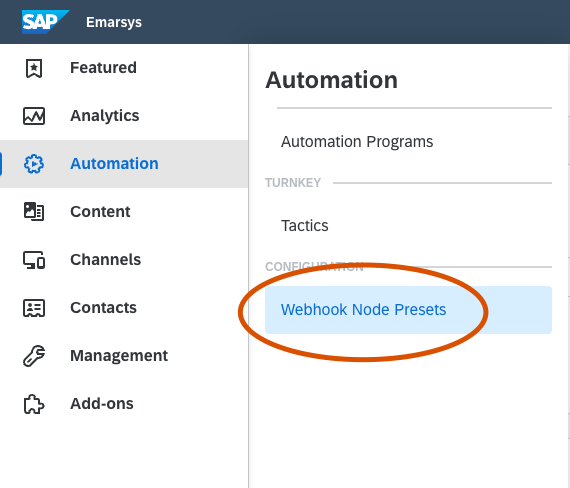
Poplar's Emarsys integration allows you to create a webhook set up in your automations.
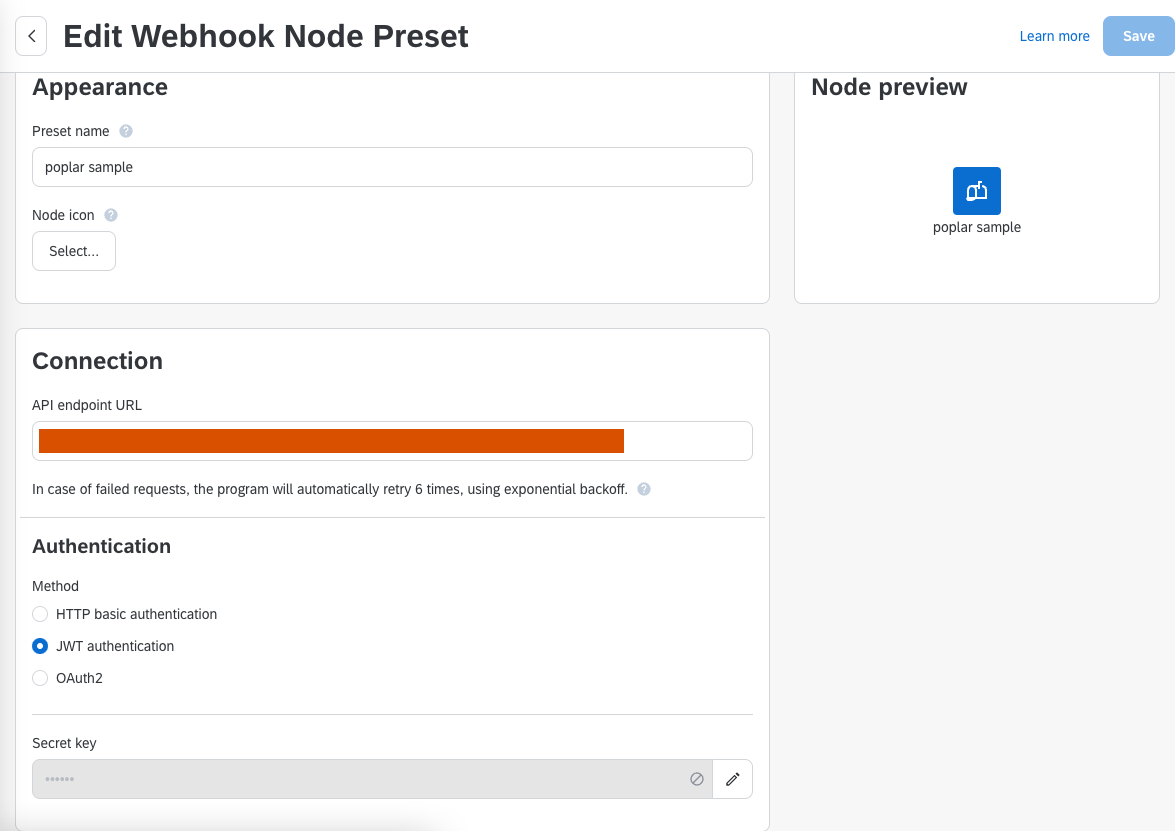
Open your Emarsys console and navigate to Automation > Webhook Node Presets
Name your node preset on Emarsys and select “JWT Authentication” for the Authentication choice. Enter the API endpoint URL and Secret Key from Poplar.
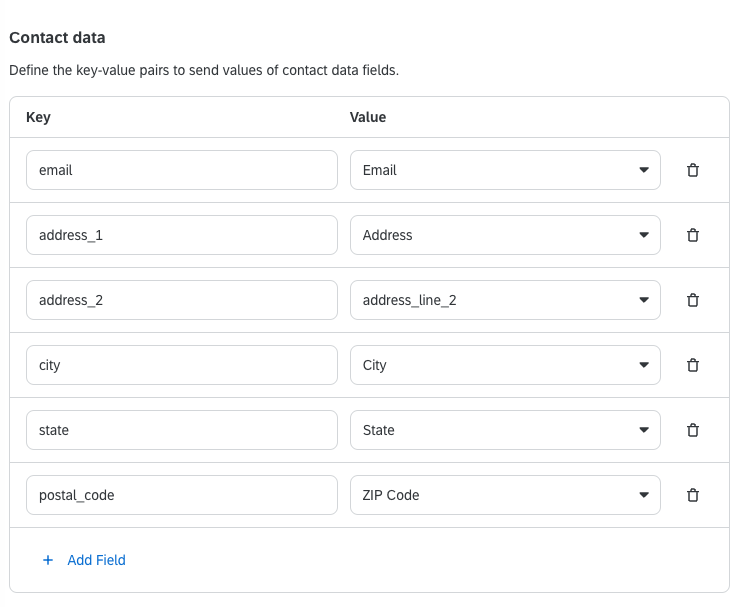
Add a key-value pair for each of these Poplar data fields. Map the appropriate Emarsys contact data field using the drop downs on the right.
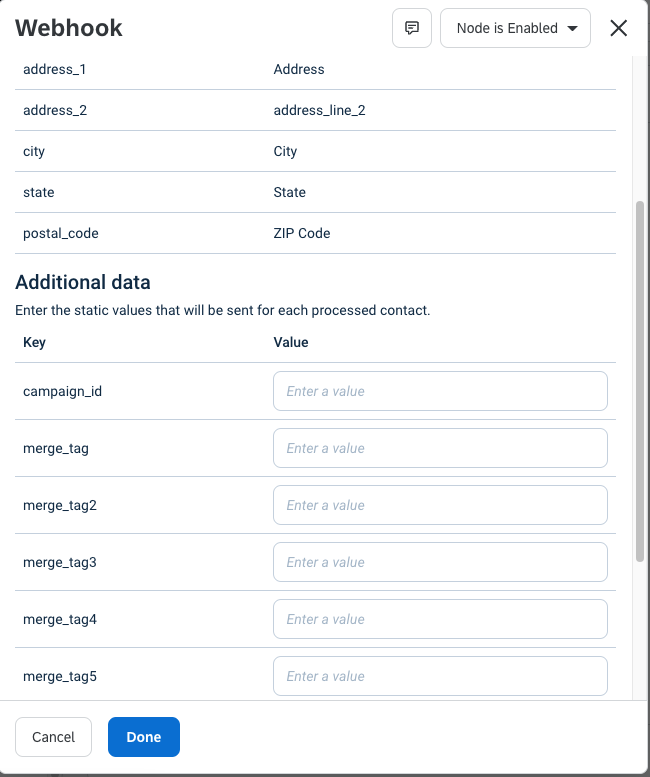
Add Additional Data fields for campaign_id and merge_tags.
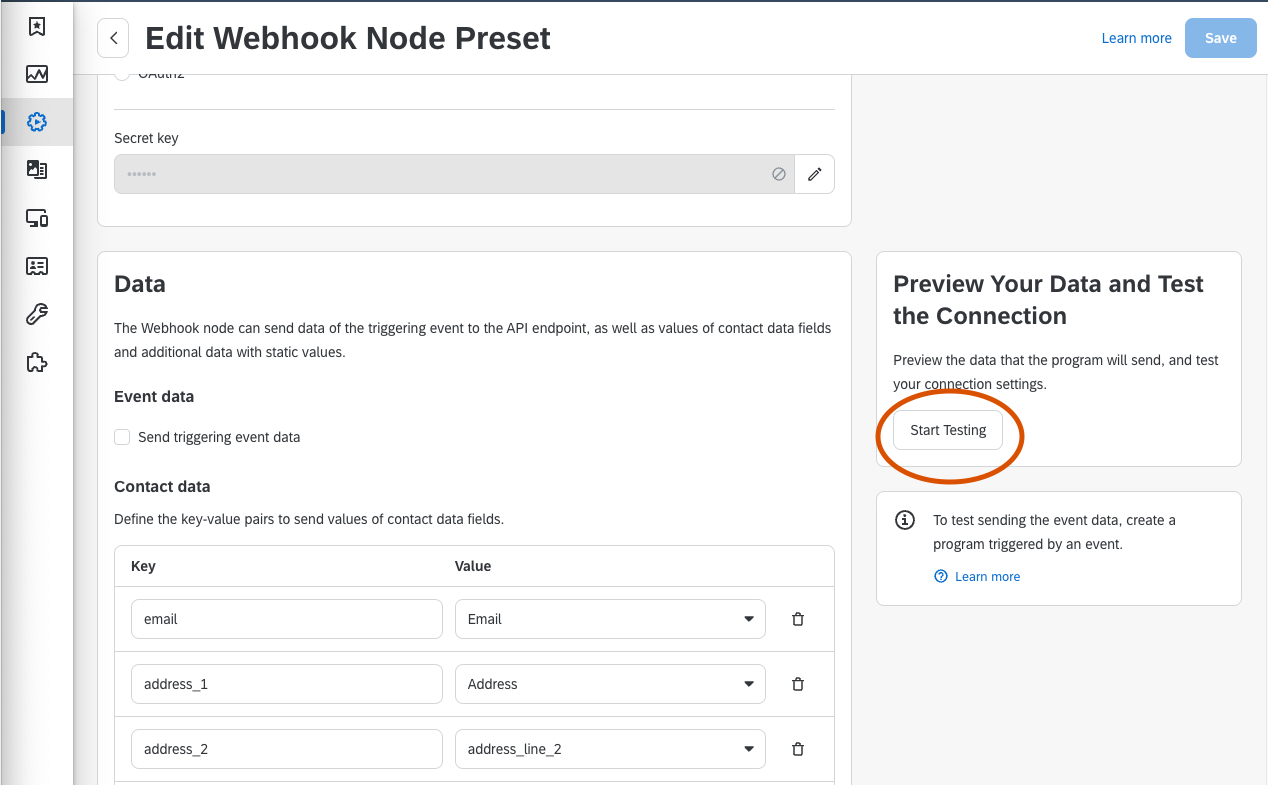
Test the connection with the Start Testing button, then save.
In Emarsys, open any Automation program that you’d like to add a Poplar campaign.
In the Nodes window, find the webhook node in the Channels category and place it in your automation.
Double-click on the Webhook node you just placed. Select your new Poplar node from the dropdown.
Scroll down in this window and add the campaign_id you’d like to send, along with any required merge_tags.
That’s it! We recommend testing your automation with before activating it for your customers.
Reach out to support@heypoplar.com for additional assistance
Before integrating and sending tests with Customer.io, make sure you've completed the following:
Create a campaign in Poplar
For the webhook request to hit our API and be accepted, there must be an active campaign with creative uploaded - otherwise a 400 error will be sent back.
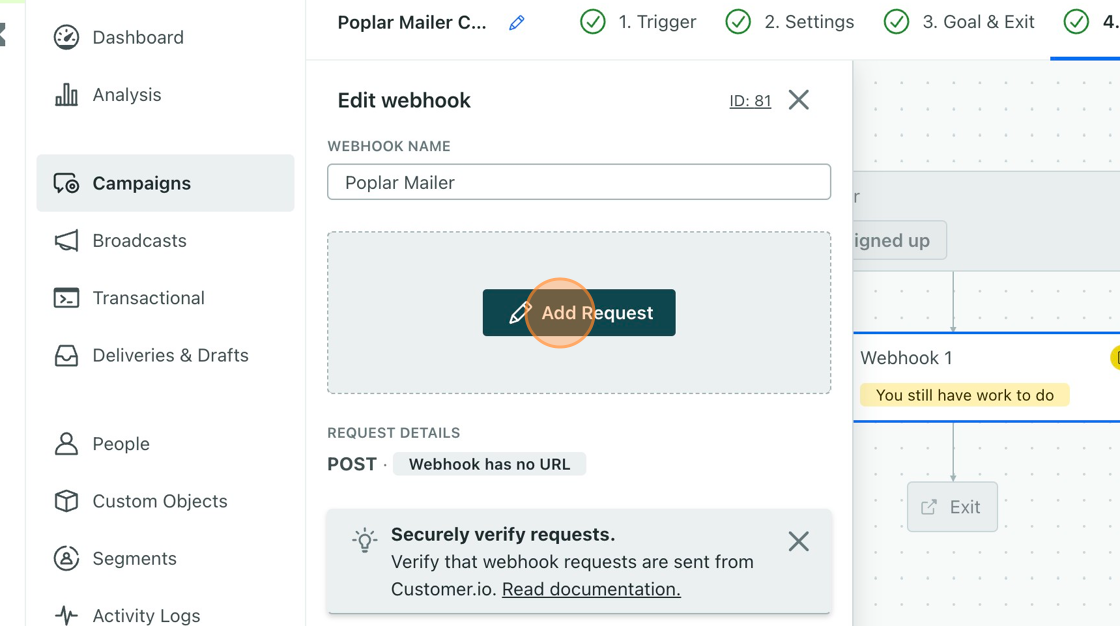
Log in to Customer.io and click the Campaign tab on the left. If creating a new campaign, give your campaign a name, then click Create Campaign.
On the Trigger Step, select the criteria for a customer to enter the campaign flow, then when ready click Next.
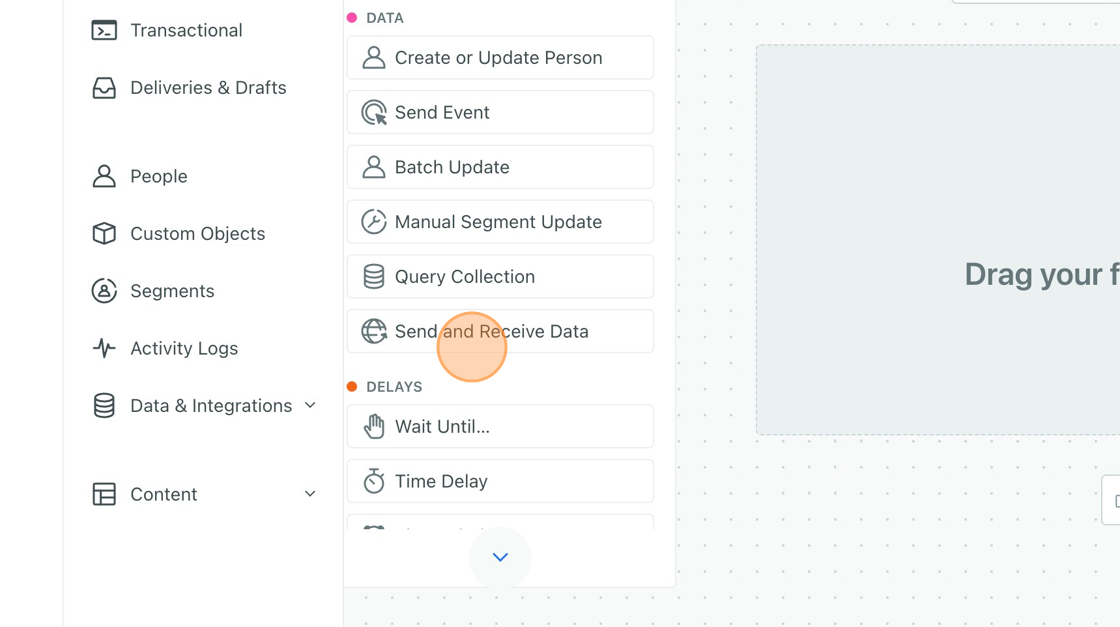
On the Workflow Step, drag and drop the Send and Receive Data action into the flow where you'd like to send your Poplar Mailer.
Click the webhook, name it, and select the Add Request.
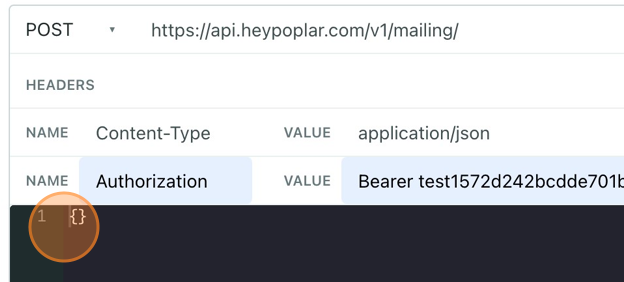
Set the URL to: https://api.heypoplar.com/v1/mailing/
Add an HTTP Header and configure an Authorization key and set the Bearer <Your API Key> (make sure to also delete the <>)
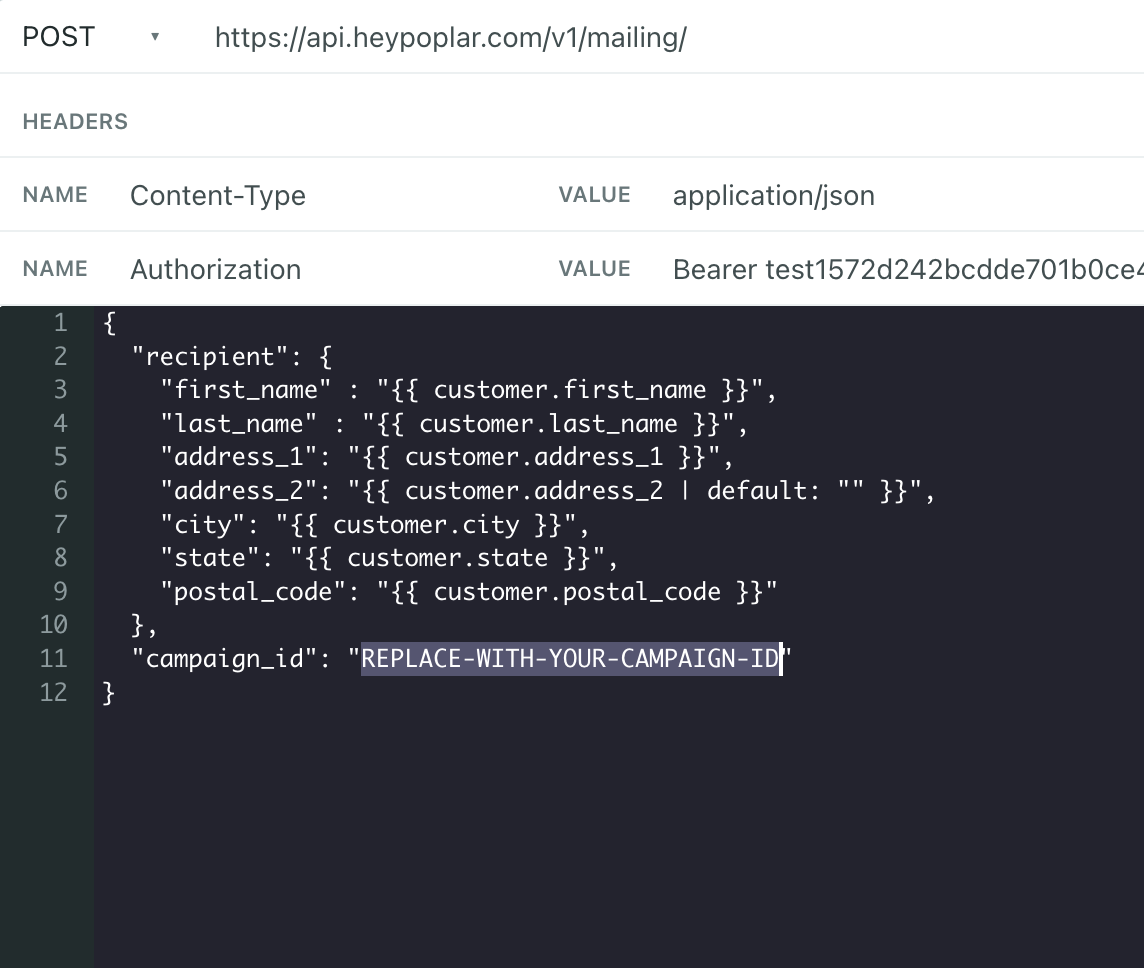
Configure the webhook contents.
If you're doing address enrichment you just need to pass the email in the recipient block, the campaign_id, and any other variable data (Merge Tags). If mailing existing customer addresses, you'll pass in the full address. Note the double brackets surrounding the variable data being passed.
For an email append: the customer attribute names you have in your account may differ and need to be modified.
For a full address mailing:
You can also add merge tags with your own variable data at the end. When using first & last name options instead of full name you need to include both or it will error.
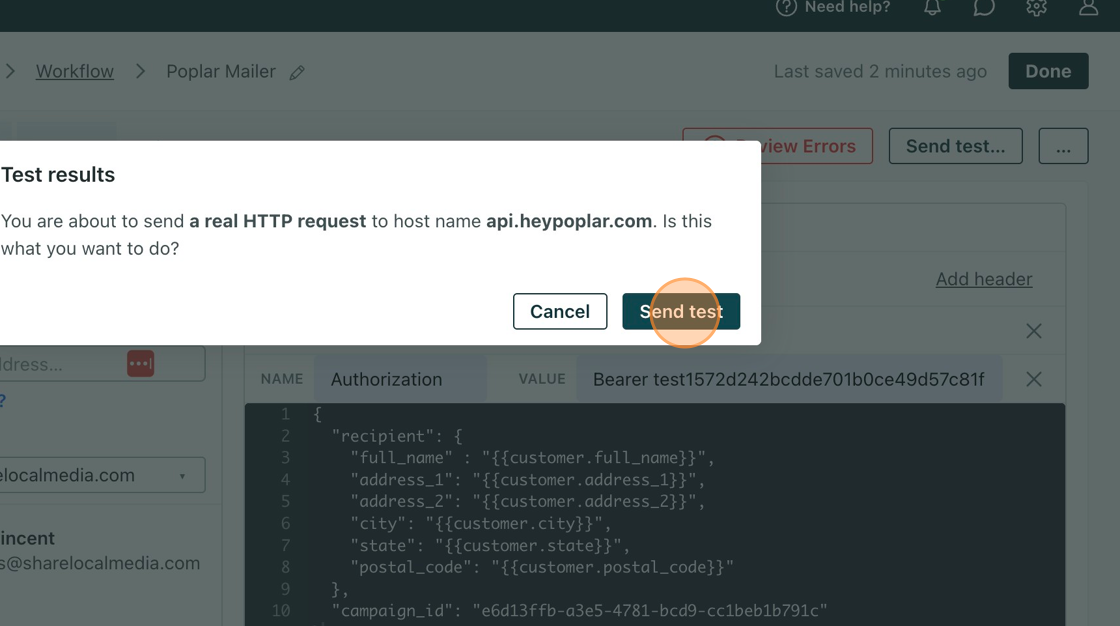
Test your webhook by sending a test, then checking the history tab of the campaign in poplar to see if it appeared.
Exceptions/Troubleshooting
You may see an exception when you don't have a name or address_2 or other metadata you are referencing on every recipient record. It's easy to solve this using an if statement in the webhook.
{% if customer.address_2 != blank %}
{{ customer.address_2 }}
{% else %}
{% endif %}
Reach out to support@heypoplar.com for additional assistance
Before setting up your Simon > Poplar Integration you must reach out to Simon to have their customer success team add the webhook option to your Flows and have our Poplar API URLs whitelisted.
Refer to our SLM Webhooks documentation for configuration settings. If you have any questions please reach out to your Simon or Poplar account manager for details.
Log into Simon and create a segment.
From the segment overview, select " Create Flow" at the top right.
Name the flow and make sure the select " Triggered" option.
Simon will only send over once a day, so we recommend setting it to 1:30pm Eastern Time in order to hit our print cut-off.
Follow the below instructions to populate the corresponding header values, and Payload. We recommend using a test api key for the webhook to start so you can confirm mailings are being created successfully prior to using a production api key.
Send a test webhook at the bottom and you should see it show up in the history tab of your campaign.
Any new users in the audience segment will be pushed to our platform once a day at the time you set.
Our API URL: https://api.heypoplar.com/v1/mailing/9Add headers: When pasting in the API key make sure that there is one space before the key and to include the word "Bearer" before it.
Log into Simon and create a segment.
From the segment overview, select " Create Flow" at the top right.
Name the flow and make sure the select " Triggered" option.
Simon will only send over once a day, so we recommend setting it to 1:30pm Eastern Time in order to hit our print cut-off.
Follow the below instructions to populate the corresponding header values, and Payload. We recommend using a test api key for the webhook to start so you can confirm mailings are being created successfully prior to using a production api key.
Send a test webhook at the bottom and you should see it show up in the history tab of your campaign.
Any new users in the audience segment will be pushed to our platform once a day at the time you set.
Our API URL: https://api.heypoplar.com/v1/mailing/
Add headers: When pasting in the API key make sure that there is one space before the key and to include the word "Bearer" before it.
Email Address Append
You can lookup your campaign_id on the campaign detail page on Poplar.
Pull in the recipient data (either email and/or address data, as well as any variable data for the piece by leveraging recipient values you have stored in Simon)
Your Simon Data variables may be different than the above, it's best to click edit for each value and populate it from the Simon window.
If you want to use the full address instead of using the email append you'd use: recipient.address_1, recipient.address_2, recipient.city, recipient.state, recipient.postal_code with the corresponding values in your Simon setup.
Note: you can also add merge tags into the payload as merge_tags.merge-tag-name paired with a value. Replace merge-tag-name with the name of your merge tag. ex: merge_tags.category
Preventing Null Values:
When setting up the address_2 field or other fields that you may not have data for every recipient make sure to add or "" within the variable which will send a blank string instead of a null value and prevent the request from erroring out.
Example if your Simon data field is:
{{ contact.address_2 }} update it to: {{ contact.address_ or '' }}
Need help? Contact support@heypoplar.com for assistance.
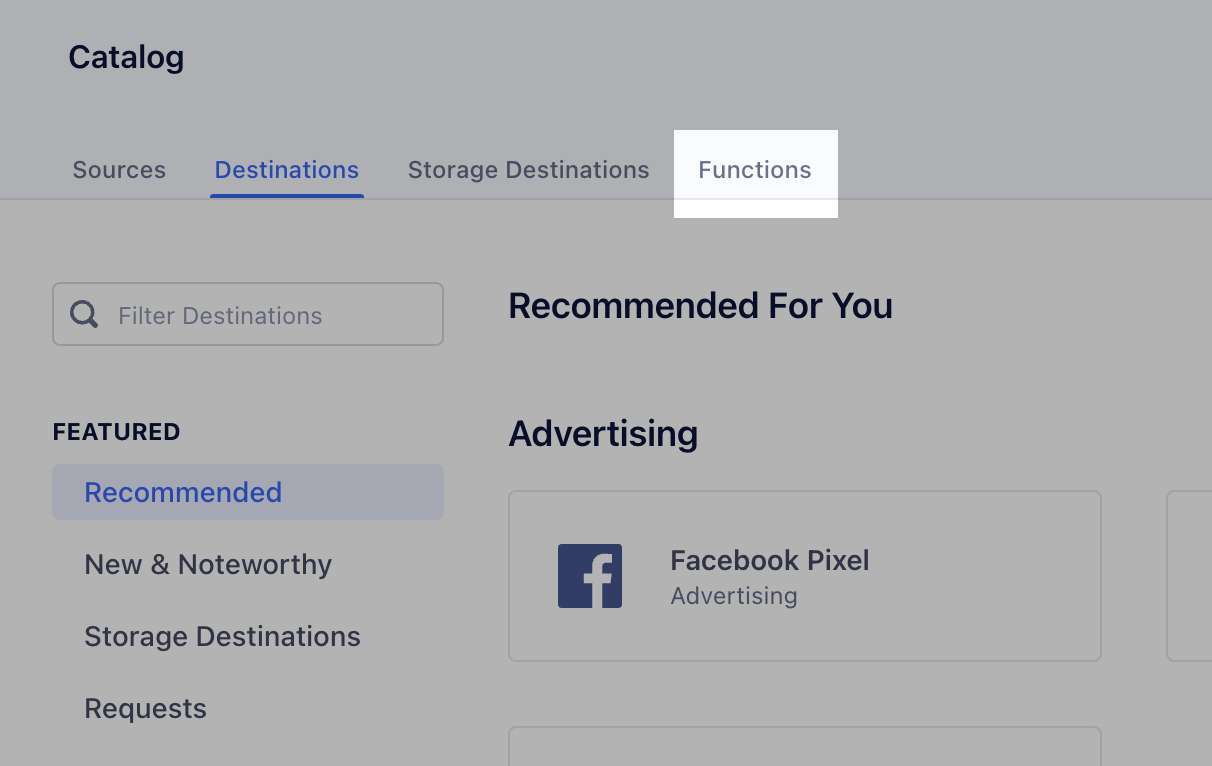
Start by navigating to the Connections tab within your Segment account:
On the left you'll see a list of your data Sources and the option to + Add Source, and on the right you'll see a list of your Destinations and the option to + Add Destination.
If it's not already listed, add the Source from where you'll be pulling mailing data and make sure it's Enabled for use.
Once your Source is established, click Add Destination to view the Destination options under the Catalog section. To integrate with Poplar, you'll need to build a custom function that triggers a mailing when an event occurs.
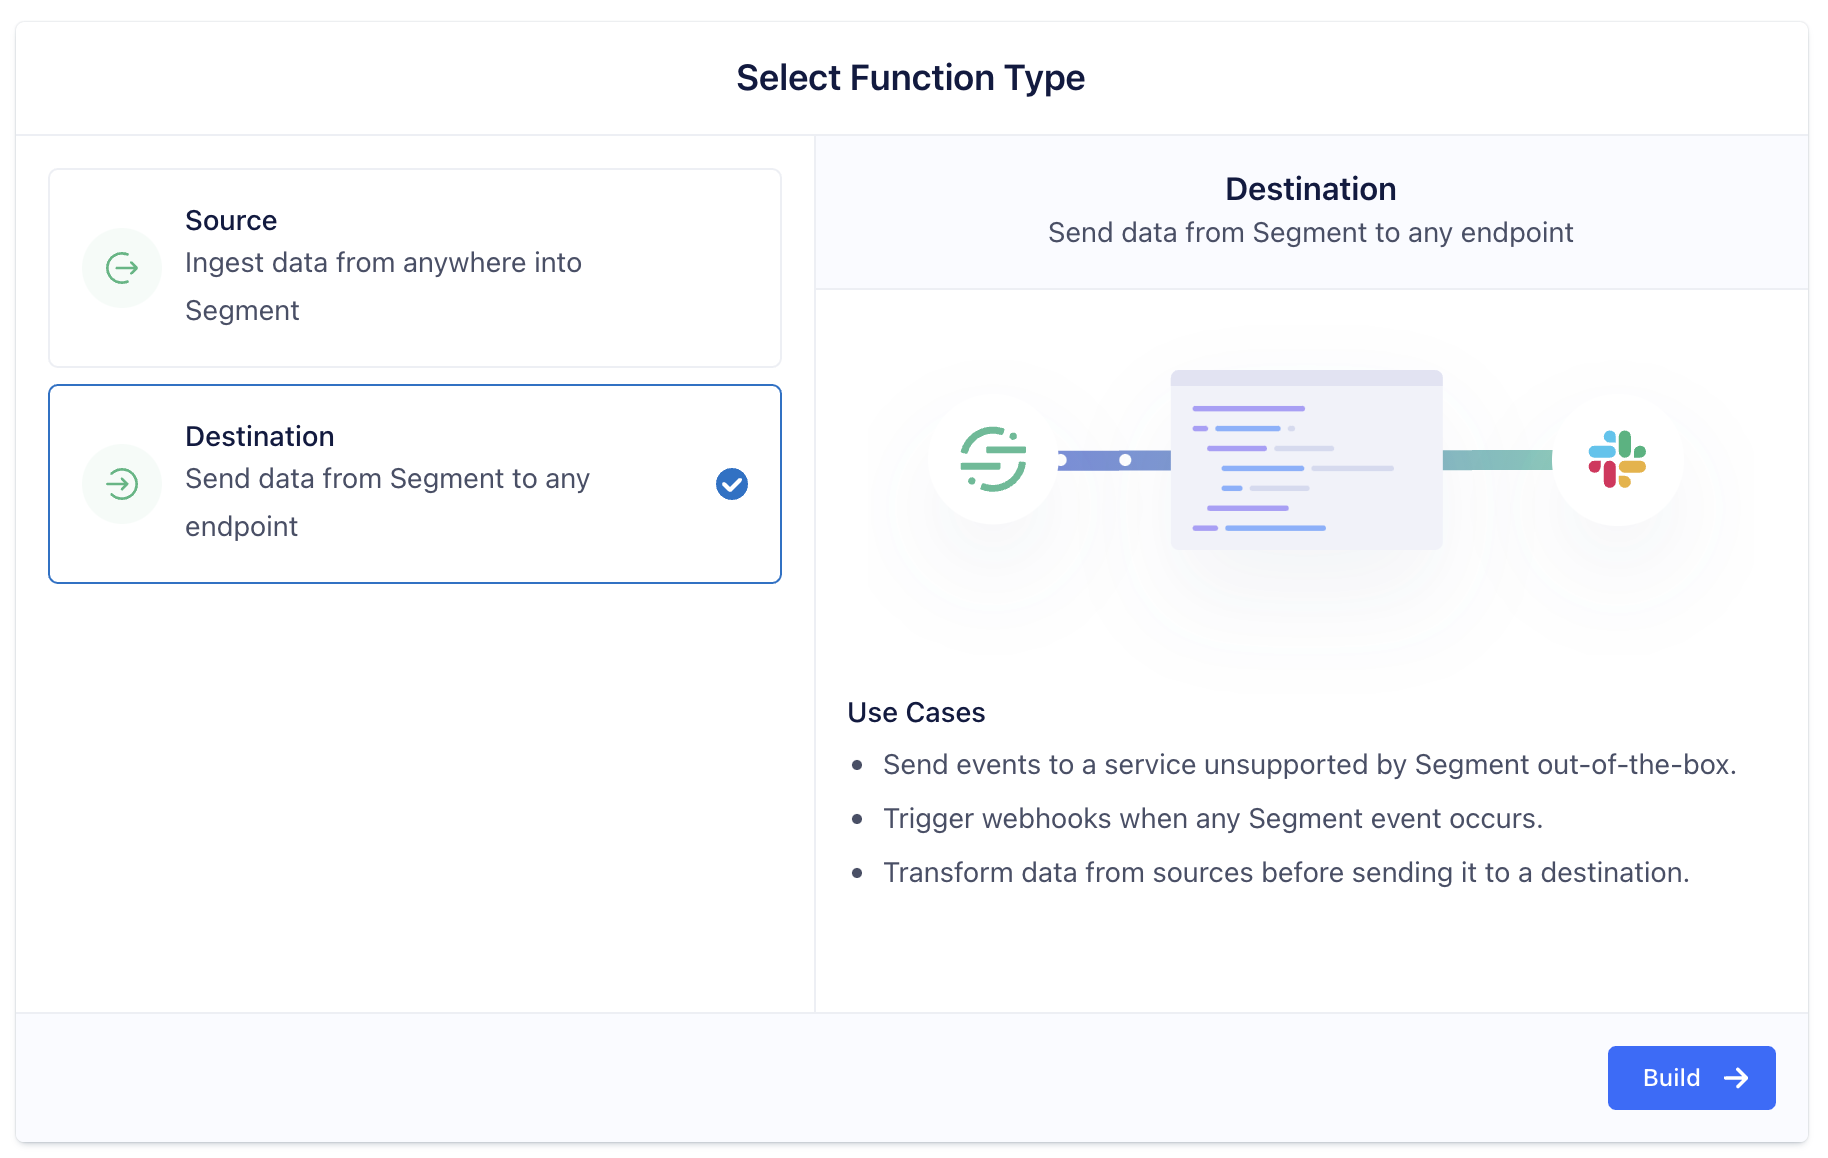
Navigate to the Functions tab and click + New Function to begin:
Select Destination as the Function Type, then Build:
There are a number of ways Segment can integrate with Poplar's APIs:
Trigger a mailing
Share order data for in-platform reporting
Update an existing audience list
Update your Do Not Mail list
Head to the Settings tab and click + Add Setting. Each use case listed above requires different Setting which should be defined in the following ways:
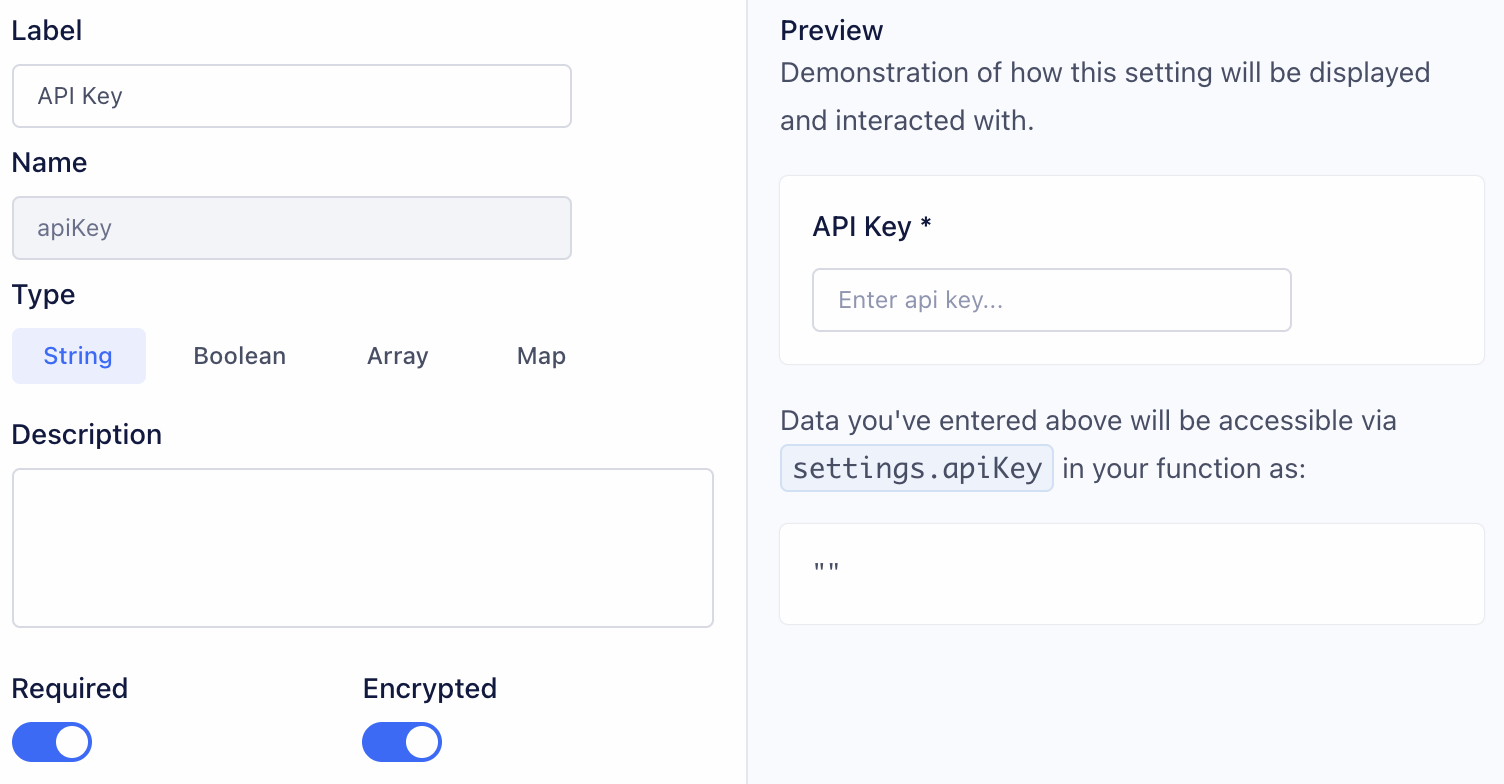
First you'll want to configure the variable for your Test or Production Access Token.
Make sure both Required and Encrypted are enabled, the encryption setting will ensure your access token stays secret.
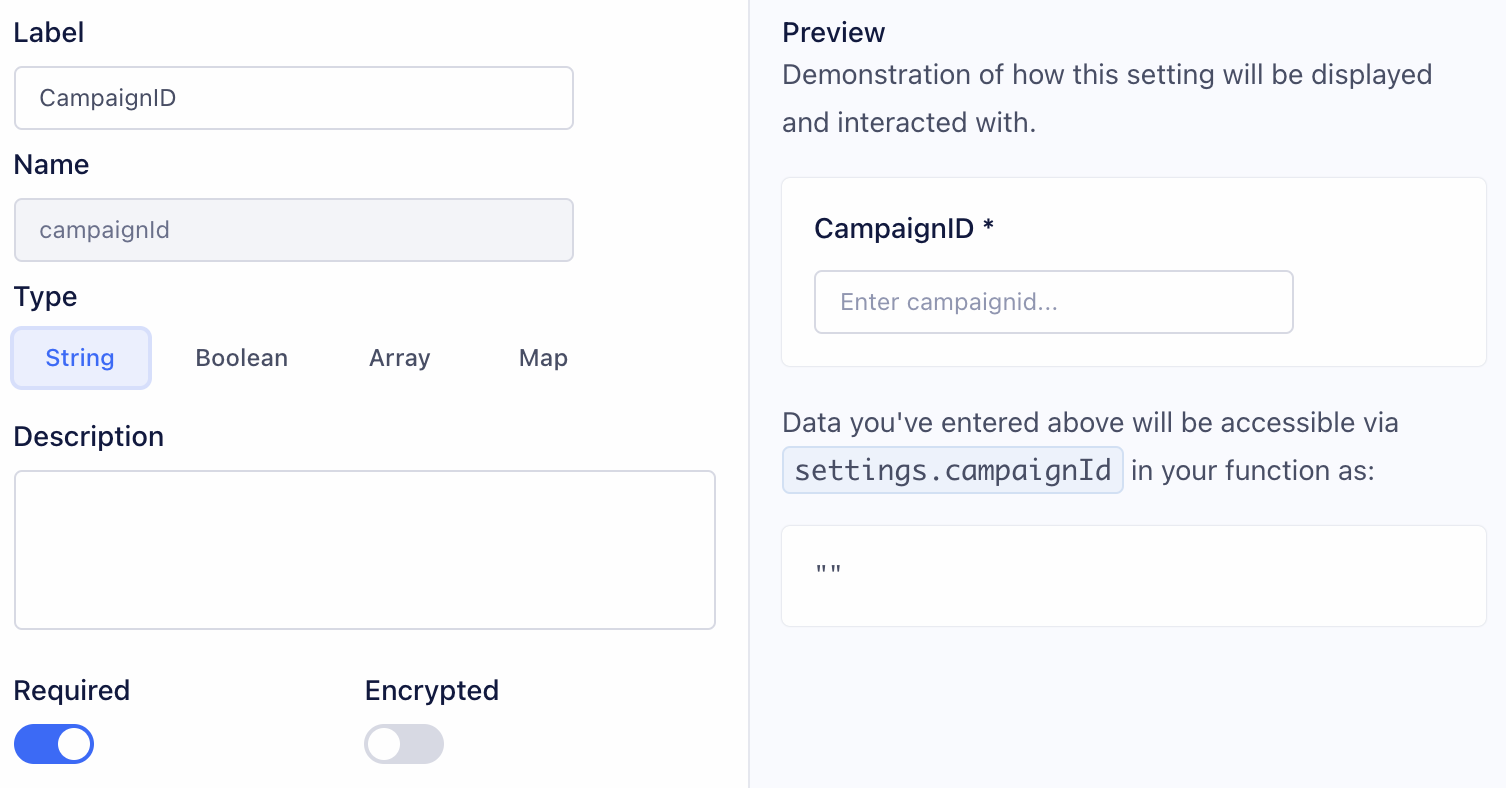
Create another Setting for your campaign_id. Campaign ID can be found in your Poplar account under your campaign's Overview tab. This value does not need to be Encrypted.
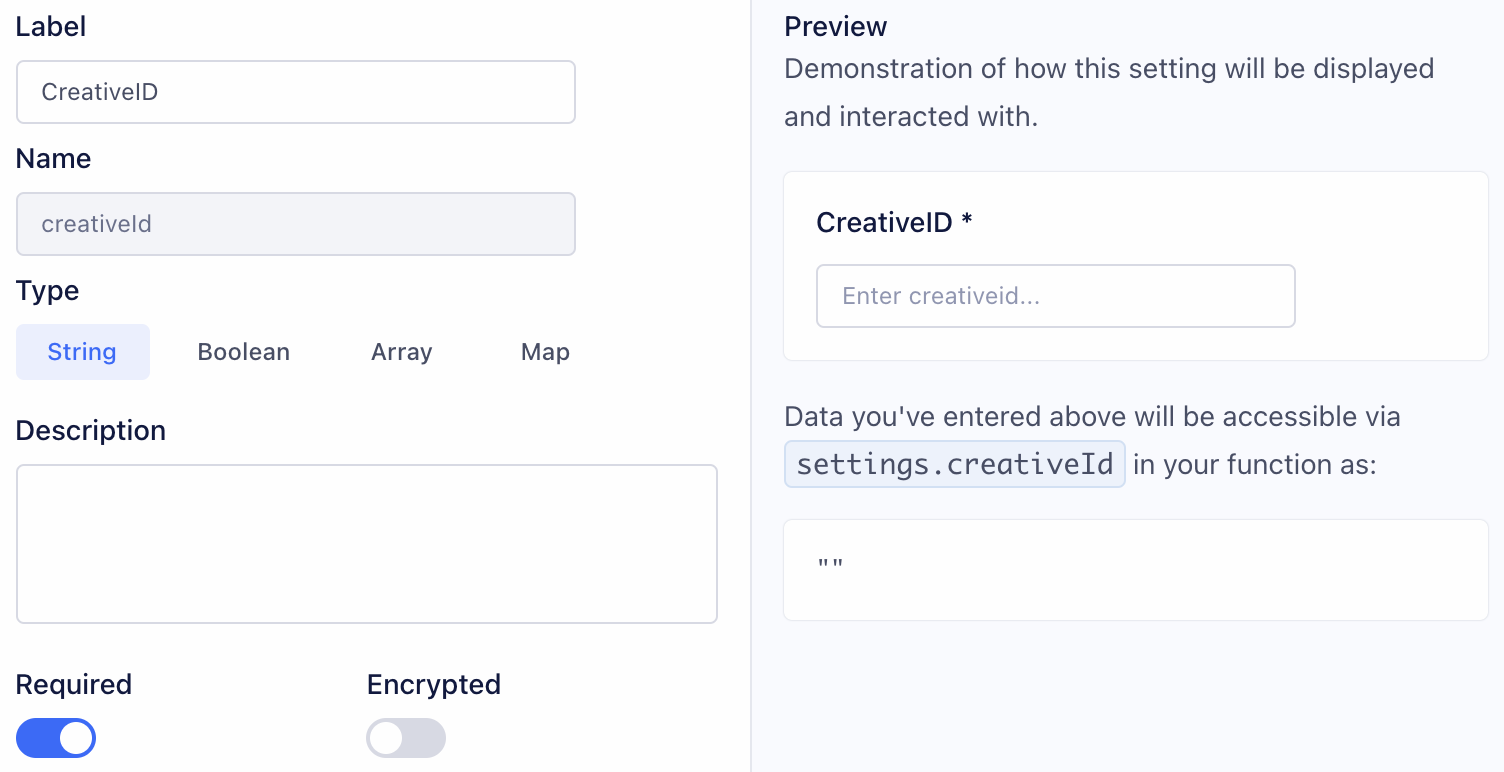
Creative ID (Optional)
Creative ID can be specified if more than one creative is active under the campaign, and you want to specifically point to one. Click into a creative to find the creative_id.
If creative_id is not specified, the trigger will point to the Default active creative. If no creative is set as the default, it equally rotate between mailing all active creatives under the campaign to A/B Test.
First you'll want to configure the variable for your ProductionAccess Token. Make sure both Required and Encrypted are enabled, the encryption setting will ensure your access token stays secret.
First you'll want to configure the variable for your ProductionAccess Token. Make sure both Required and Encrypted are enabled, the encryption setting will ensure your access token stays secret.
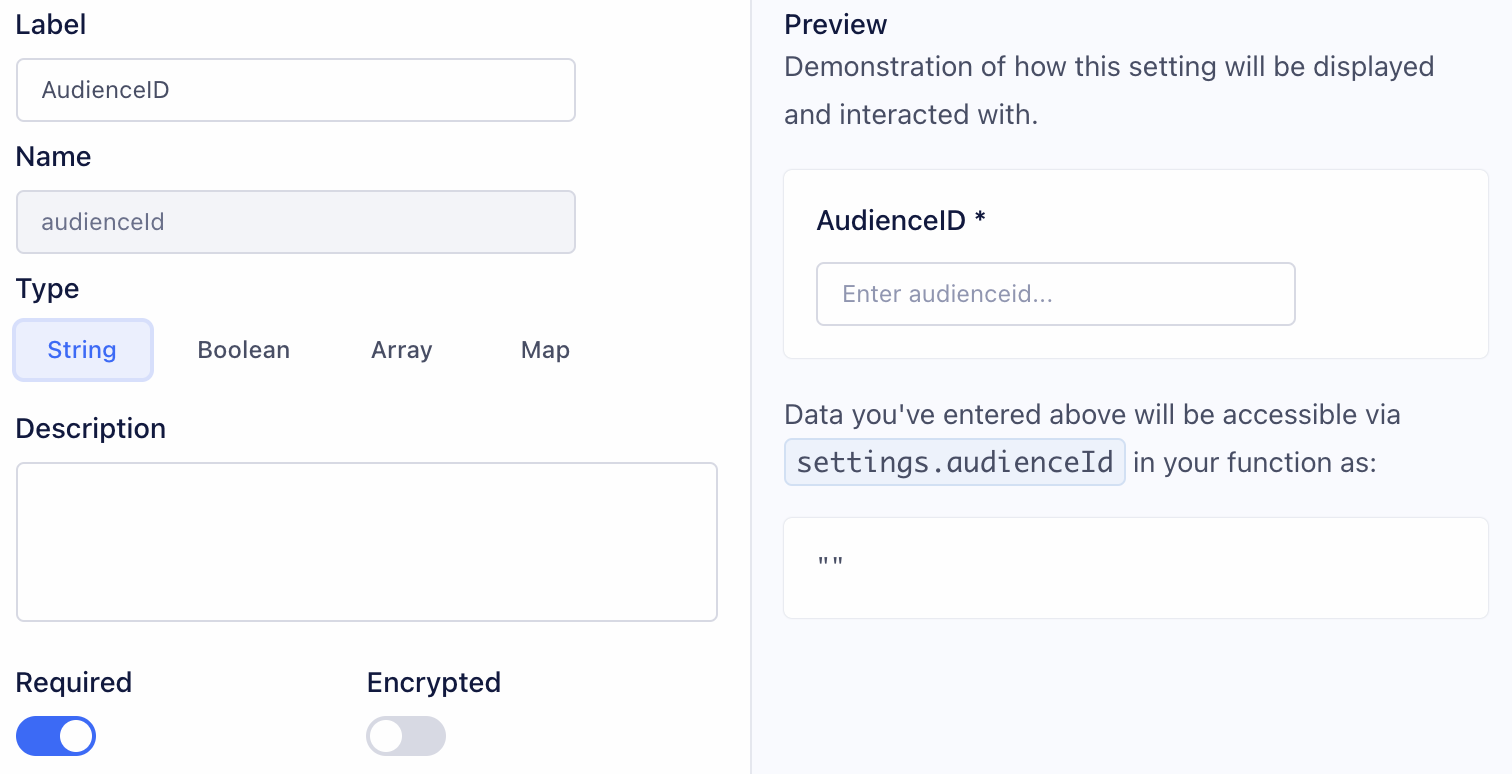
To add an audience member to a list, the audience must first be created in Poplar. Click into an existing Audience to find the audience_id.
First you'll want to configure the variable for your ProductionAccess Token. Make sure both Required and Encrypted are enabled, the encryption setting will ensure your access token stays secret.
onIdentify
onTrack
onPage
onScreen
onGroup
onAlias
onDelete
onBatch
Each of the functions above accepts two arguments:
Just like Settings, different source code is required based on use case. Below are code templates that can be copy & pasted in place of any existing source code:
Our examples show a destination function that listens for “Track” events, and sends certain data to Poplar by using the event.properties prefix. This prefix will likely differ by case depending on how your data is structured.
To create a mailing, you'll want to send a POST request to https://api.heypoplar.com/v1/mailing
Your headers should contain Authorization: `Bearer ${settings.apiKey}`, and 'Content-Type': 'application/json'
Address and/or Email Data
To share order data, you'll want to send a POST request to https://api.heypoplar.com/v1/order
Your headers should contain Authorization: `Bearer ${settings.apiKey}`, and 'Content-Type': 'application/json'
shipping_address and/or billing_address may be used when passing order data. For more details on required and optional values, see our Orders API.
To add an audience member to a list, you'll want to send a POST request to https://api.heypoplar.com/v1/audiences/${settings.audienceID}
Your headers should contain Authorization: `Bearer ${settings.apiKey}`, and 'Content-Type': 'application/json'
For more details on required & optional values, see our Audiences API.
To add a member to your Do Not Mail list, you'll want to send a POST request to https://api.heypoplar.com/v1/do-not-mail
Your headers should contain Authorization: `Bearer ${settings.apiKey}`, and 'Content-Type': 'application/json'
To run your function, you'll need to select a sample event from your Source. Make sure the sample event contains all the necessary data for mailing.
Need help? Contact support@heypoplar.com for assistance.
Locate both your Production Access Token and Test Access Token on the page of your Poplar Account
We strongly recommend using the Test Access Token provided in the section of your Poplar account, to ensure your trigger is set up successfully. After confirming the requests are successfully coming through to the History tab of your campaign for a period of time, swap in the Production token to go live.
If you have customer email addresses and want to use them to mail with Poplar's feature, use the code below as a template for your JSON Body:
Navigate to the page on your Poplar account and click Enable Emarsys. This will generate your secret key and webhook URL.
Upload creative (can be a placeholder creative for testing purposes - )
Locate both your Production Access Token and Test Access Token on the page of your Poplar Account
Log into Poplar and setup a new test API Key for Customer.io. You can get the key at . Copy the test API token and head back to the webhook configuration in customer.io
Use Segment to trigger a mailing, share order data, or add an audience member to a list in Poplar with custom . There are two primary ways to send a destination function to Poplar within Segment:
Before editing code, you'll need to configure the behavior of your function by adding Settings. Settings are used for encrypting your Authorization credentials ( ) and they allow you to pass variables such as campaign_id, creative_id, and audience_id to your function.
Now that you've established Settings, you can begin coding your function. . Destination functions can define handlers for each message type in the :
event - Segment event object, where fields and values depend on the event type. For example, in “Identify” events, Segment formats the object to match the .
settings - List of for this function.
This function can be used for both full address data or emails for
If your creative uses , be sure to include the merge_tags object.
Key
Value
campaign_id
copy from the right side of the campaign page on Poplar
full_name
Optional, you can also replace with a fixed string like 'Current Resident' for use on the address block
first_name
When using first & last name instead of full name in your webhook, you must use BOTH or it will error out.
last_name
address_1
address_2
city
state
postal_code


Create a new or select an existing Lifecycle Optimizer Flow under the Messaging tab in Sailthru.
Add an Action step to the flow.3Select Send Webhook in the dropdown.
Add our URL: https://api.heypoplar.com/v1/mailing/
Set the method to POST.
Set the content type to Other.
Add your formatted payload - this will change depending on the data structure of your Sailthru configuration, and what you want to pass into Poplar.
Select Send Webhook in the dropdown.
Add our URL: https://api.heypoplar.com/v1/mailing/
Set the method to POST.
Set the content type to Other.
Add your formatted payload - this will change depending on the data structure of your Sailthru configuration, and what you want to pass into Poplar.
Email Append
When formatting your Mailing Address payload, use & to separate parameters. Be careful not to include any breaks or spaces because they will prevent the data from passing to Poplar in the right format. Nested parameters live inside square brackets [...] and continue to nest within those brackets. For example, payload campaign_id=XXXXX&recipient[full_name]=Poplar&recipient[postal_code]=10004 would appear:
- Use profile.{insert-field-name} to pull from Sailthru's core data.
- Use profile.vars.{your-custom-variable-name} to pull any custom variables you created that were not originally fields specified by Sailthru.
- Note: The customer email is an exception to the above. It is specifically referenced as {email}.
key
value
campaign_id
Copy from the right side of the Campaign > Overview
creative_id
(optional) Copy from the individual creative page under Campaign > Creative
full_name
(optional) You can also replace with a fixed string like Current Resident for use on the address block
first_name
When using first & last name instead of full name in your webhook you must use BOTH or it will error out
last_name
address_1
address_2
city
state
postal_code
You can also add merge tags with your own variable data at the end. When using first & last name options instead of full name you need to include both or it will error.
You can also add merge tags with your own variable data at the end.
Add a HTTP Header and configure an Authorization key and set the *Bearer Your API Key* (make sure to also replace the asterisks*)
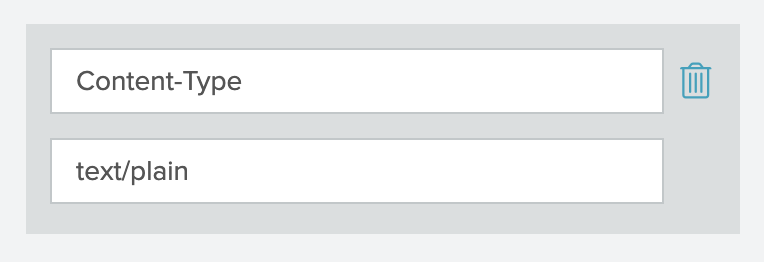
Underneath Headers, you must also specify your Content-Type to be text/plain.
Test your webhook by sending a test through the flow, and then checking the History Tab of the campaign in Poplar to confirm that the data looks as you intended.
We recommend leaving the webhook live with your test key for a period of time to get a sense of your volume. Once it looks like it's working well, go back in and replace the API Key with a Production Key to begin mailing.
Add a HTTP Header and configure an Authorization key and set the *Bearer Your API Key* (make sure to also replace the asterisks*)
We strongly recommend you use a Test API Key to start. Once your workflow is set up successfully and running in test mode, go back into the webhook and swap it out for a Production API Key to begin mailing.
Underneath Headers, you must also specify your Content-Type to be text/plain.
Test your webhook by sending a test through the flow, and then checking the History Tab of the campaign in Poplar to confirm that the data looks as you intended.
We recommend leaving the webhook live with your test key for a period of time to get a sense of your volume. Once it looks like it's working well, go back in and replace the API Key with a Production Key to begin mailing.
Need help? Reach out at support@heypoplar.com for assistance.
Login to Cordial, click the Message Automation dropdown on the left and select the Rest Automations page at the bottom.
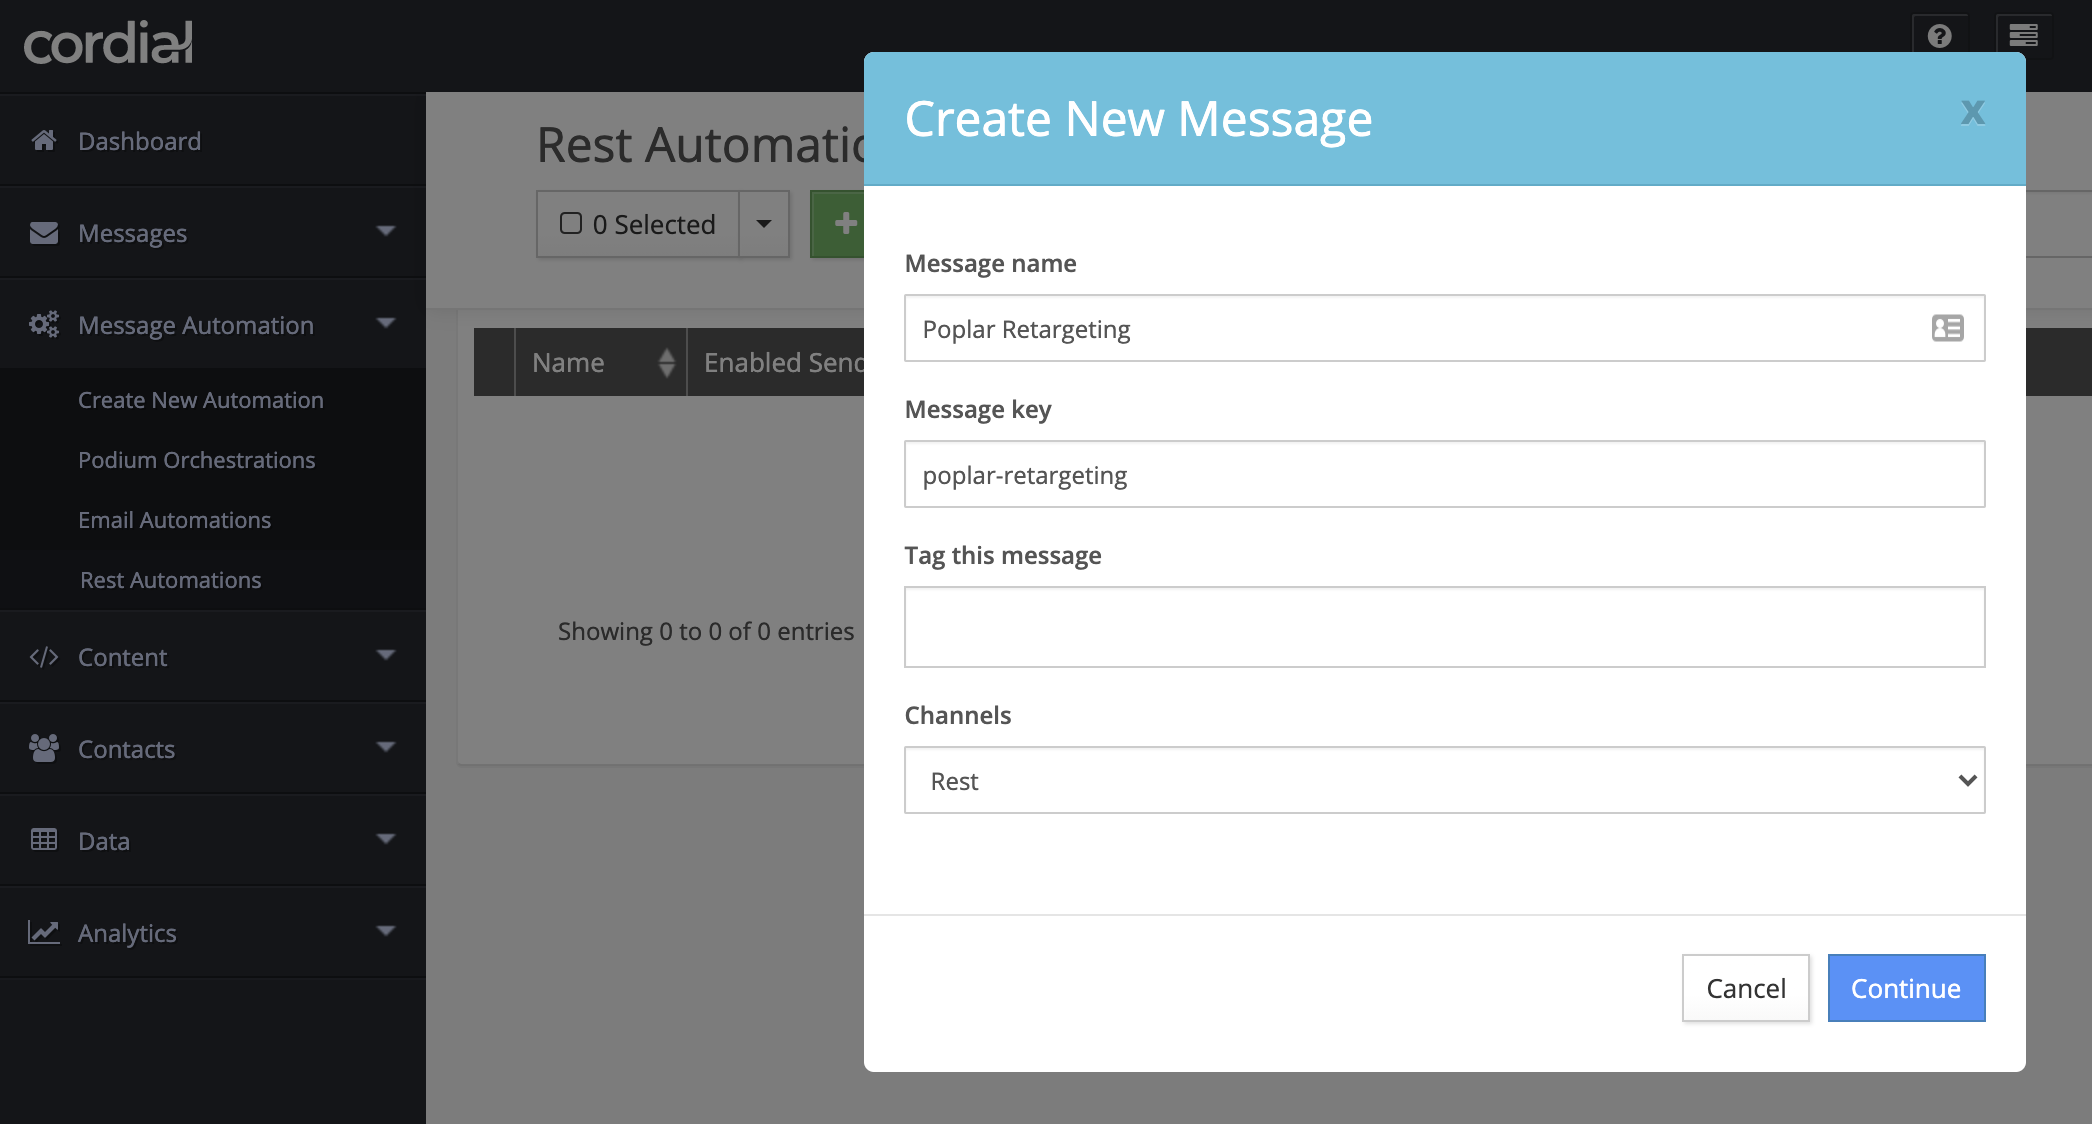
Create a new message automation by clicking the green + New button. Give the message automation a unique name based on use case, select any applicable tags, leave the Channels section set to "Rest" and Continue.
You'll be brought to the automation settings where you'll see a list of REST Parameters and REST Post Processing scripts.
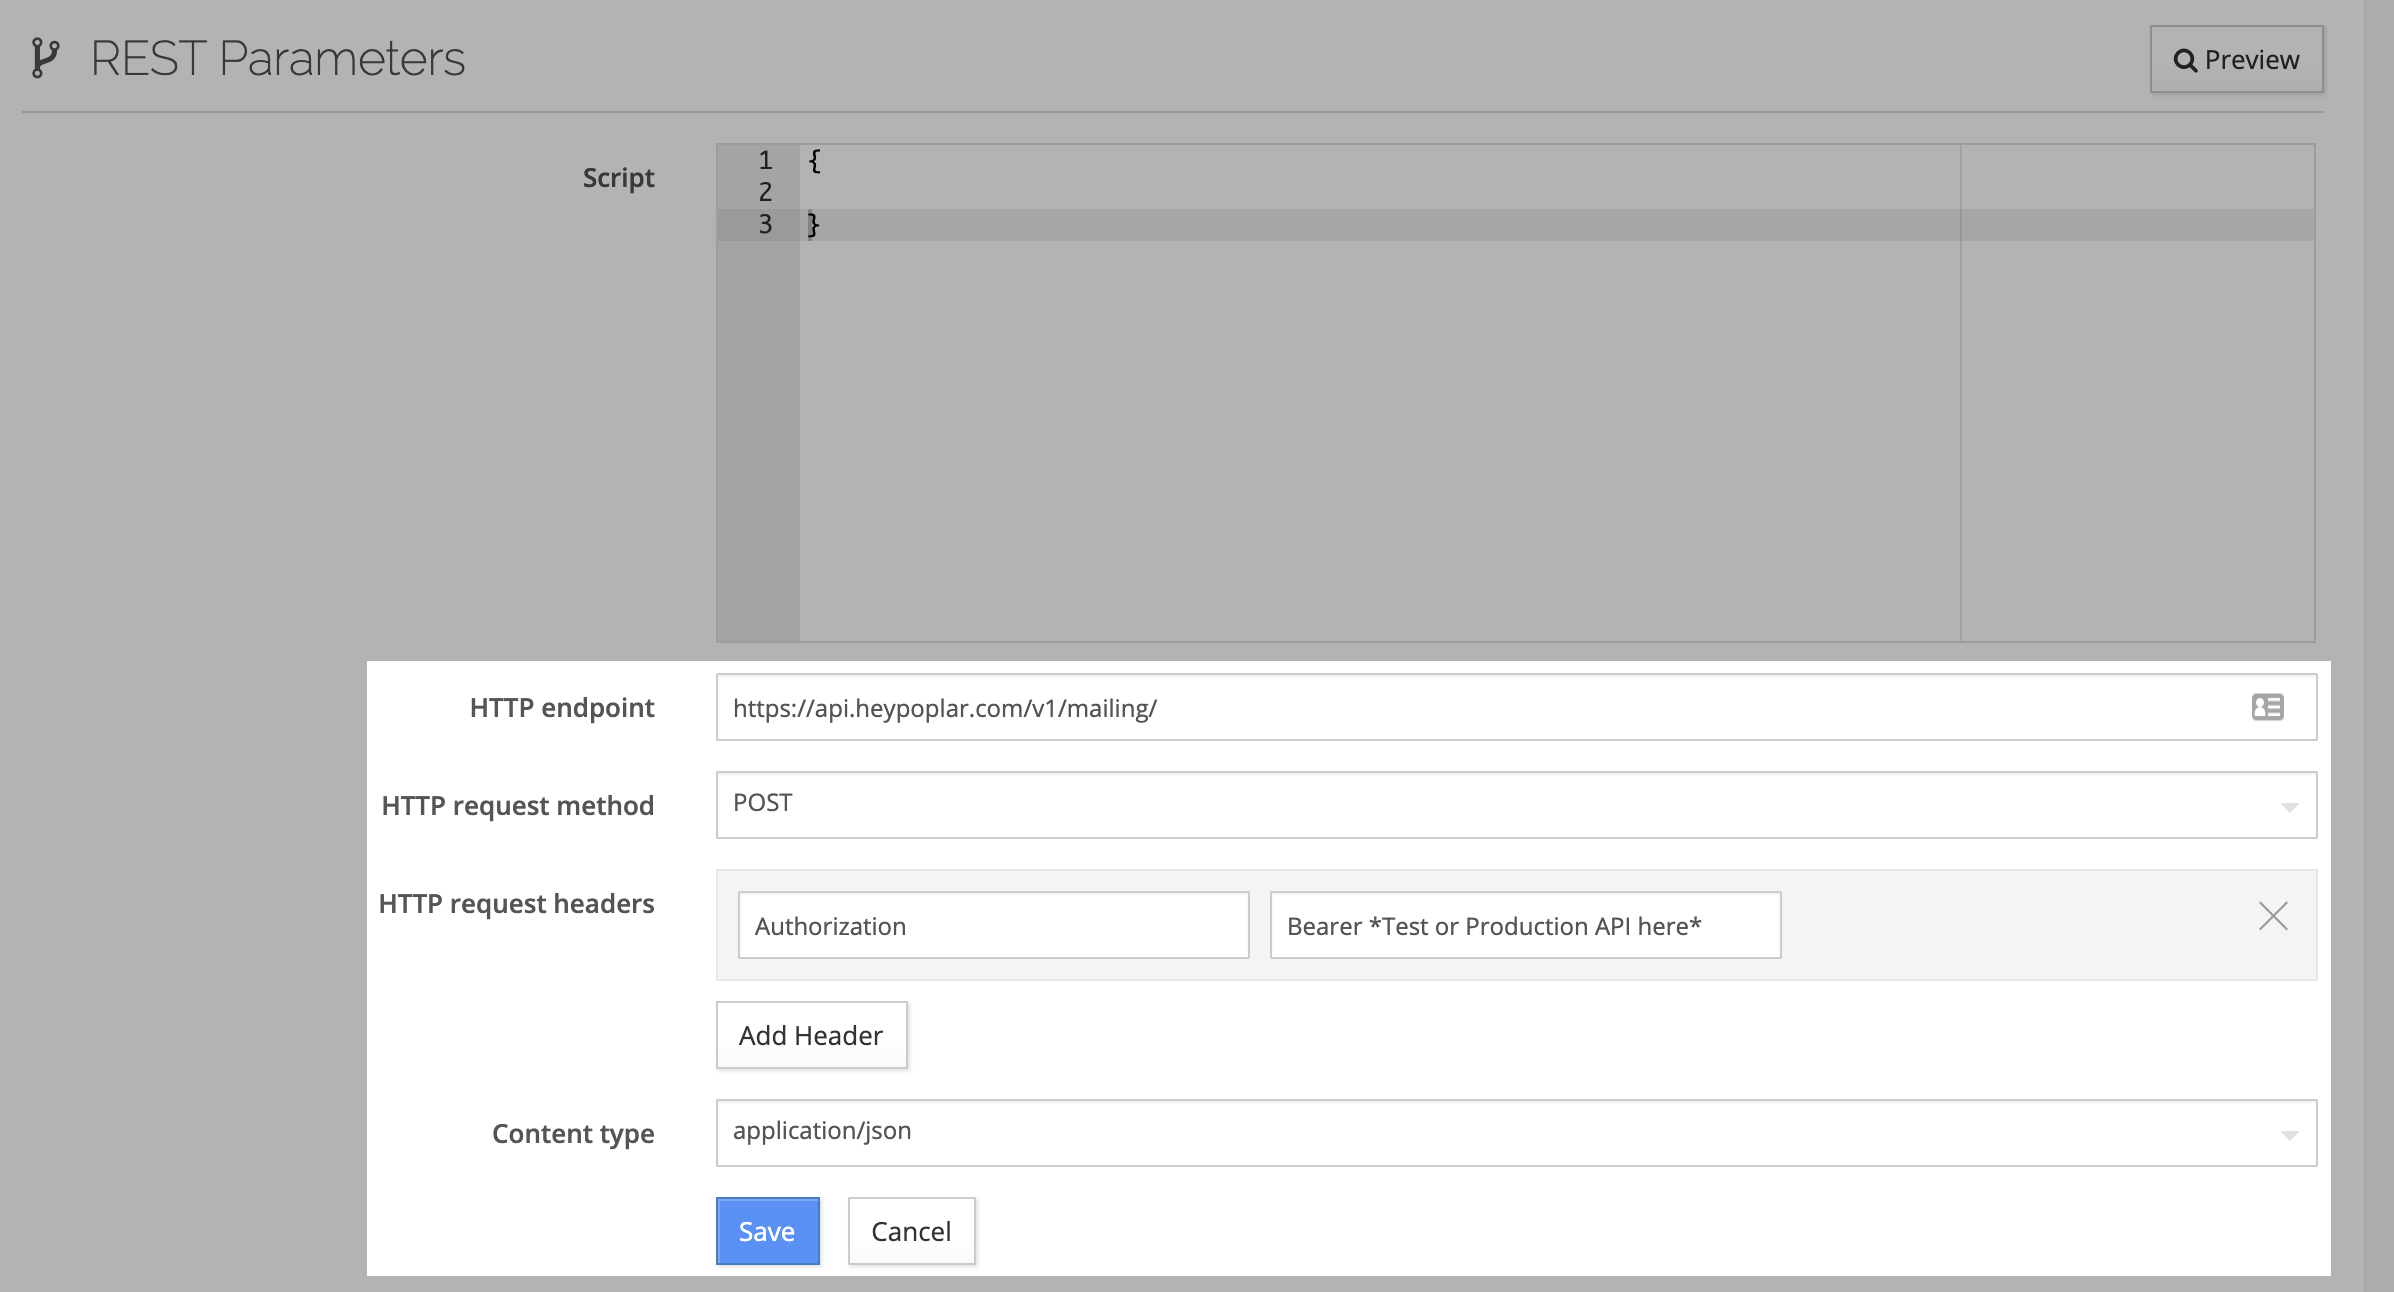
Click the Edit button to the far right of REST Parameters and enter the following settings:
HTTP endpoint
HTTP request method
POST
HTTP request header
Authorization : Bearer < Test or Production API Token>
Content type
application/json
The Script section at the top is where you'll enter logic for the recipient data being passed to Poplar. If your Poplar campaign has address enrichment enabled, only email and any other custom merge tag data needs to be passed. If mailing to existing customer addresses, you'll pass in the full address. Examples of each can be copy, pasted, and adjusted as needed:
Mailing Address
Address Enrichment
Click the Preview button in the top right to see a preview of the request, and make sure all of the data maps properly. If everything looks correct, hit the Back button in the top right then Save the settings.
Once your settings have been saved, click the Send Test button in the top right to test the integration. If the connection is successful, you'll see a mailer appear under the campaign's History tab:
If the connection is successful, Publish and move on to the Event Trigger settings on the left under Sending Methods.
Click the Edit button to the far right of Trigger Events to set the desired trigger conditions. Audience Filters can also be added to refind your target audience if needed.
Be sure to Save then Enable the trigger to set it live.
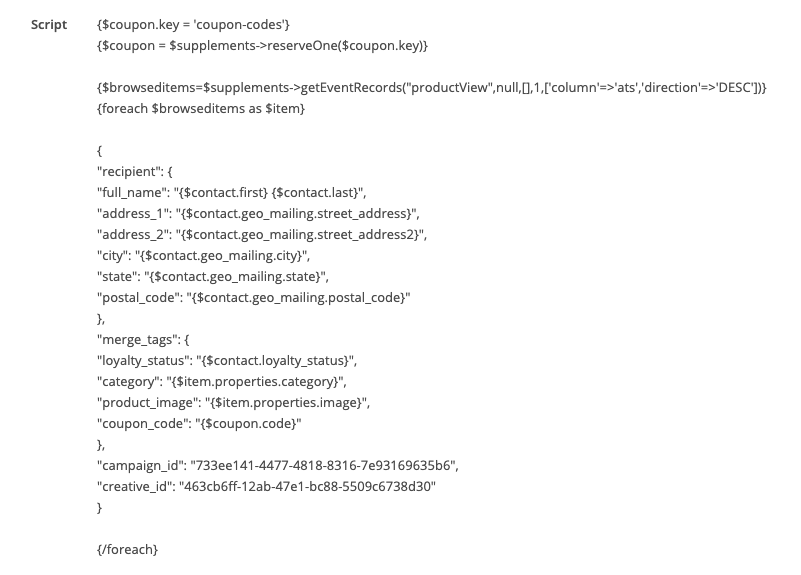
Merge Tags & Variable Data
Coupon codes, loyalty status, and even browsed items are among many examples of variable data stored in Cordial that can be passed to Poplar, and utilized in Creative design via custom merge tags.
To pull variable data into your creative, it must be uploaded to the platform as an HTML file.
When setting up your Rest Automation, you'll need to include the merge tags and their dynamic values as an object in the Script section of your REST Parameters. Here's one example:
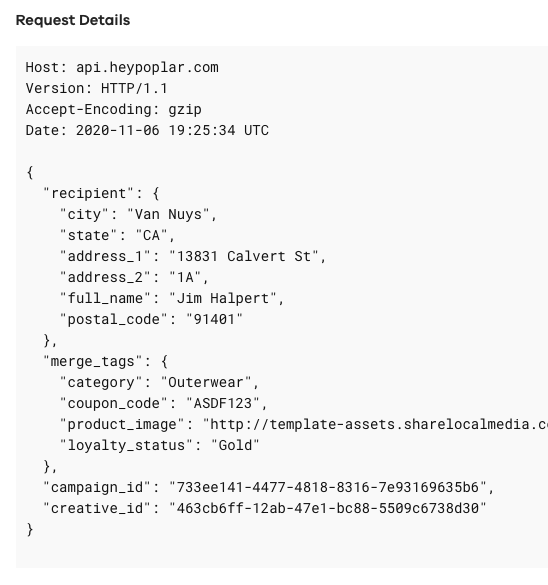
You'll know the request is successful and the merge tags are mapping accordingly if a test mailer appears in the campaigns History tab, same as above. Click into the mailer and scroll down to see the request details:
Reach out to support@heypoplar.com for additional assistance
Click New Webhook
Name & Configure Webhook
Log into Marketo, Go to Admin and click Webhooks.
Click New Webhook
Name & Configure Webhook
It may be helpful to include Poplar, and the name of the campaign you're linking to. i.e. "Poplar-Abandoned-Cart"
Set the type to POST
Set the Template as follows:
For an email append: the customer attribute names you have in your account may differ and need to be modified.
Set the URL to: https://api.heypoplar.com/v1/mailing/
Set the type to POST
Set the Template as follows:
For an email append: the customer attribute names you have in your account may differ and need to be modified.
For a full address mailing:
key
value
campaign_id
Found on the right hand side of your campaign's overview page
full_name
(optional) You can also replace with a fixed string like Current Resident for use on the address block
first_name
When using first & last name instead of full name in your webhook you must use BOTH or it will error out
last_name
address_1
Required
address_2
city
state
Required
postal_code
Required
email
You can also add merge tags with your own variable data at the end. When using first & last name options instead of full name you need to include both or it will error.7
Set the token & response types to JSON
Click Create
Custom Headers – Accessed through Webhooks Actions -> Set Custom Header, this menu allows the addition of any number of custom Key-Value pairs as HTTP Headers.
You'll want to configure an Authorization key and set the Bearer <Your API Key> (make sure to also replace the <>)
Create another header and use Content-type for the key, then application/json for the value.
Add this new webhook as a node in any of your Smart Campaigns.
Create a Smart Campaign
Go to the Flow tab and drag in the Call webhook flow action
Select the webhook (among the dropdown list of webhooks you've created)
Need help? Reach out at support@heypoplar.com for assistance.
Before integrating and sending tests with Hightouch, make sure you've completed the following:
Log into your Hightouch account
Navigate to Destinations -> " Add destination"
Select Destination: Type " Poplar" and connect.
Choose the model you would like to sync
Select Poplar as destination
Select "Campaign Trigger"
Select your Poplar campaign
Select your creative (optional) - if left blank, Poplar will automatically a/b split between all active creatives in the specified campaign
Map fields from your source to the equivalent fields in Poplar
If using a dynamic creative, include any additional fields to map the the merge tag fields
Choose a profile that has all the necessary attributes and click "Sync as added row"
Look for 200 OK: Success Response
Check the History tab in Poplar to confirm integration success
Once connection is verified, click "Continue"
In Hightouch, navigate back to Destinations -> Poplar Destination -> Configuration -> Edit
Save & Exit
Navigate to Syncs -> Run Sync
Need help? Reach out to support@heypoplar.com for assistance.
Log into Braze, in the left navigation under Engagement, select Templates & Media, then the tab Webhook Templates in the middle.
Then select Blank Webhook
Give your new template a name
Under the configuration set the Webhook URL to: https://api.heypoplar.com/v1/mailing/
Switch the Request Body in the dropdown to Raw Text
You can then set up either an email append or an addressed API request template. You'll need to copy the campaign ID from Poplar.
Depending on your custom attribute configuration you'll need to modify the names of the attributes from what is in the code above.
Select the Settings tab. You'll want to configure an Authorization key and set the Bearer <Your API Key> (make sure to also replace the <>)
Back in Braze, select the Test tab to test your template. Either select an existing user, or if you don't have user data select custom and send a test to Poplar. You can then head over to Poplar > Campaign > History tab to view the test you sent.
Once your template is successful, you can then go to Campaigns and add a new campaign or edit an existing campaign to add a webhook. Then select the template you just created to use it.
After selecting the template you can select your targeting and delivery settings as you would normally for any other Braze campaign.
Need help? Reach out at support@heypoplar.com for assistance.
Connecting Drip via Zapier
Drip can integrate with Poplar via either connector platform: Automate.io or Zapier. Given we have a native Zapier app for Poplar the configuration is slightly easier via Zapier.
1. Log into your Zapier account and from your dashboard, click MAKE A ZAP to begin the new trigger setup.
2. You'll then select Drip as the trigger.
3. When it comes to picking the type of event to trigger on we recommend either " New Subscriber" if you want to target all new subscribers to a list, or "New Subscriber with Tag" that will allow you to target a specific segment that gets a tag applied manually or use an automated workflow in Drip to apply a tag at a specific step in the flow and then use that tag to trigger the mailing.
4. Connect your drip account via an API Key. Note: you must reach out to Drip to have them enable the API capabilities in your account.
5. Pull in Sample Data, to kickstart your segment you may need to manually apply the tag to a member of the audience in Drip. Then click the big blue " Continue" button.
7. With Drip you likely don't have address data so you'll want to select the Email Append option, but you can alternatively create additional zaps and use the other Action Events for things like updating your do not mail list.
We recommend first entering your Test key, this will allow you to test the trigger connection without actually mailing. Successful trigger requests will be visible from the History tab of the connected campaign.
Click + Connect a new account again to enter your Production key. We recommend only selecting this account when you're ready to go live.
If using your Production Account Token, clicking Test Trigger during will trigger a live mailer.
9. Select the campaign (or head to Poplar to create a campaign and upload creative if you haven't yet).
10. (optional) Select your creative (or leave this blank if you want to run a multivariate test of any creatives enabled in the campaign.
11. Select the 4 line + button on the right and then Select the Drip field that contains the sample data email, this will allow us to pass the recipient email to Poplar.
12. Send a test and then hop back over to Poplar to the history tab of the campaign and you can check the digital proof we created.
13. If tests are successful, it's time to turn on your Zap! If you want to let the trigger run naturally under the Test environment for a day or two, feel free to leave your Test Account selected. If you feel ready to go live, head back to Choose Account and select the one connected to your Production key before turning on your Zap!
Need help? Reach out to support@heypoplar.com for assistance.
Connecting HubSpot to Zapier
HubSpot can integrate with Poplar by either connecter platform: Automate.io or Zapier. Given we have a native Zapier app for Poplar the configuration is slightly easier via Zapier.
1. Log into your Zapier account and from your dashboard, click MAKE A ZAP to begin the new trigger setup.
2. You'll then select HubSpot as the trigger.
3. When it comes to picking the type of event to trigger on, we recommend either " New Contact" if you want to target all new subscribers to a list, or "New Contact in List" that will allow you to target a specific segment that gets manually applied to a list or use an automated workflow in HubSpot to move a contact to a list at a specific step in the flow and then use that list to trigger the mailing.
5. If you only have access to email data in HubSpot you'll want to select the Email Append option, but you can alternatively create additional Zaps and use the other Action Events for things like updating your do not mail list, or mailing to customers you have existing address data for.
We recommend first entering your Test key, this will allow you to test the trigger connection without actually mailing. Successful trigger requests will be visible from the History tab of the connected campaign.
Click + Connect a new account again to enter your Production key. We recommend only selecting this account when you're ready to go live.
If using your Production Account Token, clicking the Test Trigger button will trigger a live mailer to be sent.
7. Select the campaign ( or head to Poplar to create a campaign and upload creative if you haven't yet).
Campaigns are not considered active until creative is uploaded, if your campaign is missing creative Zapier will not be able to detect your campaigns.
8. (optional) Select your creative (or leave this blank if you want to run a multivariate test of any creatives enabled in the campaign.
9. Select the 4 line + button on the right and then Select the HubSpot field that contains the sample data email, this will allow us to pass the recipient email to Poplar.
10. Send a test and then hop back over to Poplar to the history tab of the campaign and you can check the digital proof we created.
11. If tests are successful, it's time to turn on your Zap! If you want to let the trigger run naturally under the Test environment for a day or two, feel free to leave your Test Account selected. If you feel ready to go live, head back to Choose Account and select the one connected to your Production key before turning on your Zap!
Need help? Reach out to support@heypoplar.com for assistance.
Connecting ReCharge via Zapier
1. Log into your Zapier account and from your dashboard, click MAKE A ZAP to begin the new trigger setup.
2. You'll then choose ReCharge as your App, and select the appropriate event for your trigger.
3. Connect your ReCharge account by entering your Shopify shop URL and allowing installation.
4. Customize the conditions of your trigger.
We recommend first entering your Test key, this will allow you to test the trigger connection without actually mailing. Successful trigger requests will be visible from the History tab of the connected campaign.
Click + Connect a new account again to enter your Production key. We recommend only selecting this account when you're ready to go live.
If using your Production account, clicking Test Trigger during will trigger a live mailer.
8. Select the campaign (or head to Poplar and create a campaign if you have not yet created one).
9. (optional) Select your creative (or leave this blank if you want to run a multivariate test of any creatives enabled in the campaign.
10. Choose ReCharge data to populate the data fields being sent to Poplar.
11. Test & Review and then head to your campaign's History tab within Poplar to check the digital proof created by the test.
12. If tests are successful, it's time to turn on your Zap! If you want to let the trigger run naturally under the Test environment for a day or two, feel free to leave your Test Account selected. If you feel ready to go live, head back to Choose Account and select the one connected to your Production key before turning on your Zap!
Need help? Reach out to support@heypoplar.com for assistance.
Connecting ActiveCampaign via Zapier
1. Log into your Zapier account and from your dashboard, click MAKE A ZAP to begin the new trigger setup.
2. You'll then select ActiveCampaign as the Trigger.
3. Then you'll connect your account, when it opens the new window head to ActiveCampaign to the settings -> developer to copy/paste both the URL and Key into the Zapier window.
4. Add a webhook to your automation.
6. If you only have access to email data in ActiveCampaign you'll want to select the Email Append option, but you can alternatively create additional zaps and use the other Action Events for things like updating your do not mail list, or mailing to customers you have existing address data for.
We recommend first entering your Test key, this will allow you to test the trigger connection without actually mailing. Successful trigger requests will be visible from the History tab of the connected campaign.
Click + Connect a new account again to enter your Production key. We recommend only selecting this account when you're ready to go live.
If using your Production account token, clicking the Test Trigger will trigger a live mailer that will be sent.
8. Select the campaign (or head to Poplar to create a campaign and upload creative if you haven't yet).
9. (optional) Select your creative (or leave this blank if you want to run a multivariate test of any creatives enabled in the campaign).
10. Select the 4 line + button on the right and then Select the ActiveCampaign field that contains the sample data email, this will allow us to pass the recipient email to Poplar. (see below)
Alternatively, if you are supplying your own address data you will select the field containing sample recipient info:
11. Send a test and then hop back over to Poplar to the history tab of the campaign and you can check the digital proof we created.
12. If tests are successful, it's time to turn on your Zap! If you want to let the trigger run naturally under the Test environment for a day or two, feel free to leave your Test Account selected. If you feel ready to go live, head back to Choose Account and select the one connected to your Production key before turning on your Zap!
Need help? Reach out to support@heypoplar.com for assistance.
Connect your Marketing Automation/CRM platform to Poplar
We are unable to support the Zapier Klaviyo app. The Zapier team has designed it to pass in and charge for every event you record in Klaviyo, it will quickly deplete your task credits in Zapier and is effectively unusable.
Log into your Zapier account and from your dashboard, click MAKE A ZAP to begin the new trigger setup.
Give your Zap a name related to its use case, then select the marketing automation or cloud platform that has the audience or segmentation data you'd like to send to Poplar.
Next you'll be prompted to choose the trigger event you'd like to use to send data to Poplar. Connect to your chosen account to access your data and set up the trigger. Test your trigger to make sure your account is connected and all the necessary data can be pulled.
As pictured above, there are a number of different actions to choose from in addition to creating a mailing. Choose the action that best suits your needs, then click Continue to connect your Poplar account.
We recommend first entering your Test key, this will allow you to test the trigger connection without actually mailing. Successful trigger requests will be visible from the History tab of the connected campaign.
Click + Connect a new account again to enter your Production key. We recommend only selecting this account when you're ready to go live.
If using your Production account, clicking Test Trigger during will trigger a live mailer.
With your Poplar account connected, you'll be prompted to select the required criteria for your trigger, and map the data you'd like to send to the required fields.
Next, you'll want to either Test & Review or Test & Continue. Submitting this test should successfully pass your data to Poplar. If you're triggering a mailing, the successful request will appear in the History tab of your connected campaign.
If tests are successful, it's time to turn on your Zap! If you want to let the trigger run naturally under the Test environment for a day or two, feel free to leave your Test Account from Step 4 selected. If you feel ready to go live, head back to Choose Account and select the one connected to your Production key before turning on your Zap!
Add branching logic to Zaps
Paths help you build advanced workflows to run different actions based on varying conditions. With each path, you set rules to decide which actions should occur when those rules are met.
Filters can be added to any Zap to restrict it to run only when certain conditions are met. Filters are an optional part of setting up a Zap, but they're a great way to make sure Zaps only continue for certain items.
You can add a filter at any point after the trigger, and can even have multiple filters in a single Zap
Delays allow you to put your Zap on hold for a specified amount of time before your actions are run. You can use delays to set up scheduled mailings, send automatic follow-ups, and automate other tasks in your workflow.
Formatter is Zapier’s built-in utility tool for transforming text, numbers, and other data into the format you need. Use Formatter when you need data in a different format than the format it’s coming in from your trigger or another step.
Need help? Reach out at support@heypoplar.com for assistance.
We've provided the Poplar-specific webhook directions below. is also available.
When pulling data, it is important to know when to use profile. vs profile.vars. Sailthru's model is a useful reference.
See the for complete details.
To integrate Cordial with Poplar you can refer to the section of their documentation while following the step-by-step guide below.
We strongly recommend you use a key to start. Once your workflow is set up successfully and running in test mode, go back into the REST Parameter settings and swap it out for a Production API key to begin mailing.
We've provided detailed Poplar specific integration docs below, you can alternatively reference the on Creating, Calling, and using it in a .
Create a campaign in Poplar - sign up for free .
Upload creative (can be a placeholder creative for testing purposes - )
Locate both your Production Access Token and Test Access Token on the page of your Poplar Account
Copy/Paste the Test API token from the page in your Poplar account.
Copy/Paste Production API token from Poplar page
We've provided detailed Poplar specific integration docs below, you can alternatively reference the .
Head over to Poplar to get a Test API Key: We highly recommend setting things up using a Test API Key first because it will let you create digital proofs and check them before switching to a Production API key.
6. You're now ready to configure the Action step of the Zap, search for and select the to use as your action; the destination where you'll be sending your data.
8. To connect your account, you'll be prompted to enter an Access Token which can be found on the page of your Poplar account.
4. Test & Continue (optional) if the test is successful, search for and select the to use as your action; the destination where you'll be sending your data.
6. To connect your account, you'll be prompted to enter an Access Token which can be found on the page of your Poplar account.
5. Test your ReCharge connection, if successful search for and select the to use as your action; the destination where you'll be sending your data.
6. Depending on the Trigger selected in Step 4, choose whether you'll be creating a mailing with user email data (with enabled) or complete physical address data. You also have the option to add a user to your list in Poplar.
7. To connect your account, you'll be prompted to enter an Access Token which can be found on the page of your Poplar account.
5. Search for and select the to use as your action; the destination where you'll be sending your data.
7. To connect your account, you'll be prompted to enter an Access Token which can be found on the page of your Poplar account.
Zapier allows you to link hundreds of different web services with the Poplar API through the . They support easy access to hundreds of CRMs, marketing tools and even Google Forms and Spreadsheets.
& hundreds
Search for and select the to use as your action; the destination where you'll be sending your data.
To connect your account, you'll be prompted to enter an Access Token which can be found on the page of your Poplar account.
BigCommerce
Magento
Hubspot
Mixpanel
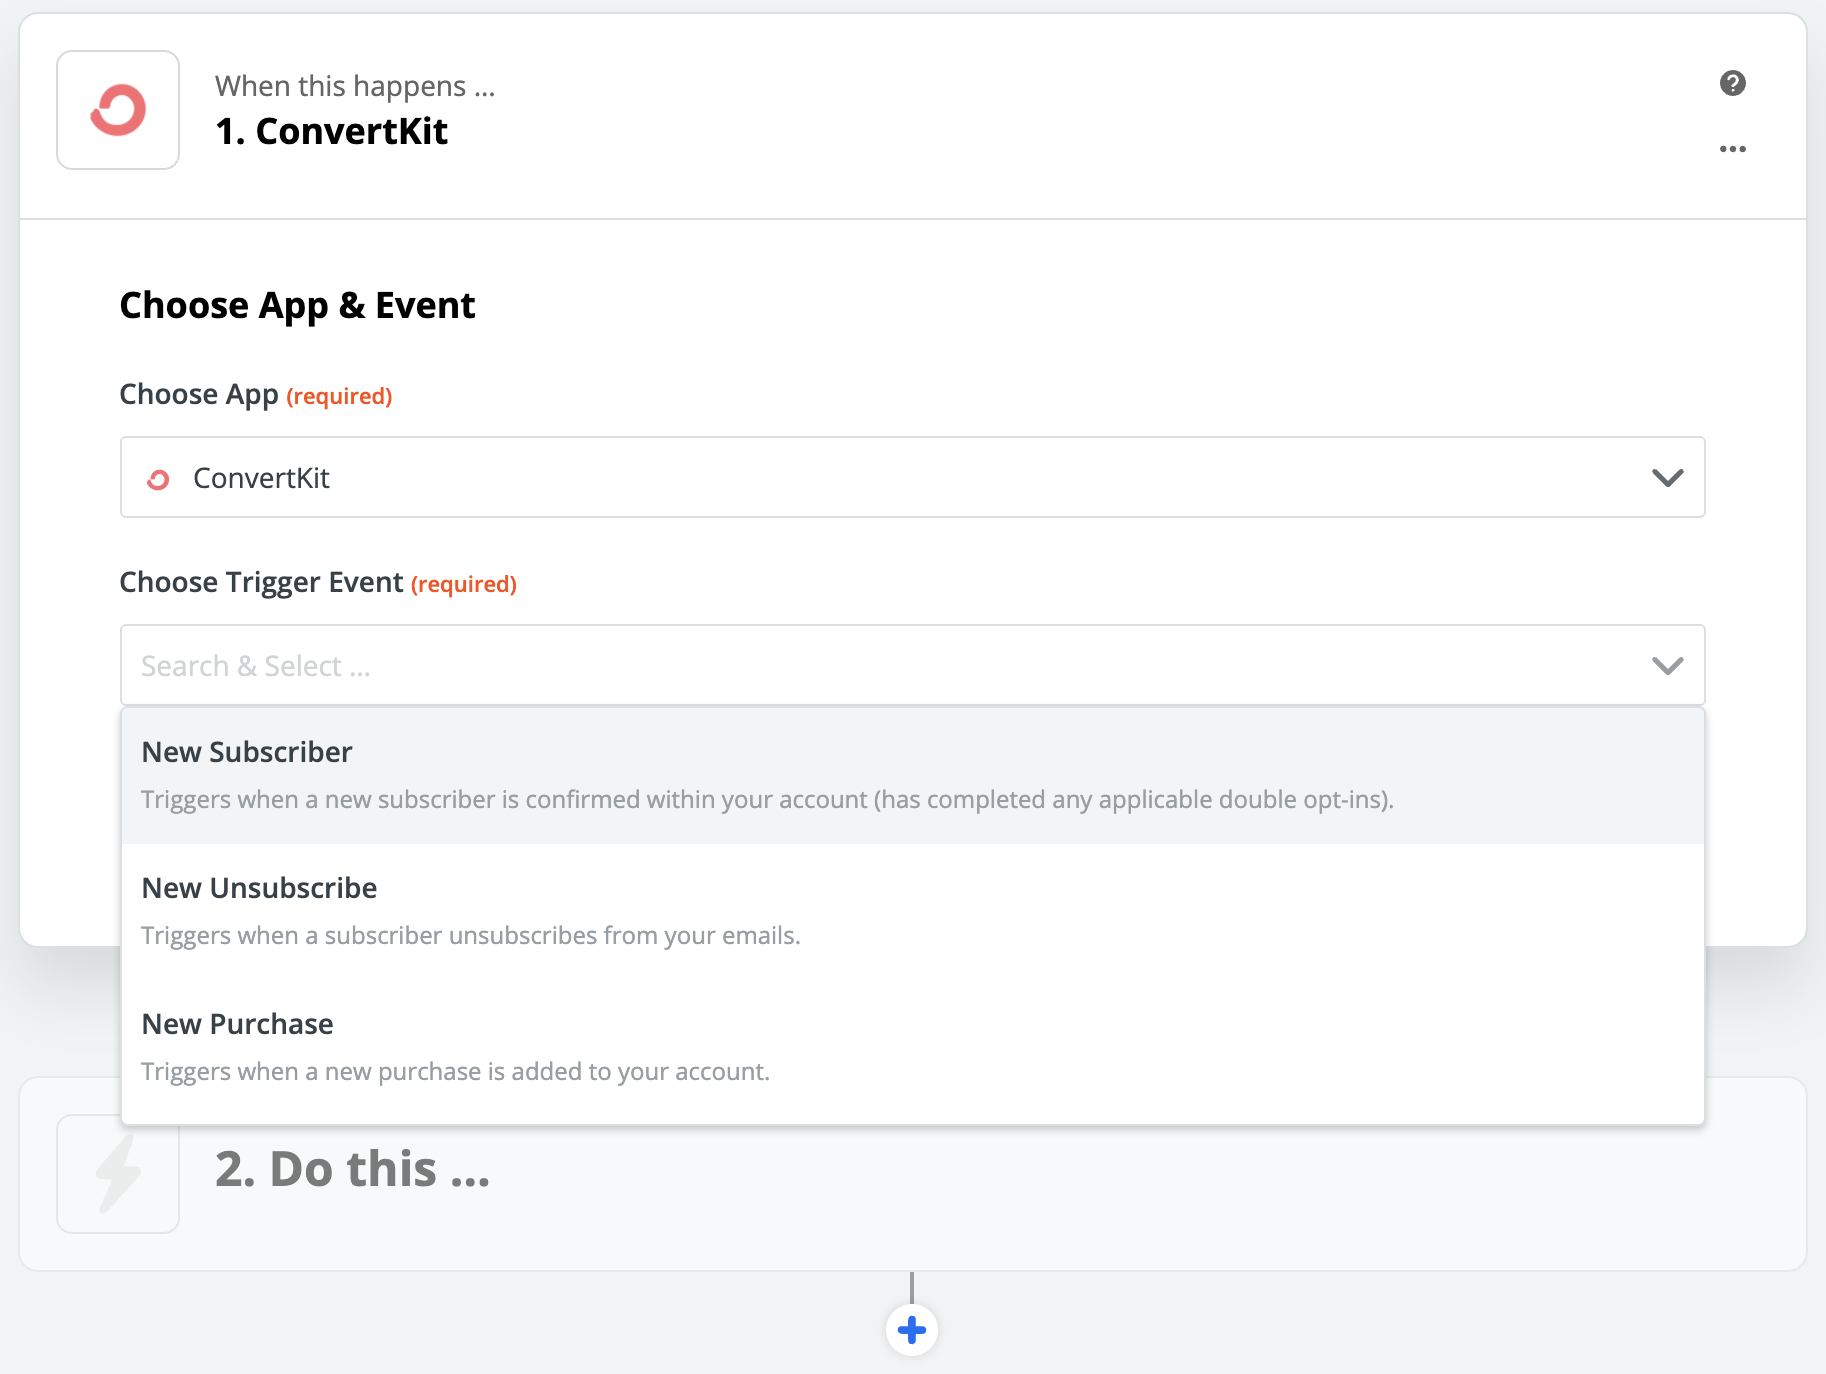
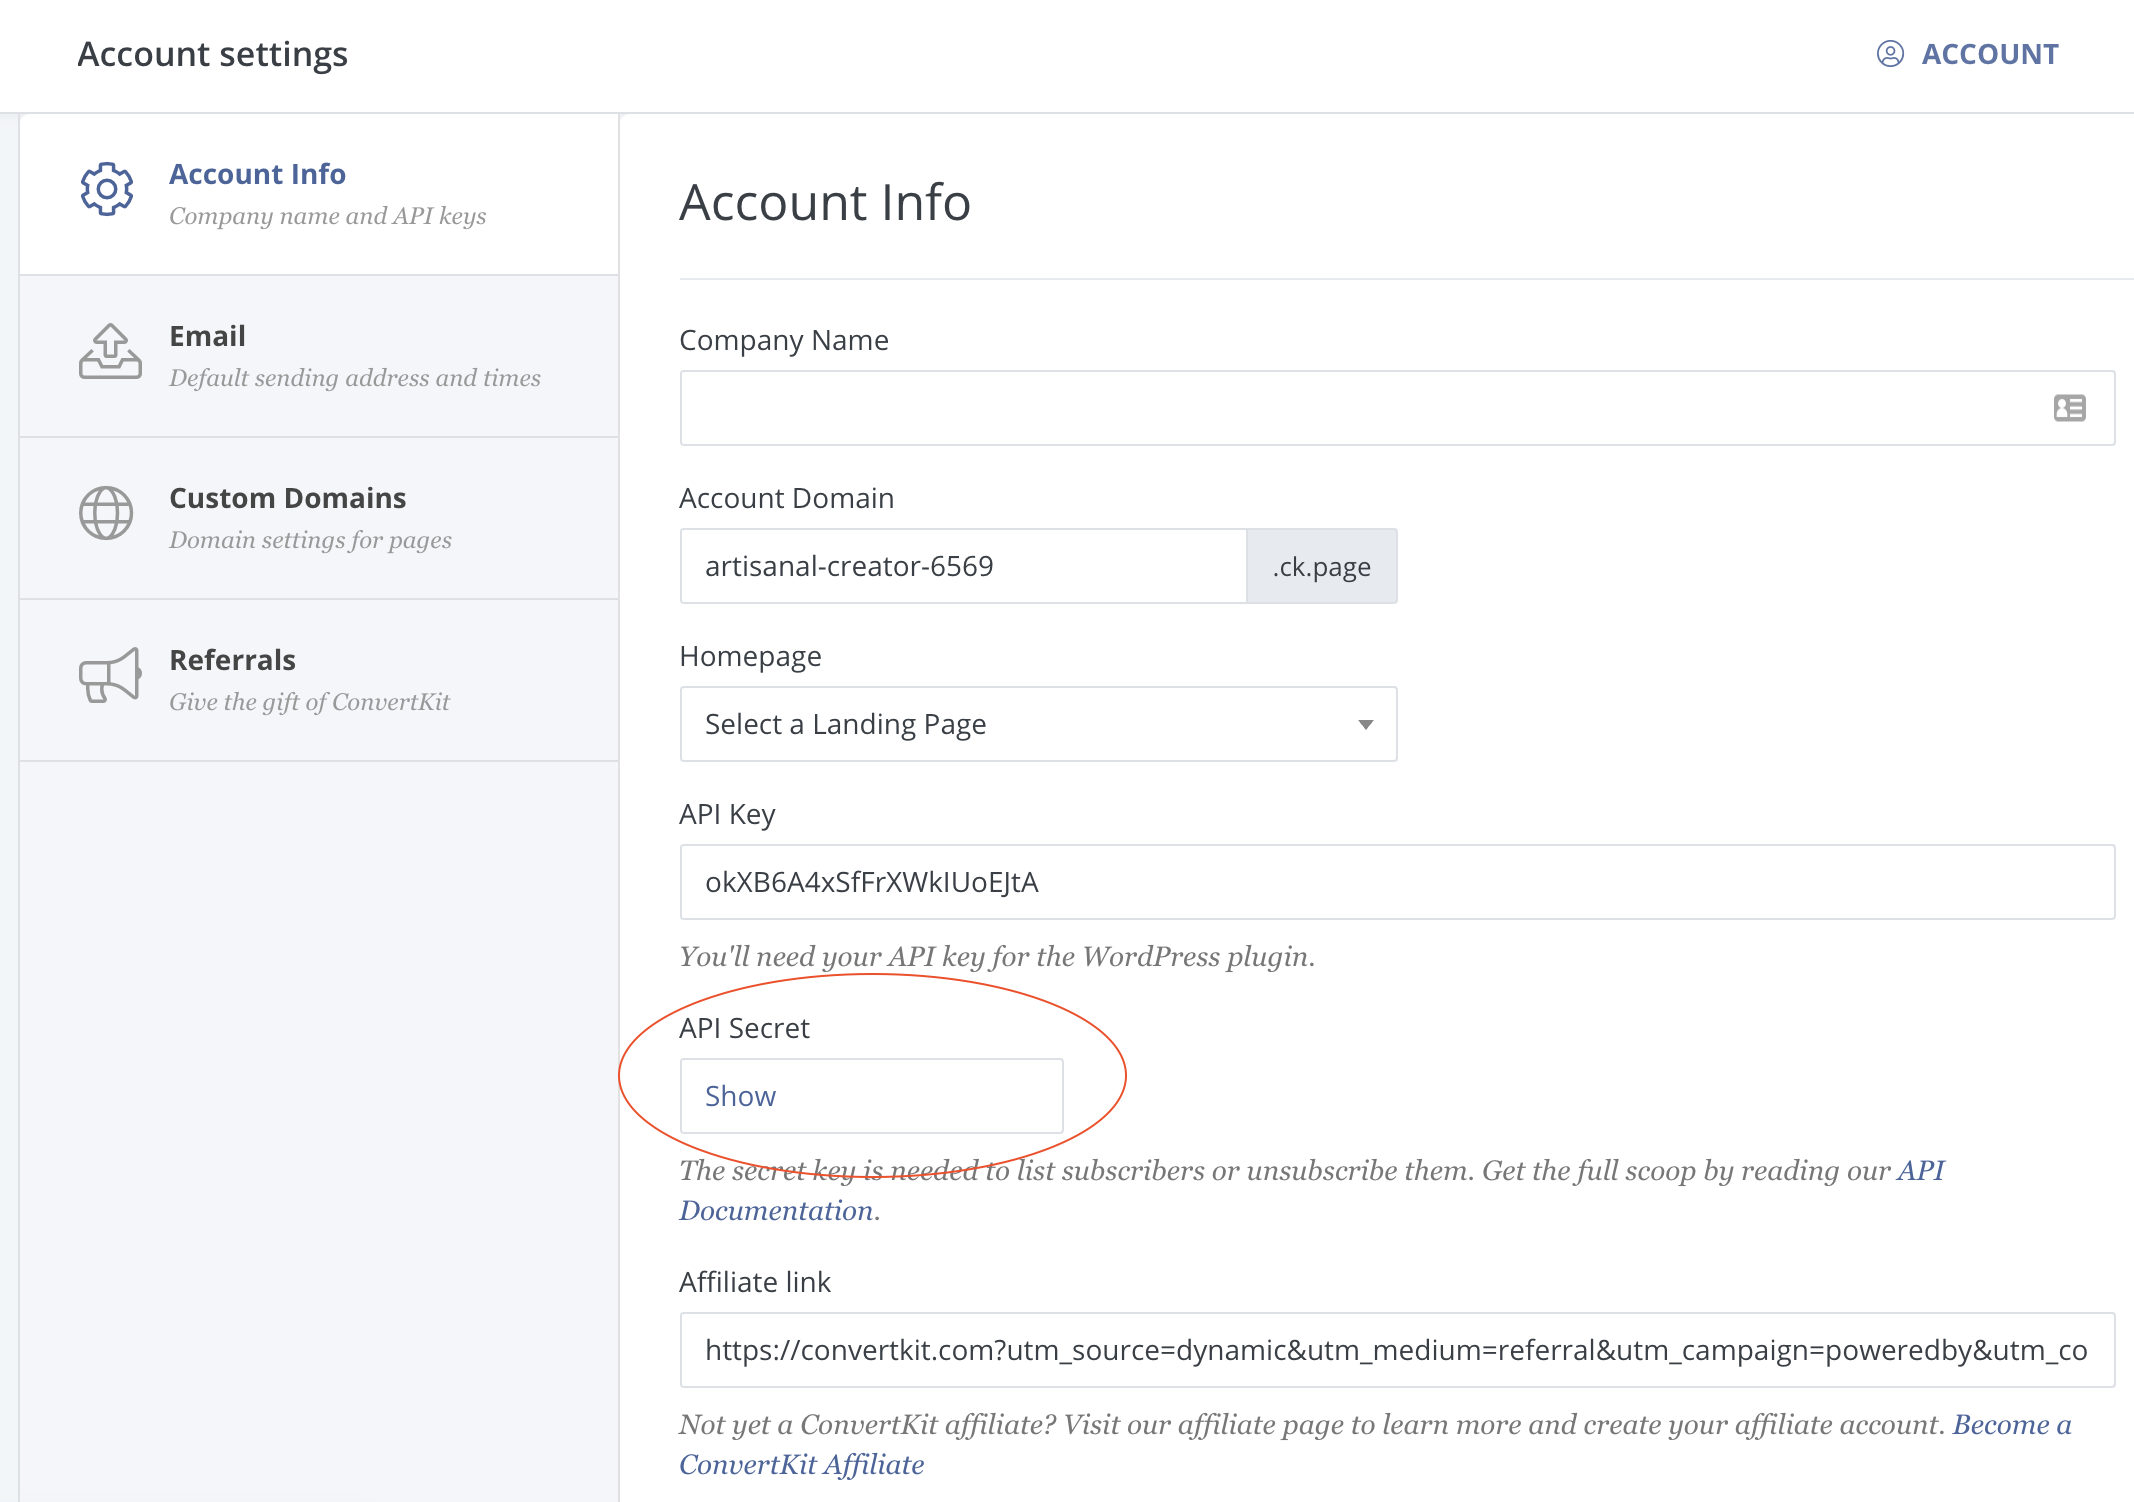
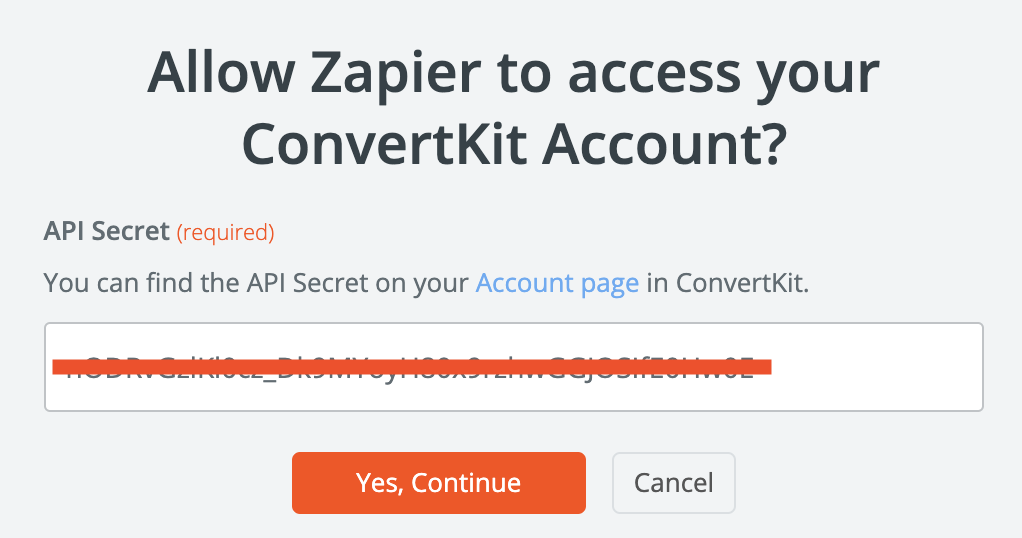
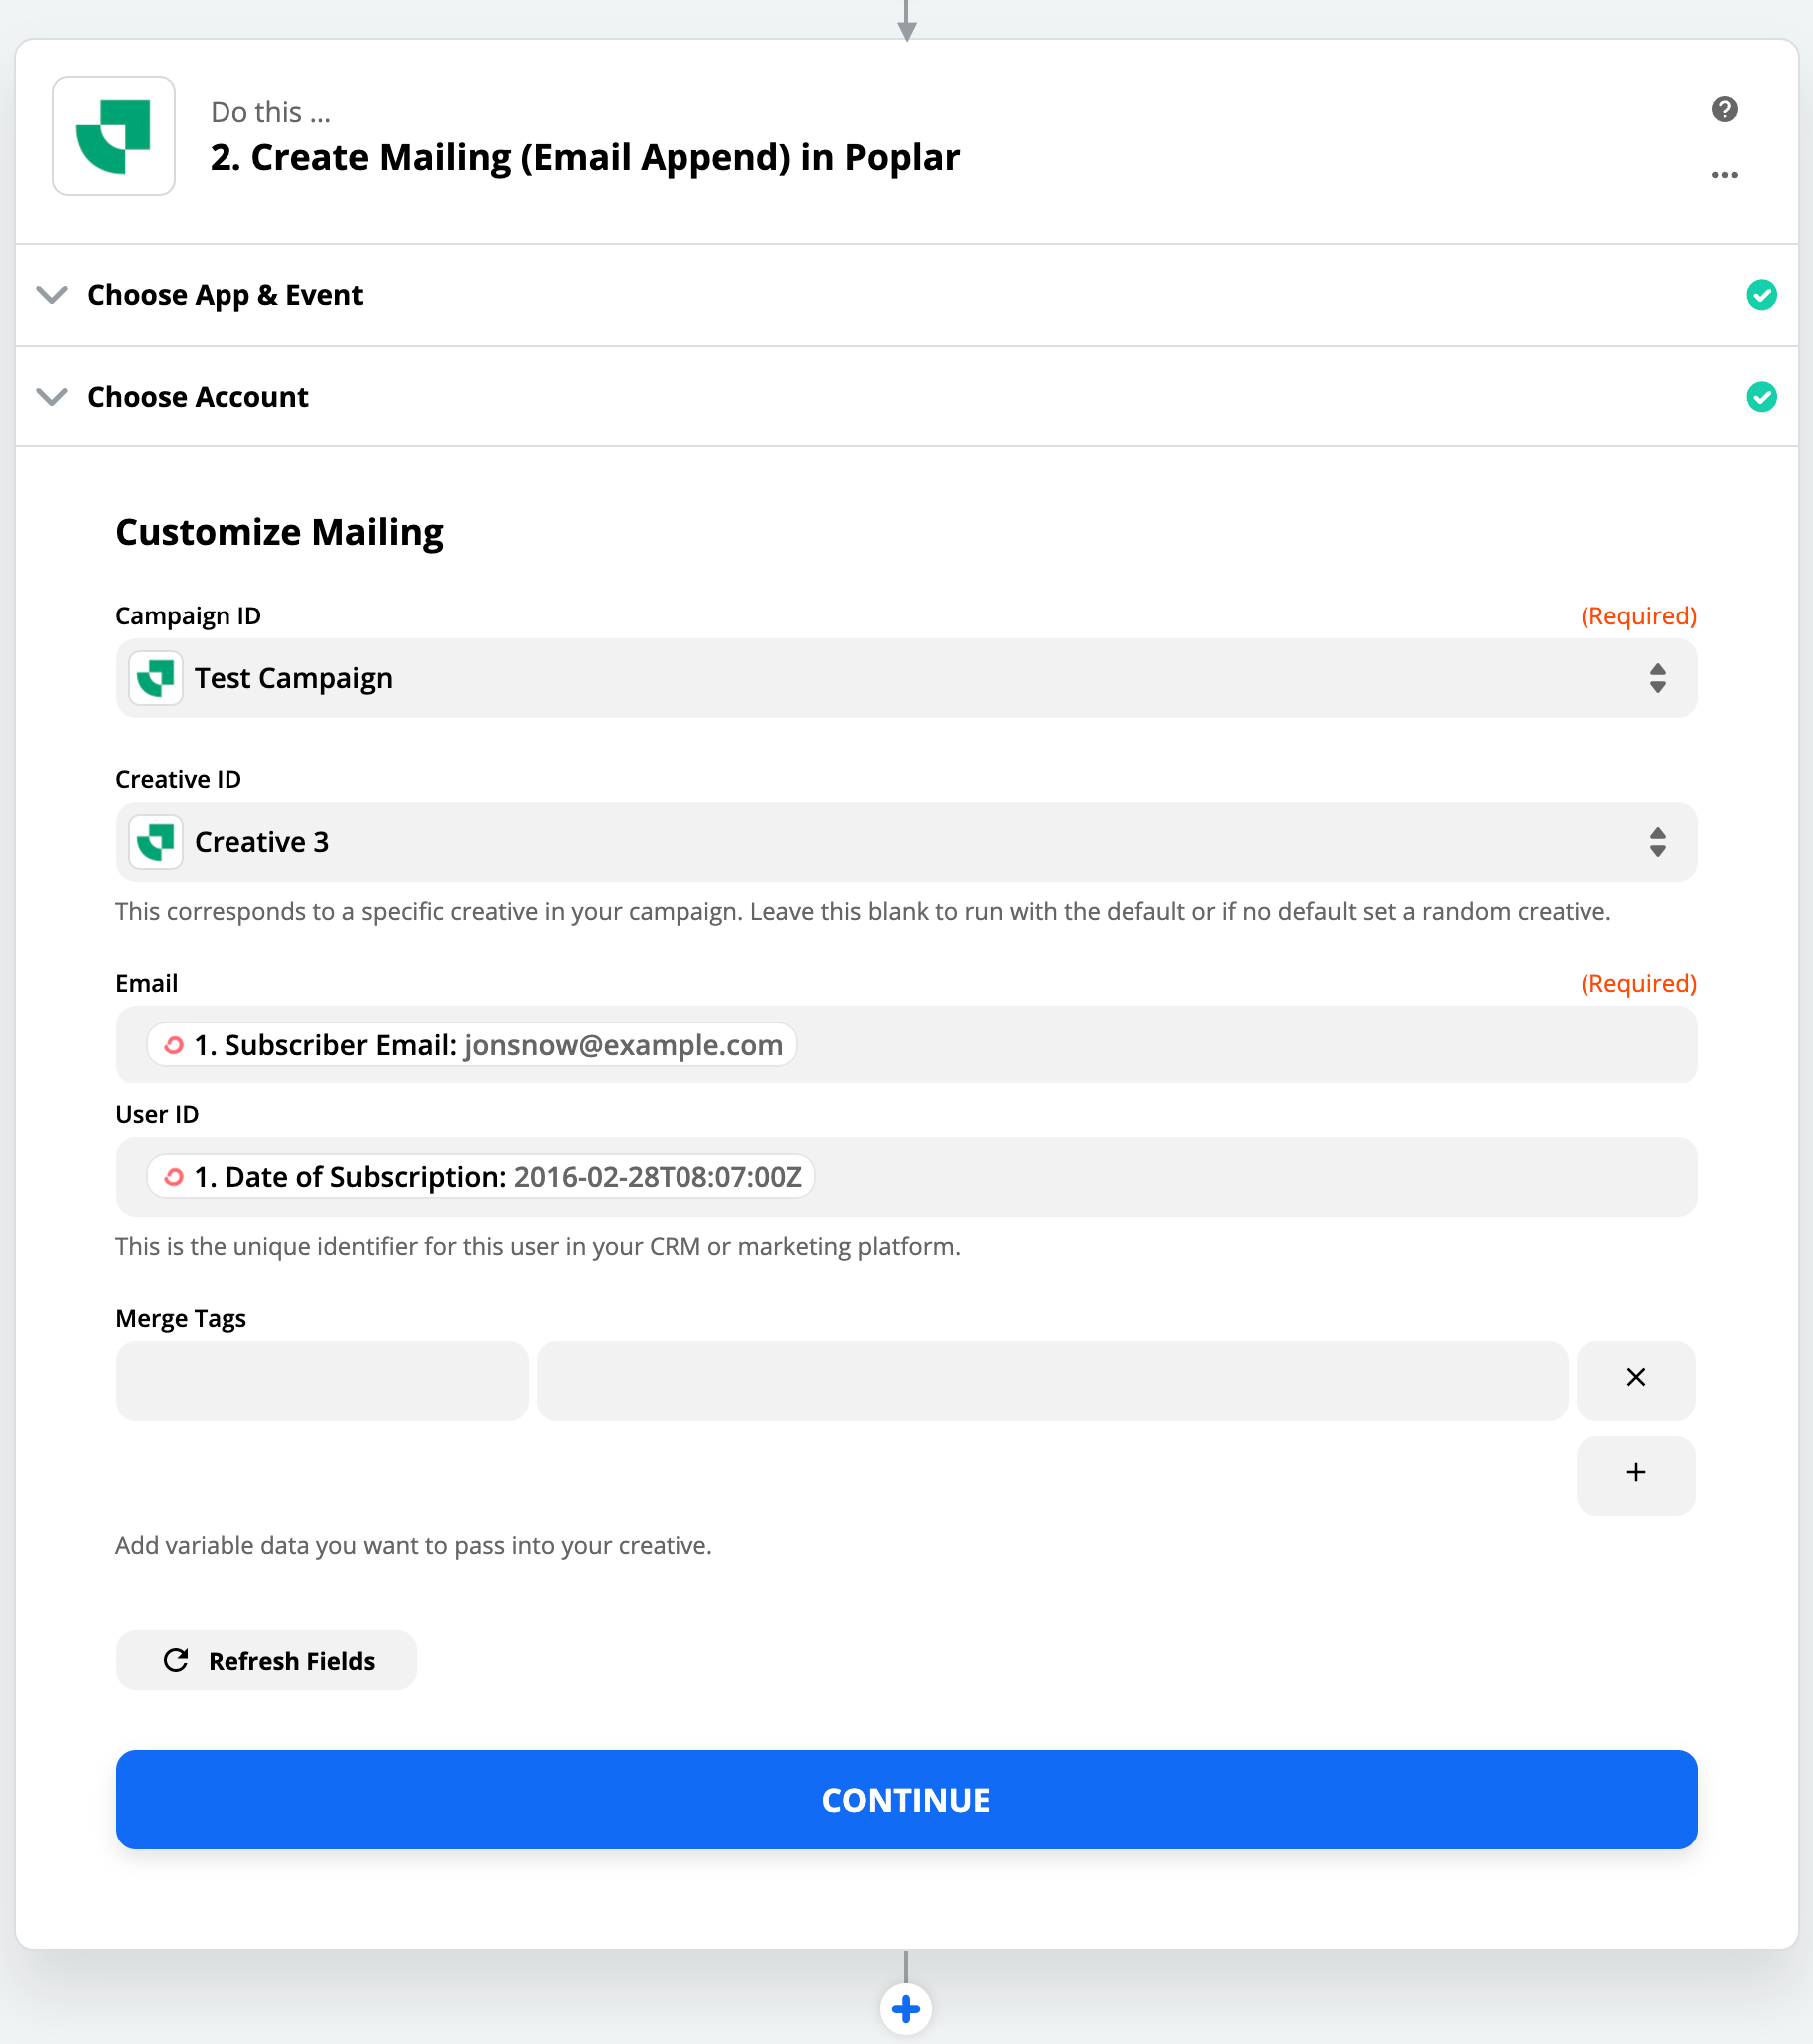
ConvertKit
Lytics
Drip.io
ReCharge
Infusionsoft
Salesforce
Highrise
Zoho
Mailchimp
Hightouch


If you are an Iterable user, you can push email or full address data to Poplar's Mailing, Audiences, or Do Not Mail endpoints. Before integrating and sending tests, make sure you've completed the following:
Create a campaign in Poplar (must be set to Active)
Upload creative (can be a placeholder creative for testing purposes)
Log into Iterable and navigate to Journey webhooks under the Integrations tab:
If you don't see an Integrations tab, reach out to your Iterable account owner for permission to access.
Click the green New Webhook button and enter the following criteria:
Click the Add Header button and enter the following values:
Authorization
Bearer *Test or Production API Access Token*
Make sure the Body is set to URL-encoded form, then click the Add Form Field button to begin adding each webhook field. The form fields entered here construct all data that will be sent to Poplar for the mailing. The values on the right should correspond to how/where your data is stored in Iterable, and the keys on the left represent the values they'll map to in Poplar.
If you have customer Shipping or Billing addresses stored in Iterable and you want to use them for mailing:
If using custom merge tags in your creative artwork, make sure the value inside the merge_tags[ *value*] object maps to the value used in your {{custom.*value*}} creative.
Be sure to include all relevant data - if you're passing full addresses for mailing but plan to track using email addresses, be sure to include the email field as well.
Once you've double checked your fields for typos and saved your webhook, navigate to Journeys under the Messaging tab:
Select the workflow with which you'd like to implement the Poplar webhook, or click Create New Journey to build a new one from scratch.
Under Integrations on the right, select the Call webhook option:
Drag and drop the action into your flow, then double click the node to access the settings:
Make sure Use preset journey webhook is turned ON so you can select your Poplar webhook from the dropdown, then click Update.
When brought back to the workflow, click Save Journey to access the Test Journey... option:
Enter an Email address to receive trigger and hit Test Journey.
Make sure the email address used contains all the data listed in your webhook, under their user profile - if recipient data is missing the test will not go through.
Head to the History tab of your campaign within your Poplar account to see successful tests come through:
Click into one of the mailers to see a PDF proof with the user data applied. Scroll down to the Request Details to confirm the data coming through the platform matches your Iterable journey.
If using custom merge tags, make sure they are properly located within the merge_tags object in your Request Details.
Once you've confirmed the connection is successful and customer data is coming through to Poplar as desired, use your Production Access Token in place of your Test token, save all updates accordingly and make sure your journey is Enabled:
Need help? Reach out to support@heypoplar.com for assistance.
If you are an Optimizely or Zaius user, you can add the Poplar Direct Mail channel App to your new or existing campaigns. Before integrating and sending tests, make sure you've completed the following:
Create a campaign in Poplar
Upload creative (this can be a placeholder creative for testing purposes)
From your Optimizely Dashboard, navigate to the App Directory in the top right and search for Poplar to install the App:
Once you've confirmed the connection is successful, the Production API Key can be swapped in its place.
Navigate to your Optimizely Campaigns to create or update an existing campaign.
Establish your audience segment criteria in the Enrollment tab, then move on to the Touchpoints tab to add Direct Mail (Poplar) as a channel:
If you already have an existing Touchpoint such as Email set up, click the + ADD CHANNEL tab at the top to add Direct Mail (Poplar).
From inside the Target tab, select your Poplar campaign from the dropdown list.
If your campaign isn't listed in the drop down, make sure creative has been uploaded and the campaign is labeled Active for mailing.
MERGE TAG 1 should contain the value in your Poplar creative (if you have {{custom.promo-code}} in your creative, you'll want to simply enter promo-code), and MERGE TAG 1 VALUE should pull in the data from Optimizely to map to the custom merge tag.
Click the blue Test button in the top right to make sure the data is being pulled into the request correctly. This Test button will not send a test to Poplar, it will only help you preview the data that will be sent in the request.
Save your Poplar channel and campaign settings, the click the green Go Live button:
Since you entered your Test API key under your Poplar App Settings, nothing will actually mail and you wont be charged for incoming requests.
To test the trigger, you can either manually push audience members through the flow or leave the campaign live for a day or two and let the test requests come through organically.
Successful triggers will be visible under your campaign's History tab. Once you've confirmed the connection is successful and all the necessary data is coming through and mapping properly, you can go live to Production.
To switch to Production, navigate to the API page in your Poplar account and copy your Production Access Token.
Then head to the App Directory in Optimizely to bring up the Poplar App. In the Settings tab, paste your Production token where your Test token was under Authorization:
Hit Authorize, then head back to your campaign no make sure it's set live to production!
Need help? Reach out at support@heypoplar.com for assistance.
Connecting Zoho via Zapier
1. Log into your Zapier account and from your dashboard, click MAKE A ZAP to begin the new trigger setup.
2. You'll then select Zoho CRM as the trigger.
3. When it comes to picking the type of event to trigger on we recommend either "New Contact" if you want to target all new subscribers, or "New Updated Contact" that will allow you to target a specific segment that gets manually updated or use an automated workflow in Zoho to mark a contact as updated during a specific step in the flow and then use that update to trigger the mailing.
4. Next, you'll be prompted to connect to your Zoho account. If the connection is successful, hit continue to add either test or add customizations to your event.
6. If you only have access to email data in Zoho you'll want to select the Email Append option, but you can alternatively create additional Zaps and use the other Action Events for things like updating your do not mail list, or mailing to customers you have existing address data for.
We recommend first entering your Test key, this will allow you to test the trigger connection without actually mailing. Successful trigger requests will be visible from the History tab of the connected campaign.
Click + Connect a new account again to enter your Production key. We recommend only selecting this account when you're ready to go live.
If using your Production Account Token, clicking Test Trigger during will trigger a live mailer.
8. Select the campaign ( or head to Poplar to create a campaign and upload creative if you haven't yet).
9. (optional) Select your creative (or leave this blank if you want to run a multivariate test of any creatives enabled in the campaign.
10. Click the 4 line + button on the right and then Select the Zoho field that contains the sample data email, this will allow us to pass the recipient email to Poplar.
11. Send a test and then hop back over to Poplar to the history tab of the campaign and you can check the digital proof we created.
12. If tests are successful, it's time to turn on your Zap! If you want to let the trigger run naturally under the Test environment for a day or two, feel free to leave your Test Account selected. If you feel ready to go live, head back to Choose Account and select the one connected to your Production key before turning on your Zap!
Need help? Reach out to support@heypoplar.com for assistance.
A guide to status errors you may encounter when testing integrations.
Client Error
A 400 error indicates a client error somewhere in the webhook. We recommend checking the following:
Your Poplar campaign is Active and has creative uploaded.
The variables in your webhook match the values in the user profile.
The required address_1, city, state, and postal_code data is present.
The user you are testing with has all the data above saved on their profile.
Double check the JSON syntax is correct and you dont have any extra commas or curly braces.
Client Error
A 403 error indicates a client error related to Authentication. We recommend checking the following:
The key to your Authorization header has "Bearer testorproductiontoken".
Your API access token was copy and pasted completely.
(Klaviyo Only) If a webhook has been duplicated, make sure you copy and paste your access token directly from Poplar otherwise the hashes ### will be copied over instead of the full access token.
If you have multiple organizations, make sure you're using the correct corresponding token for the account.
If you are connecting to an endpoint other than the Mailing API (Audiences, Orders, Do Not Mail, etc.), make sure you are using your Production token. Only the Mailing API is built to accept the Test token.
Client Error
A 429 error indicates too many requests are being sent through at once and a rate limit is being hit - either on the side of your CRM/ESP or on the Poplar end.
To prevent misuse, our API endpoints implement rate limiting. If your application exceeds this limit then a HTTP 429 "Too Many Requests" response code will be returned.
HTTP headers are returned on all endpoints which contain how many more requests your application is allowed.
Server Error
A 500 error indicates a server error on the Poplar side, meaning our servers could be down. This is extremely rare, and we recommend double checking all of the points above to be safe. If you're still experiencing a 500, reach out to support@heypoplar.com for assistance.
Connecting WooCommerce via Zapier
1. Log into your Zapier account and from your dashboard, click MAKE A ZAP to begin the new trigger setup.
2. You'll then select WooCommerce as the trigger.
4. Visit your WordPress Dashboard, WooCommerce, Zapier Feeds, and add a new Zapier Feed.
5. Copy the webhook URL and paste it into the Webhook URL field
Connecting BigCommerce via Zapier
1. Log into you Zapier account and from your dashboard, click MAKE A ZAP to begin the new trigger setup.
2. You'll then select BigCommerce as the trigger.
4. One you've hit continue, head back to Zapier and your BigCommerce account should be selected in the dropdown menu under Choose Account click the blue continue button.
5a. Next you'll have the option to customize your order; this isn't a required step but if left blank, Zapier will trigger on all order statuses, including "Incomplete" orders.
5b. If you selected New Customer, you'll skip 5a and go straight to step 6.
7. If you only have access to email data in BigCommerce you'll want to select the Email Append option, but you can alternatively create additional Zaps and use the other Action Events for things like updating your do not mail list, or mailing to customers you have existing address data for.
We recommend first entering your Test key, this will allow you to test the trigger connection without actually mailing. Successful trigger requests will be visible from the History tab of the connected campaign.
Click + Connect a new account again to enter your Production key. We recommend only selecting this account when you're ready to go live.
If using your Production account token, clicking the Test Trigger button will trigger a live mailer that will be sent.
9. Select the campaign (or head to Poplar to create a campaign and upload creative if you haven't yet).
10. (optional) Select your creative (or leave this blank if you want to run a multivariate test of any creatives enabled in the campaign.
11. Select the 4 line + button on the right and then Select the BigCommerce field that contains the sample data email, this will allow us to pass the recipient email to Poplar.
12. Send a test and then hop back over to Poplar to the history tab of the campaign and you can check the digital proof we created.
13. If tests are successful, it's time to turn on your Zap! If you want to let the trigger run naturally under the Test environment for a day or two, feel free to leave your Test Account selected. If you feel ready to go live, head back to Choose Account and select the one connected to your Production key before turning on your Zap!
Need help? Reach out to support@heypoplar.com for assistance.
Connecting Mailchimp via Zapier
1. Log into your Zapier account and from your dashboard, click MAKE A ZAP to begin the new trigger setup.
2. You'll then select Mailchimp as the Trigger. When it comes to picking the type of event to trigger on we recommend either "New Subscriber" if you want to target all new subscribers to a list, or "New Subscriber with Tag" that will allow you to target a specific segment that gets a tag applied manually or use an automated workflow in Mailchimp to apply a tag at a specific step in the flow and then use that tag to trigger the mailing.
3. Once you've selected the type of event you'll connect your Mailchimp account to Zapier.
4. If you are using the tag approach head over to Mailchimp, if not skip the rest of step 6.
Select the audience that your workflow is in, then "Create a new tag". Name it something to correspond to this mail campaign.
Go to the workflow that will trigger the mailing, then click the arrow dropdown to "Edit", then select the email you want to trigger the mailing by clicking "Pause and Edit". Select "Post-send Action: Add" then on the dropdown select "Add Tag" and pick the Tag you recently created in step.
Head back to Zapier to the Create action step and select the "New Subscriber with Tag" and then refresh the dropdown to pull in your newly created tag on the next field.
5. Pull in Sample Data, to kickstart your segment you may need to manually apply the tag to a member of the audience in Mailchimp. Then click the big blue " Continue" button.
7. With Mailchimp you likely don't have address data so you'll want to select the Email Append option, but you can alternatively create additional zaps and use the other Action Events for things like updating your do not mail list.
We recommend first entering your Test key, this will allow you to test the trigger connection without actually mailing. Successful trigger requests will be visible from the History tab of the connected campaign.
Click + Connect a new account again to enter your Production key. We recommend only selecting this account when you're ready to go live.
If using your Production account, clicking Test Trigger during will trigger a live mailer.
9. Select the campaign (or head to Poplar to create a campaign and upload creative if you haven't already).
10. ( optional) Select your creative (or leave this blank if you want to run a multivariate test of any creatives enabled in the campaign).
11. Select the 4 line + button on the right and then Select the mailchimp field that contains the sample data email, this will allow us to pass the recipient email to Poplar. (see below)
12. Send a test and then hop back over to Poplar to the history tab of the campaign and you can check the digital proof we created.
13. If tests are successful, it's time to turn on your Zap! If you want to let the trigger run naturally under the Test environment for a day or two, feel free to leave your Test Account selected. If you feel ready to go live, head back to Choose Account and select the one connected to your Production key before turning on your Zap!
If you are pushing a large segment all at once from Mailchimp through to Zapier they may temporarily pause the zap and email you to confirm that you want it to be processed. Once you confirm by clicking through it will process the backlog and reenable the Zap.
Can't find the tag in the Mailchimp dropdown?
If you have more than 100 tags on the Mailchimp audience it's possible they won't pull in on the dropdown. To fix this you'll need to lookup the tag ID and then plug it in manually following the 3 steps below.
Once you copy the url paste it into a text editor and pull out the ID that is at the end. it should be a 5 digit number at the very end (not the 6 digit list ID).
Head back to your Zap and audience selection:
You can remove a tag using the same approach in Mailchimp as you used to add the tag. By removing the tag after the mailing has been sent you keep the total audience size with the tag small enough to pull via Zapier. Zapier will tend to get timeouts as your list size goes above 5-10k. So it's critical to keep the audience in Mailchimp below that.
Need help? Reach out to support@heypoplar.com for assistance.
Locate both your Production Access Token and Test Access Token on the page of your Poplar Account
Head to the page of your Poplar account to locate your Production and Test Access Tokens. You'll want to first test your trigger using your Once it's confirmed the connection is successful, this token can be swapped out for your Production key to set the trigger live.
We strongly recommend you use the Test token provided in the section of your Poplar account, to ensure your trigger is set up successfully. After you see it working, swap it out for the Production token which will set the trigger live.
Navigate to your campaign's tab to find the campaign_id, navigate to the creative tab and click into one of your creatives to find the creative_id if it needs to be specified. If creative_id is not specified, only the default or active creatives (if ) under the campaign will mail.
If you have customer email addresses and want to use them to mail with Poplar's feature:
Additionally, make sure the Request Details look similar to the sample API Request shown in the under your Creative:
Locate both your Production Access Token and Test Access Token on the page of your Poplar Account
Navigate to the Settings tab of the Poplar App in Optimizely to enter either your
If Use addresses when available AND Use email when available are both enabled, make sure is also enabled for your Poplar campaign. Otherwise emails will not be accepted or matched to physical addresses for mailing.
If your Poplar creative uses , enable the merge tag option and select the number of custom merge tags present in your creative:
5. Search for and select the to use as your action; the destination where you'll be sending your data.
7. To connect your account, you'll be prompted to enter an Access Token which can be found on the page of your Poplar account.
3. Make sure you have the installed.
See their for more details on Zapier Integration...
3. Go to your BigCommerce account and follow the first 3 steps in the pop-up window. Click to see their documentation
6. Test your BigCommerce connection, if successful search for and select the to use as your action; the destination where you'll be sending your data.
8. To connect your account, you'll be prompted to enter an Access Token which can be found on the page of your Poplar account.
6. You're now ready to configure the Action step of the Zap, search for and select the to use as your action; the destination where you'll be sending your data.
8. To connect your account, you'll be prompted to enter an Access Token which can be found on the page of your Poplar account.
Why is Zapier timing out every time it attempts to pull the Mailchimp audience?
x-rate-limit-limit
The rate limit for a given endpoint
x-rate-limit-remaining
The number of requests remaining
x-rate-limit-reset
The time at which the rate limit resets


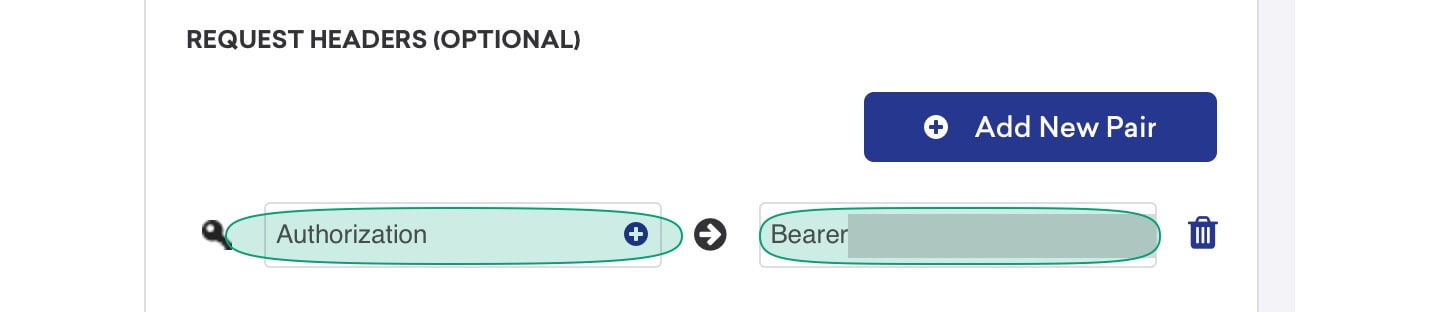


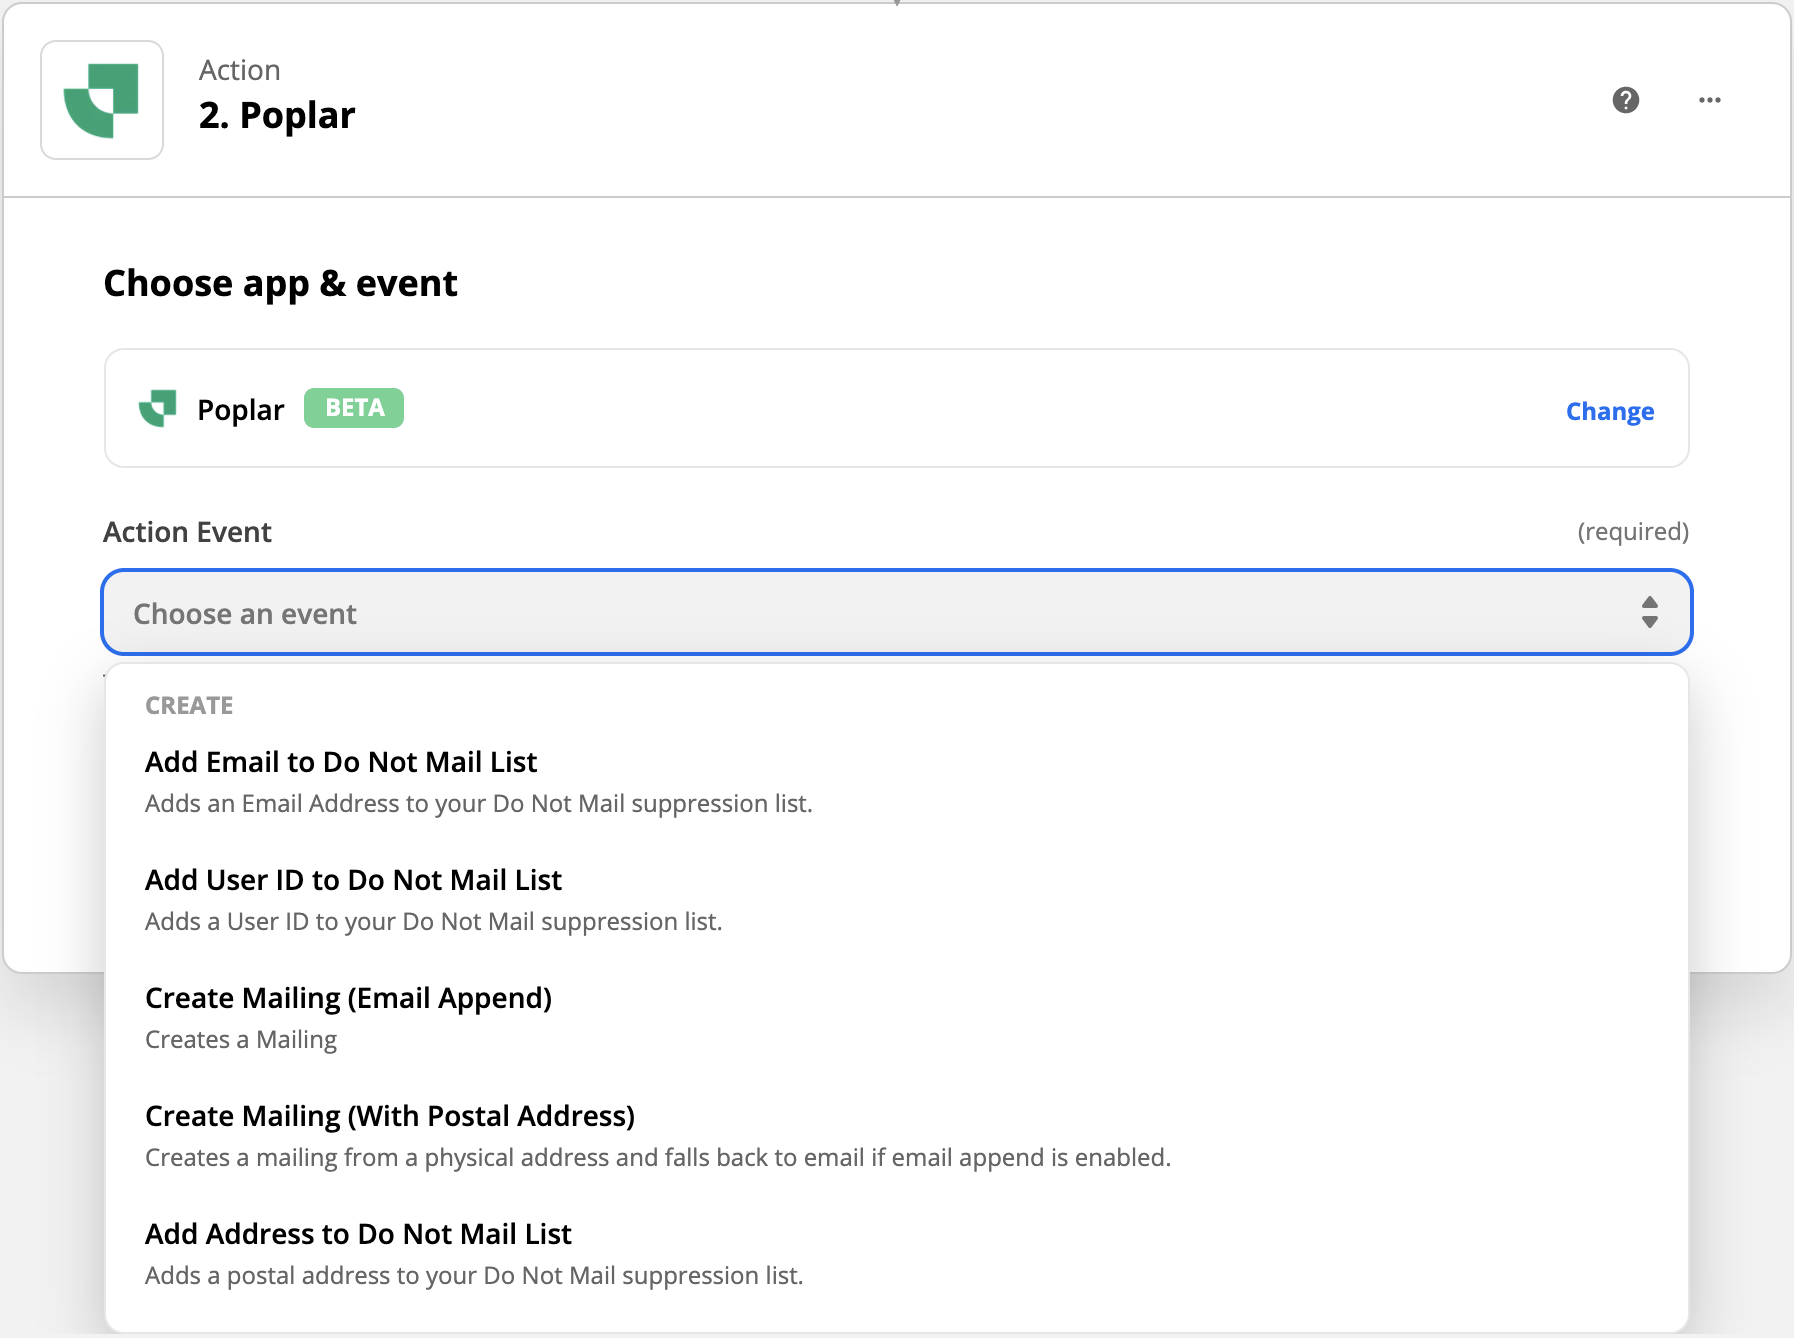


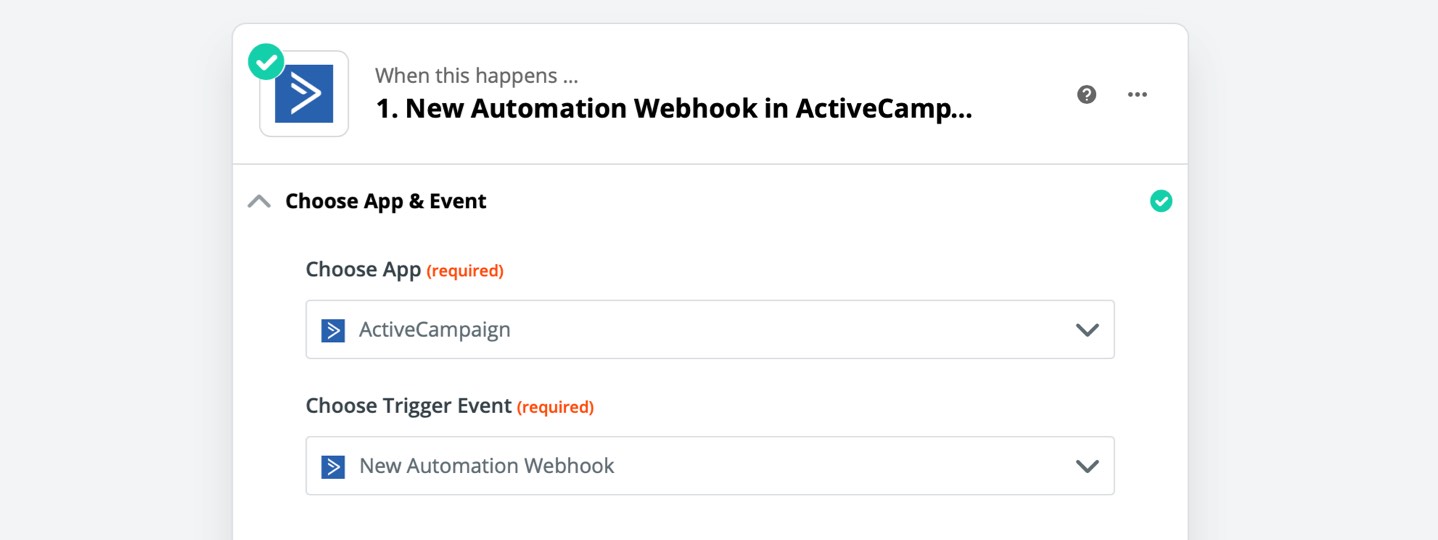


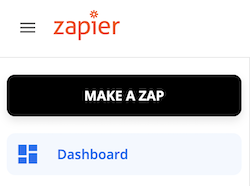
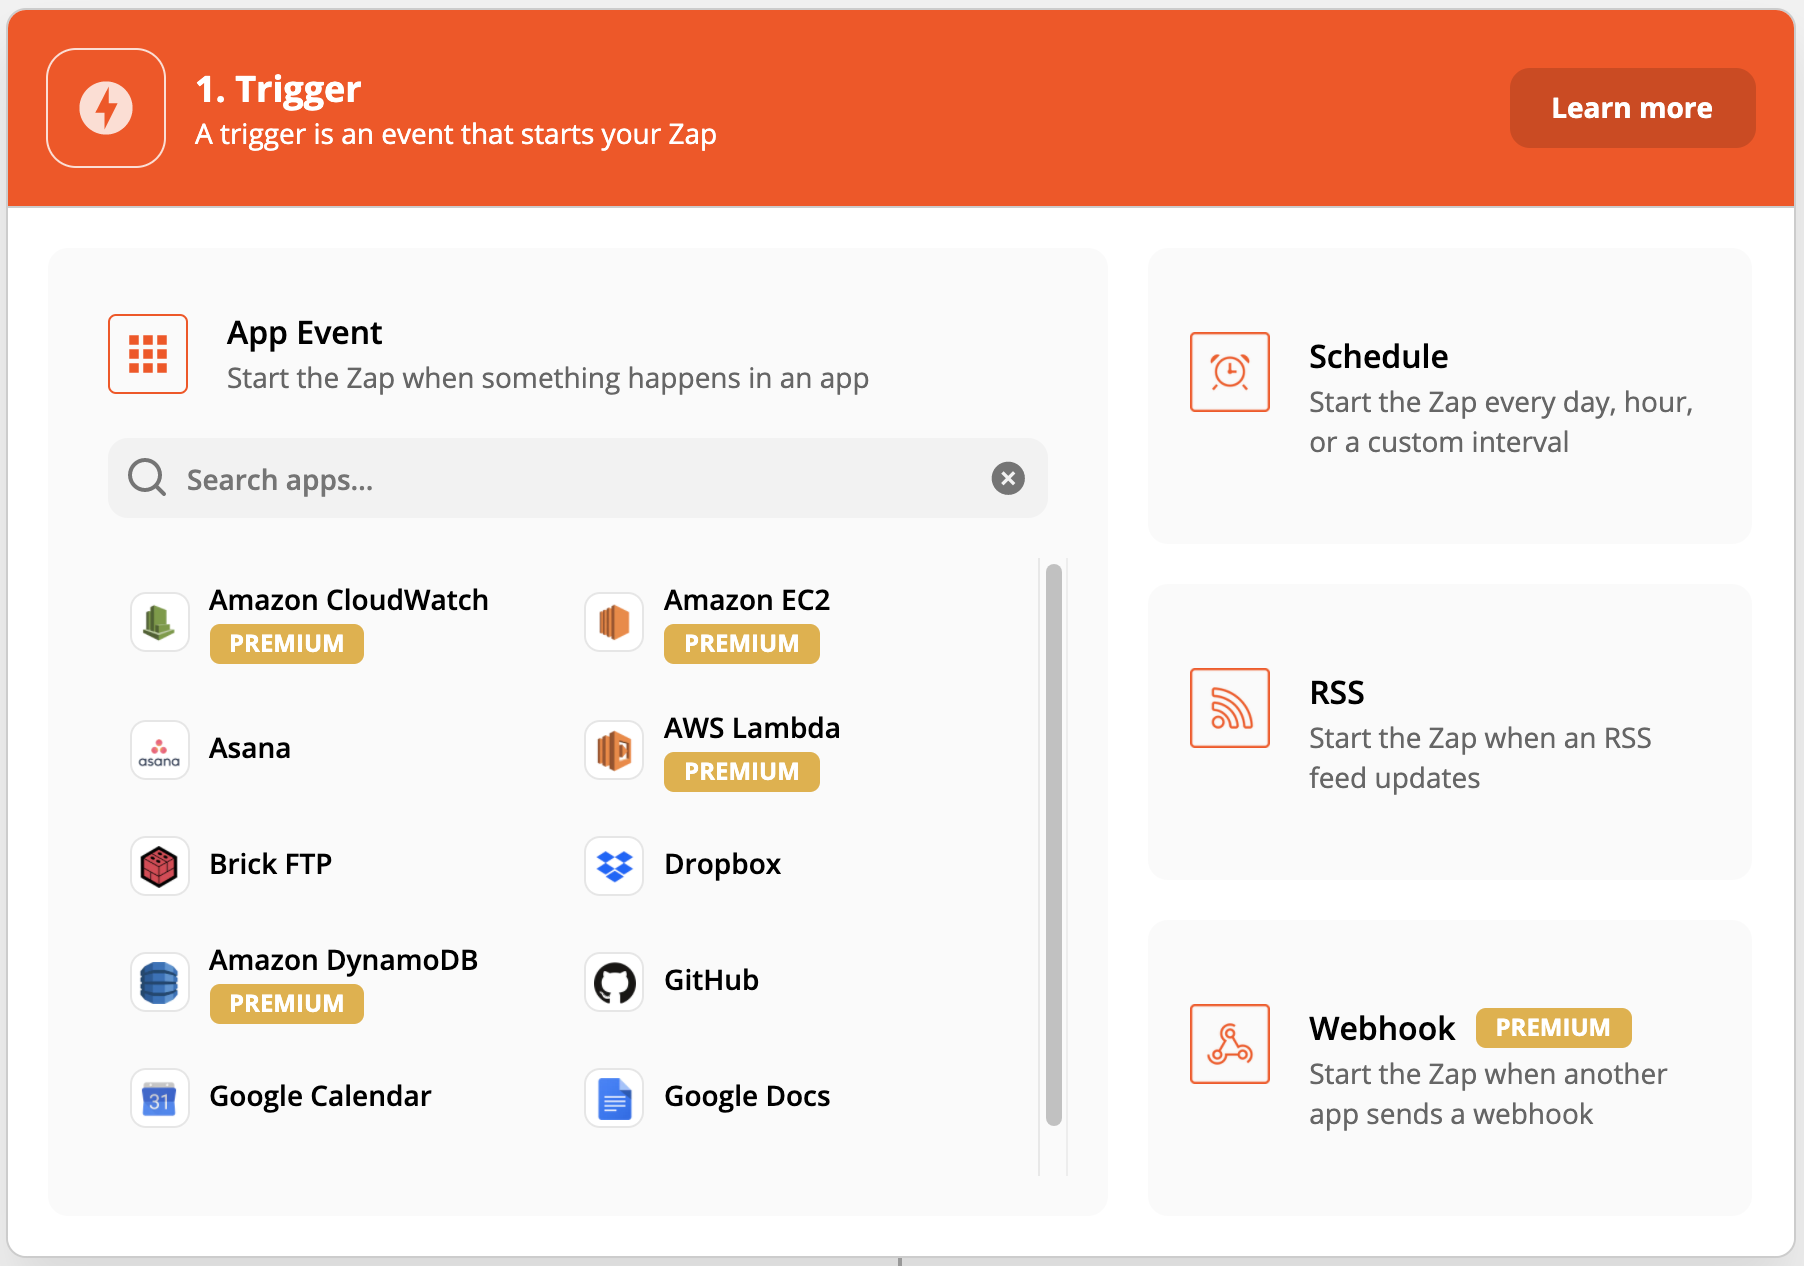


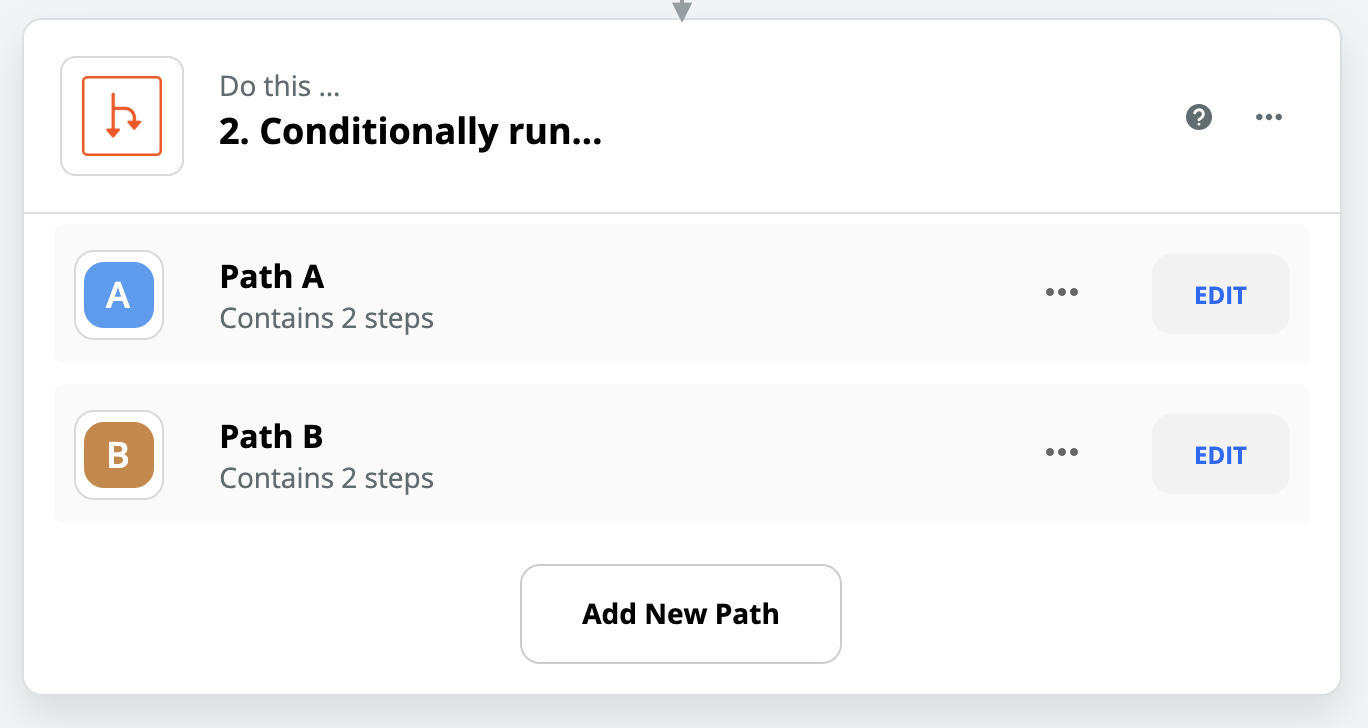
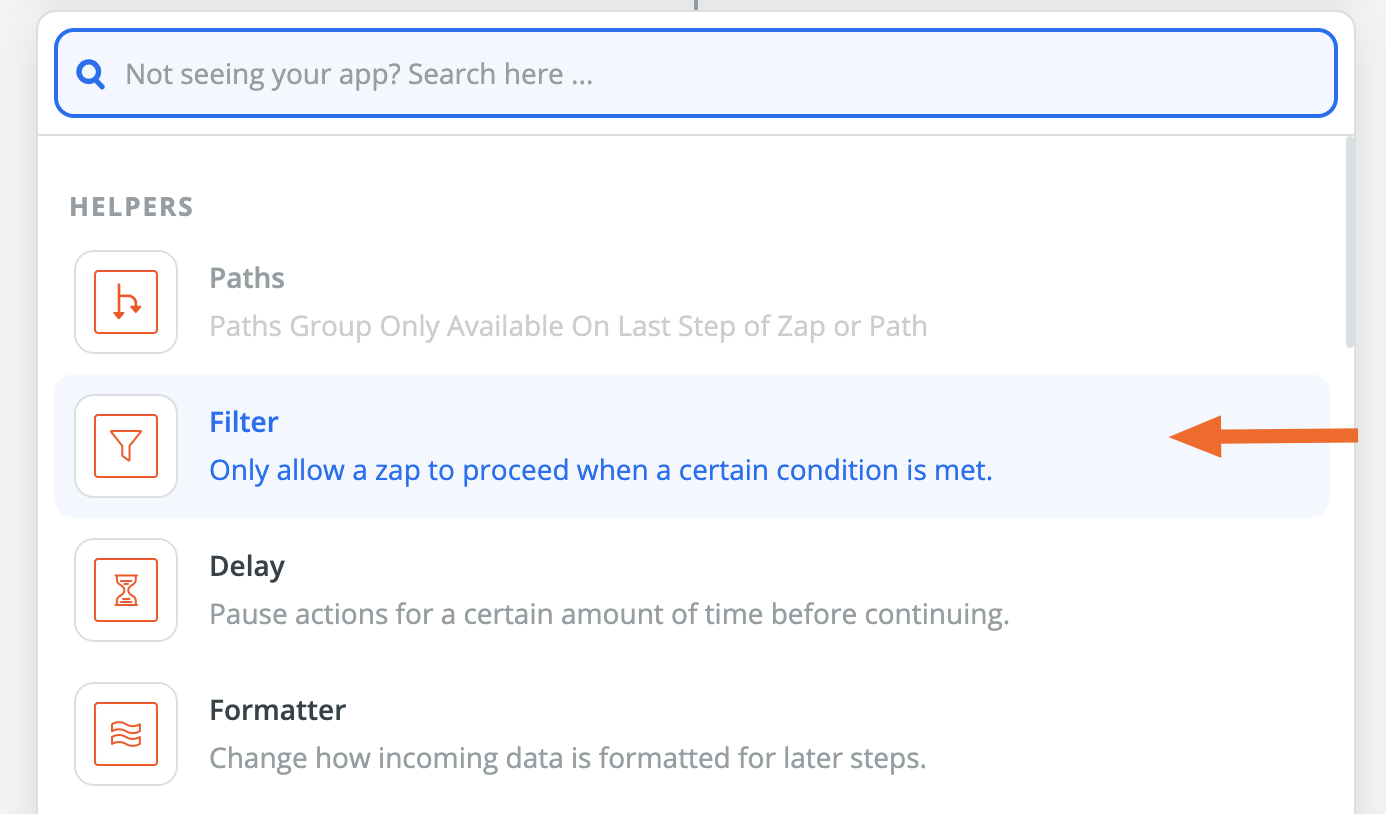


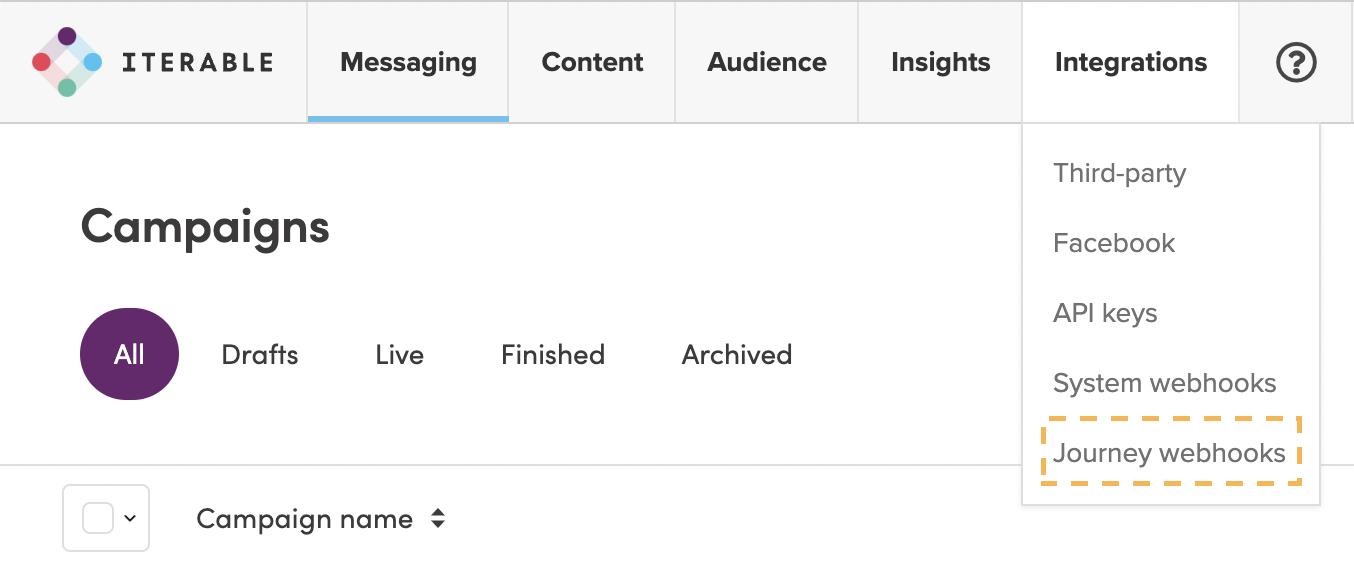
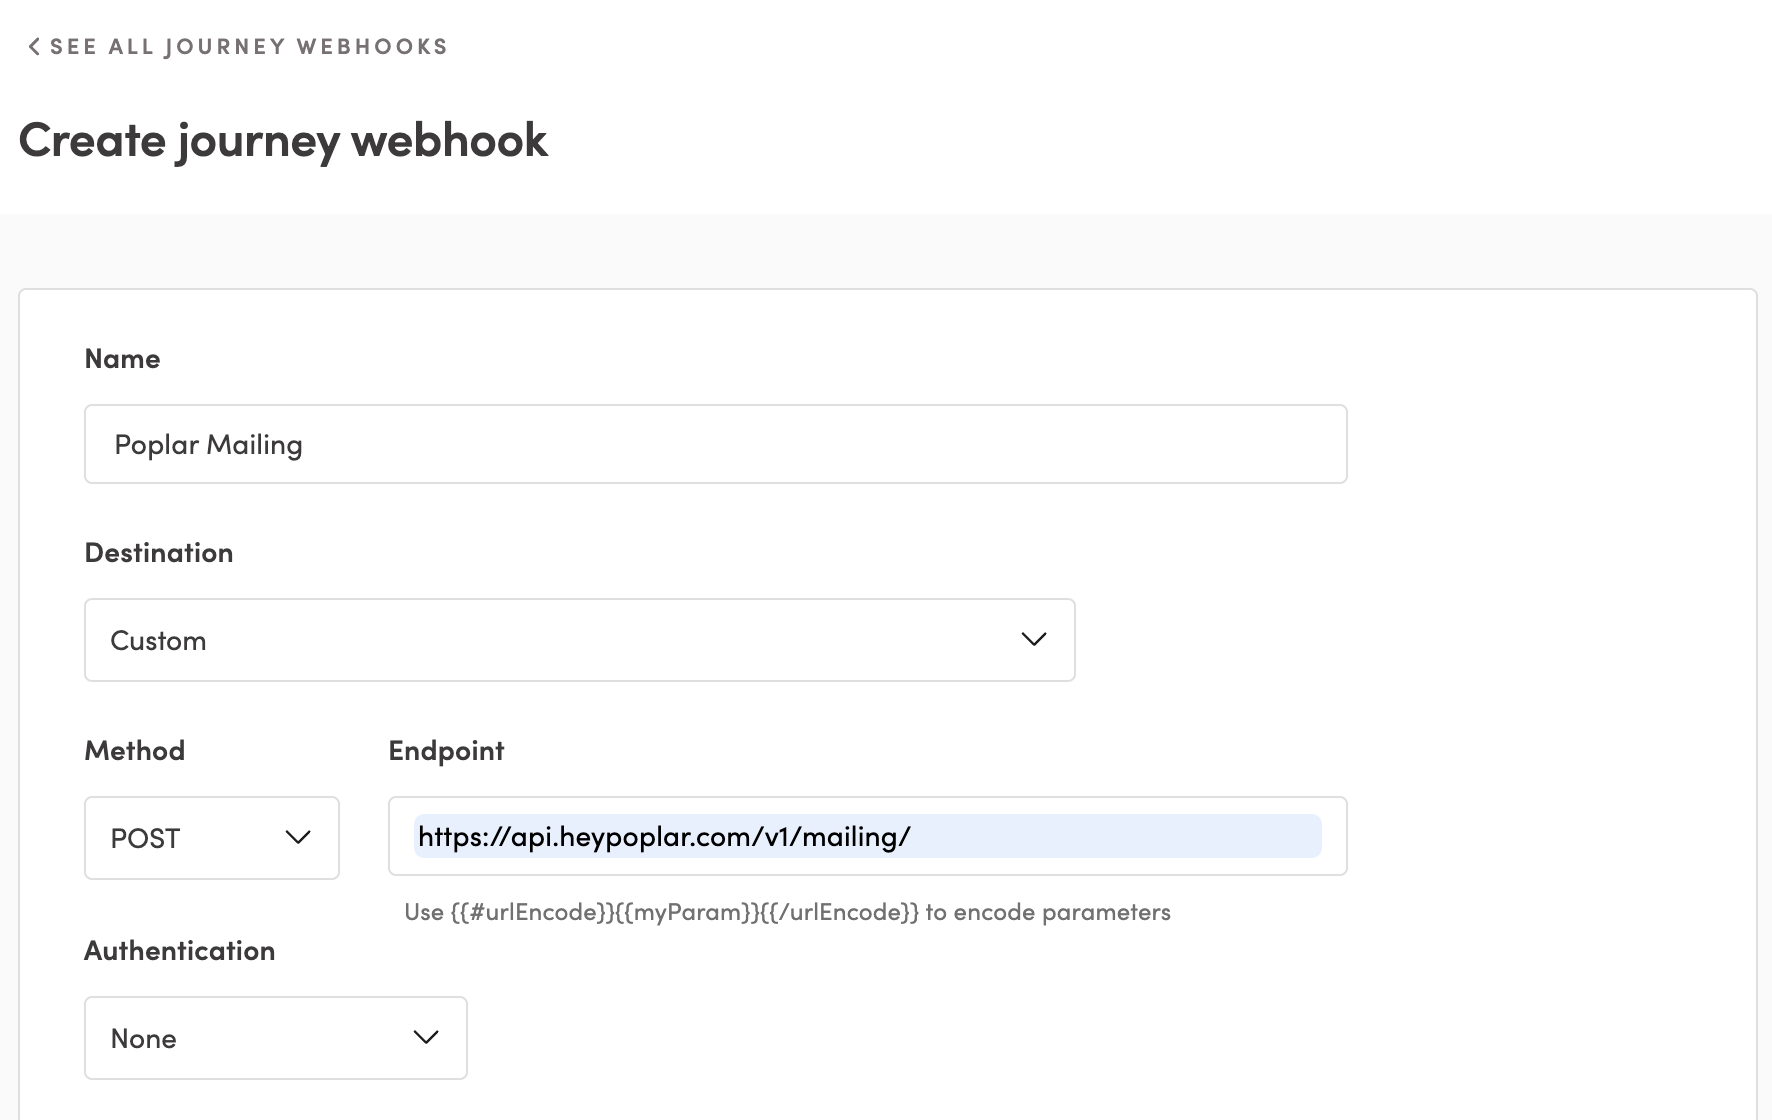
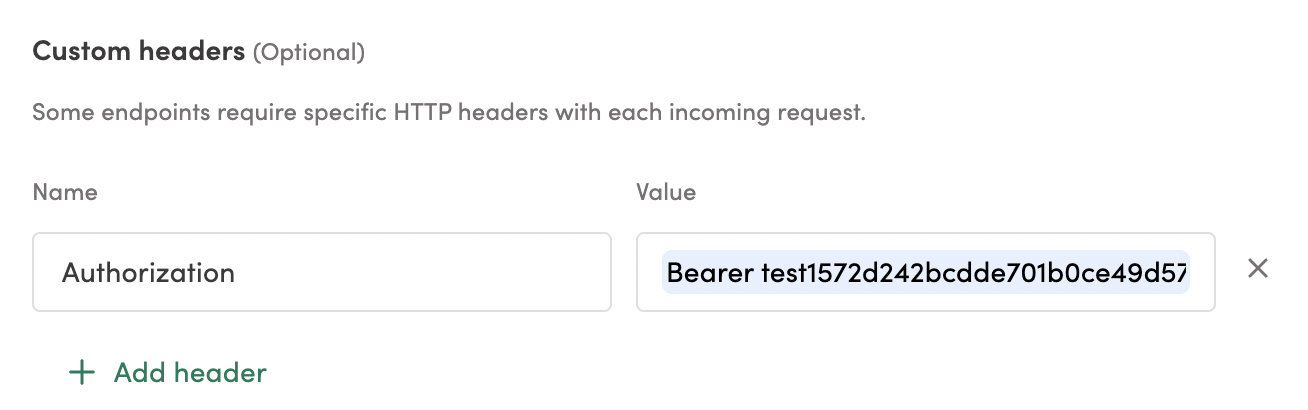
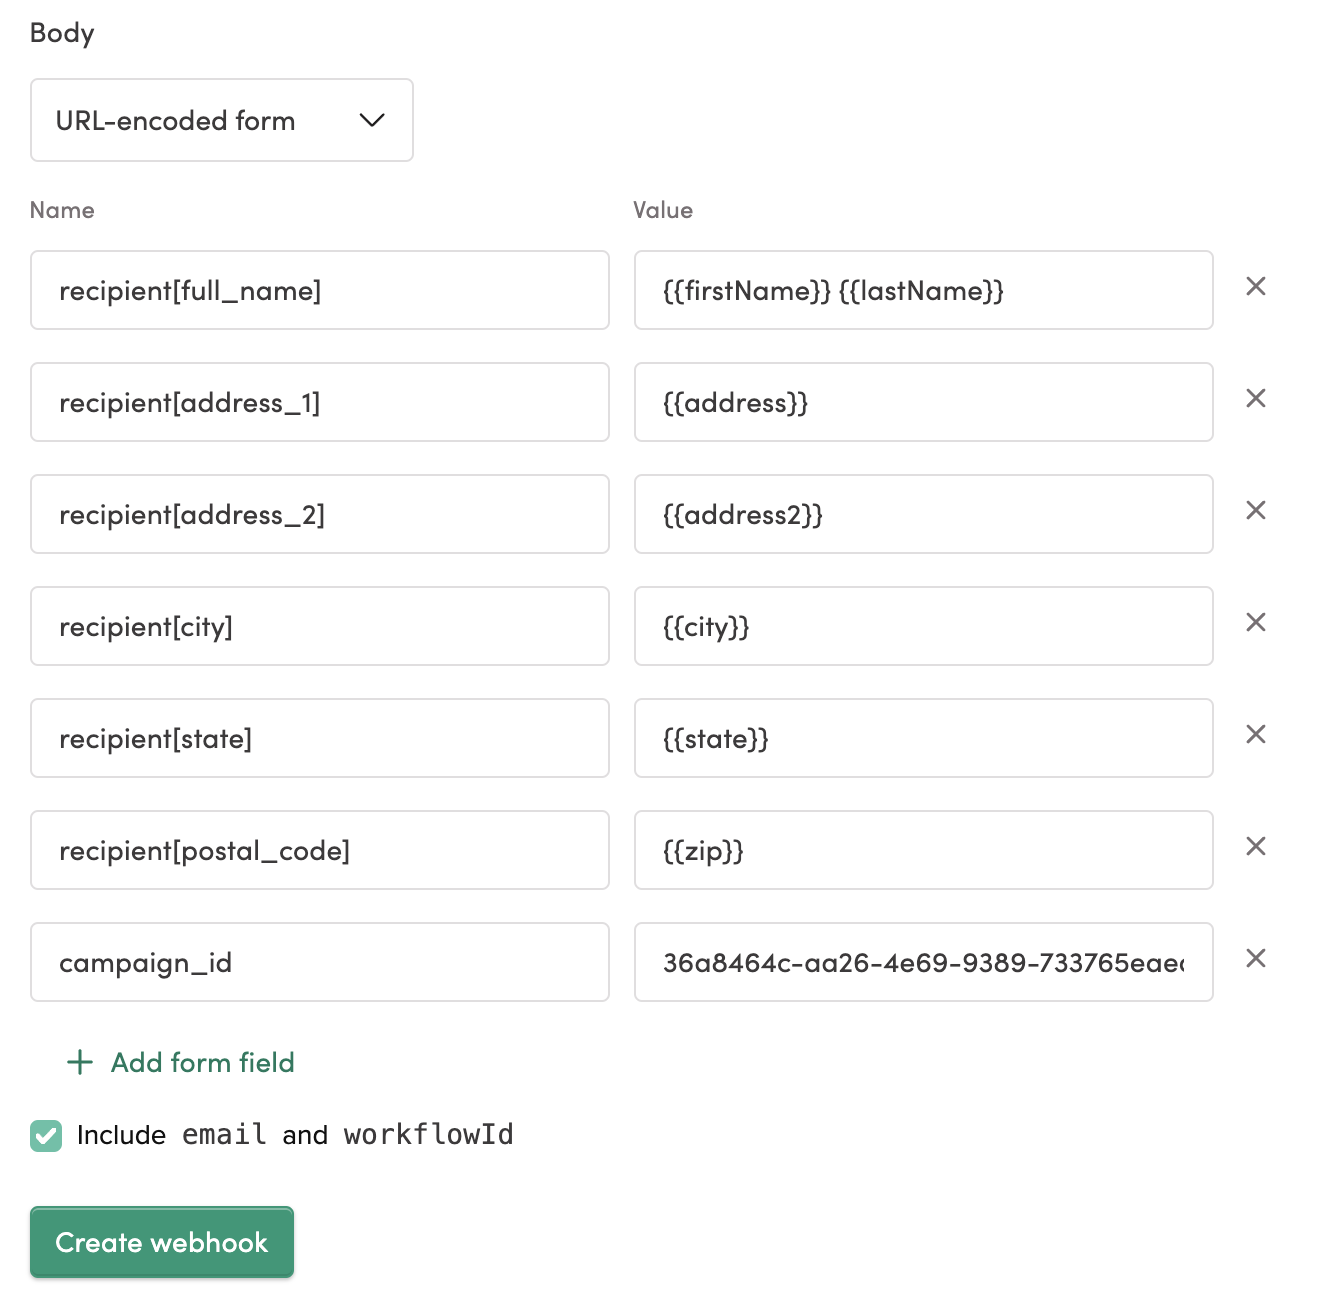
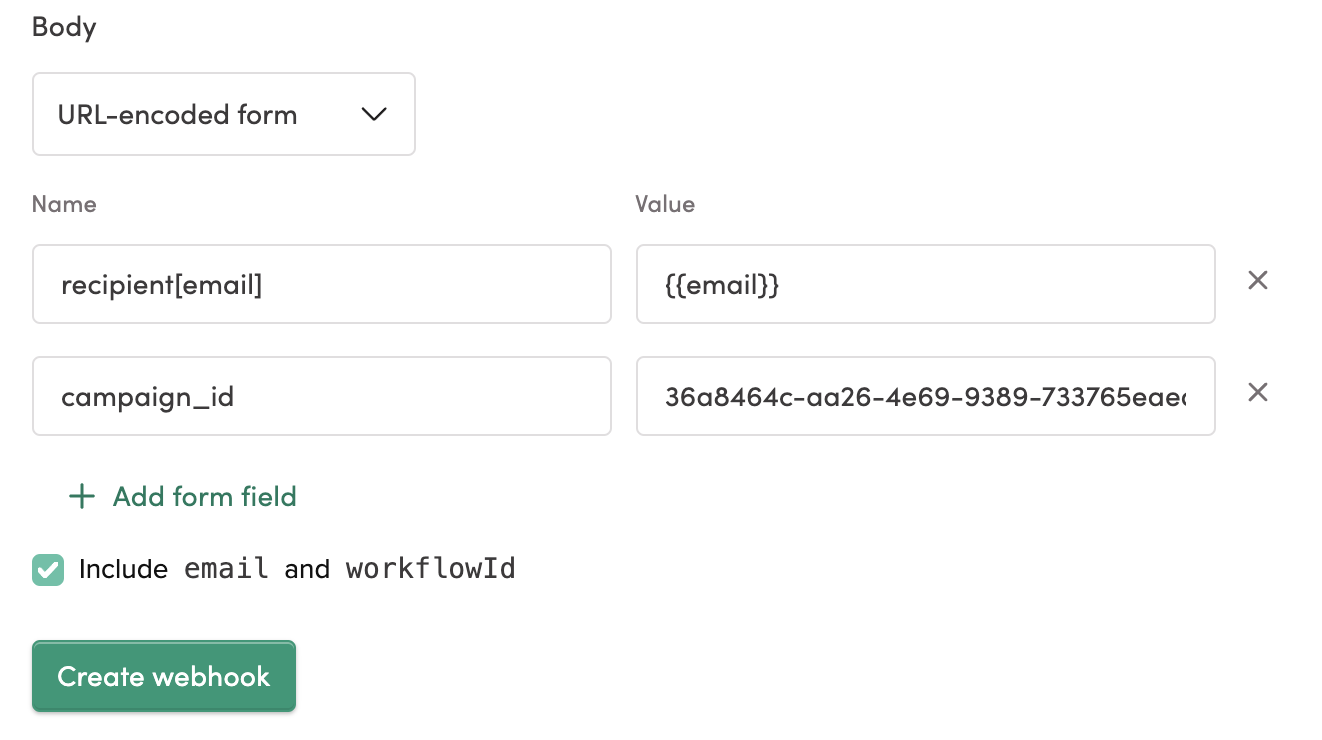
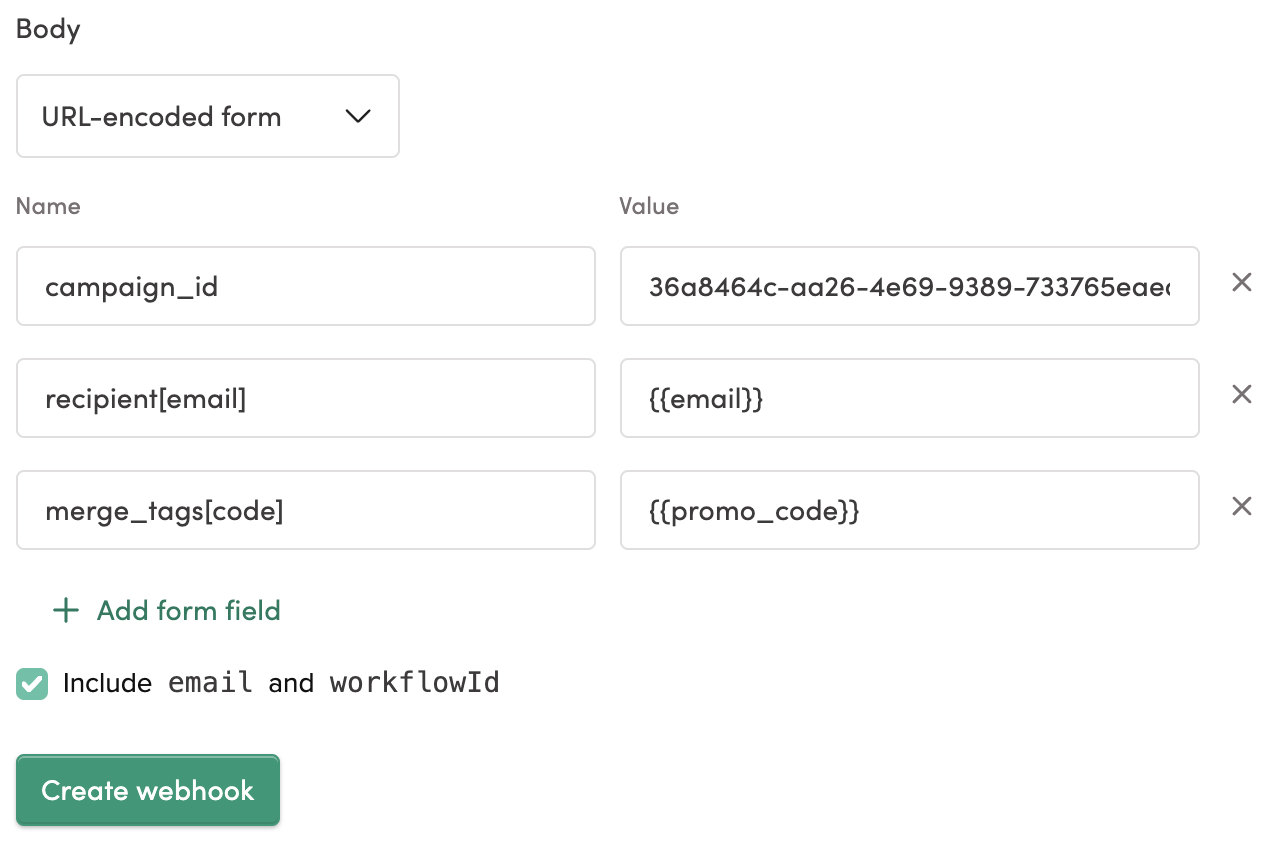
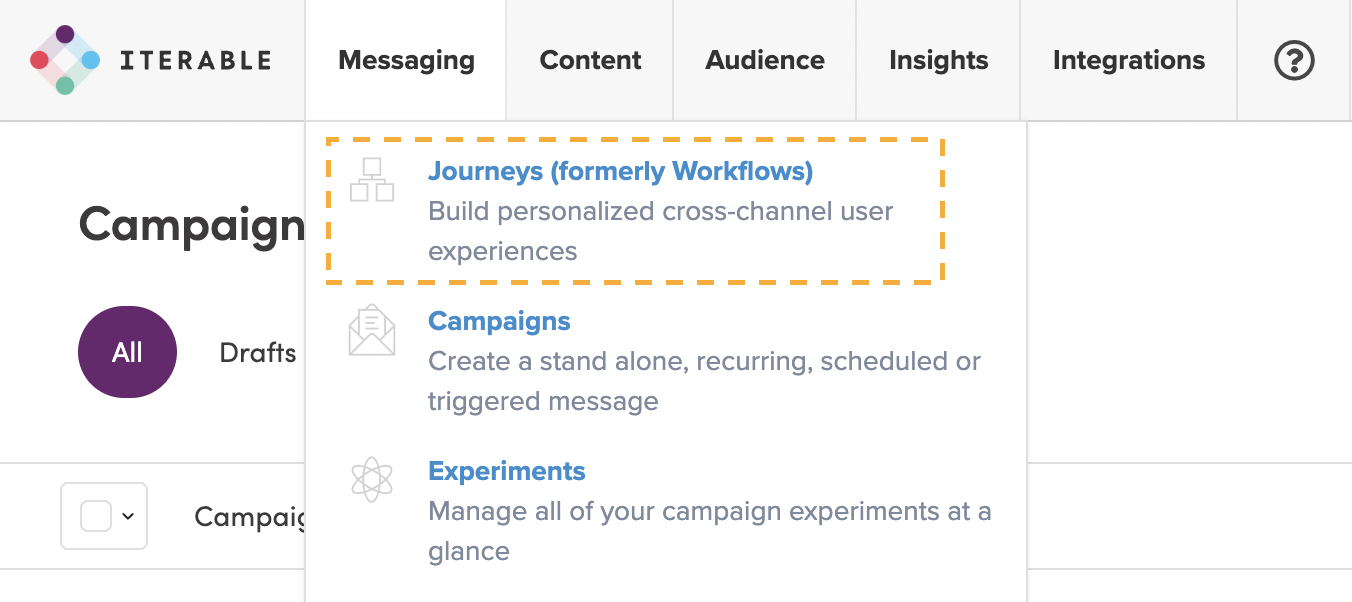

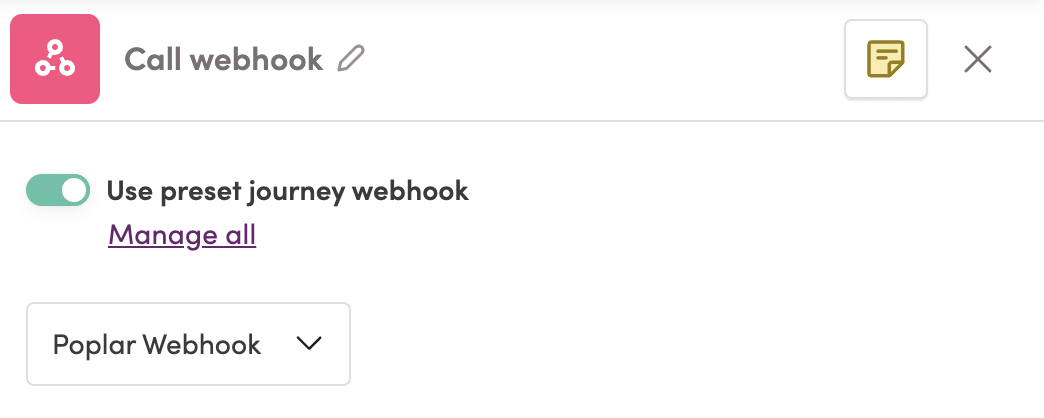
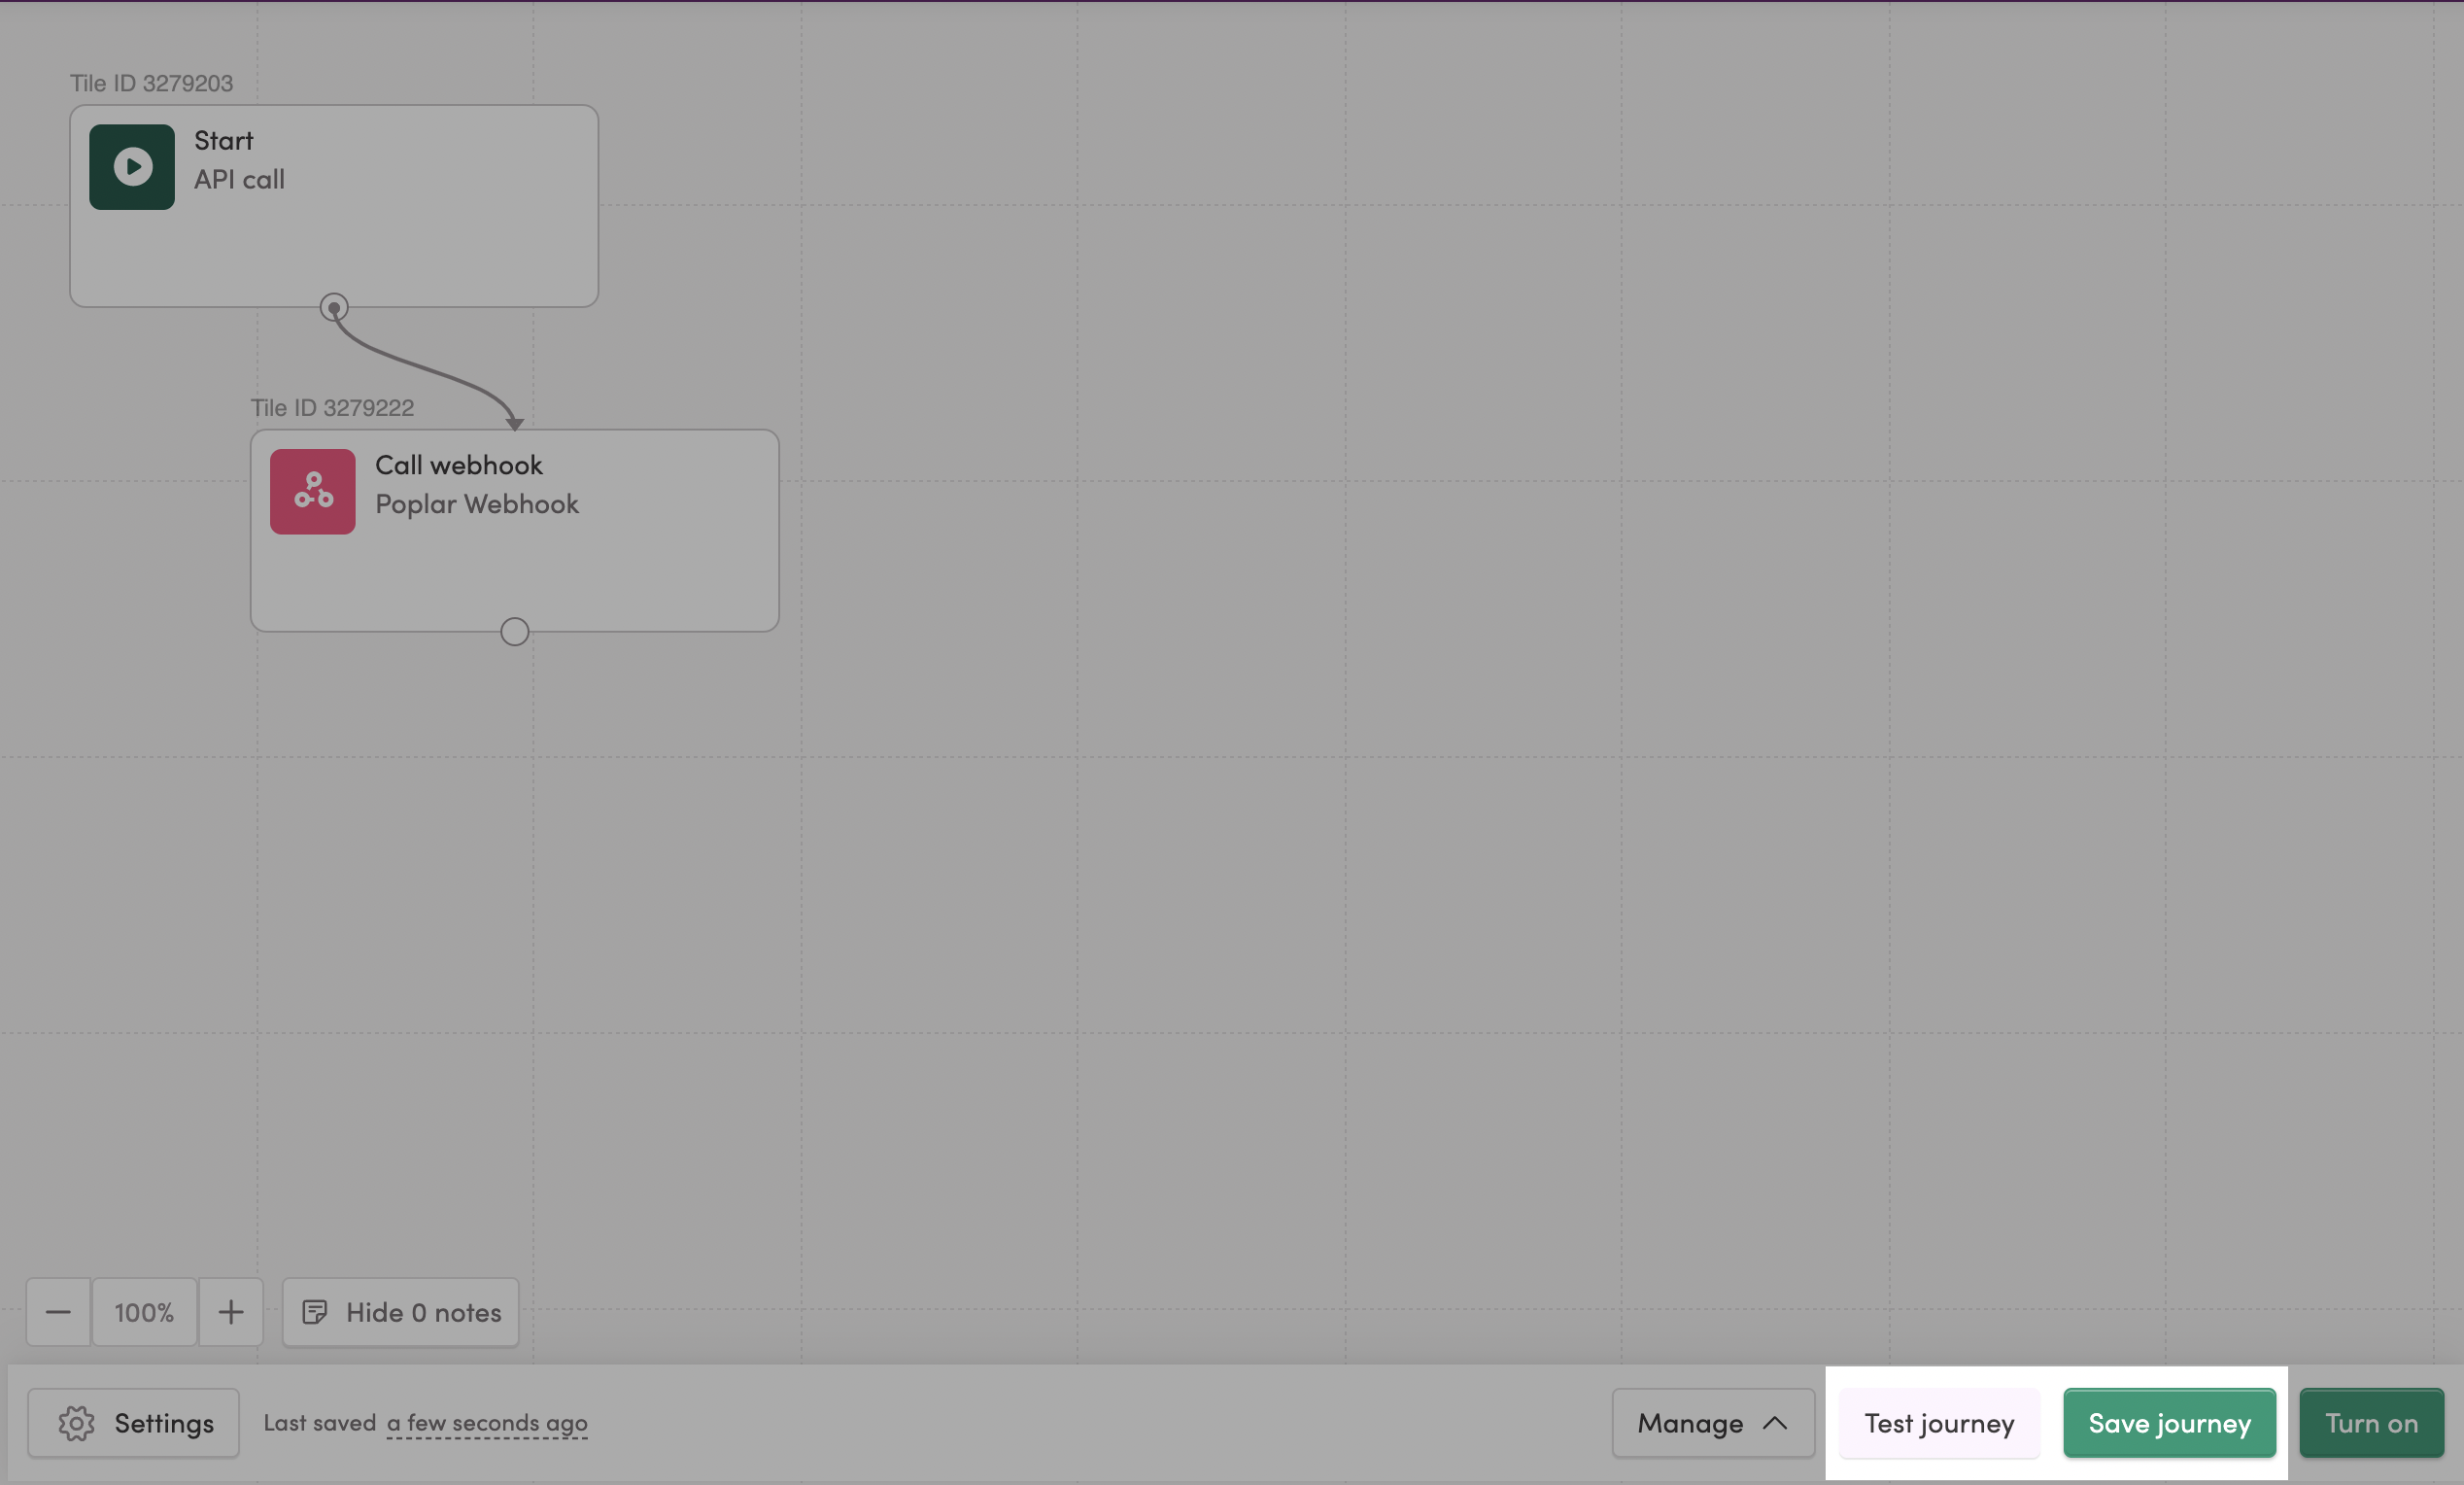
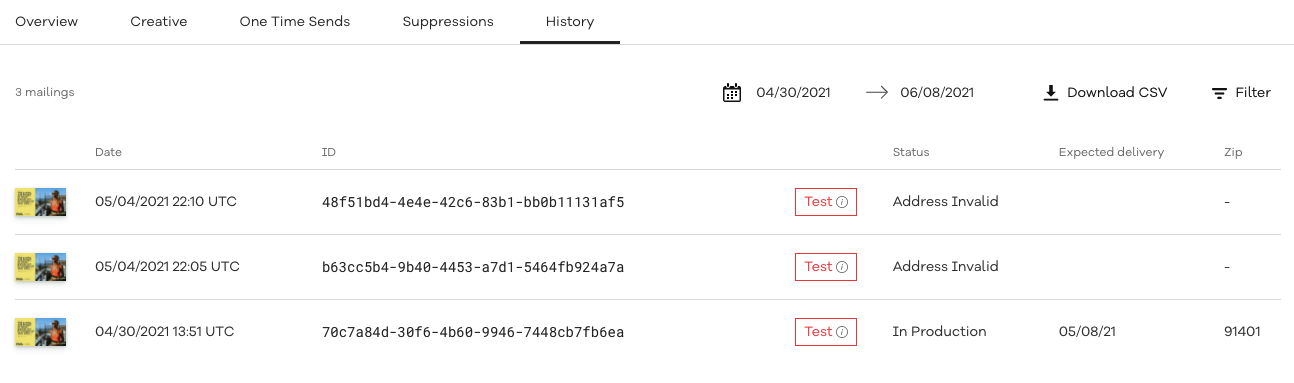

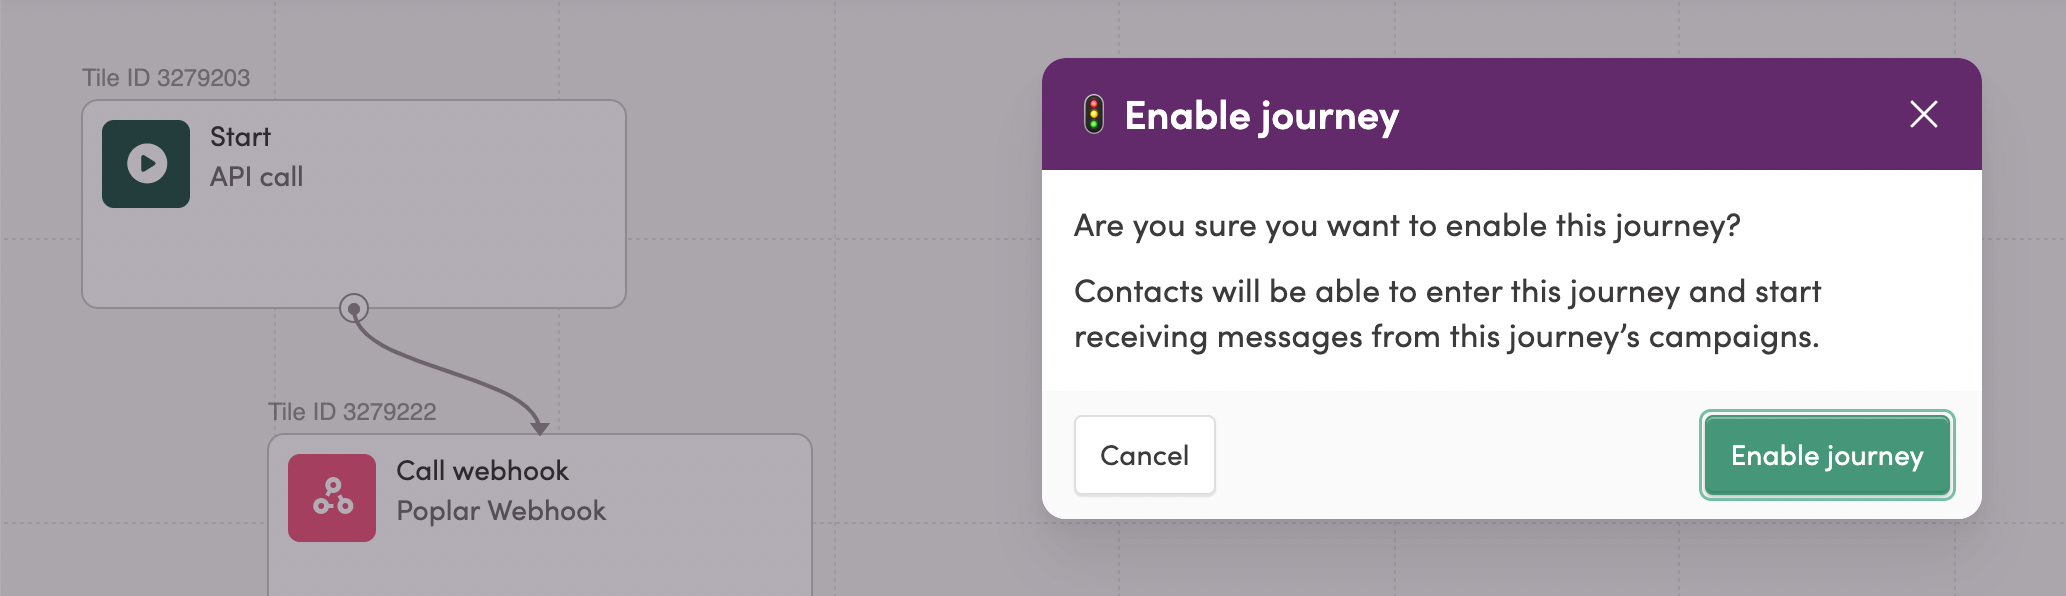


Connecting Convertkit via Zapier
1. Log into your Zapier account and from your dashboard, click MAKE A ZAP to begin the new trigger setup.
2. You'll then choose ConvertKit as your App, and select the appropriate event for your trigger.
4. Head back to Zapier and paste your API Secret in the pop-up to connect.
We recommend first entering your Test key, this will allow you to test the trigger connection without actually mailing. Successful trigger requests will be visible from the History tab of the connected campaign.
Click + Connect a new account again to enter your Production key. We recommend only selecting this account when you're ready to go live.
If using your Production account, clicking Test Trigger during will trigger a live mailer.
8. Select the campaign (or head to Poplar to create a campaign and upload creative if you haven't already).
9. (optional) Select your creative (or leave this blank if you want to run a multivariate test of any creatives enabled in the campaign.
10. Choose ConvertKit data to populate the data fields being sent to Poplar.
11. Test & Review and then head to your campaign's History tab within Poplar to check the digital proof created by the test.
12. If tests are successful, it's time to turn on your Zap! If you want to let the trigger run naturally under the Test environment for a day or two, feel free to leave your Test Account selected. If you feel ready to go live, head back to Choose Account and select the one connected to your Production key before turning on your Zap!
Need help? Reach out to support@heypoplar.com for assistance.
3. Connect your ConvertKit Account by heading to and clicking Show to access your API Secret.
5. Test your ConvertKit connection, if successful search for and select the to use as your action; the destination where you'll be sending your data.
6. Depending on the Trigger selected in Step 4, choose whether you'll be creating a mailing with user email data (with enabled) or complete physical address data. You also have the option to add a user to your list in Poplar.
7. To connect your account, you'll be prompted to enter an Access Token which can be found on the page of your Poplar account.