
Campaign Setup
Most of your work will be done from the Campaigns page. Once you begin creating and launching campaigns. At the top you'll see the Total Mailed, Total Spend along with a date picker and the option to download a CSV of campaign data. You can sort campaigns based on Expected In Home date, last updated, number mailed, and total spend.

Click the New Campaign button in the top right to create a new campaign, or click into an existing campaign to see the Overview, Results, Creative, One Time Sends, and Suppressions.
Campaign Settings
For existing campaigns, the campaign settings can be accessed by clicking into the campaign and selecting Edit Campaign on the far right. If your Poplar account is brand new, the only thing you'll see on the Campaign's page is the option to Create New Campaign:

Name, Description & Purpose
The campaign name should be unique and reflect your use case - adding the date of creation is recommended, if you plan on having multiple campaigns of the same nature.
The description should contain any key information such as trigger filters, notes on audience suppression, or anything relevant worth communicating to team members.
Setting a campaign purpose helps communicate even more context across team members. It also gives the Poplar team insight into campaign goals and use cases so we can better assist with strategy and results analysis.
Additional Settings

Address Enrichment
Poplar's Address Enrichment feature matches email addresses to physical addresses. If you plan on passing only email addresses via trigger or when uploading a CSV list to be matched, Enable Address Enrichment when your campaign is created, or click Edit Campaign in an existing campaign to adjust the setting. If you already have full address data for your target audience, leave this setting Disabled.
Typically, Poplar's address enrichment process sees a 60-80%+ match rate. In our internal tests we have generally found that older demographics tend to yield a higher match rate than younger ones. Thanks to the strict accuracy filters we've put in place, there should be a high yield of accurately matched addresses.
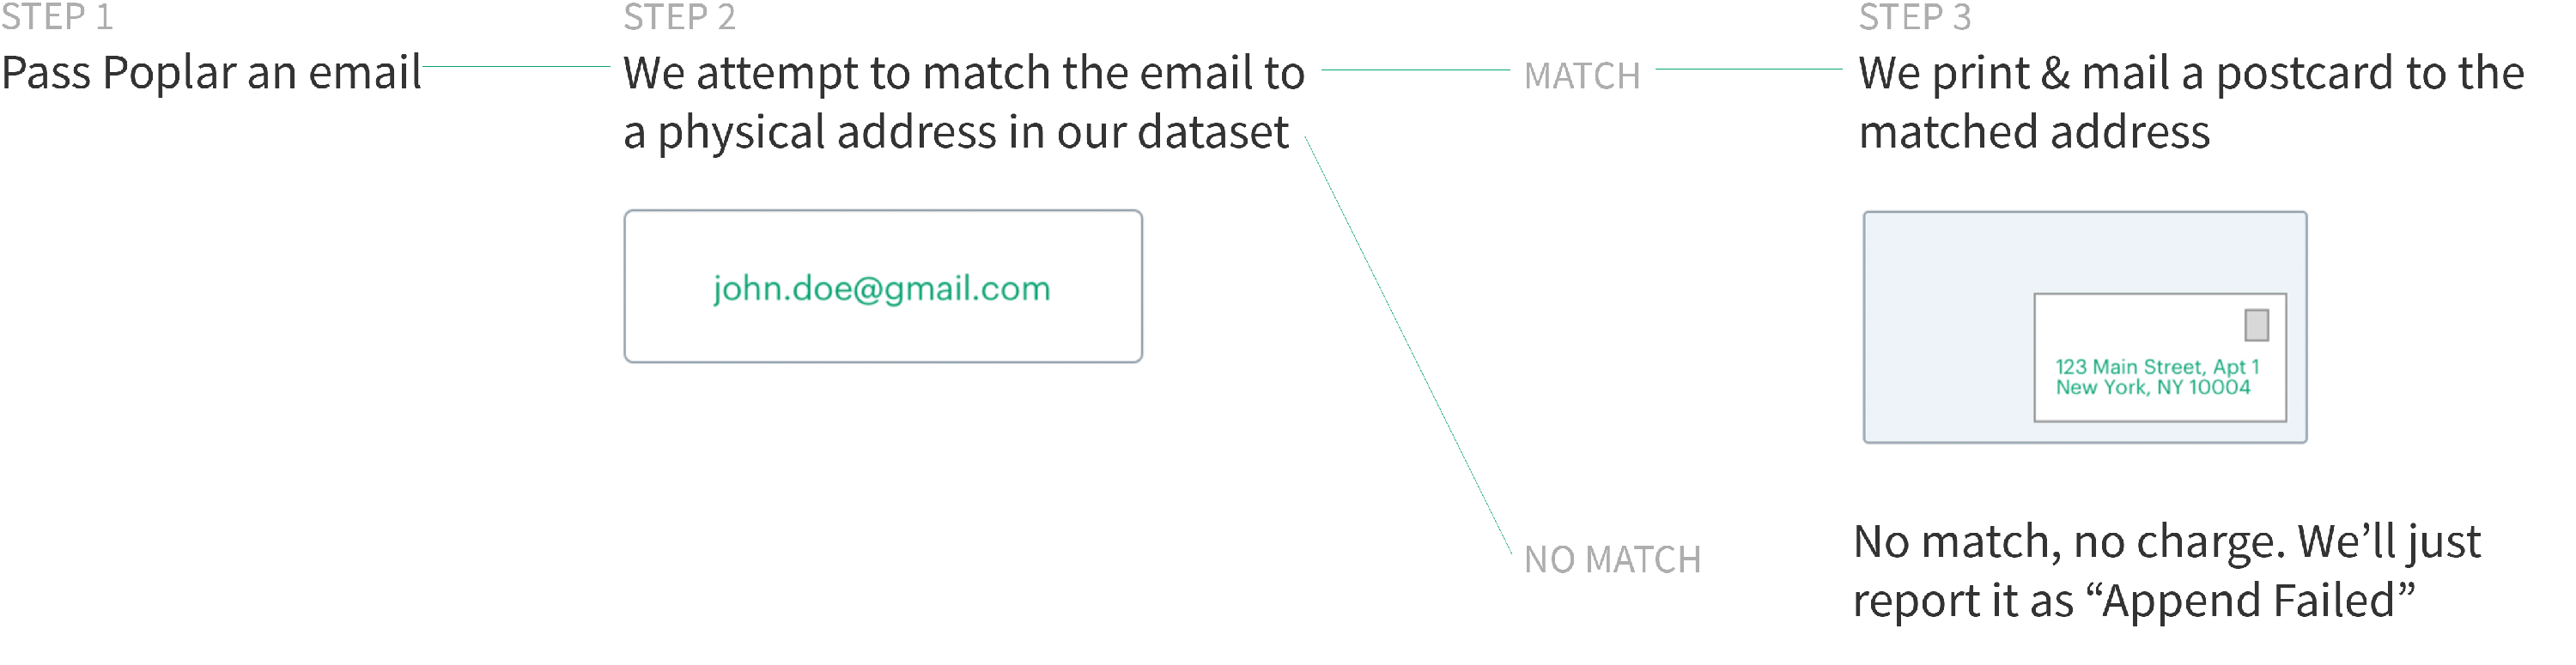
Running the match process costs an extra $0.07 per piece. You will only be charged if an append is successful, and will not be charged if a match can't be found. Under the campaign's History tab, the system will return append failed if it is unable to identify an address to match. If it's successful it'll change the status to mailing_queued.
Rules and Limitations
You must agree to the Share Local Media Supplemental Terms of Use. (screenshot below)
Emails submitted must be customer emails; you should NOT submit emails you have obtained in other ways.
The emails must belong to US residents only.
Recipient addresses for append will always be addressed to "Current Resident." Any personalization of the mail piece should not include any PII (personally identifiable information) for that specific customer.
Use of certain merge tags in creative design is restricted for recipient privacy purposes.
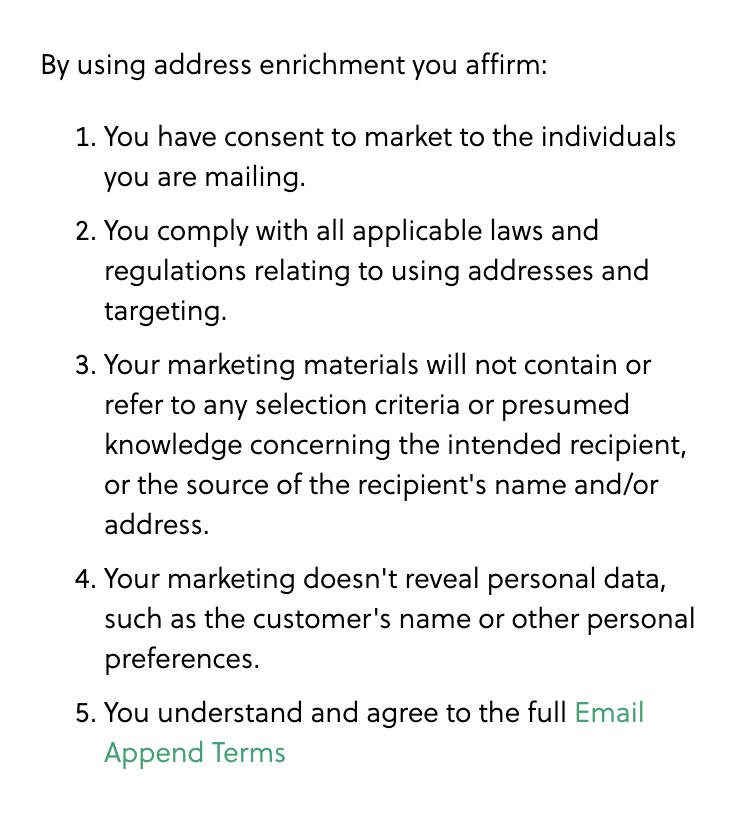
Matched address data is not available for download and will be redacted from CSV mailing records downloaded from the campaign's History tab. The email addresses that found a match will be visible for tracking and attribution reports.
Holdout
Enable a specified holdout percentage to compare conversions between mailed and unmailed groups and easily analyze incremental lift. Given that mailings are triggered or launched individually and in real time, the holdout percentage is approximate. The holdout percentage you set is just the odds that any individual mailing will move to the holdout group.
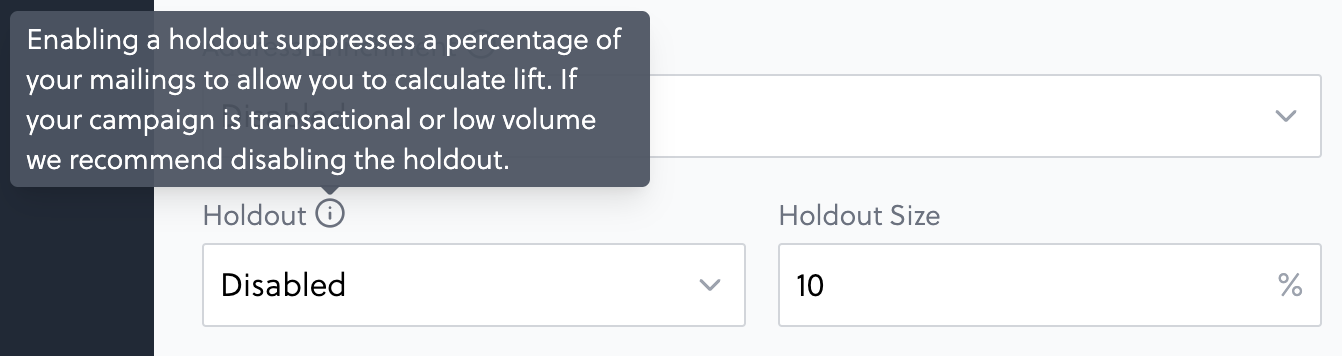
We strongly recommend taking a holdout for campaigns sending at least ~5,000 pieces per month. If you're mailing at lower volumes, the holdout size is generally too small to get a high level of confidence in it, in which case this setting can be left Disabled.
We do not recommend manually taking a holdout from your audience segment, outside of the platform. It is best practice to set a holdout inside the platform to ensure the highest level of randomization, and allow for in-platform reporting of lift metrics.
Holdouts are taken after Address Enrichment so matched addresses can be checked against your opt out list. Any holdout requests are still charged for address enrichment, but the base print and mail fee is not charged when the mailing is in the holdout group.
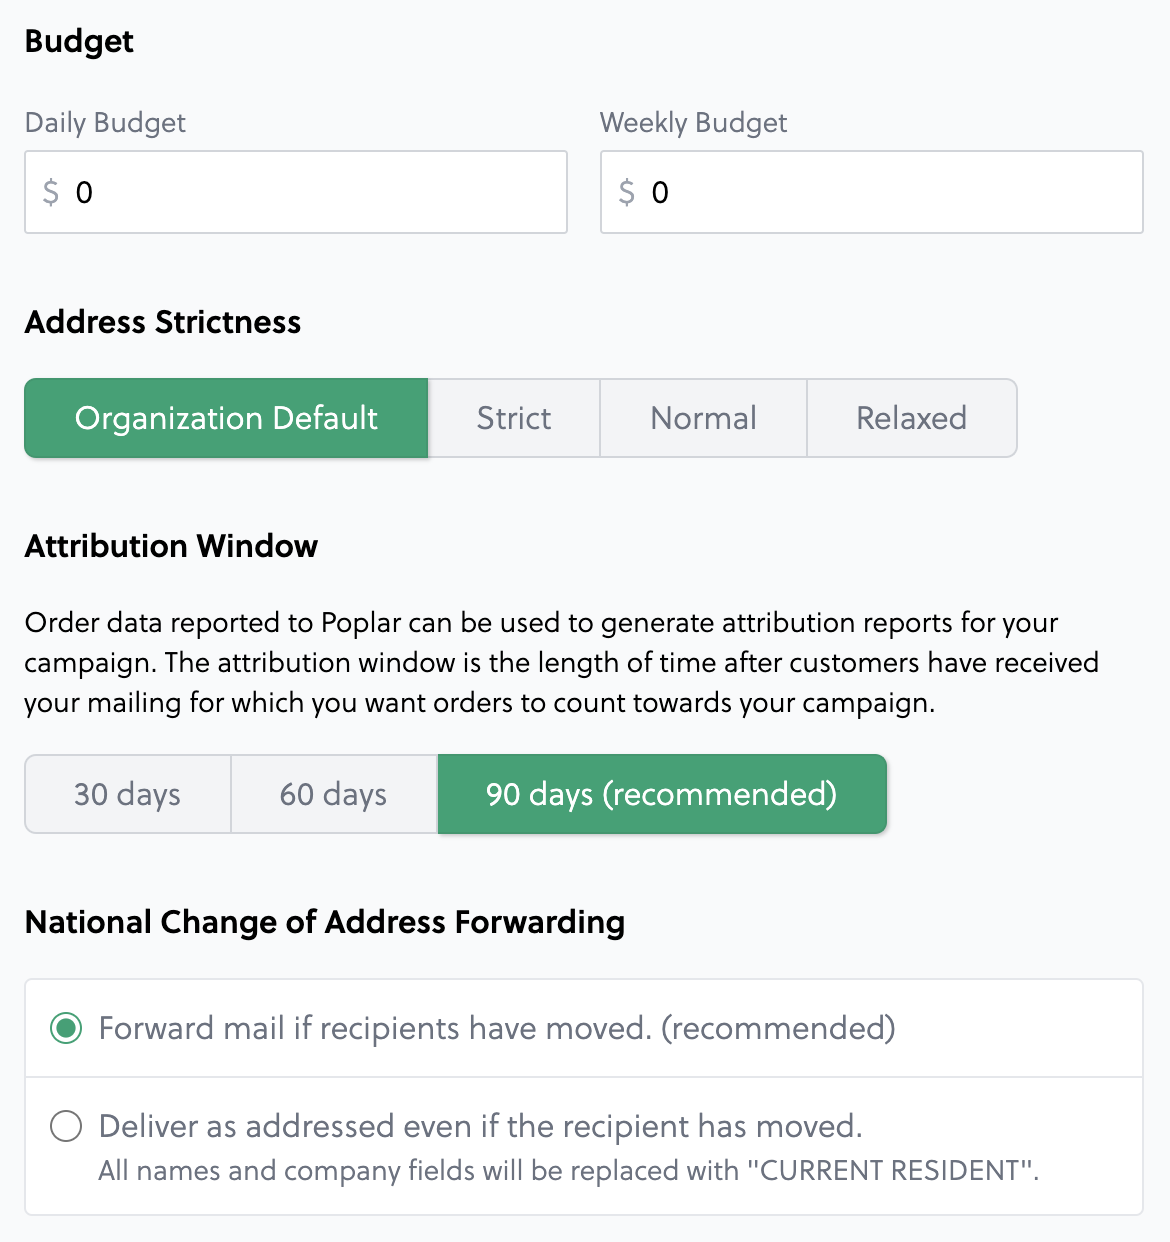
Budget
For triggered campaigns, you have the option to specify a daily and/or weekly budget cap. Budget caps are approximate and your actual costs may end up lower or higher.
The reason for this is because you are only charged after specific events occur in the mailing stream. This means if more data appends succeed than expected, or if more mailing addresses you've provided fail to validate, you may see the actual costs come in above or below your budget.
Weekly Budget
Resets every Sunday at 12:00am UTC
Budget settings are ignored for One Time Sends. The cost of the send will be charged to your account credits, and the card on file if the balance exceeds your account credits.
Advanced Settings

Address Strictness
Address Strictness can be set on a campaign-level, which will override the global strictness set under Account Settings. Varying rules are applied when uploading address data and when sending mailings to gauge the highest possible deliverability.
Organization Default
Uses the strictness specified under Account Settings
Strict
Only allows addresses deemed "in-service" by the USPS
Normal
Checks the existence of an address and verifies the street and unit information is correct
Relaxed
Will mail regardless of validity *This is only recommended when mailing to commercial addresses
Attribution Window
You can set a custom attribution window when you create a new campaign. By default, Poplar uses a 90-day attribution window. This is the period of time for which you wish to credit a customer's transaction to the mailing. We recommend a minimum of 30 days to see the full scope of your results.
If you're sharing transactional data with Poplar, you may begin to see some results before your attribution window has fully passed. Since these number are considered incomplete, we suggest waiting until the attribution window has fully passed before evaluating the performance of your campaign.
National Change of Address Forwarding (NCOA)
NCOA is a dataset of change-of-addresses filed by individuals and/or businesses with the USPS. The database is maintained by the USPS and we are required by the USPS run a check for every mail piece we send. Learn more.
How is NCOA accounted for when using Geolocations, Geofences, and Zip & State suppressions?
Our location and area-based checks are performed on the original address that you provide. These checks are run prior to NCOA, meaning if your recipient has moved, we do not account for the move in our checks.
However, if you are concerned about potentially mailing someone who has moved outside your delivery area(s), you can append the phrase " or Current Resident" to your recipient name field. This allows you to skip NCOA, meaning your mailer ultimately lands at the original address.
Example
USPS requires NCOA on this address will be forwarded
Bypasses NCOA won't be forwarded
Jane Doe 123 Main Street Brooklyn, NY 11221
Jane Doe or Current Resident 123 Main Street Brooklyn, NY 11221
Recommended when targeting commercial addresses, for higher possibility of successful delivery.
Return Address (Optional)
Some campaign use cases require or would benefit from the option to show a unique return address from the one listed for your Organization.
Campaign Overview
Click into a campaign to see its Overview tab. At the top you'll see the Mailed number which includes all requests that have or will likely move to production within the selected date range, total Spend which includes any requests that have or will incur a cost as it moves through the system (i.e. production and/or data appends) and a pie chart of Mailing Statuses.
All data and graphs are controlled by the adjustable calendar.

On the right hand side next to the adjustable calendar, you'll see three dots which you can click to Edit or Pause the campaign at the top, followed by the unique campaign_id and a summary of the campaign's settings. All settings can be updated at any point by editing the campaign. The option to archive a campaign will appear once a campaign is paused.
Campaign Active indicates a campaign is available for launch. A campaign will not start mailing unless it is hooked up to a live trigger or specifically launched via One Time Send.
Campaign Details
Below the graphs you'll find the Campaign details which includes your Campaign ID (for third-party integrations) along with campaign settings such as Address Enrichment, Holdouts, daily and weekly budgets.
History
Keep scrolling down to find your campaign History. Here you will see all mailers, their status, and you can click into individual mailers to see creative on an individual level, as well as an Event Log to track the mailer through the mail stream in real time. These updates we receive directly from USPS scan data.

You can filter mailers by status and download a CSV of the History. Us the date picker at the top of the page to apply specific dates.
When testing third-party integrations for triggered campaigns, you should see successful test requests come through the History section as well. You can click into each request to see the creative populate with the data sent over in your Request Details. This is how you confirm a sucessful integration before setting your campaign live to production.
Results
If you're sharing transactional data with the platform, the Results page will show a detailed attribution analysis divided by each creative mailed. If the campaign has been in-home for the 30-90 day attribution window, this section breaks down campaign's success and is especially useful if comparing against a holdout group or A/B testing different creatives.

Visible attribution metrics can be adjusted using the columns filter to the right. Descriptions of each metric appear when hovering your mouse over the information circle.
Download Raw Matches
A record of raw matches can be downloaded can be downloaded on a campaign and account-wide level. When you download this record for a single campaign, the CSV file will contain all matches and attributions.
If you only need attributions, please ensure you filter out matches under the column match_type
A means that the order was attributed to that particular mailing.
M means that the order simply matched to that particular mailing, but was not attributed to that mailing. We follow a last-touch attribution model across campaigns, so it could be that the mail piece was not the last one that the specific customer received.
Creatives
The creatives tab is where you can upload new or archive new creatives. You can also adjust shipping speeds and send yourself samples.
One Time Sends
This is where the Magic happens! From the One Time Sends tab you can launch your campaign to an existing audience list in minutes.
Suppressions
From the Suppressions tab you can control all campaign-level suppressions such as:
Audience Suppressions
Select existing audiences to suppress.
Zip Code Allowlist
Enter specific zip codes you want to mail to from your existing audience data.
State Allowlist
Select specific states to allow or suppress (could be based on shipping or service areas).
Saved Location Options
Apply saved location settings for brick & mortar locations.
Geofence Suppressions
For even more custom Geolocation suppressions, set up an inclusion or exclusion geofenced area for an existing audience list.
Poplar cannot generate address data for custom locations based on these settings - you must already have mailing data for these to apply. For custom mailing lists reach out to [email protected] with the details of your campaign and target demographic, and an account manager will assist you with next steps.
Exceptions
If you see an Exceptions tab appear, this indicates there are mailers that did not process due to insufficient funds, daily/weekly budget exceeded, or insufficient promo codes (see Promotions).
Once funds or codes have been added, mailers can be retried.

Last updated