> For the complete documentation index, see [llms.txt](https://docs.heypoplar.com/llms.txt). Markdown versions of documentation pages are available by appending `.md` to page URLs; this page is available as [Markdown](https://docs.heypoplar.com/integrations/supported-platforms/segment.md).
# Segment
Use Segment to **trigger a mailing, share order data, or add an audience member to a list** in Poplar with custom [Destination Functions](https://segment.com/docs/connections/functions/destination-functions/). There are two primary ways to send a destination function to Poplar within Segment:
***
## Connections
Start by navigating to the **Connections** tab within your Segment account:
On the left you'll see a list of your data **Sources** and the option to **+ Add Source**, and on the right you'll see a list of your **Destinations** and the option to **+ Add Destination.**
If it's not already listed, add the Source from where you'll be pulling mailing data and make sure it's **Enabled** for use.
***
## Destination
Once your Source is established, click **Add Destination** to view the Destination options under the **Catalog section**. To integrate with Poplar, you'll need to build a custom function that triggers a mailing when an event occurs.
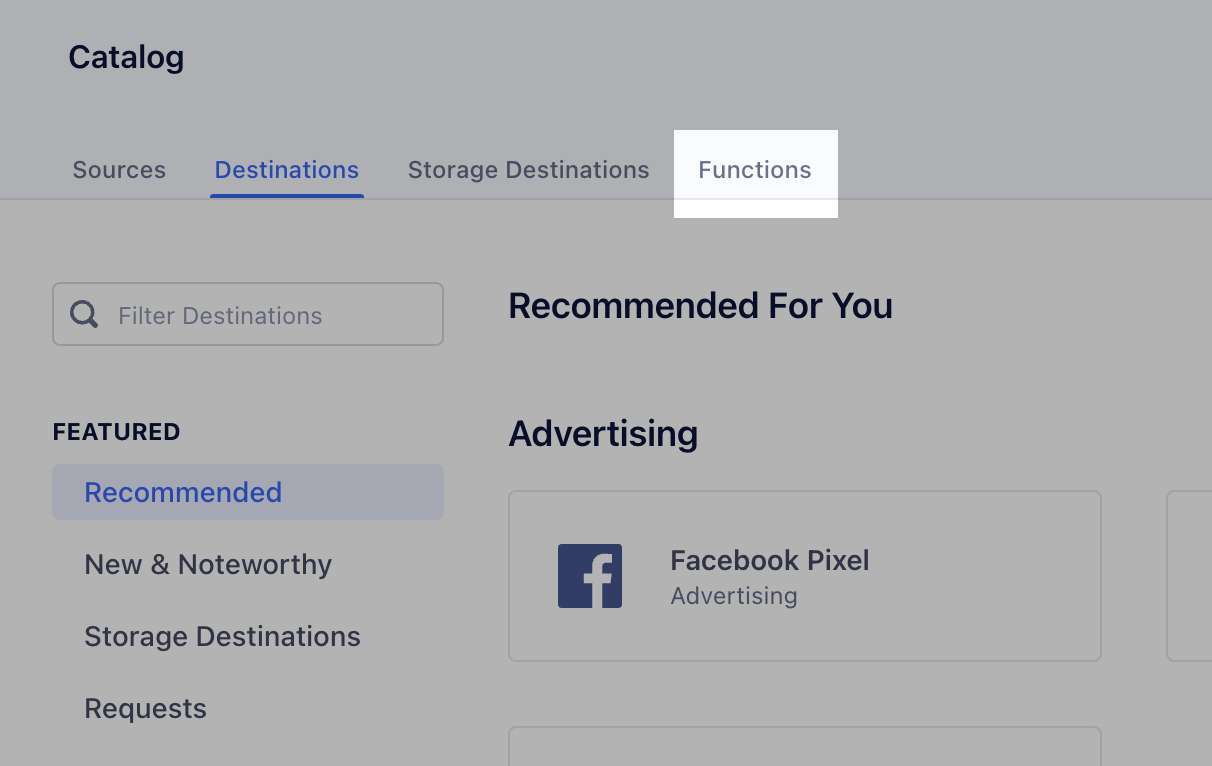
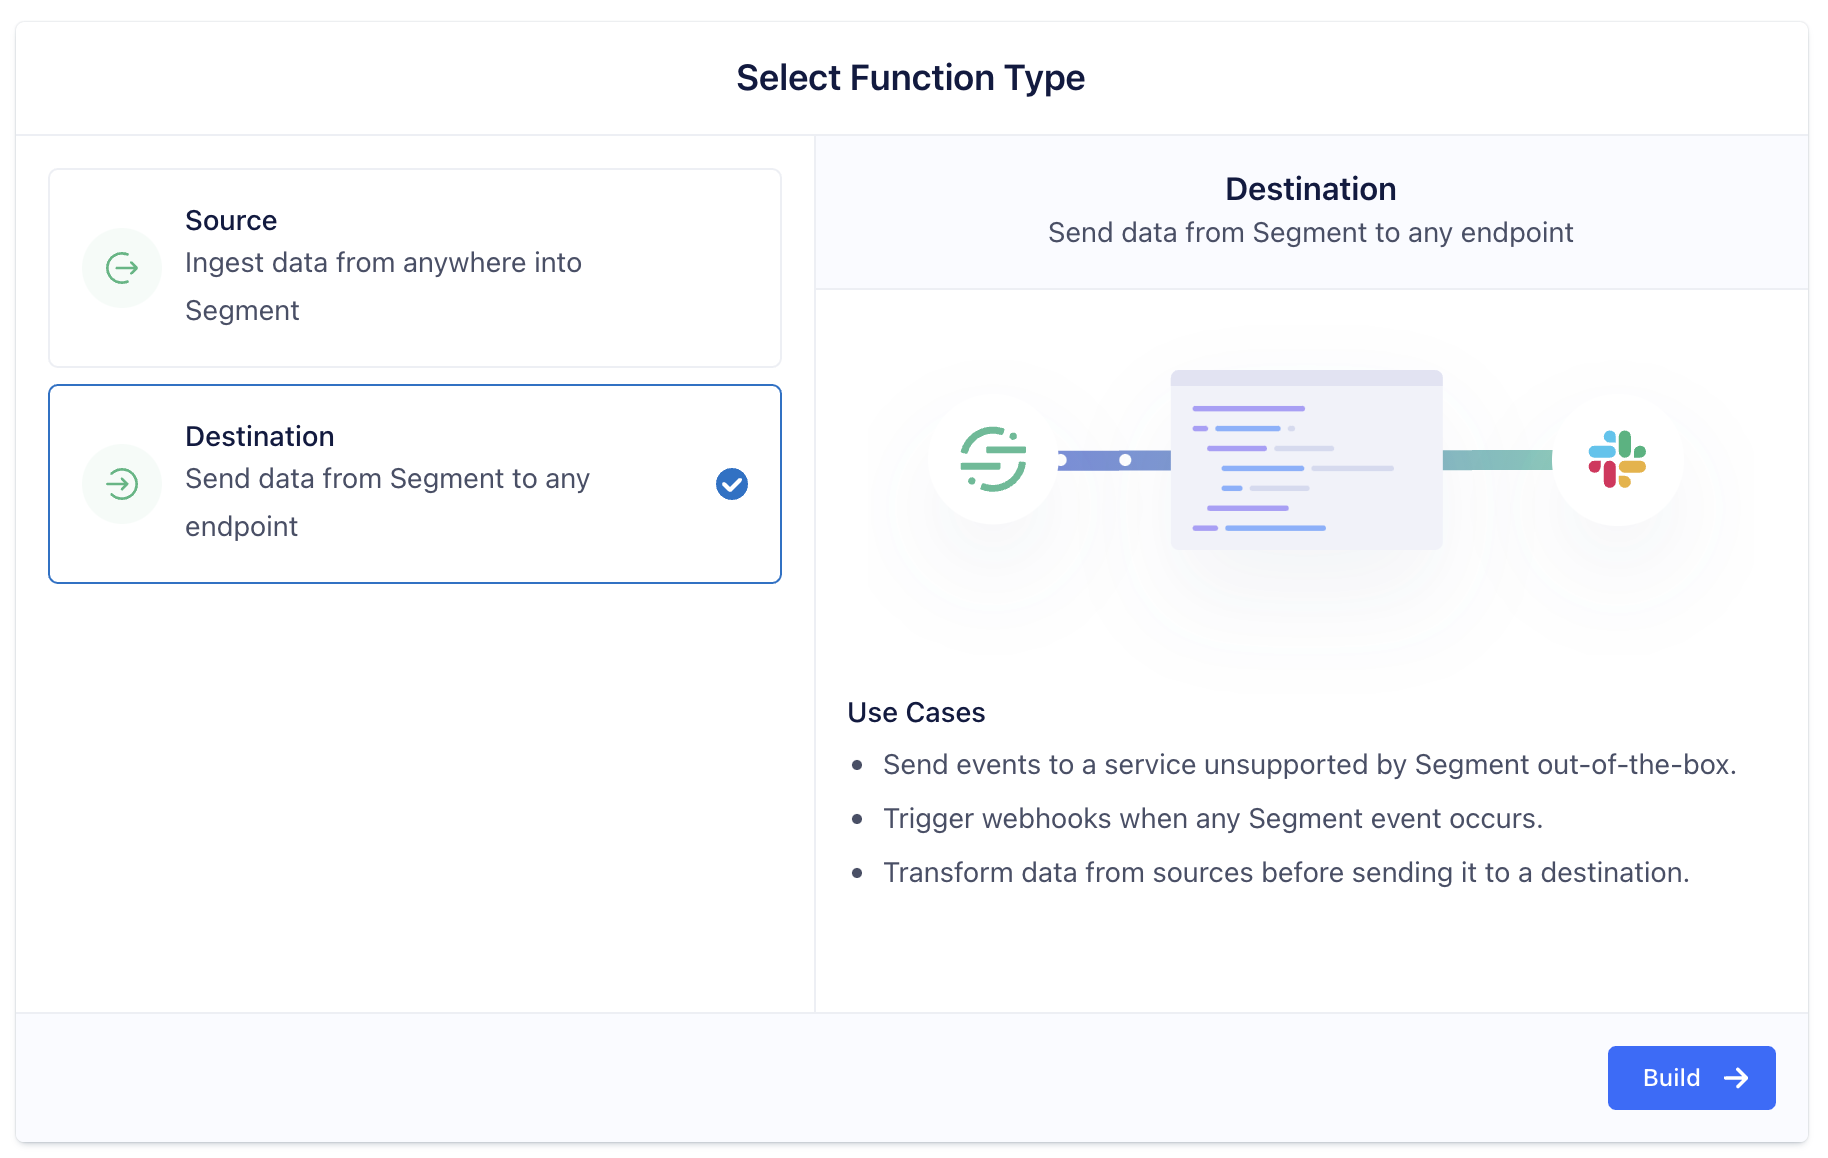
Navigate to the **Functions** tab and click **+ New Function** to begin:
Select **Destination** as the Function Type, then **Build**:
***
## Build
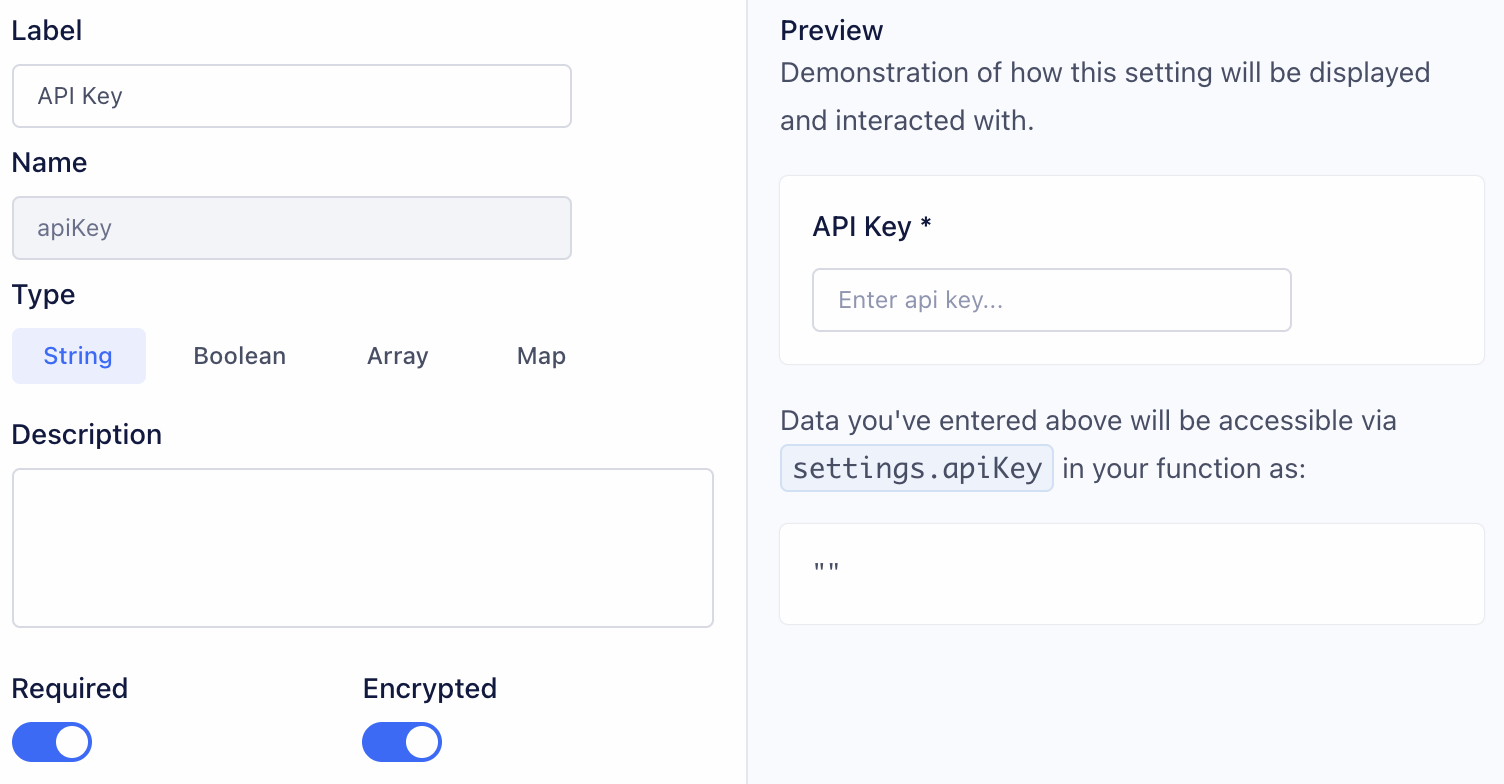
Before editing code, you'll need to configure the behavior of your function by adding **Settings.** Settings are used for encrypting your **Authorization** credentials ( [API Access Tokens](about:/triggered-mailing-api/using-the-tool/platform-overview/api#credentials-and-access-tokens)) and they allow you to pass variables such as `campaign_id`, `creative_id`, and `audience_id` to your function.
There are a number of ways Segment can integrate with Poplar's APIs:
* **Trigger a mailing**
* **Share order data for in-platform reporting**
* **Update an existing audience list**
* **Update your Do Not Mail list**
### Settings
Head to the Settings tab and click **+ Add Setting.** Each use case listed above requires different Setting which should be defined in the following ways:
***
## Mailing
### **Authorization**
First you'll want to configure the variable for your **Test** or **Production Access Token.**
Make sure both **Required** and **Encrypted** are enabled, the encryption setting will ensure your access token stays secret.
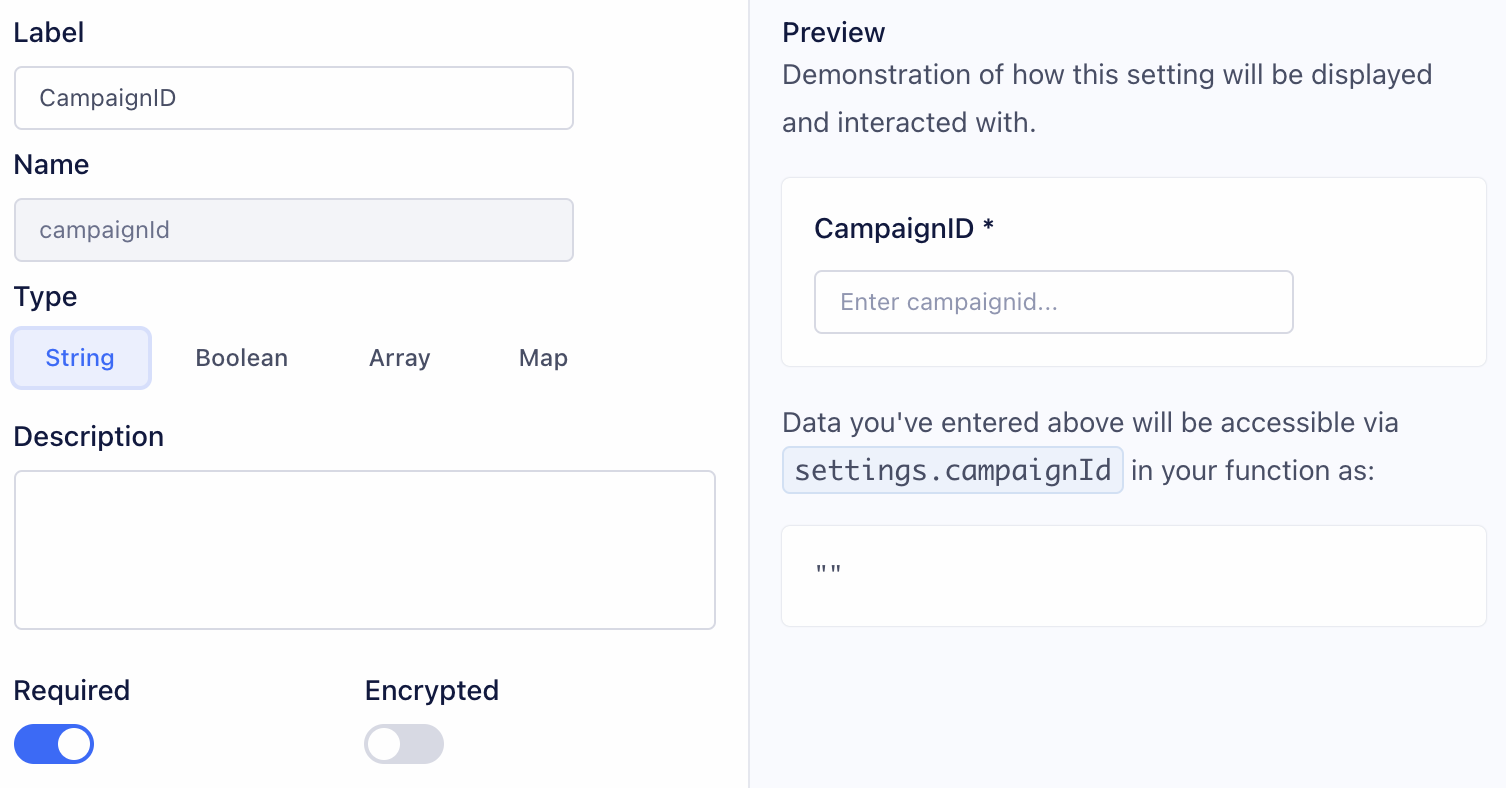
### **Campaign ID**
Create another Setting for your `campaign_id`. Campaign ID can be found in your Poplar account under your campaign's Overview tab. This value does **not** need to be Encrypted.
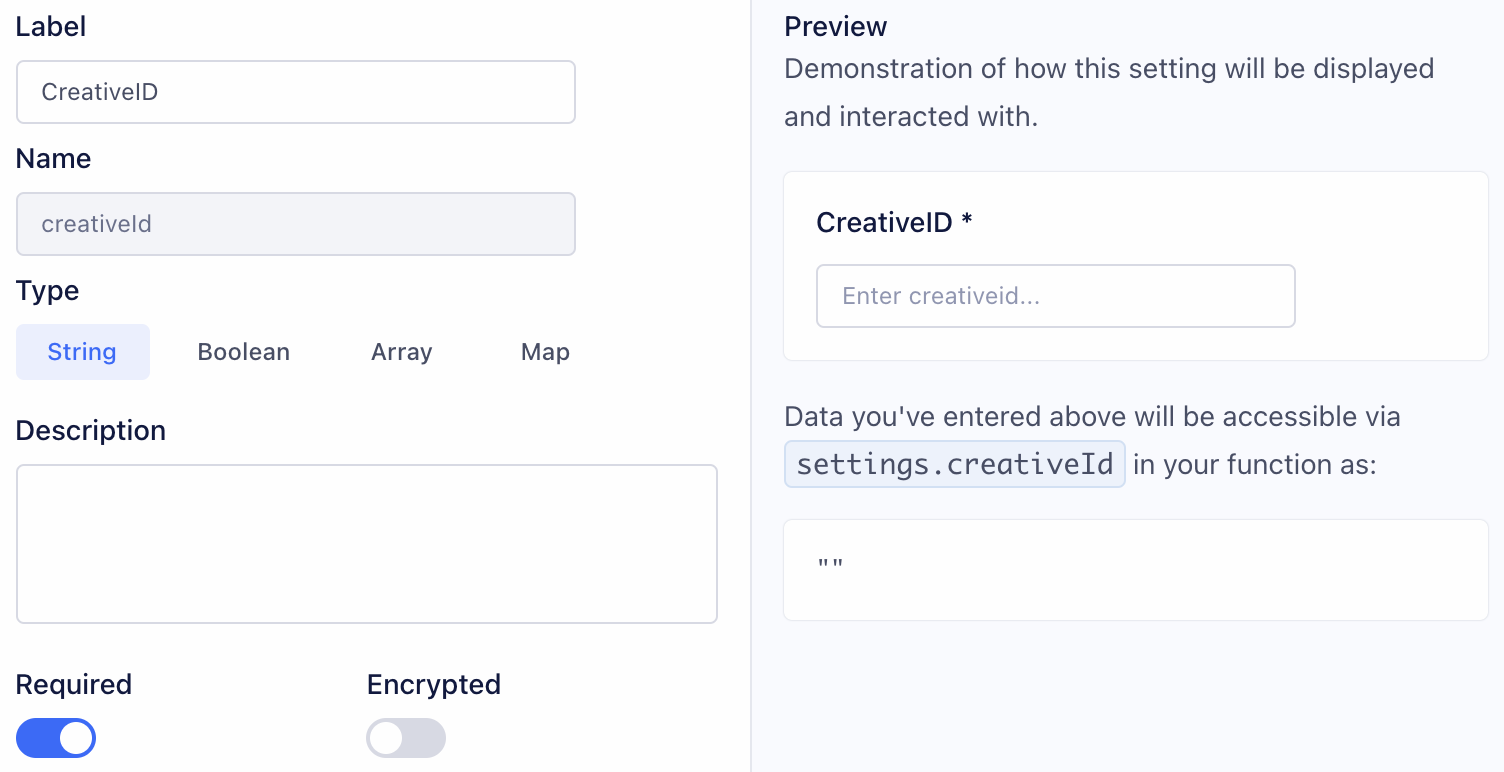
**Creative ID *****(Optional)***
Creative ID can be specified if more than one creative is active under the campaign, and you want to specifically point to one. Click into a creative to find the `creative_id`.
If creative\_id is not specified, the trigger will point to the Default active creative. If no creative is set as the default, it equally rotate between mailing all active creatives under the campaign to A/B Test.
## Orders
### **Authorization**
First you'll want to configure the variable for your **ProductionAccess Token.** Make sure both **Required** and **Encrypted** are enabled, the encryption setting will ensure your access token stays secret.

***
## Audiences
### **Authorization**
First you'll want to configure the variable for your **ProductionAccess Token.** Make sure both **Required** and **Encrypted** are enabled, the encryption setting will ensure your access token stays secret.

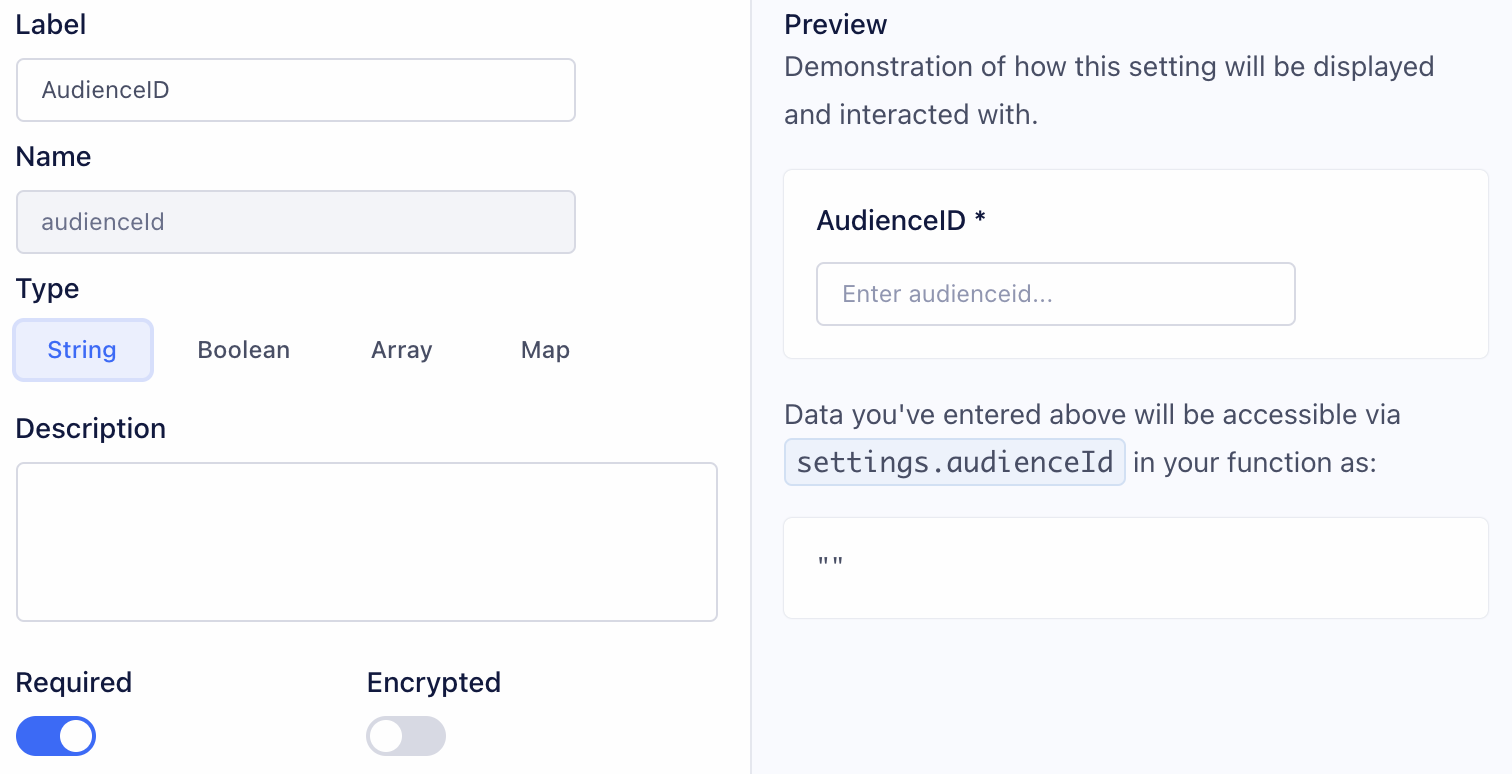
### **Audience ID**
To add an audience member to a list, the audience must first be created in Poplar. Click into an existing Audience to find the `audience_id`.
***
## Do Not Mail
### **Authorization**
First you'll want to configure the variable for your **ProductionAccess Token.** Make sure both **Required** and **Encrypted** are enabled, the encryption setting will ensure your access token stays secret.

***
## Source Code
Now that you've established Settings, you can begin coding your function. [Segment invokes a separate part of the function (called a “handler”) for each event type](https://segment.com/docs/connections/functions/destination-functions/#code-the-destination-function). Destination functions can define handlers for each message type in the [Segment spec](https://segment.com/docs/connections/spec/):
* `onIdentify`
* `onTrack`
* `onPage`
* `onScreen`
* `onGroup`
* `onAlias`
* `onDelete`
* `onBatch`
Each of the functions above accepts two arguments:
* **event** - Segment event object, where fields and values depend on the event type. For example, in “Identify” events, Segment formats the object to match the [Identify spec](https://segment.com/docs/connections/spec/identify/).
* **settings** - List of [settings](https://segment.com/docs/connections/functions/destination-functions/#create-settings-and-secrets) for this function.
Just like Settings, different source code is required based on use case. Below are code templates that can be copy & pasted **in place of** any existing source code:
Our examples show a destination function that listens for “Track” events, and sends certain data to Poplar by using the **`event.properties`** prefix. **This prefix will likely differ by case depending on how your data is structured.**
***
## Mailing
To create a mailing, you'll want to send a **`POST`** request to `https://api.heypoplar.com/v1/mailing`
Your headers should contain ``Authorization: `Bearer ${settings.apiKey}`,`` and `'Content-Type': 'application/json'`
**Address and/or Email Data**
This function can be used for both full address data or emails for [**Address Enrichment.**](about:/triggered-mailing-api/using-the-tool/audiences#address-enrichment)
```
/**
* @param {SpecTrack} event The track event
* @param {Object.} settings Custom settings
* @return any
*/
async function onTrack(event, settings) {
const body = {
campaign_id: `${settings.campaignId}`,
recipient: {
full_name: event.properties.full_name,
address_1: event.properties.address_1,
address_2: event.properties.address_2,
city: event.properties.city,
state: event.properties.state,
postal_code: event.properties.postal_code,
email: event.properties.email
}
};
const response = await fetch('https://api.heypoplar.com/v1/mailing', {
method: 'POST',
headers: {
Authorization: `Bearer ${settings.apiKey}`,
'Content-Type': 'application/json'
},
body: JSON.stringify(body)
});
return response.json();
}
```
## **Custom Merge Tags**
If your creative uses [custom merge tags](about:/triggered-mailing-api/using-the-tool/creative/dynamic-creatives/merge-tags#custom-merge-tags), be sure to include the `merge_tags` object.
```
/**
* @param {SpecTrack} event The track event
* @param {Object.} settings Custom settings
* @return any
*/
async function onTrack(event, settings) {
const body = {
campaign_id: `${settings.campaignId}`,
recipient: {
full_name: event.properties.full_name,
address_1: event.properties.address_1,
address_2: event.properties.address_2,
city: event.properties.city,
state: event.properties.state,
postal_code: event.properties.postal_code,
email: event.properties.email
},
merge_tags: {
promo-code: event.properties.code
}
};
const response = await fetch('https://api.heypoplar.com/v1/mailing', {
method: 'POST',
headers: {
Authorization: `Bearer ${settings.apiKey}`,
'Content-Type': 'application/json'
},
body: JSON.stringify(body)
});
return response.json();
}
```
***
## **Orders**
To share order data, you'll want to send a **`POST`** request to `https://api.heypoplar.com/v1/order`
Your headers should contain ``Authorization: `Bearer ${settings.apiKey}`,`` and `'Content-Type': 'application/json'`
```
/**
* @param {SpecTrack} event The track event
* @param {Object.} settings Custom settings
* @return any
*/
async function onTrack(event, settings) {
const body = {
email: event.properties.email,
identifier: event.properties.identifier,
shipping_address: {
name: event.properties.full_name,
address_1: event.properties.address_1,
address_2: event.properties.address_2,
city: event.properties.city,
state: event.properties.state,
postal_code: event.properties.postal_code
},
order_id: event.properties.order_id,
total: event.properties.order_total,
order_date: event.receivedAt
};
const response = await fetch('https://api.heypoplar.com/v1/order', {
method: 'POST',
headers: {
Authorization: `Bearer ${settings.poplarApiKey}`,
'Content-Type': 'application/json'
},
body: JSON.stringify(body)
});
return response.json();
}
```
`shipping_address` and/or `billing_address` may be used when passing order data. For more details on **required** and **optional** values, see our Orders API.
***
## Audiences
To add an audience member to a list, you'll want to send a **`POST`** request to `https://api.heypoplar.com/v1/audiences/${settings.audienceID}`
Your headers should contain ``Authorization: `Bearer ${settings.apiKey}`,`` and `'Content-Type': 'application/json'`
```
/**
* @param {SpecTrack} event The track event
* @param {Object.} settings Custom settings
* @return any
*/
async function onTrack(event, settings) {
const body = {
address: {
name: event.properties.full_name,
address_1: event.properties.address_1,
address_2: event.properties.address_2,
city: event.properties.city,
state: event.properties.state,
postal_code: event.properties.postal_code
},
email: event.properties.email,
identifier: event.properties.identifier
};
const response = await fetch(
`https://api.heypoplar.com/v1/audience/${settings.audienceId}`,
{
method: 'POST',
headers: {
Authorization: `Bearer ${settings.apiKey}`,
'Content-Type': 'application/json'
},
body: JSON.stringify(body)
}
);
return response.json();
}
```
For more details on **required** & **optional** values, see our **Audiences API**.
***
## Do Not Mail
To add a member to your Do Not Mail list, you'll want to send a **`POST`** request to `https://api.heypoplar.com/v1/do-not-mail`
Your headers should contain ``Authorization: `Bearer ${settings.apiKey}`,`` and `'Content-Type': 'application/json'`
***
## Run
To run your function, you'll need to select a sample event from your Source. Make sure the sample event contains all the necessary data for mailing.
---
# Agent Instructions
This documentation is published with GitBook. GitBook is the documentation platform designed so that both humans and AI agents can read, navigate, and reason over technical content effectively. Learn more at gitbook.com.
## Querying This Documentation
If you need additional information that is not directly available in this page, you can query the documentation dynamically by asking a question.
Perform an HTTP GET request on the current page URL with the `ask` query parameter, and the optional `goal` query parameter:
```
GET https://docs.heypoplar.com/integrations/supported-platforms/segment.md?ask=&goal=
```
`ask` is the immediate question: it should be specific, self-contained, and written in natural language.
`goal` is optional and describes the broader end goal you are ultimately trying to accomplish on behalf of the user. GitBook uses it to tailor the answer towards what is most useful for that goal.
The response will contain a direct answer to the question and relevant excerpts and sources from the documentation.
Use this mechanism when the answer is not explicitly present in the current page, you need clarification or additional context, or you want to retrieve related documentation sections.