> For the complete documentation index, see [llms.txt](https://docs.heypoplar.com/llms.txt). Markdown versions of documentation pages are available by appending `.md` to page URLs; this page is available as [Markdown](https://docs.heypoplar.com/integrations/supported-platforms/klaviyo.md).
# Klaviyo
## Overview
Getting started with the Klaviyo + Poplar integration is quick and straightforward, with minimal coding and no engineers required. In the steps below, we’ll walk you through how to connect your accounts, add direct mail as a step in your Klaviyo flow, and start sending automated postcards! 🚀
With this integration, you can:
* Create a flow from scratch, or add the Poplar Direct Mail webhook to an existing flow to automatically trigger a mailer - the same way you would for email or SMS.
* Send customer/user data to an existing Audience in Poplar, which can be used for suppression or a One Time Send.
* Utilize customer data (*anything stored on a user-level as an **attribute***) to personalize creative artwork (first name, unique promo code, city, last purchase, etc.).
* Use your existing customer segments to delivery timely, targeted messages.
Whether you're re-engaging inactive customers or rewarding your best ones, this integration makes it easy to add direct mail to your marketing mix—no technical skills required.
### Prerequisites
Before integrating and sending tests with Klaviyo, make sure you've completed the following:
* [ ] Create a Campaign in Poplar and upload creative (can be a placeholder creative if official designs aren't ready yet).
* [ ] Locate your campaign\_id, Test and Production API tokens in Poplar so you have them ready when creating the webhook.
* [ ] Create a new or select an existing dynamic segment in Klaviyo to use as your trigger action/entry point (we recommend using dynamic segments instead of lists for use cases such as Abandoned Cart, so users can enter and exit the segment if they return to make a purchase before the mailer is triggered).
* [ ] Determine whether you'll be targeting users with full address data, only email data, or both. If you plan on utilizing our [Address Enrichment](#emails-for-address-enrichment) feature to match physical addresses to email addresses, make sure that setting is enabled for your campaign.
{% hint style="warning" %}
If creative isn't uploaded to your campaign, you will receive a 400 error in Klaviyo when testing the webhook. The campaign must be **Active** with creative uploaded in order to test the integration.
{% endhint %}
***
## Step 1: Flows
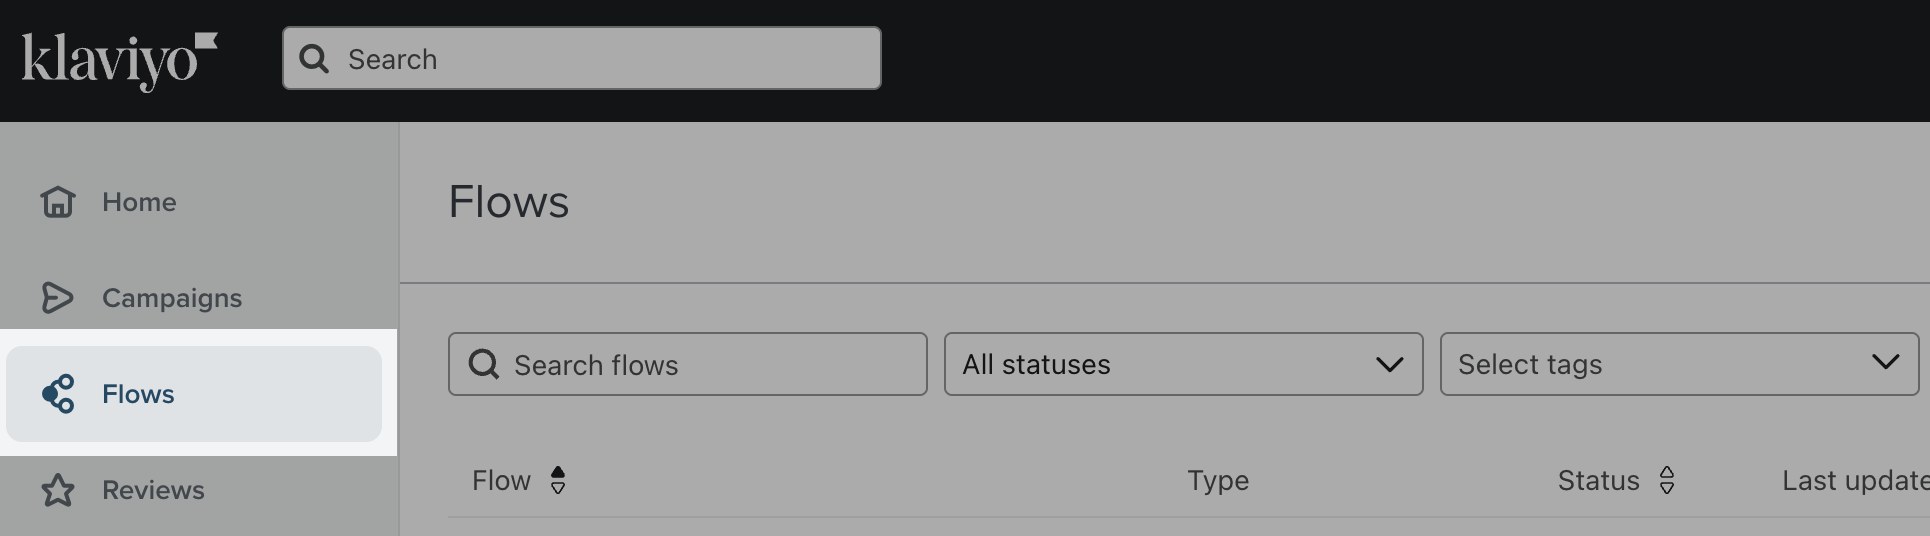
From your Klaviyo Dashboard, navigate to your **Flows** page and use the **Create Flow** button, or select an existing one by clicking **Edit Flow**.
## Step 2: Actions
If you're creating a flow from scratch, select your Trigger event, set any necessary filters, and click **Save,** then **Done** to access the Actions step.
Drag and drop the **Webhook** action into your flow:
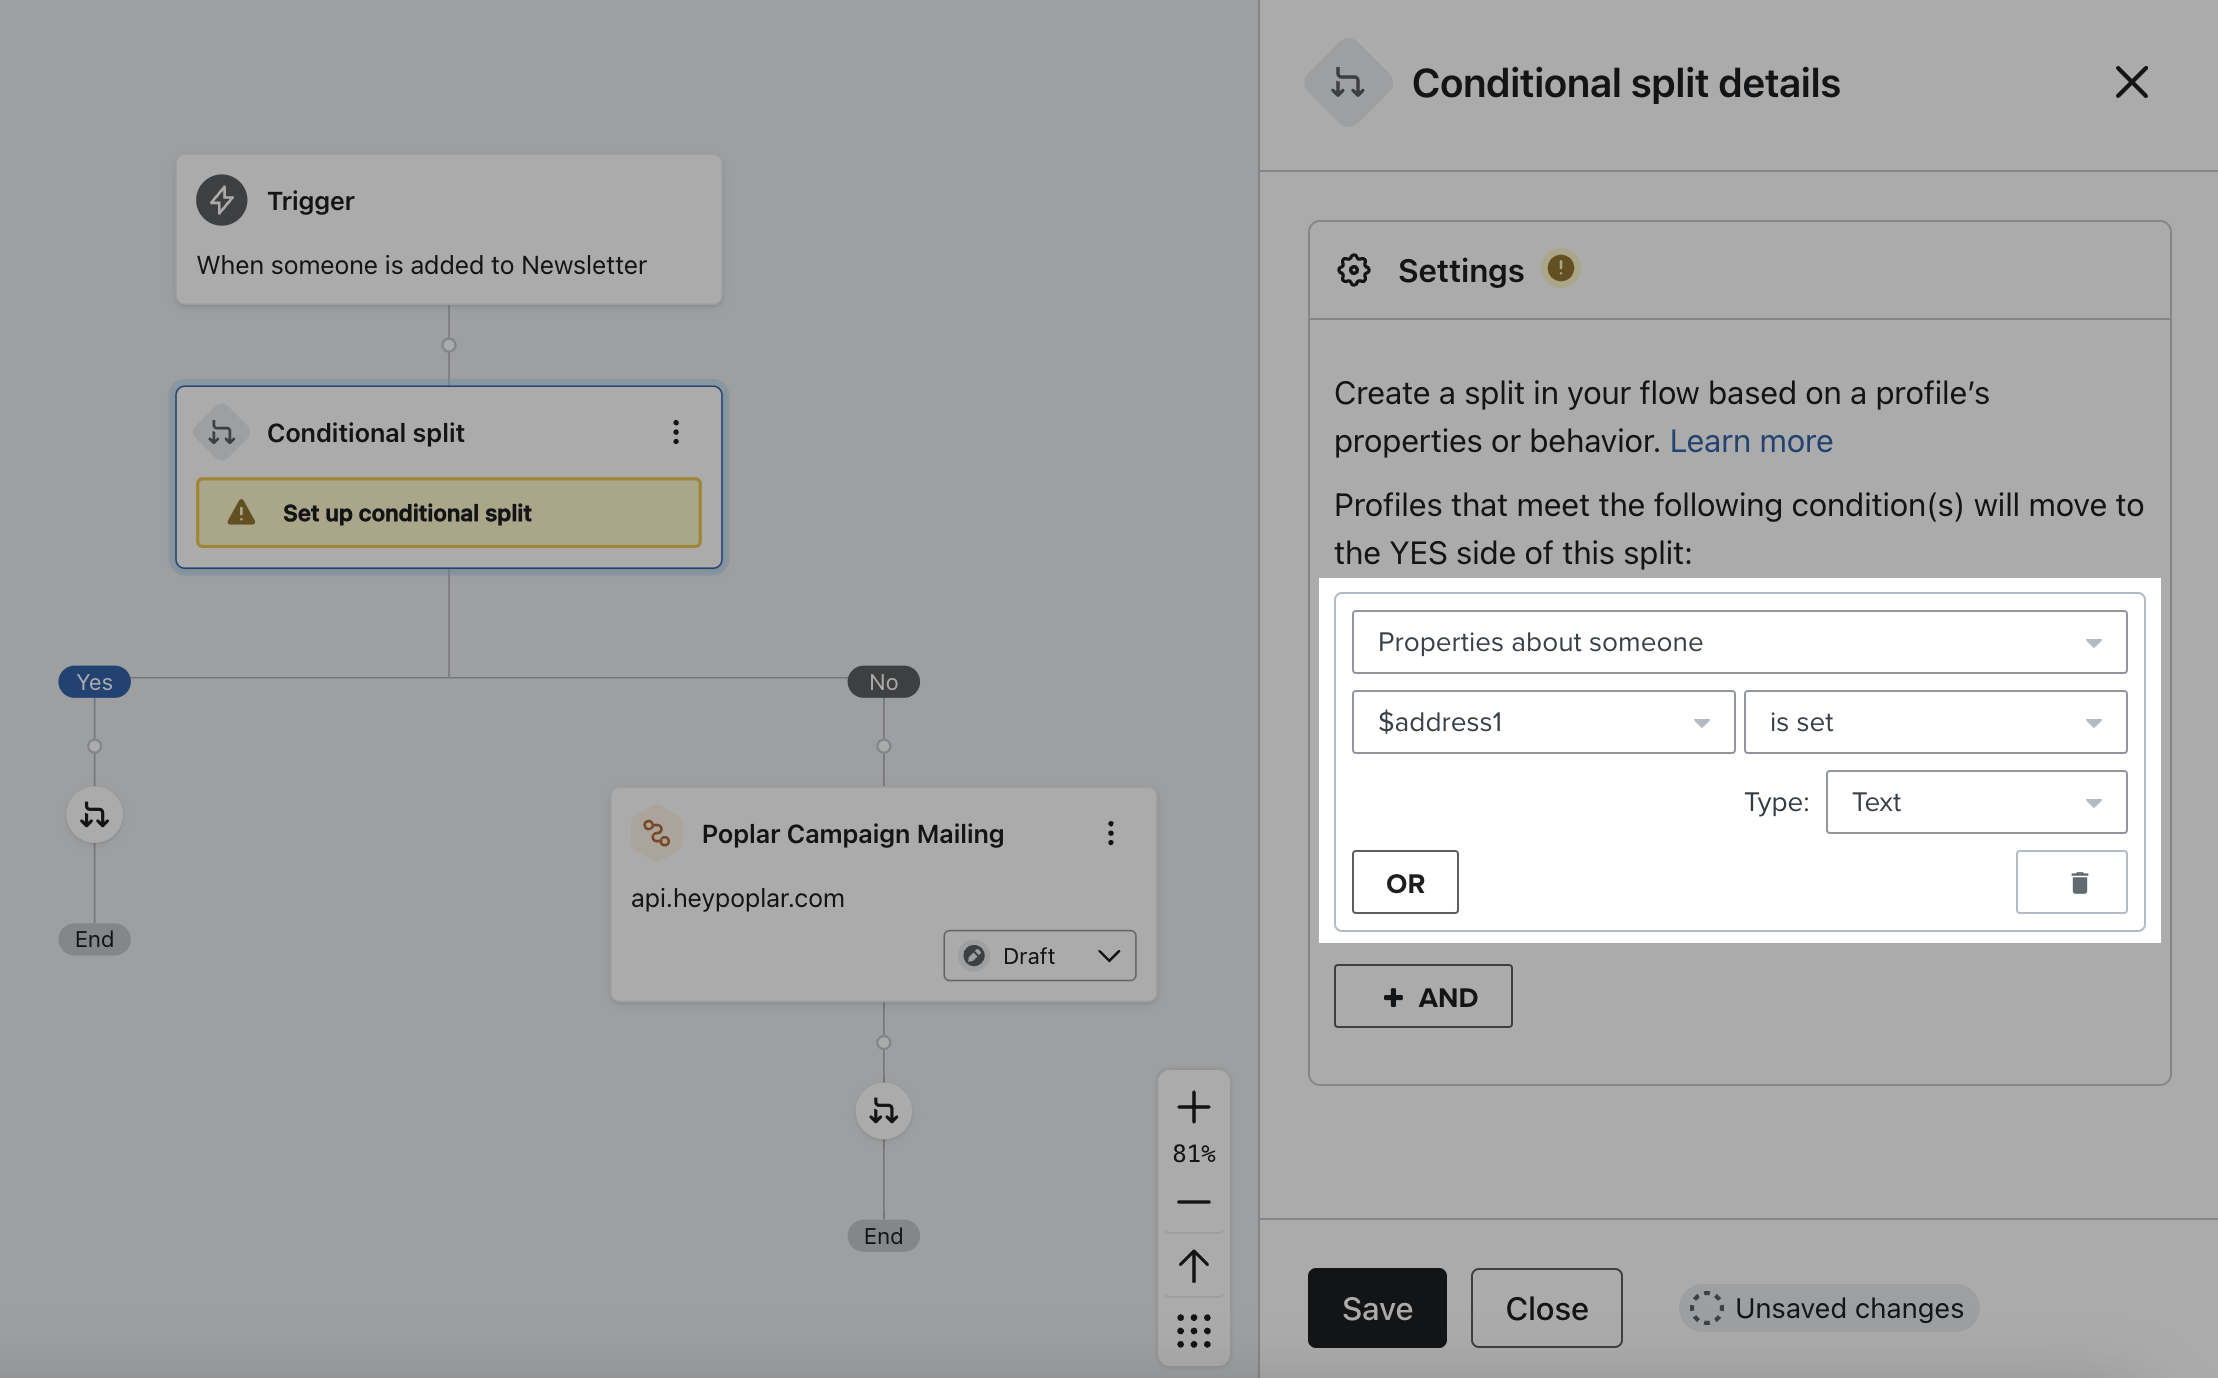
## Step 3: Conditional Splits
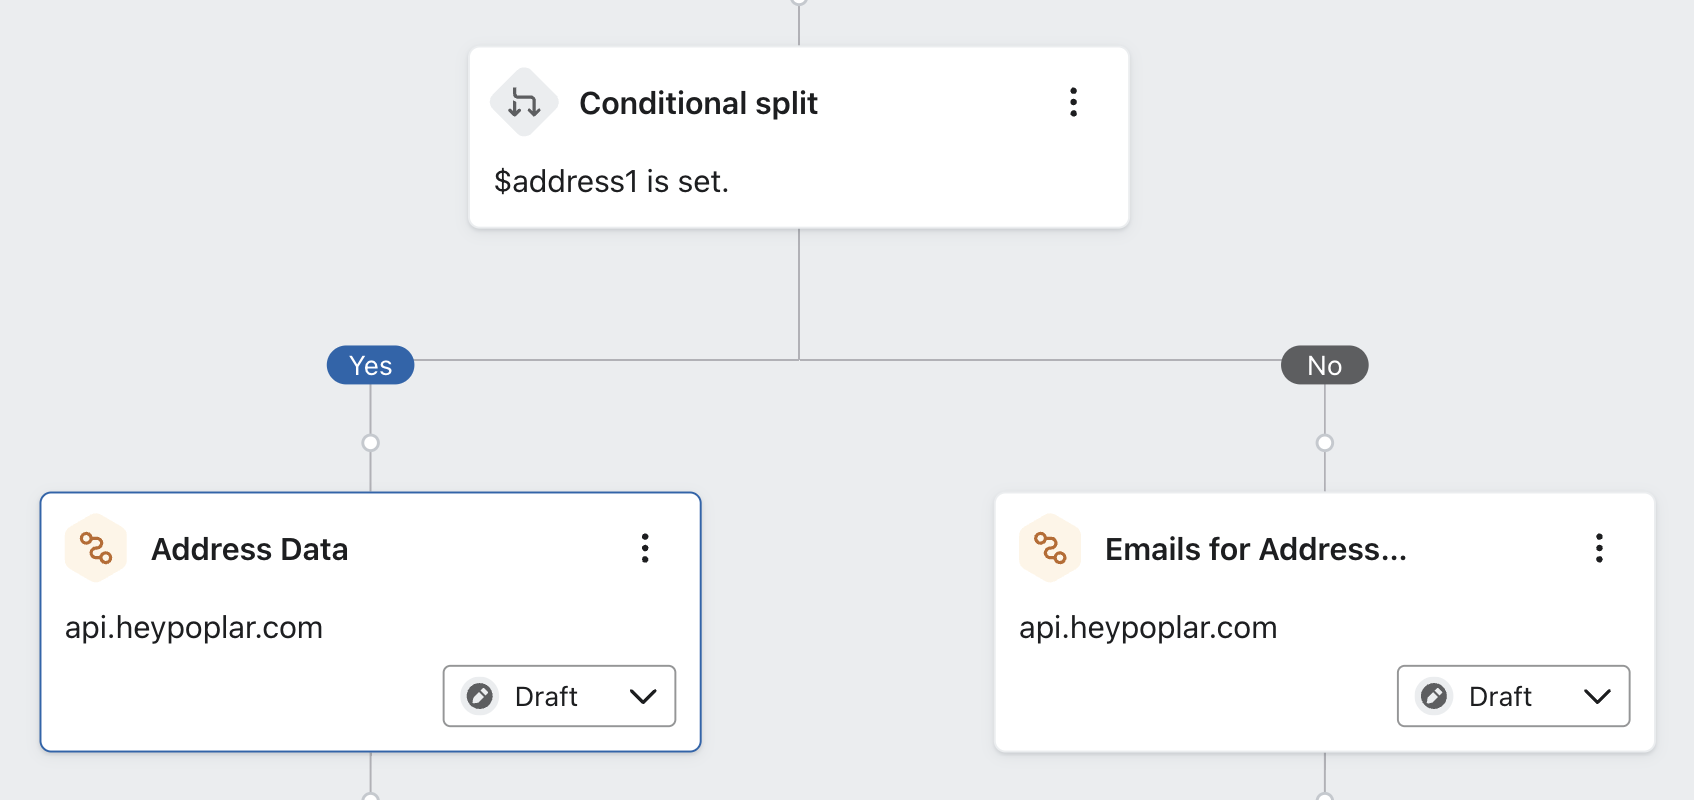
If some of your customers in the flow only have email stored (no mailing address captured), you'll have to add a conditional split and set up 2 separate webhooks: one for users with full address data, and one for users with only email data.
{% hint style="info" %}
If you plan on only mailing to existing customers (users with full address data) or only mailing to users with email data (subscribers/unsubscribers), you can skip the conditional split and move on to step 4.
{% endhint %}
Without the conditional split, any users with only email that try to pass through a full address webhook will fail due to missing address\_1, city, or postal\_code data.
## Step 4: Webhook Configuration
Under the configuration settings on the left, you'll want to enter the following values so that you can trigger a mailing, add a user to an existing audience or Do Not Mail list:
{% tabs %}
{% tab title="Mailing API" %}
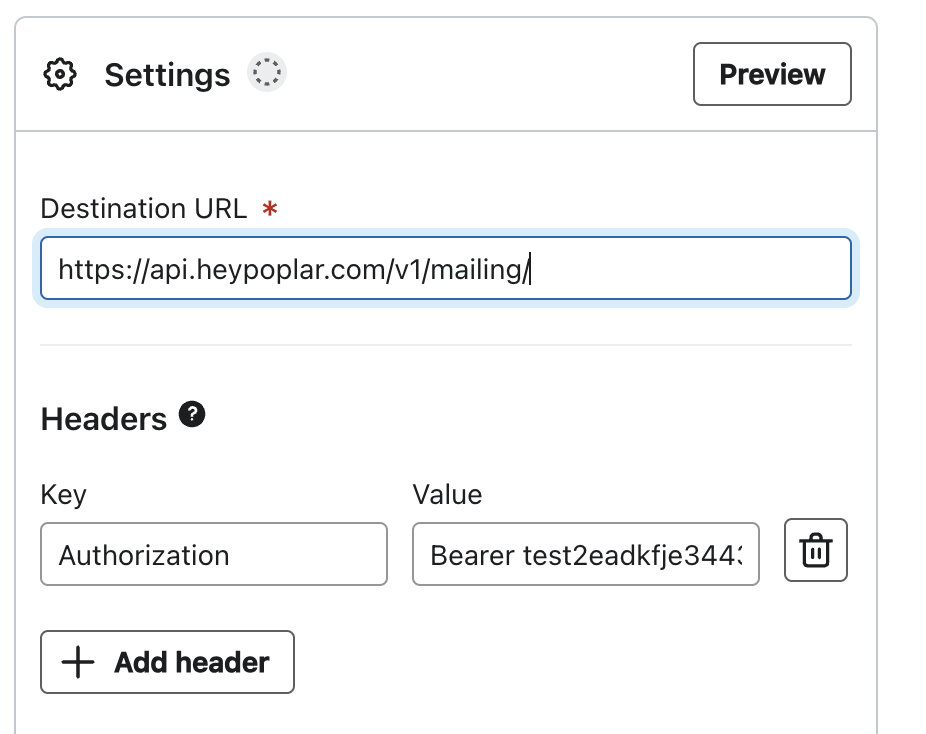
To set up the webhook to send a mailer, enter the following credentials:
Destination URL: `https://api.heypoplar.com/v1/mailing/`
Key: `Authorization`
Value: `Bearer PasteYourTestAPITokenHere`
{% hint style="info" %}
We strongly recommend using the **Test Access Token** provided in the [API ](https://app.heypoplar.com/credentials)section of your Poplar account, to ensure your trigger is set up successfully.
After confirming the requests are successfully coming through to the **History** tab of your campaign for a period of time, swap in the Production token to go live.
{% endhint %}
### JSON Body
Your JSON payload should contain all the data you'd like to share with the platform. This includes recipient info such as name, address, customer ID, and/or email, along with any custom merge tags that may be present if you're using dynamic creative.
#### Emails (Address Enrichment)
```
{
"recipient": {
"email": "{{ person.email|default:'' }}"
},
"campaign_id": "REPLACE-WITH-YOUR-CAMPAIGN-ID"
}
```
#### Address Data
```
{
"recipient": {
"email": "{{ person.email|default:'' }}",
"first_name": "{{ person.first_name|default:'' }}",
"last_name": "{{ person.last_name|default:'' }}",
"address_1": "{{ person|lookup:'$address1'|default:'' }}",
"address_2": "{{ person|lookup:'$address2'|default:'' }}",
"city": "{{ person|lookup:'$city'|default:'' }}",
"state": "{{ person|lookup:'$region'|default:'' }}",
"postal_code": "{{ person|lookup:'$zip'|default:'' }}"
},
"campaign_id": "REPLACE-WITH-YOUR-CAMPAIGN-ID"
}
```
#### OPTIONAL: Creative ID
If you have multiple active creatives under one campaign and want the webhook to point to a specific one, you will have to include a line for creative\_id.
If `creative_id` is not specified, the platform will automatically launch the only active creative, or randomize between all active creatives in the campaign (ideal setup for A/B testing).
```
},
"campaign_id": "REPLACE-WITH-YOUR-CAMPAIGN-ID",
"creative_id": "REPLACE-WITH-YOUR-CREATIVE-ID"
}
```
Custom Merge Tags
If you have custom data stored in Klaviyo on a user-level that you are planning to utilize in your creative, a **merge\_tags object** can be added to pass that data through the webhook:
```
{
"recipient": {
...
},
"merge_tags": {
"company": "{{ person|lookup:'$organization'|default:'' }}"
},
"campaign_id": "REPLACE-WITH-YOUR-CAMPAIGN-ID",
"creative_id": "REPLACE-WITH-YOUR-CREATIVE-ID"
}
```
{% endtab %}
{% tab title="Audiences API" %}
{% hint style="info" %}
This endpoint is only able to **add members to an existing list** in your Poplar account. You must first create an Audience within the Poplar platform to generate an `audience_id` which should be pasted in place of **:id** in the destination URL below.
Your **Production** token must be used to hit this endpoint (only the Mailing API is able to accept Test tokens) .
{% endhint %}
Destination URL: `https://api.heypoplar.com/v1/audience/:id`
Key: `Authorization`
Value: `Bearer PasteYourProductionTokenHere`
### JSON Body
If using this list for suppression, don't for get to select it under your campaign's Suppression tab. Either `email` or `address` is **required** to match against the send data for suppression.
```
{
"address": {
"name": "{{ person.first_name|default:'' }} {{ person.last_name|default:'' }}",
"email" : "{{ person.email|default:'' }}",
"address_1": "{{ person|lookup:'$address1'|default:'' }}",
"address_2": "{{ person|lookup:'$address2'|default:'' }}",
"city": "{{ person|lookup:'$city'|default:'' }}",
"state": "{{ person|lookup:'$region'|default:'' }}",
"postal_code": "{{ person|lookup:'$zip'|default:'' }}"
}
}
```
{% endtab %}
{% tab title="Do Not Mail API" %}
{% hint style="info" %}
Your **Production** token must be used to hit this endpoint (only the Mailing API is able to accept Test tokens) .
{% endhint %}
Destination URL: `https://api.heypoplar.com/v1/do-not-mail`
Key: `Authorization`
Value: `Bearer PasteYourProductionTokenHere`
### JSON Body
```
{
"address": {
"name": "{{ person.first_name|default:'' }} {{ person.last_name|default:'' }}",
"email": "{{ person.email|default:'' }}",
"address_1": "{{ person|lookup:'$address1'|default:'' }}",
"address_2": "{{ person|lookup:'$address2'|default:'' }}",
"city": "{{ person|lookup:'$city'|default:'' }}",
"state": "{{ person|lookup:'$region'|default:'' }}",
"postal_code": "{{ person|lookup:'$zip'|default:'' }}"
},
"identifier": "{{ person.id|default:'' }}"
}
```
Either `email`, `email_sha256`, `identifier`, or `address` is **required**. For suppression to work, the same identifier must be sent when triggering a mailing.
{% endtab %}
{% endtabs %}
## Step 5: Preview Webhook & Test Trigger
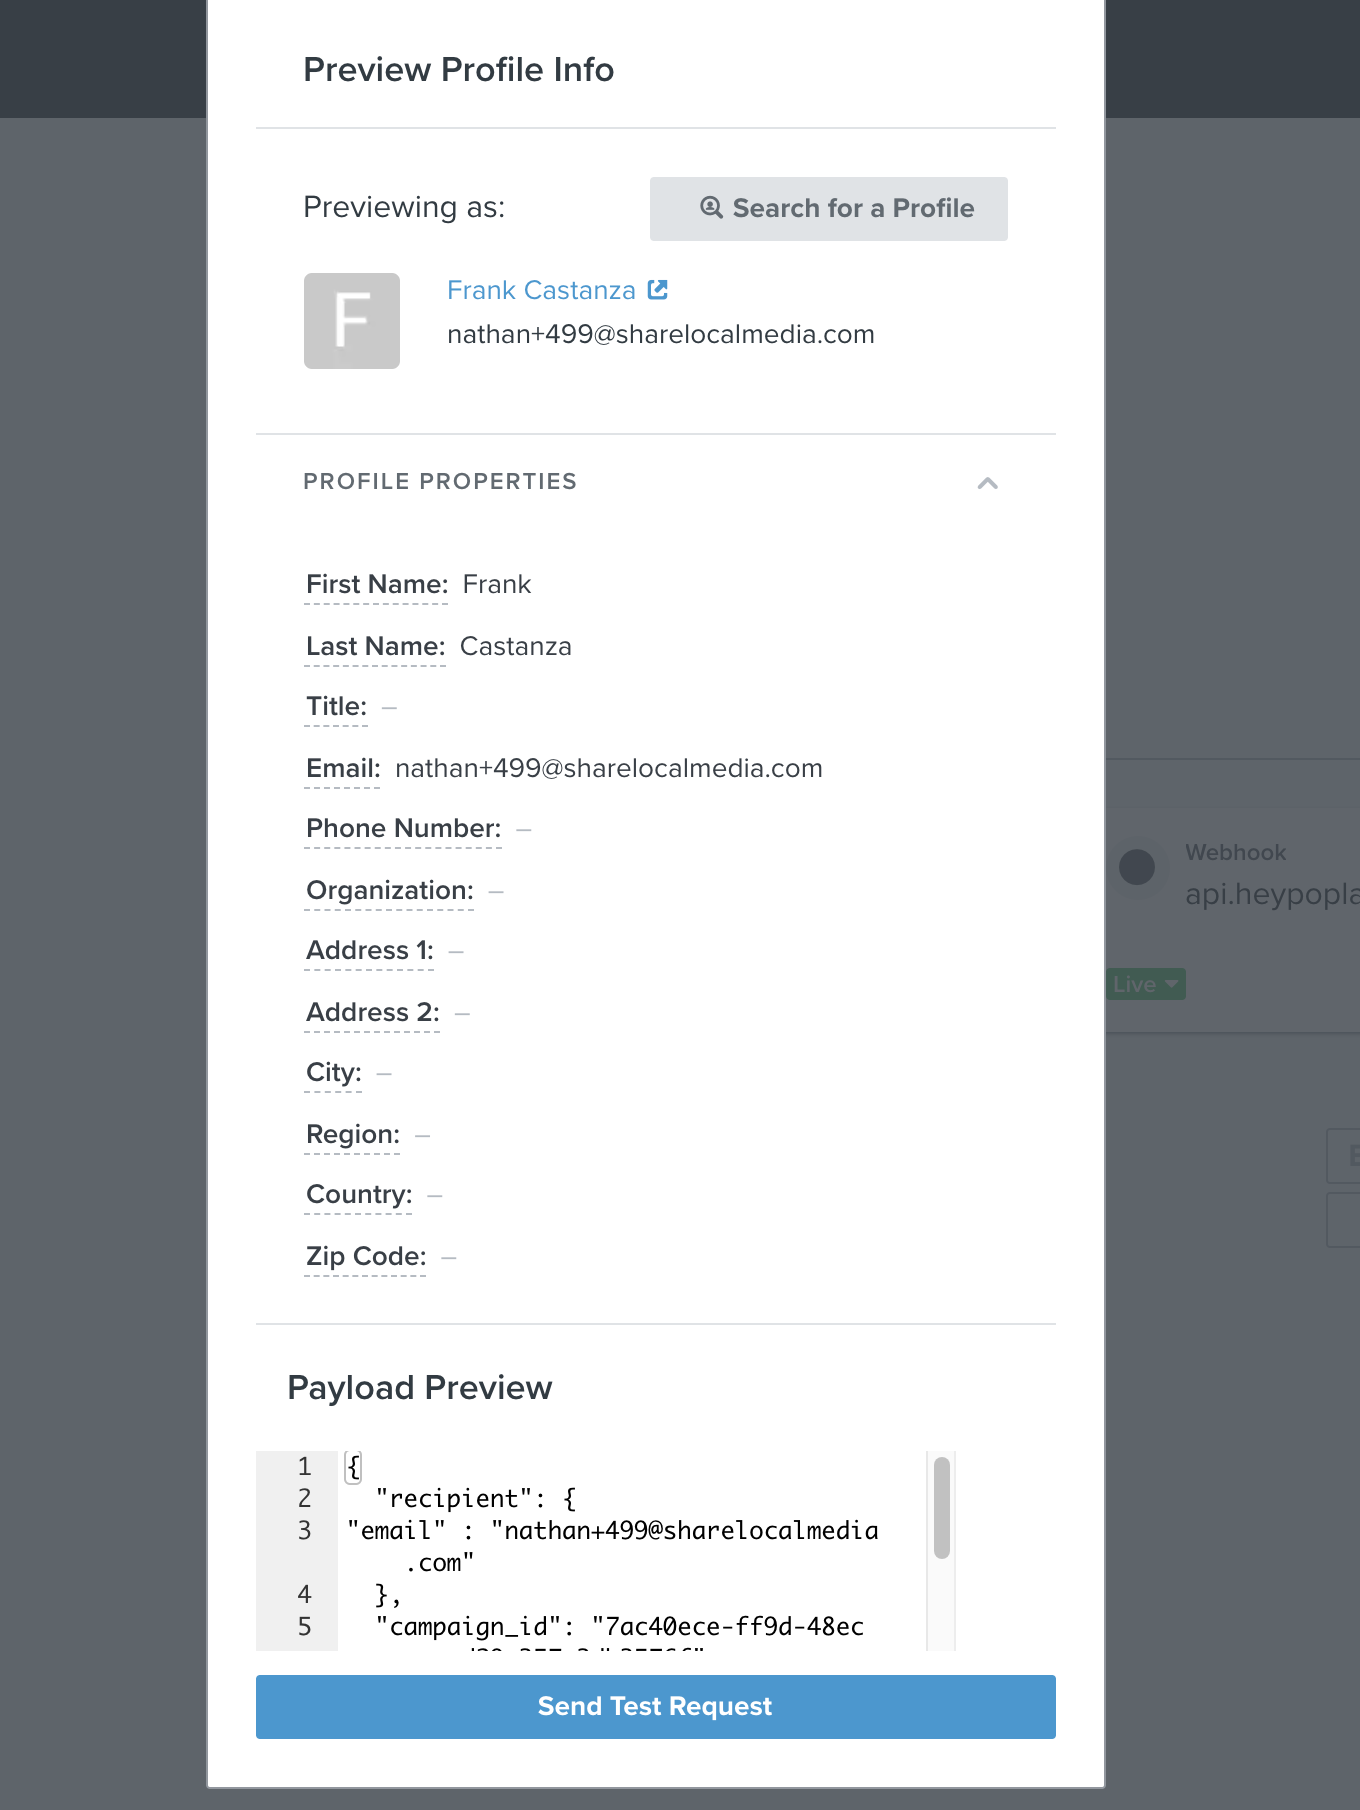
After entering your JSON Body code, click **Preview Webhook** to view a sample customer profile and ensure all the desired data is being pulled into each field.
The **Profile Properties** will show all the data for the sample customer, and the **Payload Preview** will show what data is being pulled into the webhook to be passed to the platform.
Data that appears under Profile Properties isn't guaranteed to be passed to the platform, always make sure the desired data is present in the Payload Preview as well.
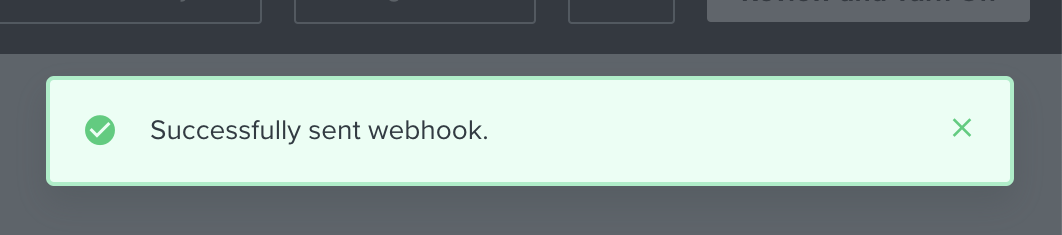
**Send Test Request** to push the webhook preview to Poplar to confirm the connection is successful. If the trigger goes through **successfully**, you'll see a green **"Successfully sent webhook"** in Klaviyo:
If you receive anything but a green success or if you receive a 400 error, consult the Troubleshooting section below or reach out to **** for assistance.
## Step 6: View Successful Requests
Head to your **Campaign Overview** in Poplar and scroll down to the **History** section to see successful tests come through.
Click into one of the mailers to see a PDF proof with the user data applied. Scroll down to the **Request Details** to confirm the data coming through the platform matches your Klaviyo JSON payload:
## Go Live!
Once you've confirmed the connection is successful and customer data is coming through to Poplar as desired, swap your **Production Access Token** in place of your Test token under the Headers section. Make sure to Save your updates, then set your Webhook action to Live!
### Manual
The manual setting will accumulate customers when they reach this step in the flow, and will only get passed onto Poplar if they are triggered manually.
***
## Troubleshooting
### 403 Error (Cloned Webhook)
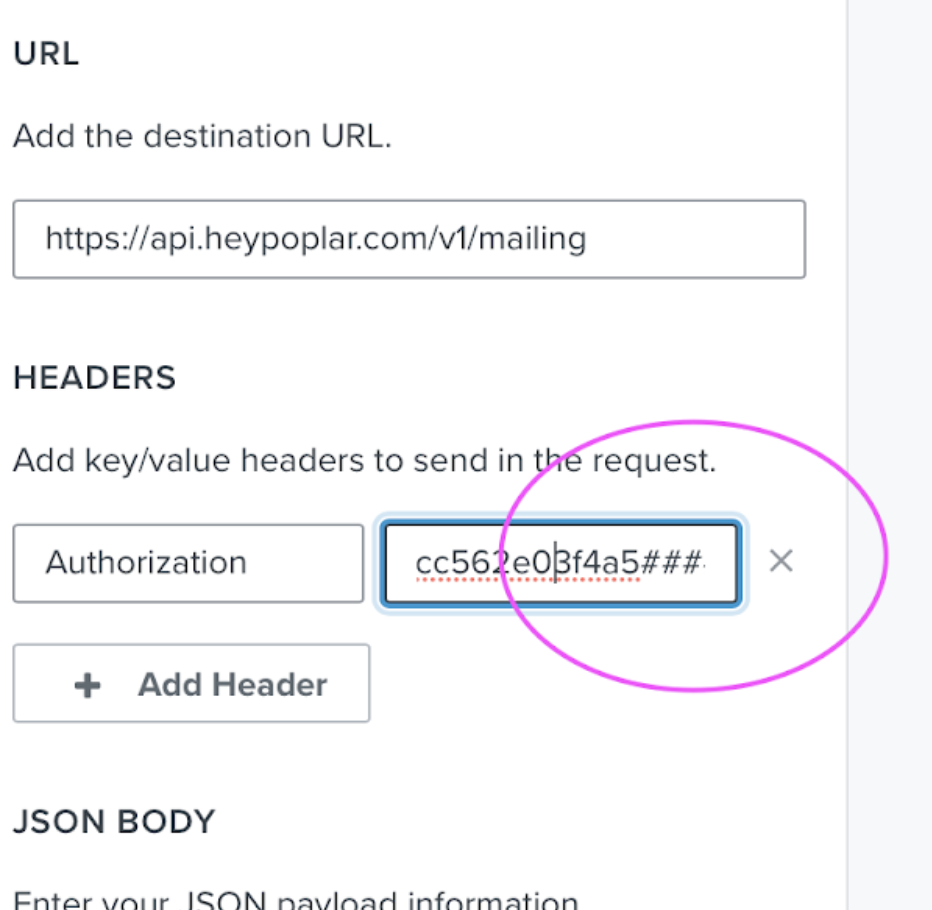
If you cloned an existing Poplar webhook and are now receiving a 403 (Authorization) error during testing - don't worry! It is a quick fix.
For security purposes, when cloning a webhook the API token you entered under Headers will transfer with hashes at the end, instead of the unique number value:
To fix this, simply copy and paste the access token directly from Poplar again. After pasting you will notice the hashes appear again, but this time they are actually hiding the true value of the token.
#### 403 Error on an Original Webhook?
Double check there aren't any typos under the Headers key/value inputs, and that value includes **Bearer** followed by a space and your full pasted access token.
### 400 Error (Missing or Incorrect Fields)
The most common causes of a 400 error are:
* Missing required address data (address\_1, city, postal\_code): If you are attempting to test your webhook using a user that only has email data saved or has incomplete address data.
* Spotcheck the user data in your list to make sure all the required fields are present and match the variables you have listed in your webhook.
* Inactive/Paused Campaign or Missing Creative: If your webhook is pointing to a campaign in Poplar that is Inactive/Paused, missing creative artwork, or a creative\_id is specified and is pointing to an old creative that had been deactivated.
* Head to your Poplar account to make sure your campaign is Active and using the intended creative - double check the campaign\_id and creative\_id are correct.
* JSON Syntax Typos: If everything else checks out and you're still running into an error, you might have a typo in one of the values or a missing/added comma or curly brace.
* Look over each line very closely, or get a second pair of eyes to help out. When listing out webhook data each value should be followed by a comma unless it is the last item in the list. Double check there are quotes where there should be quotes, and double curly braces where there should be double.
### "Failed" Status in Poplar Campaign History
If data successfully made it to Poplar, and you can see the test request in your History tab but it has a "Failed" status - you just tried to pass email data without enabling Address Enrichment in your campaign settings.
Head to Edit Campaign and make sure Address Enrichment is Enabled. It won't retroactively correct the existing request, but if you send a new one through you should now see *Queued for Address Enrichment*.
*Still stuck? Reach out to **** for assistance.*
---
# Agent Instructions
This documentation is published with GitBook. GitBook is the documentation platform designed so that both humans and AI agents can read, navigate, and reason over technical content effectively. Learn more at gitbook.com.
## Querying This Documentation
If you need additional information that is not directly available in this page, you can query the documentation dynamically by asking a question.
Perform an HTTP GET request on the current page URL with the `ask` query parameter, and the optional `goal` query parameter:
```
GET https://docs.heypoplar.com/integrations/supported-platforms/klaviyo.md?ask=&goal=
```
`ask` is the immediate question: it should be specific, self-contained, and written in natural language.
`goal` is optional and describes the broader end goal you are ultimately trying to accomplish on behalf of the user. GitBook uses it to tailor the answer towards what is most useful for that goal.
The response will contain a direct answer to the question and relevant excerpts and sources from the documentation.
Use this mechanism when the answer is not explicitly present in the current page, you need clarification or additional context, or you want to retrieve related documentation sections.
 ## Step 3: Conditional Splits
If some of your customers in the flow only have email stored (no mailing address captured), you'll have to add a conditional split and set up 2 separate webhooks: one for users with full address data, and one for users with only email data.
{% hint style="info" %}
If you plan on only mailing to existing customers (users with full address data) or only mailing to users with email data (subscribers/unsubscribers), you can skip the conditional split and move on to step 4.
{% endhint %}
## Step 3: Conditional Splits
If some of your customers in the flow only have email stored (no mailing address captured), you'll have to add a conditional split and set up 2 separate webhooks: one for users with full address data, and one for users with only email data.
{% hint style="info" %}
If you plan on only mailing to existing customers (users with full address data) or only mailing to users with email data (subscribers/unsubscribers), you can skip the conditional split and move on to step 4.
{% endhint %}
 Without the conditional split, any users with only email that try to pass through a full address webhook will fail due to missing address\_1, city, or postal\_code data.
 ## Step 4: Webhook Configuration
Under the configuration settings on the left, you'll want to enter the following values so that you can trigger a mailing, add a user to an existing audience or Do Not Mail list:
{% tabs %}
{% tab title="Mailing API" %}
To set up the webhook to send a mailer, enter the following credentials:
## Step 4: Webhook Configuration
Under the configuration settings on the left, you'll want to enter the following values so that you can trigger a mailing, add a user to an existing audience or Do Not Mail list:
{% tabs %}
{% tab title="Mailing API" %}
To set up the webhook to send a mailer, enter the following credentials:
 Destination URL: `https://api.heypoplar.com/v1/mailing/`
Key: `Authorization`
Value: `Bearer PasteYourTestAPITokenHere`
{% hint style="info" %}
We strongly recommend using the **Test Access Token** provided in the [API ](https://app.heypoplar.com/credentials)section of your Poplar account, to ensure your trigger is set up successfully.
After confirming the requests are successfully coming through to the **History** tab of your campaign for a period of time, swap in the Production token to go live.
{% endhint %}
### JSON Body
Your JSON payload should contain all the data you'd like to share with the platform. This includes recipient info such as name, address, customer ID, and/or email, along with any custom merge tags that may be present if you're using dynamic creative.
#### Emails (Address Enrichment)
```
{
"recipient": {
"email": "{{ person.email|default:'' }}"
},
"campaign_id": "REPLACE-WITH-YOUR-CAMPAIGN-ID"
}
```
#### Address Data
```
{
"recipient": {
"email": "{{ person.email|default:'' }}",
"first_name": "{{ person.first_name|default:'' }}",
"last_name": "{{ person.last_name|default:'' }}",
"address_1": "{{ person|lookup:'$address1'|default:'' }}",
"address_2": "{{ person|lookup:'$address2'|default:'' }}",
"city": "{{ person|lookup:'$city'|default:'' }}",
"state": "{{ person|lookup:'$region'|default:'' }}",
"postal_code": "{{ person|lookup:'$zip'|default:'' }}"
},
"campaign_id": "REPLACE-WITH-YOUR-CAMPAIGN-ID"
}
```
#### OPTIONAL: Creative ID
If you have multiple active creatives under one campaign and want the webhook to point to a specific one, you will have to include a line for creative\_id.
If `creative_id` is not specified, the platform will automatically launch the only active creative, or randomize between all active creatives in the campaign (ideal setup for A/B testing).
```
},
"campaign_id": "REPLACE-WITH-YOUR-CAMPAIGN-ID",
"creative_id": "REPLACE-WITH-YOUR-CREATIVE-ID"
}
```
Custom Merge Tags
If you have custom data stored in Klaviyo on a user-level that you are planning to utilize in your creative, a **merge\_tags object** can be added to pass that data through the webhook:
```
{
"recipient": {
...
},
"merge_tags": {
"company": "{{ person|lookup:'$organization'|default:'' }}"
},
"campaign_id": "REPLACE-WITH-YOUR-CAMPAIGN-ID",
"creative_id": "REPLACE-WITH-YOUR-CREATIVE-ID"
}
```
{% endtab %}
{% tab title="Audiences API" %}
{% hint style="info" %}
This endpoint is only able to **add members to an existing list** in your Poplar account. You must first create an Audience within the Poplar platform to generate an `audience_id` which should be pasted in place of **:id** in the destination URL below.
Your **Production** token must be used to hit this endpoint (only the Mailing API is able to accept Test tokens) .
{% endhint %}
Destination URL: `https://api.heypoplar.com/v1/audience/:id`
Key: `Authorization`
Value: `Bearer PasteYourProductionTokenHere`
### JSON Body
If using this list for suppression, don't for get to select it under your campaign's Suppression tab. Either `email` or `address` is **required** to match against the send data for suppression.
```
{
"address": {
"name": "{{ person.first_name|default:'' }} {{ person.last_name|default:'' }}",
"email" : "{{ person.email|default:'' }}",
"address_1": "{{ person|lookup:'$address1'|default:'' }}",
"address_2": "{{ person|lookup:'$address2'|default:'' }}",
"city": "{{ person|lookup:'$city'|default:'' }}",
"state": "{{ person|lookup:'$region'|default:'' }}",
"postal_code": "{{ person|lookup:'$zip'|default:'' }}"
}
}
```
{% endtab %}
{% tab title="Do Not Mail API" %}
{% hint style="info" %}
Your **Production** token must be used to hit this endpoint (only the Mailing API is able to accept Test tokens) .
{% endhint %}
Destination URL: `https://api.heypoplar.com/v1/do-not-mail`
Key: `Authorization`
Value: `Bearer PasteYourProductionTokenHere`
### JSON Body
```
{
"address": {
"name": "{{ person.first_name|default:'' }} {{ person.last_name|default:'' }}",
"email": "{{ person.email|default:'' }}",
"address_1": "{{ person|lookup:'$address1'|default:'' }}",
"address_2": "{{ person|lookup:'$address2'|default:'' }}",
"city": "{{ person|lookup:'$city'|default:'' }}",
"state": "{{ person|lookup:'$region'|default:'' }}",
"postal_code": "{{ person|lookup:'$zip'|default:'' }}"
},
"identifier": "{{ person.id|default:'' }}"
}
```
Either `email`, `email_sha256`, `identifier`, or `address` is **required**. For suppression to work, the same identifier must be sent when triggering a mailing.
{% endtab %}
{% endtabs %}
## Step 5: Preview Webhook & Test Trigger
After entering your JSON Body code, click **Preview Webhook** to view a sample customer profile and ensure all the desired data is being pulled into each field.
Destination URL: `https://api.heypoplar.com/v1/mailing/`
Key: `Authorization`
Value: `Bearer PasteYourTestAPITokenHere`
{% hint style="info" %}
We strongly recommend using the **Test Access Token** provided in the [API ](https://app.heypoplar.com/credentials)section of your Poplar account, to ensure your trigger is set up successfully.
After confirming the requests are successfully coming through to the **History** tab of your campaign for a period of time, swap in the Production token to go live.
{% endhint %}
### JSON Body
Your JSON payload should contain all the data you'd like to share with the platform. This includes recipient info such as name, address, customer ID, and/or email, along with any custom merge tags that may be present if you're using dynamic creative.
#### Emails (Address Enrichment)
```
{
"recipient": {
"email": "{{ person.email|default:'' }}"
},
"campaign_id": "REPLACE-WITH-YOUR-CAMPAIGN-ID"
}
```
#### Address Data
```
{
"recipient": {
"email": "{{ person.email|default:'' }}",
"first_name": "{{ person.first_name|default:'' }}",
"last_name": "{{ person.last_name|default:'' }}",
"address_1": "{{ person|lookup:'$address1'|default:'' }}",
"address_2": "{{ person|lookup:'$address2'|default:'' }}",
"city": "{{ person|lookup:'$city'|default:'' }}",
"state": "{{ person|lookup:'$region'|default:'' }}",
"postal_code": "{{ person|lookup:'$zip'|default:'' }}"
},
"campaign_id": "REPLACE-WITH-YOUR-CAMPAIGN-ID"
}
```
#### OPTIONAL: Creative ID
If you have multiple active creatives under one campaign and want the webhook to point to a specific one, you will have to include a line for creative\_id.
If `creative_id` is not specified, the platform will automatically launch the only active creative, or randomize between all active creatives in the campaign (ideal setup for A/B testing).
```
},
"campaign_id": "REPLACE-WITH-YOUR-CAMPAIGN-ID",
"creative_id": "REPLACE-WITH-YOUR-CREATIVE-ID"
}
```
Custom Merge Tags
If you have custom data stored in Klaviyo on a user-level that you are planning to utilize in your creative, a **merge\_tags object** can be added to pass that data through the webhook:
```
{
"recipient": {
...
},
"merge_tags": {
"company": "{{ person|lookup:'$organization'|default:'' }}"
},
"campaign_id": "REPLACE-WITH-YOUR-CAMPAIGN-ID",
"creative_id": "REPLACE-WITH-YOUR-CREATIVE-ID"
}
```
{% endtab %}
{% tab title="Audiences API" %}
{% hint style="info" %}
This endpoint is only able to **add members to an existing list** in your Poplar account. You must first create an Audience within the Poplar platform to generate an `audience_id` which should be pasted in place of **:id** in the destination URL below.
Your **Production** token must be used to hit this endpoint (only the Mailing API is able to accept Test tokens) .
{% endhint %}
Destination URL: `https://api.heypoplar.com/v1/audience/:id`
Key: `Authorization`
Value: `Bearer PasteYourProductionTokenHere`
### JSON Body
If using this list for suppression, don't for get to select it under your campaign's Suppression tab. Either `email` or `address` is **required** to match against the send data for suppression.
```
{
"address": {
"name": "{{ person.first_name|default:'' }} {{ person.last_name|default:'' }}",
"email" : "{{ person.email|default:'' }}",
"address_1": "{{ person|lookup:'$address1'|default:'' }}",
"address_2": "{{ person|lookup:'$address2'|default:'' }}",
"city": "{{ person|lookup:'$city'|default:'' }}",
"state": "{{ person|lookup:'$region'|default:'' }}",
"postal_code": "{{ person|lookup:'$zip'|default:'' }}"
}
}
```
{% endtab %}
{% tab title="Do Not Mail API" %}
{% hint style="info" %}
Your **Production** token must be used to hit this endpoint (only the Mailing API is able to accept Test tokens) .
{% endhint %}
Destination URL: `https://api.heypoplar.com/v1/do-not-mail`
Key: `Authorization`
Value: `Bearer PasteYourProductionTokenHere`
### JSON Body
```
{
"address": {
"name": "{{ person.first_name|default:'' }} {{ person.last_name|default:'' }}",
"email": "{{ person.email|default:'' }}",
"address_1": "{{ person|lookup:'$address1'|default:'' }}",
"address_2": "{{ person|lookup:'$address2'|default:'' }}",
"city": "{{ person|lookup:'$city'|default:'' }}",
"state": "{{ person|lookup:'$region'|default:'' }}",
"postal_code": "{{ person|lookup:'$zip'|default:'' }}"
},
"identifier": "{{ person.id|default:'' }}"
}
```
Either `email`, `email_sha256`, `identifier`, or `address` is **required**. For suppression to work, the same identifier must be sent when triggering a mailing.
{% endtab %}
{% endtabs %}
## Step 5: Preview Webhook & Test Trigger
After entering your JSON Body code, click **Preview Webhook** to view a sample customer profile and ensure all the desired data is being pulled into each field.
 The **Profile Properties** will show all the data for the sample customer, and the **Payload Preview** will show what data is being pulled into the webhook to be passed to the platform.
Data that appears under Profile Properties isn't guaranteed to be passed to the platform, always make sure the desired data is present in the Payload Preview as well.
**Send Test Request** to push the webhook preview to Poplar to confirm the connection is successful. If the trigger goes through **successfully**, you'll see a green **"Successfully sent webhook"** in Klaviyo:
The **Profile Properties** will show all the data for the sample customer, and the **Payload Preview** will show what data is being pulled into the webhook to be passed to the platform.
Data that appears under Profile Properties isn't guaranteed to be passed to the platform, always make sure the desired data is present in the Payload Preview as well.
**Send Test Request** to push the webhook preview to Poplar to confirm the connection is successful. If the trigger goes through **successfully**, you'll see a green **"Successfully sent webhook"** in Klaviyo:
 If you receive anything but a green success or if you receive a 400 error, consult the Troubleshooting section below or reach out to **
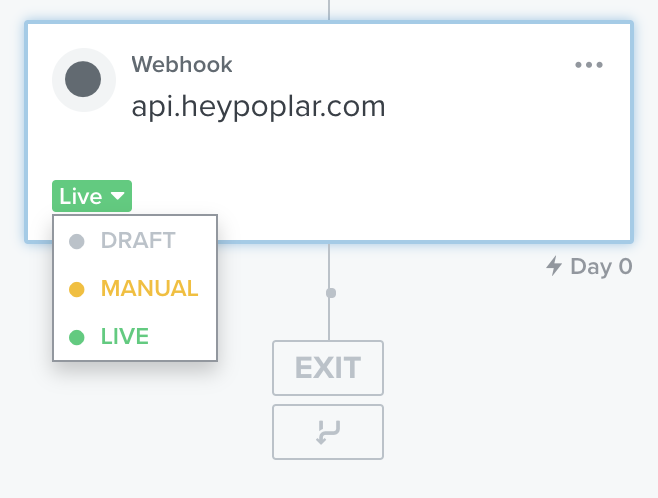 ### Manual
The manual setting will accumulate customers when they reach this step in the flow, and will only get passed onto Poplar if they are triggered manually.
***
## Troubleshooting
### 403 Error (Cloned Webhook)
If you cloned an existing Poplar webhook and are now receiving a 403 (Authorization) error during testing - don't worry! It is a quick fix.
For security purposes, when cloning a webhook the API token you entered under Headers will transfer with hashes at the end, instead of the unique number value:
### Manual
The manual setting will accumulate customers when they reach this step in the flow, and will only get passed onto Poplar if they are triggered manually.
***
## Troubleshooting
### 403 Error (Cloned Webhook)
If you cloned an existing Poplar webhook and are now receiving a 403 (Authorization) error during testing - don't worry! It is a quick fix.
For security purposes, when cloning a webhook the API token you entered under Headers will transfer with hashes at the end, instead of the unique number value:
 To fix this, simply copy and paste the access token directly from Poplar again. After pasting you will notice the hashes appear again, but this time they are actually hiding the true value of the token.
#### 403 Error on an Original Webhook?
Double check there aren't any typos under the Headers key/value inputs, and that value includes **Bearer** followed by a space and your full pasted access token.
### 400 Error (Missing or Incorrect Fields)
The most common causes of a 400 error are:
* Missing required address data (address\_1, city, postal\_code): If you are attempting to test your webhook using a user that only has email data saved or has incomplete address data.
* Spotcheck the user data in your list to make sure all the required fields are present and match the variables you have listed in your webhook.
* Inactive/Paused Campaign or Missing Creative: If your webhook is pointing to a campaign in Poplar that is Inactive/Paused, missing creative artwork, or a creative\_id is specified and is pointing to an old creative that had been deactivated.
* Head to your Poplar account to make sure your campaign is Active and using the intended creative - double check the campaign\_id and creative\_id are correct.
* JSON Syntax Typos: If everything else checks out and you're still running into an error, you might have a typo in one of the values or a missing/added comma or curly brace.
* Look over each line very closely, or get a second pair of eyes to help out. When listing out webhook data each value should be followed by a comma unless it is the last item in the list. Double check there are quotes where there should be quotes, and double curly braces where there should be double.
### "Failed" Status in Poplar Campaign History
If data successfully made it to Poplar, and you can see the test request in your History tab but it has a "Failed" status - you just tried to pass email data without enabling Address Enrichment in your campaign settings.
Head to Edit Campaign and make sure Address Enrichment is Enabled. It won't retroactively correct the existing request, but if you send a new one through you should now see *Queued for Address Enrichment*.
*Still stuck? Reach out to **
To fix this, simply copy and paste the access token directly from Poplar again. After pasting you will notice the hashes appear again, but this time they are actually hiding the true value of the token.
#### 403 Error on an Original Webhook?
Double check there aren't any typos under the Headers key/value inputs, and that value includes **Bearer** followed by a space and your full pasted access token.
### 400 Error (Missing or Incorrect Fields)
The most common causes of a 400 error are:
* Missing required address data (address\_1, city, postal\_code): If you are attempting to test your webhook using a user that only has email data saved or has incomplete address data.
* Spotcheck the user data in your list to make sure all the required fields are present and match the variables you have listed in your webhook.
* Inactive/Paused Campaign or Missing Creative: If your webhook is pointing to a campaign in Poplar that is Inactive/Paused, missing creative artwork, or a creative\_id is specified and is pointing to an old creative that had been deactivated.
* Head to your Poplar account to make sure your campaign is Active and using the intended creative - double check the campaign\_id and creative\_id are correct.
* JSON Syntax Typos: If everything else checks out and you're still running into an error, you might have a typo in one of the values or a missing/added comma or curly brace.
* Look over each line very closely, or get a second pair of eyes to help out. When listing out webhook data each value should be followed by a comma unless it is the last item in the list. Double check there are quotes where there should be quotes, and double curly braces where there should be double.
### "Failed" Status in Poplar Campaign History
If data successfully made it to Poplar, and you can see the test request in your History tab but it has a "Failed" status - you just tried to pass email data without enabling Address Enrichment in your campaign settings.
Head to Edit Campaign and make sure Address Enrichment is Enabled. It won't retroactively correct the existing request, but if you send a new one through you should now see *Queued for Address Enrichment*.
*Still stuck? Reach out to **