> For the complete documentation index, see [llms.txt](https://docs.heypoplar.com/llms.txt). Markdown versions of documentation pages are available by appending `.md` to page URLs; this page is available as [Markdown](https://docs.heypoplar.com/integrations/supported-platforms/sailthru.md).
# Sailthru
We've provided the Poplar-specific webhook directions below. [**Sailthru's documentation**](https://getstarted.sailthru.com/lo/webhooks-lo/) is also available.
***
Create a new or select an existing Lifecycle Optimizer Flow under the Messaging tab in Sailthru.
Add an Action step to the flow\.3Select **Send Webhook** in the dropdown.
Add our URL: `https://api.heypoplar.com/v1/mailing/`
Set the method to **POST**.
Set the content type to **Other**.
Add your formatted payload - this will change depending on the data structure of your Sailthru configuration, and what you want to pass into Poplar.
### **Email Append:**
3. Select **Send Webhook** in the dropdown.
4. Add our URL: `https://api.heypoplar.com/v1/mailing/`
5. Set the method to **POST**.
6. Set the content type to **Other**.
7. Add your formatted payload - this will change depending on the data structure of your Sailthru configuration, and what you want to pass into Poplar.
\
**Email Append**
```
campaign_id=XXXXX&creative_id=XXXXX&recipient[email]={email}
```
### **Mailing Address:**
```
campaign_id=XXXXX&creative_id=XXXXX&recipient[full_name]={profile.vars.full_name}&recipient[address_1]={profile.vars.address_1}&recipient[address_2]={profile.vars.address_2}&recipient[city]={profile.vars.city}&recipient[state]={profile.vars.state}&recipient[postal_code]={profile.vars.postal_code}
```
#### "Profile" Object Syntax
When formatting your Mailing Address payload, use `&` to separate parameters. Be careful not to include any breaks or spaces because they will prevent the data from passing to Poplar in the right format. Nested parameters live inside square brackets `[...]` and continue to nest within those brackets. For example, payload `campaign_id=XXXXX&recipient[full_name]=Poplar&recipient[postal_code]=10004` would appear:
```
{
"campaign_id":"XXXXX",
"recipient": {
"full_name":"Poplar",
"postal_code:"10004"
}
}
```
When pulling data, it is important to know when to use `profile.` vs `profile.vars`. Sailthru's [Profile Object](https://getstarted.sailthru.com/developers/zephyr-syntax/profile-object/) model is a useful reference.
* \- Use `profile.{insert-field-name}` to pull from Sailthru's core data.\
\- Use `profile.vars.{your-custom-variable-name}` to pull any custom variables you created that were not originally fields specified by Sailthru.\
\- **Note:** The customer email is an exception to the above. It is specifically referenced as `{email}`.
* *See the* [*Sailthru Profile Object* ](https://getstarted.sailthru.com/developers/zephyr-syntax/profile-object/)*for complete details.*
| **key** | **value** |
| ------------- | -------------------------------------------------------------------------------------------------------- |
| `campaign_id` | Copy from the right side of the Campaign > Overview |
| `creative_id` | (optional) Copy from the individual creative page under Campaign > Creative |
| `full_name` | (optional) You can also replace with a fixed string like `Current Resident` for use on the address block |
| `first_name` | When using first & last name instead of full name in your webhook you must use BOTH or it will error out |
| `last_name` | |
| `address_1` | |
| `address_2` | |
| `city` | |
| `state` | |
| `postal_code` | |
| | |
You can also add merge tags with your own variable data at the end. When using first & last name options instead of full name you need to include both or it will error.
***
You can also add merge tags with your own variable data at the end.
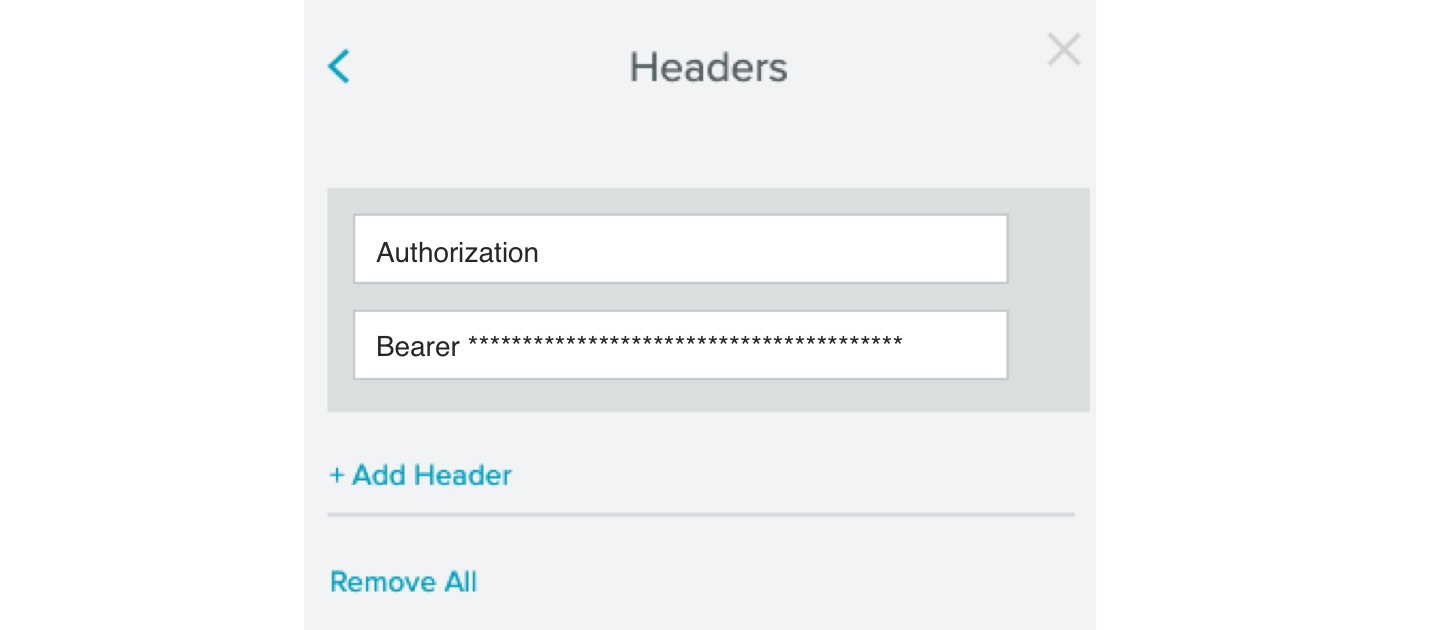
8. Add a HTTP **Header** and configure an `Authorization` key and set the `*Bearer Your API Key*` (make sure to also replace the asterisks\*)
{% hint style="info" %}
We strongly recommend you use a **Test API Key** to start. Once your workflow is set up successfully and running in test mode, go back into the webhook and swap it out for a **Production API Key** to begin mailing.
{% endhint %}
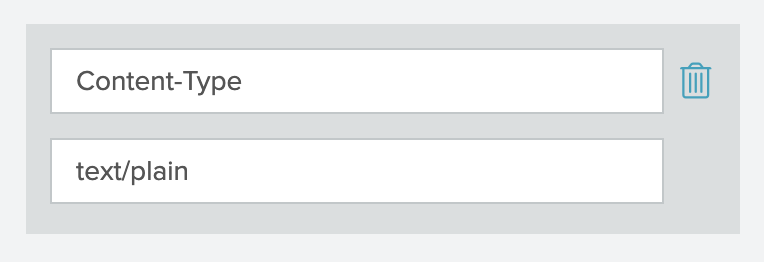
9. Underneath Headers, you must also specify your Content-Type to be text/plain.
10. Test your webhook by sending a test through the flow, and then checking the **History Tab** of the campaign in Poplar to confirm that the data looks as you intended.
11. We recommend leaving the webhook live with your test key for a period of time to get a sense of your volume. Once it looks like it's working well, go back in and **replace** the **API Key** with a **Production Key** to begin mailing.
Add a HTTP **Header** and configure an `Authorization` key and set the `*Bearer Your API Key*` (make sure to also replace the asterisks\*)
We strongly recommend you use a **Test API Key** to start. Once your workflow is set up successfully and running in test mode, go back into the webhook and swap it out for a **Production API Key** to begin mailing.
Underneath Headers, you must also specify your Content-Type to be text/plain.
Test your webhook by sending a test through the flow, and then checking the **History** section of the **Campaign Overview** in Poplar to confirm that the data looks as you intended.
We recommend leaving the webhook live with your test key for a period of time to get a sense of your volume. Once it looks like it's working well, go back in and **replace** the **API Key** with a **Production Key** to begin mailing.
---
# Agent Instructions
This documentation is published with GitBook. GitBook is the documentation platform designed so that both humans and AI agents can read, navigate, and reason over technical content effectively. Learn more at gitbook.com.
## Querying This Documentation
If you need additional information that is not directly available in this page, you can query the documentation dynamically by asking a question.
Perform an HTTP GET request on the current page URL with the `ask` query parameter, and the optional `goal` query parameter:
```
GET https://docs.heypoplar.com/integrations/supported-platforms/sailthru.md?ask=&goal=
```
`ask` is the immediate question: it should be specific, self-contained, and written in natural language.
`goal` is optional and describes the broader end goal you are ultimately trying to accomplish on behalf of the user. GitBook uses it to tailor the answer towards what is most useful for that goal.
The response will contain a direct answer to the question and relevant excerpts and sources from the documentation.
Use this mechanism when the answer is not explicitly present in the current page, you need clarification or additional context, or you want to retrieve related documentation sections.