> For the complete documentation index, see [llms.txt](https://docs.heypoplar.com/llms.txt). Markdown versions of documentation pages are available by appending `.md` to page URLs; this page is available as [Markdown](https://docs.heypoplar.com/integrations/supported-platforms/cordial.md).
# Cordial
To integrate Cordial with Poplar you can refer to the [Automated Messages](https://support.cordial.com/hc/en-us/articles/115005364287-Automated-Messages) section of their documentation while following the step-by-step guide below.
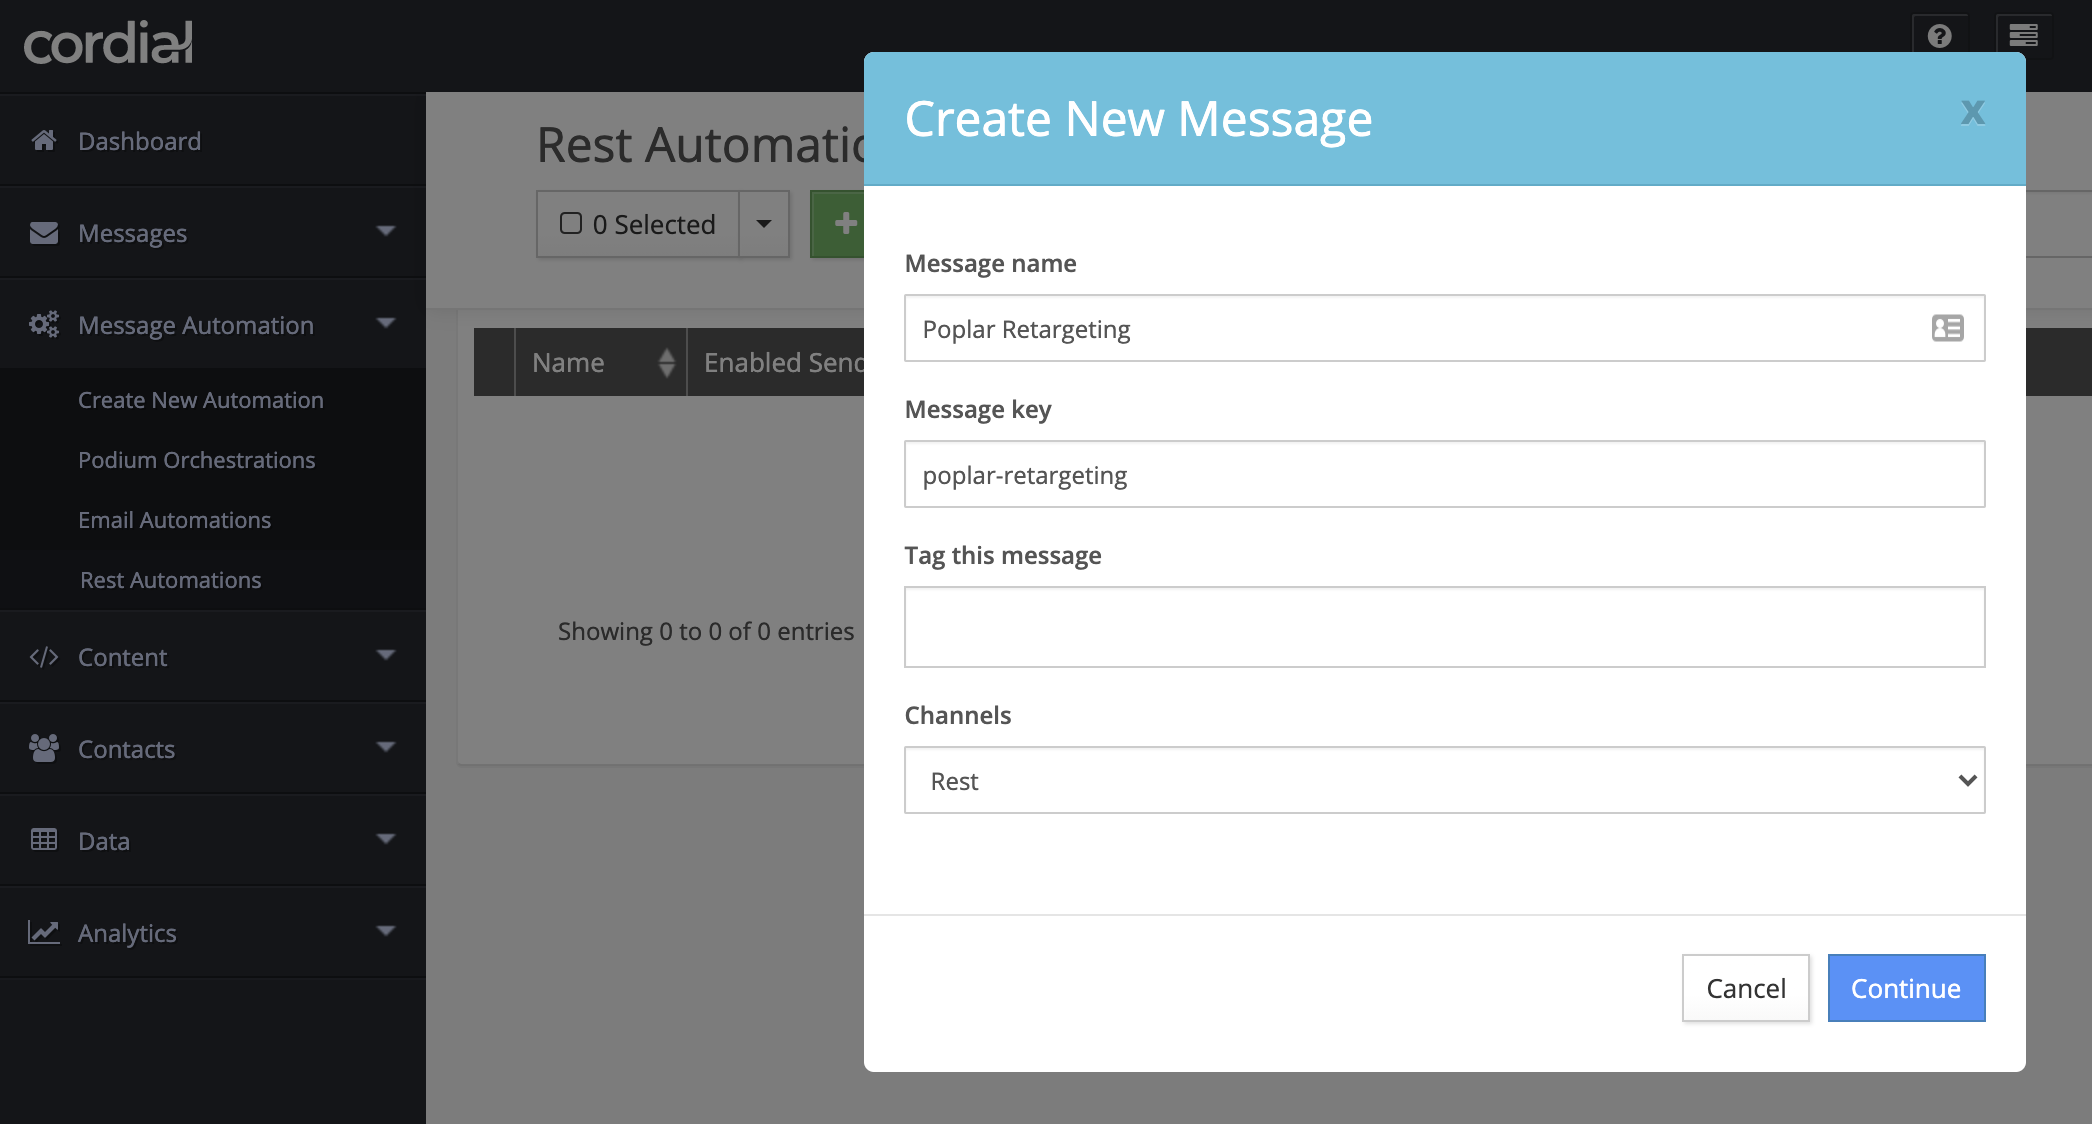
1. Login to Cordial, click the Message Automation dropdown on the left and select the **Rest Automations** page at the bottom.
2. Create a new message automation by clicking the green **+ New** button. Give the message automation a unique name based on use case, select any applicable tags, leave the Channels section set to "Rest" and Continue.
3. You'll be brought to the automation settings where you'll see a list of **REST Parameters** and REST Post Processing scripts.
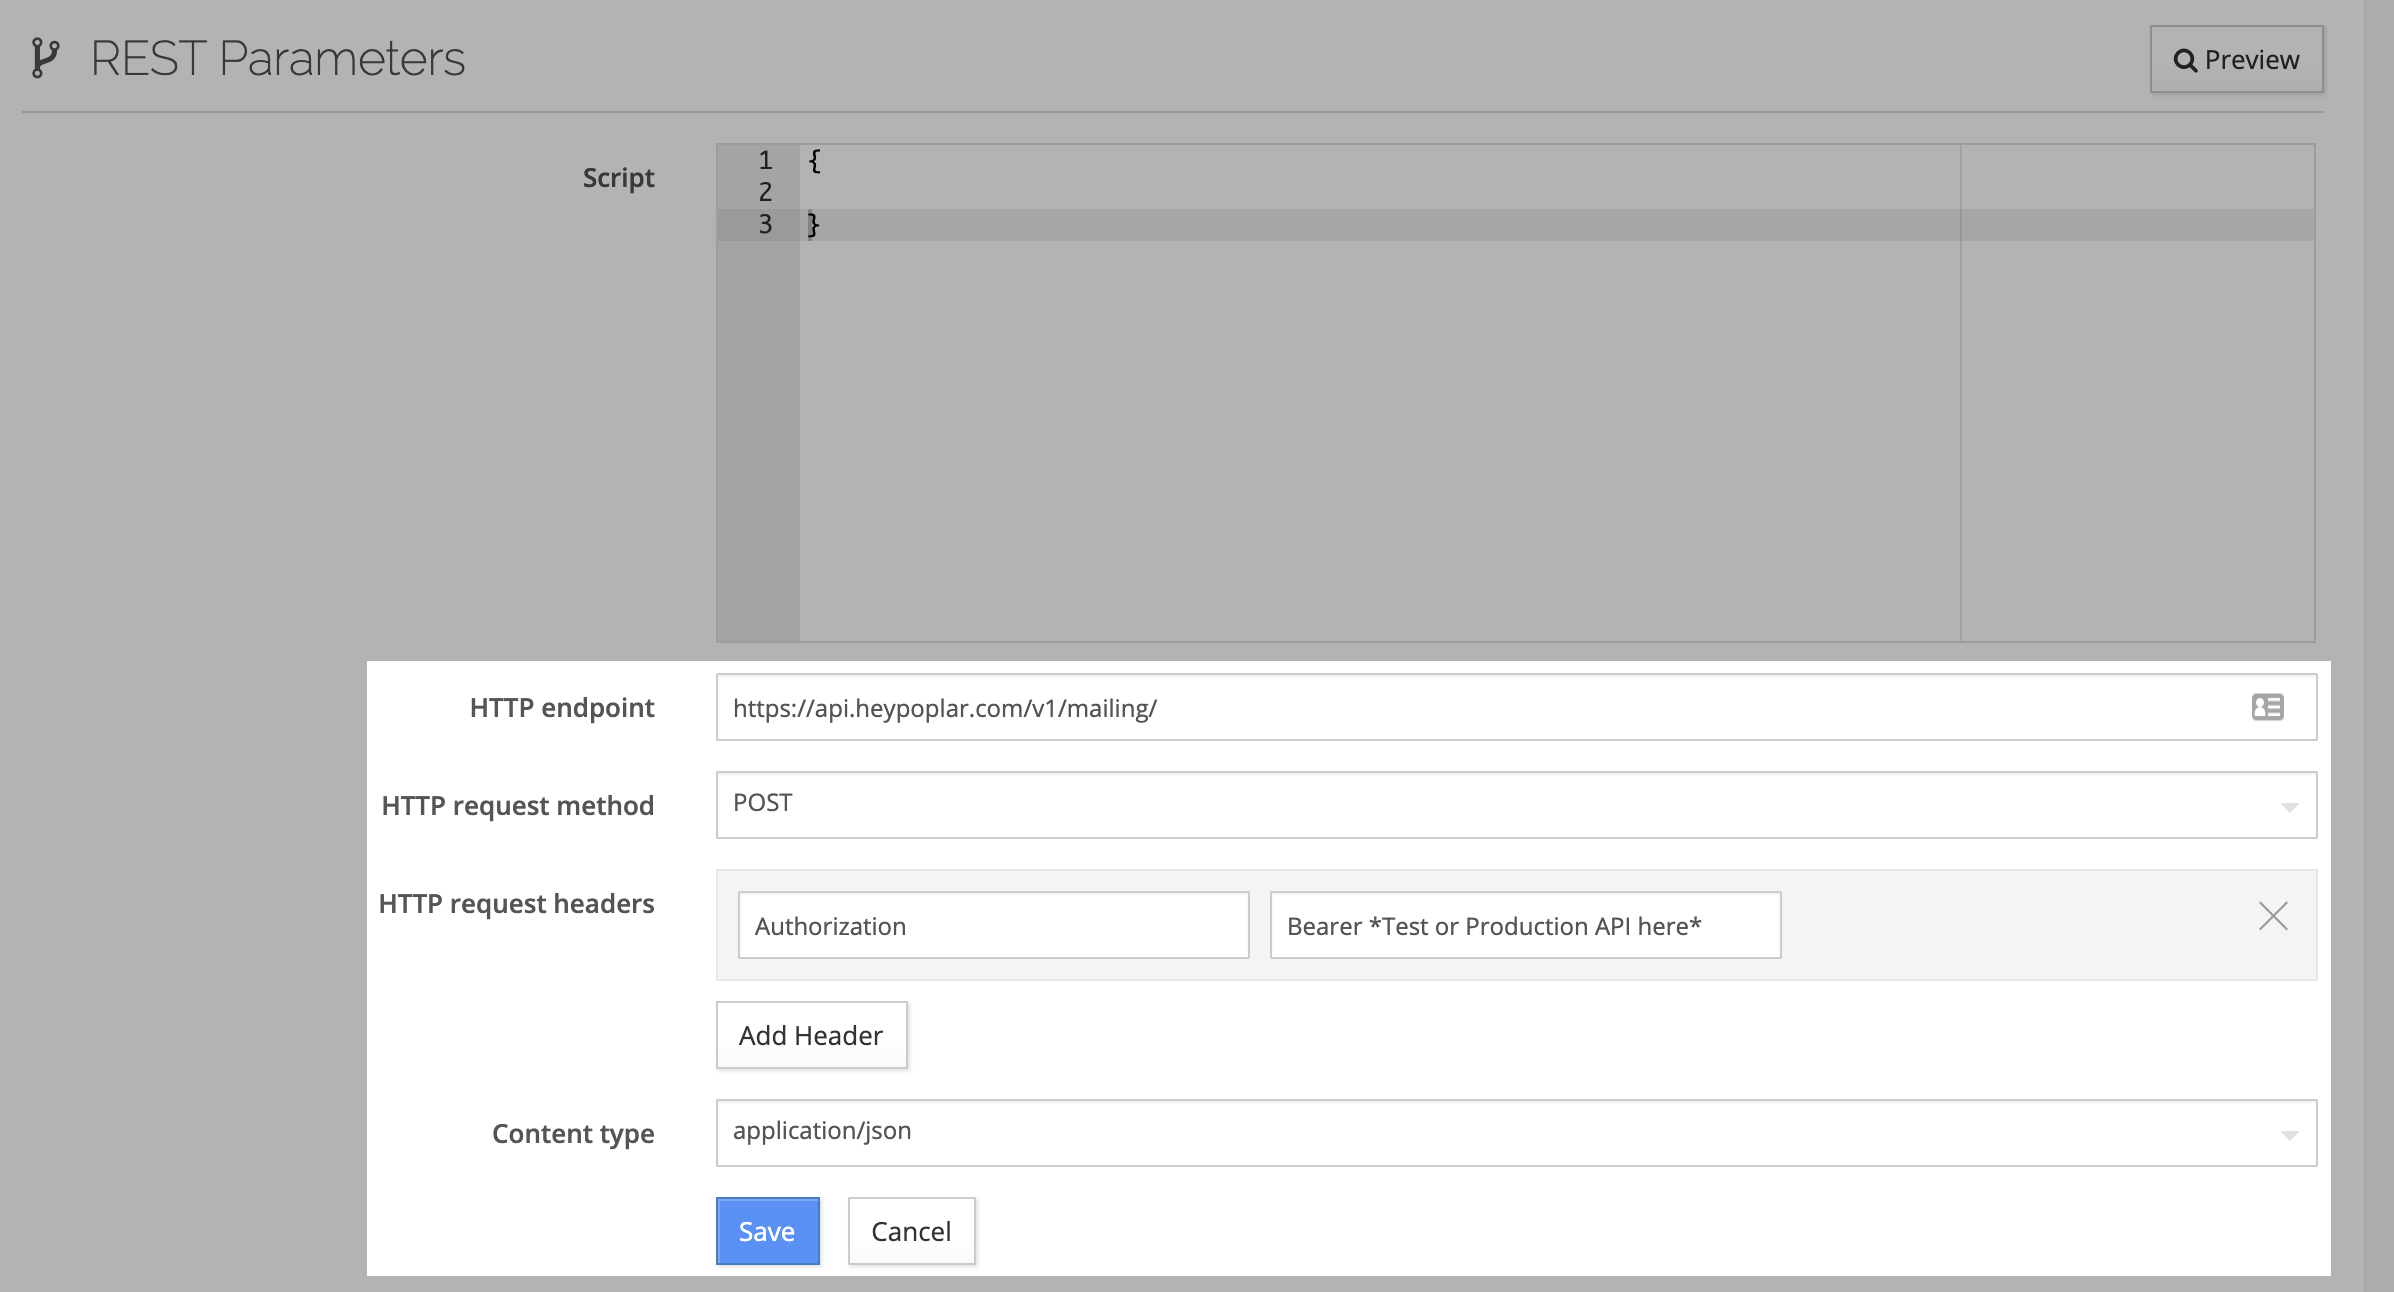
4. Click the **Edit** button to the far right of REST Parameters and enter the following settings:
Parameter
Value
HTTP endpoint
https://api.heypoplar.com/v1/mailing/
HTTP request method
POST
HTTP request header
Authorization : Bearer < Test or Production API Token>
Content type
application/json
{% hint style="info" %}
We strongly recommend you use a [**Test API**](https://app.heypoplar.com/credentials) key to start. Once your workflow is set up successfully and running in test mode, go back into the REST Parameter settings and swap it out for a Production API key to begin mailing.
{% endhint %}
5. The **Script** section at the top is where you'll enter logic for the recipient data being passed to Poplar. If your Poplar campaign has address enrichment enabled, only email and any other custom merge tag data needs to be passed. If mailing to existing customer addresses, you'll pass in the full address. Examples of each can be copy, pasted, and adjusted as needed:
**Mailing Address**
```
{
"recipient": {
"full_name": "{$contact.first} {$contact.last}",
"address_1": "{$contact.geo_mailing.street_address}",
"address_2": "{$contact.geo_mailing.street_address2}",
"city": "{$contact.geo_mailing.city}",
"state": "{$contact.geo_mailing.state}",
"postal_code": "{$contact.geo_mailing.postal_code}"
},
"campaign_id": "REPLACE-WITH-YOUR-CAMPAIGN-ID",
"creative_id": "REPLACE-WITH-YOUR-CREATIVE-ID"
}
```
{% hint style="info" %}
The creative\_id is completely optional. Poplar will automatically split mailings between all active creative if none are specified.
{% endhint %}
**Address Enrichment**
```
{
"recipient": {
"email": "{$contact.channels.email.address}"
},
"campaign_id": "REPLACE-WITH-YOUR-CAMPAIGN-ID",
"creative_id": "REPLACE-WITH-YOUR-CREATIVE-ID"
}
```
{% hint style="info" %}
The creative\_id is completely optional. Poplar will automatically split mailings between all active creative if none are specified.
{% endhint %}
6. Click the **Preview** button in the top right to see a preview of the request, and make sure all of the data maps properly. If everything looks correct, hit the Back button in the top right then **Save** the settings.
7. Once your settings have been saved, click the **Send Test** button in the top right to test the integration. If the connection is successful, you'll see a mailer appear under the campaign's History tab:
8. If the connection is successful, **Publish** and move on to the **Event Trigger** settings on the left under **Sending Methods**.
9. Click the **Edit** button to the far right of Trigger Events to set the desired trigger conditions. **Audience Filters** can also be added to refind your target audience if needed.
10. Be sure to **Save** then **Enable** the trigger to set it live.
{% hint style="info" %}
This integration was built with daily automated workflows in mind and cannot support a data push exceeding 15,000-20,000 in one batch due to API rate limiting. For large batched mailings, export the audience segment from Cordial, and mail via a One Time Send in Poplar.
{% endhint %}
***
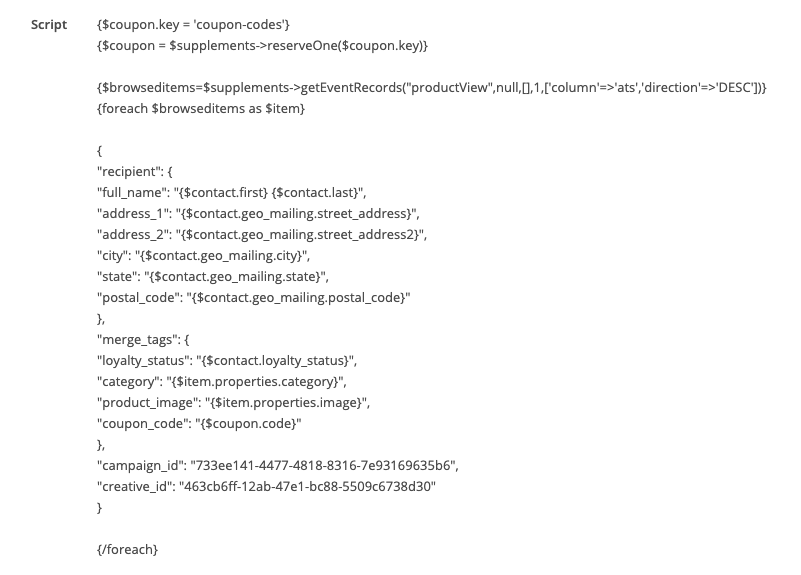
**Merge Tags & Variable Data**
Coupon codes, loyalty status, and even browsed items are among many examples of variable data stored in Cordial that can be passed to Poplar, and utilized in Creative design via custom merge tags.
To pull variable data into your creative, it must be uploaded to the platform as an HTML file.
When setting up your Rest Automation, you'll need to include the merge tags and their dynamic values as an object in the Script section of your REST Parameters. Here's one example:
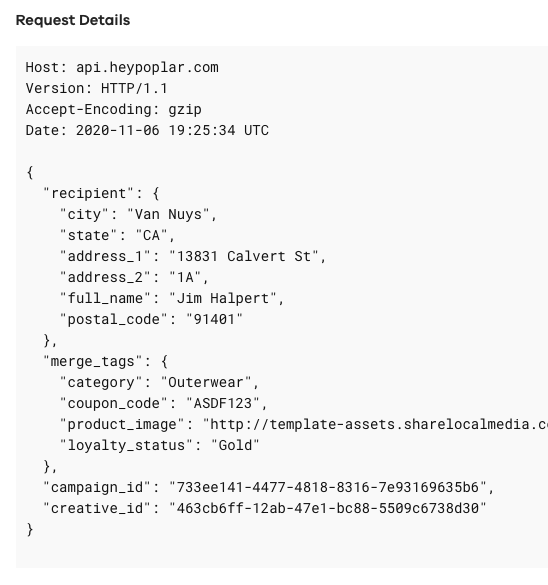
You'll know the request is successful and the merge tags are mapping accordingly if a test mailer appears in the campaigns **History** section under the **Campaign Overview** page, same as above. Click into the mailer and scroll down to see the request details:
---
# Agent Instructions
This documentation is published with GitBook. GitBook is the documentation platform designed so that both humans and AI agents can read, navigate, and reason over technical content effectively. Learn more at gitbook.com.
## Querying This Documentation
If you need additional information that is not directly available in this page, you can query the documentation dynamically by asking a question.
Perform an HTTP GET request on the current page URL with the `ask` query parameter, and the optional `goal` query parameter:
```
GET https://docs.heypoplar.com/integrations/supported-platforms/cordial.md?ask=&goal=
```
`ask` is the immediate question: it should be specific, self-contained, and written in natural language.
`goal` is optional and describes the broader end goal you are ultimately trying to accomplish on behalf of the user. GitBook uses it to tailor the answer towards what is most useful for that goal.
The response will contain a direct answer to the question and relevant excerpts and sources from the documentation.
Use this mechanism when the answer is not explicitly present in the current page, you need clarification or additional context, or you want to retrieve related documentation sections.